
Looking for a yarn?


Comments / Questions (10)
![]() Ilse wrote:
Ilse wrote:
For the 2x squares for sides, do you work the increase rows for L/XL the same as the front and back? If not, how do you attach the front/back to sides with the 5DC groups not the same count?
21.01.2023 - 10:39DROPS Design answered:
Dear Ilse, there are no further increase on side -squares, when you worked the sides A on first 2 squares, you didn't increase neither, just just make these 2 sides longer than the 2 other ones, so that the sides A all squares should be the same width. Happy crocheting!
23.01.2023 - 08:53
![]() Margaret wrote:
Margaret wrote:
I made the first 2 (front and back) squares but I am having trouble understanding the 2 side squares. Mine comes out shorter than the first 2 squares. Does not look correct. I am new at reading diagrams but I really want to make this poncho for my daughter.
24.03.2020 - 20:14DROPS Design answered:
Dear Margaret, the squares on the sides should be smaller than the first 2 but you should have same number of stitches on sides B than on sides A from these 2 first squares. Happy crocheting!
25.03.2020 - 09:46
![]() Lorry wrote:
Lorry wrote:
Found it! Thank you for your patience with my questions and for your timely replies. I'm looking forward to more purchases with your company. This has been a very positive experience.
13.08.2018 - 13:17
![]() Lorry wrote:
Lorry wrote:
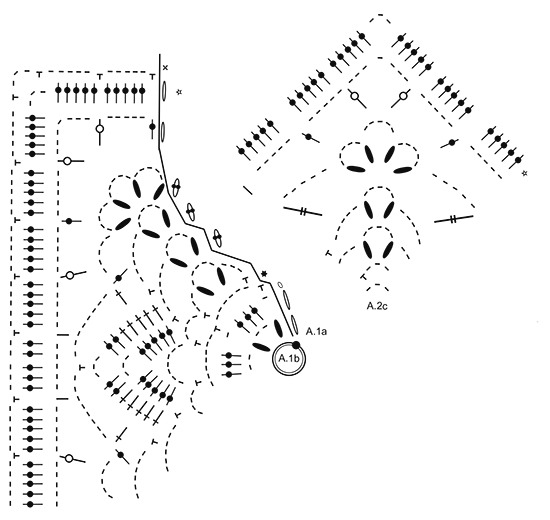
I am trying to find A.1a which I believe does not appear on your patter. I’m writing again because I have looked again right below the symbols as you answered and all I see is A.1b and to the right of that is A.2c but not A.1a. I would be most appreciative if you would reply again after double checking this. Thank you.
11.08.2018 - 16:35DROPS Design answered:
Dear Lorry, diagram A.1a is next to the circle in which A.1b is written, and it shows only how to start and finish the rounds. Look in the top right next to A.1b and you'll find A.1a. Happy crafting!
12.08.2018 - 17:11
![]() Lorry Ciporkin wrote:
Lorry Ciporkin wrote:
Pattern refers to diagram A.1.a but I’m unable to identify which that is on pattern. The other references are all there but not this one. Thank you.
10.08.2018 - 21:12DROPS Design answered:
Dear Lorry, diagram A.1 is at the bottom of the pattern, just below the diagram symbols. Happy crafting!
11.08.2018 - 15:43
![]() Leah wrote:
Leah wrote:
Are you able to provide measurements to consider which size to make?
03.08.2018 - 13:35DROPS Design answered:
Dear Leah, you will find all finished measurements in the chart at the bottom of the pattern. Compare these to a similar garment you have and like the shape to find out the matching size - measurements are taken flat from side to side - and in cm. Happy crocheting!
03.08.2018 - 15:21
![]() Jannie Hansen wrote:
Jannie Hansen wrote:
Synes det er træls at opskriften kun er i forvirret diagram. Så jeg må droppe den.....
09.01.2018 - 20:55
![]() LINDA HANSEN wrote:
LINDA HANSEN wrote:
GREAT PONCHO! PLEASE INCLUDE!
17.01.2017 - 19:12
![]() Elisabeth wrote:
Elisabeth wrote:
Smuk Poncho
14.12.2016 - 14:58
![]() Lauren McRoberts wrote:
Lauren McRoberts wrote:
What a beautiful poncho, and very much in style! I would love to have this one included!
14.12.2016 - 13:33
|
||||||||||||||||||||||||||||||||||||||||||||||||||||
Tide#tideponcho |
||||||||||||||||||||||||||||||||||||||||||||||||||||
|
|
||||||||||||||||||||||||||||||||||||||||||||||||||||
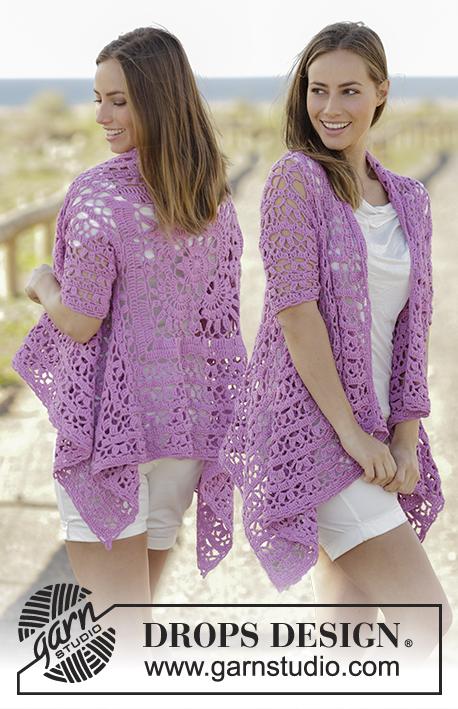
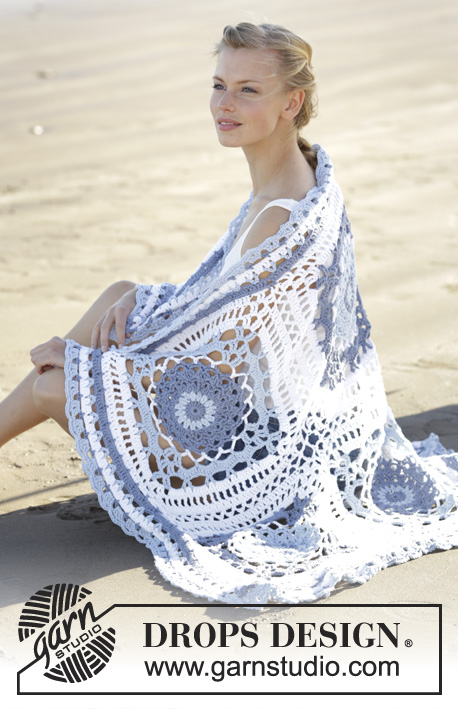
Poncho with crochet squares and stripes in DROPS Paris. Size: S - XXXL.
DROPS 177-19 |
||||||||||||||||||||||||||||||||||||||||||||||||||||
|
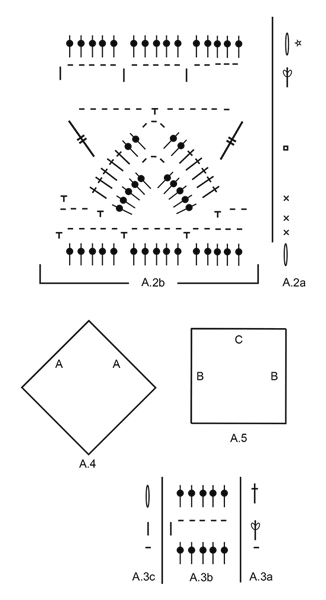
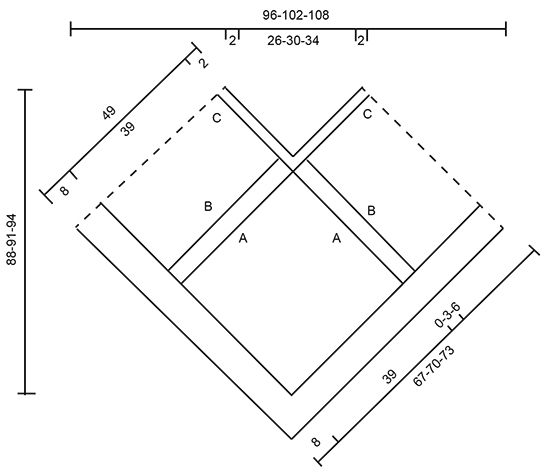
PATTERN: See diagrams A.1 to A.5. NOTE: A.4 and A.5 are illustrations and show on which side the crochet squares are worked onwards. ---------------------------------------------------------- PONCHO: First work 4 crochet squares, then sew crochet squares together before working an edge in the neck and an edge at the bottom of poncho. CROCHET SQUARE 1 (= mid front and mid back): Begin with hook size 3.5 mm and light wash and work pattern according to diagram A.1b 4 times in total on round - diagram A.1a shows how rounds begin and end and worked in addition to A.1b. REMEMBER THE CROCHET TENSION! On 9th round work with light blue. From 10th round continue with light wash. When entire diagram A.1a and A.1b have been worked vertically, crochet square measures approx. 24 x 24 cm. Cut the yarn. Now continue as follows: Begin with light wash in 4th double crochet and work from 3rd round in diagrams as follows (1st and 2nd round are already worked): Work A.2a in double crochet (A.2a shows how rounds begin and end), work A.2b over the first 3 chain spaces, * work A.2c (= corner), work A.2b over the next 9 chain spaces (= 3 repetitions) *, repeat from *-* 2 more times, work A.2c in the corner and finish with A.2b over the remaining 6 chain spaces (= 2 repetitions) on round. When 6th round in diagram A.2a to A.2c has been worked, fasten off. Crochet square measures approx. 37 x 37 cm. Switch to light blue and continue over 2 of the sides on crochet squares - see illustration A.4 and sides marked with A: Fasten strand with 1 double crochet around chain space in a corner, work 3 chain stitches and 5 trebles around chain space in the corner, then work last row in A.2b until 2 chain spaces remain before corner, work last round in A.2c, continue with last round in A.2b until next corner, work 5 trebles around chain space in the corner. Size S/M is now done. In size L/XL and XXL/XXXL continue as follows: Size L/XL: Turn piece and work 2nd row in diagrams as follows: Work A.3a, then work A.3b until next corner, work A.3c around chain space in corner. Turn and work last row in diagram A.3a to A.3c. Cut the yarn. Work the same way on the other side marked with A – see illustration A.4. Size L/XL is now done. (L/XL has 2 rows more than S/M). Size XXL/XXXL Turn piece and work from 2nd row in diagrams as follows: Work A.3a, then work A.3b until next corner, work A.3c around chain space in corner. Turn and work last row in diagram A.3a to A.3c. Work 2nd and 3rd row in diagram A.3a to A.3c 1 more time vertically. Cut the yarn. Work the same way on the other side marked with A – see illustration A.4. Size XXL/XXXL is now done. (XXL/XXXL has 4 rows more than S/M). ALL SIZES: Work 1 more square the same way = 2 equal crochet squares, one for mid front and one for mid back on poncho. CROCHET SQUARE 2 (= sides): Begin with hook size 3.5 mm and light wash and work a crochet square the same way as crochet square 1, but when 6th round (= next to last round) in diagram A.2a to A.2c is done, fasten off. Switch to light blue and continue over 3 of the sides on crochet squares - see illustration A.5 and sides marked with B and C as follows: Fasten strand with 1 double crochet around chain space in a corner, work 3 chain stitches and 5 trebles around chain space in the corner, then work last row in A.2b until 2 chain spaces remain before next corner, * work last row in A.2c, continue with last row in A.2b until next corner *, repeat from *-* 1 more time, work 5 trebles around chain space in the corner. Fasten off. Work 1 more crochet square the same way = 2 equal crochet squares for sides on poncho. ASSEMBLY: Place crochet squares together so that sides A meet sides B and sides C are inwards towards neck on poncho – see measurements chart! Sew crochet squares together edge to edge, i.e. sew in outer loops of edge stitches to avoid a chunky seam. Fasten off. EDGE AT THE BOTTOM: Work an edge at the bottom of poncho with light blue as follows: Begin in the tip on crochet square mid back, i.e. in corner pointing down on poncho and fasten strand with 1 double crochet around chain space, work 3 chain stitches and 5 trebles around the same chain space, * work 5 trebles around each of the next 13 chain spaces, work 4 trebles around next chain space (= corner on crochet square), work 2-9-17 trebles around stitch along edge in section between crochet squares worked with light blue, work 4 trebles around chain space (= corner on next crochet square), continue with 5 trebles around next 13 chain spaces, work 4 trebles around next chain space (= corner on crochet square), work 2-10-17 trebles around stitch along edge in section between crochet squares work with light blue, work 4 trebles around next chain space (= corner on crochet square), continue with 5 trebles around each of the next chain spaces, work (5 trebles, 3 chain stitches, 5 trebles) around corner (= tip mid front) *, repeat from *-* 1 more time but finish with 1 slip stitch in 3rd chain stitch at beginning of round, after (5 trebles and 3 chain stitches) in tip mid back = 225-240-255 trebles on each side of chain spaces in tips mid front and mid back. Now work pattern from 2nd round in diagrams as follows: Work 1 chain stitch (= replaces first double crochet in A.2a), * work A.2b 15-16-17 times in width, work A.2c around chain space in tip mid front *, repeat from *-* 1 more time. Continue like this in the round until diagrams A.2a to A.2c have been worked vertically. Fasten off. NECK EDGE: Work edge with light blue. ROUND 1: Begin somewhere along side C, fasten strand with a double crochet in space between 2 groups with trebles (1 group = 5 trebles worked around same chain space). Work * 5 chain stitches, skip approx. 2 cm, 1 double crochet around space between the next 2 trebles *, repeat from *-* around the entire neck. NOTE: Adjust to work 1 double crochet in tip mid front and mid back. Finish with 1 slip stitch in first chain stitch at beginning of round. ROUND 2: Work 3 chain stitches, * work 5 trebles around first/next chain space *, repeat from *-* the entire round but in chain space on each side of tip mid front and mid back work 3 trebles around chain spaces. Finish round with 1 slip stitch in 3rd chain stitch from beginning of round. Fasten off. TWINED STRING: Cut 4 lengths of 2.5 metres each with light wash. Twine the strands tog until they resist, fold the string double so that it twines again. Make a knot at each end. Thread string up and down in chain spaces, i.e. in 1st round in neck edge and tie a knot mid front on poncho. |
||||||||||||||||||||||||||||||||||||||||||||||||||||
Diagram explanations |
||||||||||||||||||||||||||||||||||||||||||||||||||||
|
||||||||||||||||||||||||||||||||||||||||||||||||||||
 |
||||||||||||||||||||||||||||||||||||||||||||||||||||
 |
||||||||||||||||||||||||||||||||||||||||||||||||||||
 |
||||||||||||||||||||||||||||||||||||||||||||||||||||
Have you finished this pattern?Tag your pictures with #dropspattern #tideponcho or submit them to the #dropsfan gallery. Do you need help with this pattern?You'll find 12 tutorial videos, a Comments/Questions area and more by visiting the pattern on garnstudio.com. © 1982-2025 DROPS Design A/S. We reserve all rights. This document, including all its sub-sections, has copyrights. Read more about what you can do with our patterns at the bottom of each pattern on our site. |
||||||||||||||||||||||||||||||||||||||||||||||||||||


With over 40 years in knitting and crochet design, DROPS Design offers one of the most extensive collections of free patterns on the internet - translated to 17 languages. As of today we count 320 catalogues and 12093 patterns translated into English (UK/cm). 12093
We work hard to bring you the best knitting and crochet have to offer, inspiration and advice as well as great quality yarns at incredible prices! Would you like to use our patterns for other than personal use? You can read what you are allowed to do in the Copyright text at the bottom of all our patterns. Happy crafting!
Post a comment to pattern DROPS 177-19
We would love to hear what you have to say about this pattern!
If you want to leave a question, please make sure you select the correct category in the form below, to speed up the answering process. Required fields are marked *.