
Looking for a yarn?


Comments / Questions (99)
![]() Christine wrote:
Christine wrote:
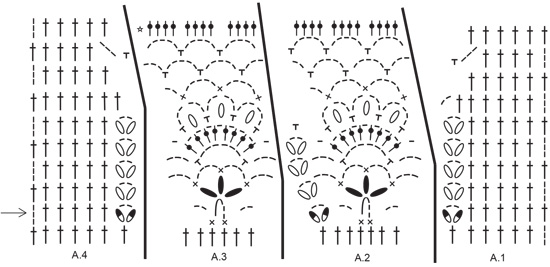
Tut mir leid, aber alle bisherigen Erklärungen beantworten nicht meine Frage. Ich versuche es noch einmal : In REIHE 7 des Musters sitzt die ERSTE feste Masche in dem 2ER-Luftmaschenbogen der Vorrunde, wogegen die LETZTE feste Masche in A2 in einem 5ER-Luftmaschenbogen der Vorrunde plaziert ist. Das ist doch kein symmetrischer Übergang, oder ? Meine Frage betrifft also NICHT die 8.REIHE des Musters, die ist klar. Es geht um die PLAZIERUNG der FESTEN Maschen der 7.Reihe.
29.02.2024 - 18:45
![]() Christine wrote:
Christine wrote:
Danke für den Versuch, es ist aber immer noch nicht klargeworden, was ich meine. Die 8.Reihe, also die 7.Reihe des Musters beginnt laut Diagramm in A4. Die Übergänge von A4 nach A3 und am Ende der Reihe von A2 nach A1 werden jeweils mit 3 Luftmaschen gebildet. Aber um welche Luftmaschenbögen der Vorrunde ( also der 6. des Musters ) werden die erste ( in A3 ) und analog die letzte feste Masche ( in A2 ) gebildet ?? Schauen Sie bitte noch mal genau das Diagramm an !
29.02.2024 - 14:03DROPS Design answered:
Liebe Christine, bei der 7. Reihe sind es beidseitig 3 Luftmaschen: Anfang Ende A.3 und am Ende A.1 (nach der letzten fM in A.2)- so wird das Muster symmetrisch sein, bei der 8. Reihe endet A.1 mit 3 Luftmaschen + 1 feste Masche in den ersten Luftmaschenbogen A.2 (mit nur 3 Lm), und am Ende der Reihe häkeln Sie nach den 5 Luftmaschen (am Ende A.3) 1 feste Masche in den letzten Luftmaschenbogen in A.3 (mit nur 3 Lm), dan 3 Lm, 1 Stäbchen überspringen, 1 Stäbchen in den nächsten Stäbchen häkeln. Aber gerne können Sie auch das Muster genauso anders anpassen. Viel Spaß beim häkeln!
29.02.2024 - 16:25
![]() Christine wrote:
Christine wrote:
Wahrscheinlich war meine Frage zu unkonkret. In Reihe 8 ( beginnt in A4 ) geht es mir um die Übergänge von A4 nach A3 und am Ende der Reihe von A2 nach A1. Die erste feste Masche in A3 wird um einen 2er Luftmaschenbogen der Vorrunde gehäkelt, aber die letzte feste Masche in A2 um einen 5er Luftmaschenbogen der Vorrunde. Das ist doch nicht symmetrisch ! Bitte können Sie das noch mal aufklären ? Freundlichen Gruß !
28.02.2024 - 20:38DROPS Design answered:
Liebe Christine, bei der 7. Reihe beginnt A.2 mit 3 Lufmtaschen nach A.1 und endet A.3 mit 3 Luftmaschen vor A.4. Bei der 8. Reihe ist die feste Masche um diese Luftmaschenbogen gehäkelt. Viel Spaß beim Häkeln!
29.02.2024 - 08:03
![]() Christine wrote:
Christine wrote:
Danke für Ihre Antwort vom 16.02. und die Korrektur ! In Reihe 8 ist die letzte feste Masche in A2 nun um den 5er Luftmaschenbogen der Vorrunde, analog ist die erste feste Masche in A3 aber um den 2er Luftmaschenbogen der Vorrunde. Ist das so gedacht ?
27.02.2024 - 11:43DROPS Design answered:
Liebe Christine, die feste Masche am Ende A.1 wird um den 1. Luftmaschen Bogen von der vorigen Reihe (= A.2) gehäkelt und die feste Masche am Anfang A.4 wird um den letzten Luftmaschenbogen am ende A.3 gehäkelt. Viel Spaß beim häkeln!
27.02.2024 - 13:34
![]() Dorthe wrote:
Dorthe wrote:
Hej i uppdateringen står det sen stickas mönster 1 ,😳är det inte virkmönster???
21.02.2024 - 17:46
![]() Christine wrote:
Christine wrote:
Hallo, ich habe eine Frage zum Muster der Passe. Ist das wirklich so gedacht, daß die Übergänge von A4 nach A3 und A2 nach A1 nicht gleich sein sollen ? Bei den ersten Reihen klappt das noch. Aber in Reihe 8 ( bzw. 7. Reihe des Musters ) kommen nach den Stäbchen drei Luftmaschen, die in einer festen Masche um den Bogen der vorigen Reihe enden. Das Ende in A2 sind dann drei Luftmaschen und A1 beginnt mit zwei Luftmaschen. Fehlt dazwischen nicht etwas ? Viele Grüße !
15.02.2024 - 15:38DROPS Design answered:
Liebe Christine, ich werde Ihre Rückmeldung weiterleiten, und würde sagen daß man auch 2 Lm nach den Stäbchen in A.4 häkeln muss (so wird es mit A.1 symmetrisch). Viel Spaß beim häkeln!
16.02.2024 - 09:24
![]() Erika Minard wrote:
Erika Minard wrote:
Hallo, danke für die schnelle Antwort. Dennoch haben Sie mir nicht beantwortet wohin die Korrektur von der Passe gehört. Dort wird geschrieben, die Anleitung wurde korrigiert, es muss abnehmen lauten. Die schreiben mur von zunehmen. Wo wird diese Korrektur angewendet bei der Passe, wo ist der Fehler in der Anleitung und an welcher Stelle muss ich diexKirrektur anwenden.
11.05.2023 - 09:13DROPS Design answered:
Liebe Frau Minard, wenn Sie die Anleitung nach alle Korrektur gedruckt haben, dann ist die Anleitung schon korrigiert. Bei der 10. Reihe der Passe sollen Sie 265 Maschen in die 4. Größe haben. Viel Spaß beim häkeln!
11.05.2023 - 16:31
![]() ZErika Munard wrote:
ZErika Munard wrote:
Ich bin in der 10 Reihe von der Passe. Da steht in der 10 und letzten Reihe hier zunehmen. In der Fehlerkorrektur steht man soll abnehmen. Ich komme hier nicht weiter. Dann stimmt doch die Gesamtzahl bei Passe auch nicht mehr, die in der Anleitung für XL angegeben sind. Mein Anschlag war 172 , nach Muster Häfen 146 Maschen. Wie muss ich jetzt weitermachen. Liebe Grússe Eri ❤
07.05.2023 - 01:28DROPS Design answered:
Liebe Frau Munard, bei der letzten Reihe von Diagrammen häkeln Sie diese Diagramme wiezuvor (= 6 M in A.1 + 12 M in A.3 + 12 M in jedem A.2 x 18 + 6 M in A.4 = 240 M) und gleichzeitig nehmen Sie 9 Maschen regelmäßig verteilt und gleichtzeitig nehmen Sie 4 Maschen 4 Mal wie beschrieben = 240+9+16=265 Maschen. Viel Spaß beim häkeln!
08.05.2023 - 08:03
![]() Iza wrote:
Iza wrote:
Witam, mam małe doświadczenie w szydelku i brakuje mi informacji o wykończeniu pracy. Czy dobrze rozumiem że rękawy i karczek robi się osobno i przyszywa? A tyl i przód w ilu jest częściach? Kiedy to się wszystko łączy i w jakiej kolejności? Dekolt dorabiamy na sam koniec jak wszystko zszyje? Bardzo dziękuję za wszelkie rady.
23.02.2023 - 15:14DROPS Design answered:
Witaj Izo, ten konkretny sweterek wykonujemy z góry na dół. Najpierw wykonujemy karczek i dół swetra (w jednej części), a następnie rękawy (razem z całym swetrem) od góry do dołu. Na końcu jest przerabiane wykończenie dekoltu zgodnie z opisem. Nic w tym swetrze nie zszywamy, po prostu dołączamy kolejne części bezpośrednio do już wykonanych za pomocą szydełka. Pozdrawiamy!
23.02.2023 - 15:33
![]() Marian Díez Forcada wrote:
Marian Díez Forcada wrote:
Hola, estoy realizando la última fila A1-A4 tallaM. Tengo 55 arcos (por 4 p.a. en cada arco son 220 p.a.) y 6+6 p.a. cenefa, 232. Si tengo que dejar para las distintas partes 36+8+42+8+56+8+42+8+36 (244 p.a.) y el patrón dice 247. Además entre los MP dice 4 p.a. y aumentar 4 p.a. repartidos, esto tampoco lo entiendo ya que no se necesita aumentar tantos puntos. Lo he repasado muchas veces y no lo entiendo. ¿Me lo podrían aclarar? Muchas gracias
14.12.2022 - 08:03
|
||||||||||||||||||||||||||||||||||
Sweet Mint Cardigan#sweetmintcardigan |
||||||||||||||||||||||||||||||||||
|
|
||||||||||||||||||||||||||||||||||
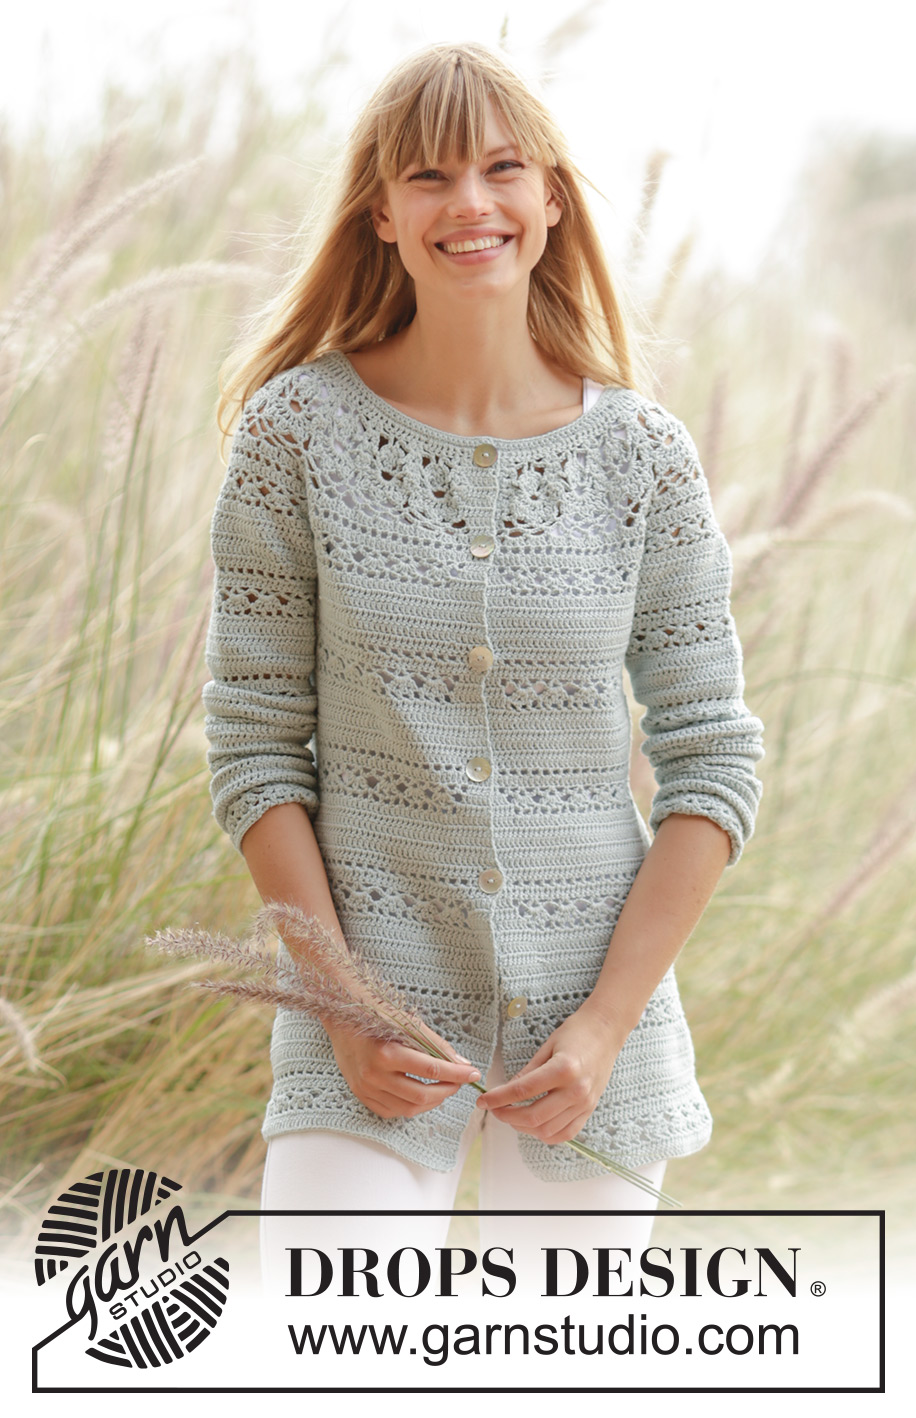
Crochet DROPS jacket with lace pattern and round yoke in ”Safran”. The piece is worked top down. Size: S - XXXL.
DROPS 169-32 |
||||||||||||||||||||||||||||||||||
|
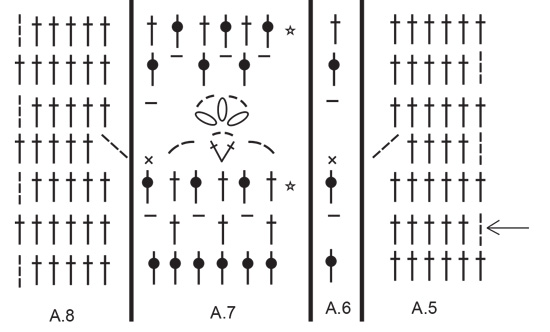
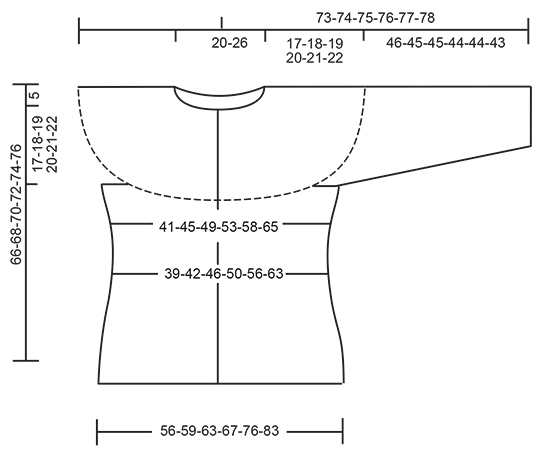
PATTERN: See diagrams A.1 to A.8. CROCHET INFO: On every tr row replace first tr with 3 ch. On every dc row replace first dc with 1 ch. Replace first tr at on every tr round with 3 ch, finish the round with 1 sl st in 3rd ch from beg of round. Replace first dc at on every dc round with 1 ch, finish the round with 1 sl st in first ch from beg of round. INCREASE TIP-1: Inc 1 tr by working 2 tr in same st. INCREASE TIP-2: Work until 2 tr/ch remain before marker, work 2 tr in/around next tr/ch (= 1 tr inc), work 1 tr in/around each of the next 2 tr/ch, markers is in the middle of these tr/ch, work 2 tr in/around next tr/ch (= 1 tr inc). Repeat inc at every marker. PATTERN-1 (applies to body): Work 1 tr in every tr until 6-8-10-10-10-10 rows have been worked, * work from RS: Work A.5 over the first 6 tr, A.6 over next tr, repeat A.7 until 6 tr remain, A.8 over the last 6 tr. When A.5 to A.8 have been worked 1 time vertically, work 6-8-10-10-10-10 rows with 1 tr in every tr *, repeat pattern from *-* until finished measurements. PATTERN-2 (applies to sleeve): * Work A.7 over all tr. When A.7 has been worked 1 time vertically, continue as follows: Work 6-8-10-10-10-10 rounds with 1 tr in every tr *, repeat from *-* until finished measurements. DECREASE TIP: Dec 1 tr by working the next 2 tr tog as follows: Work 1 tr but wait with last pull through (= 2 loops on hook), then work next tr but on last pull through, pull yarn through all 3 loops on hook. BUTTONHOLES: Make buttonholes on right band. 1 buttonhole = replace fourth tr from edge with 1 ch. On next row work band st as before (work 1 tr around ch). Work for buttonholes when piece measures: SIZE S: 2, 11, 20, 29, 38 and 47 cm. SIZE M: 2, 11, 20, 29, 38 and 47 cm. SIZE L: 2, 10, 18, 26, 34, 42 and 50 cm SIZE XL: 2, 10, 18, 26, 34, 42 and 50 cm SIZE XXL: 2, 11, 20, 29, 38, 47 and 55 cm SIZE XXXL: 2, 11, 20, 29, 38, 47 and 55 cm ---------------------------------------------------------- YOKE: Worked back and forth, top down. Work 163-163-172-172-180-180 ch on hook size 3.5 mm with Safran. Work next row as follows: Work 1 tr in 4th ch from hook (= 2 tr) - READ CROCHET INFO, 1 tr in each of the next 5-5-0-0-1-1 ch, * skip 1 ch, 1 tr in each of the next 6 ch *, repeat from *-* the entire row = 139-139-146-146-153-153 tr. Then work next row from WS as follows: Work A.4 over the first 7 tr (= right band), A.3 over the next 6 tr, repeat A.2 until 7 tr remain (= 17-17-18-18-19-19 times in width), finish with A.1 over the last 7 tr (= left band). Continue like this, i.e. work as follows from RS: A.1, A.2 17-17-18-18-19-19 times in total, A.3 and A.4. REMEMBER THE CROCHET TENSION! Remember BUTTONHOLES - see explanation above. On last row in A.1-A.4 (= from WS) insert 8 markers and inc as follows: NOTE: Continue as shown in diagrams A.1-A.4. Work and inc like as follows AT THE SAME TIME inc in addition 0-3-3-9-3-3 tr evenly on the entire row – READ INCREASE TIP-1: Work 36-36-38-38-40-40 tr, insert 1 marker in piece, work 4 tr and inc 2-4-4-4-4-4 tr evenly (= right front piece), insert 1 marker, work 42-42-44-44-46-46 tr, insert 1 marker, work 4 tr and inc 2-4-4-4-4-4 tr evenly, insert 1 marker (= sleeve), work 56-56-60-60-64-64 tr, insert 1 marker, work 4 tr and inc 2-4-4-4-4-4 tr evenly, insert 1 marker (= back piece), work 42-42-44-44-46-46 tr, insert 1 marker, work 4 tr and inc 1-4-4-4-4-4 tr evenly, insert 1 marker (= sleeve), work 36-36-38-38-40-40 tr (= left front piece) = 235-247-259-265-271-271 tr on row. Move the markers upwards when working. Piece measures approx. 9 cm. Work 0-0-0-0-2-2 row with 1 tr in every tr and inc 0-0-0-0-12-15 tr evenly on every row (= 0-0-0-0-24-30 tr in total) = 235-247-259-265-295-301 tr. Work A.5 to A.7 as follows (first row is from RS): Work A.5 over the first 6 tr (= left band), A.6 over next tr, repeat A.7 until 6 tr remain (= 37-39-41-42-47-48 times in width), finish with A.8 over the last 6 tr (= right band). On 2nd row (i.e. tr row) inc at every marker – READ INCREASE TIP-2 and inc 2-8-8-8-8-8 tr evenly on row (= 2 tr in at every marker and 2-8-8-8-8-8 tr inc evenly = 18-24-24-24-24-24 tr inc in total on row) = 253-271-283-289-319-325 tr. Now repeat A.7 40-43-45-46-51-52 times in width. Repeat inc (i.e. 2 tr inc at every marker and 2-8-8-8-8-8 tr inc evenly = 18-24-24-24-24-24 tr inc in total on row). On last row in A.5 to A.8 = 271-295-307-313-343-349 tr. * Work 1 row with 1 tr in every tr. Work 1 row with tr and inc 18-18-16-17-24-26 tr evenly *, repeat from *-* 1-1-2-3-2-3 times in total = 289-313-339-364-391-427 tr. Work 0-1-1-0-1-0 rows with 1 tr in every tr. Piece measures approx. 17-18-19-20-21-22 cm. On next row (= from RS), work as follows: Work 1 tr in each of the first 46-50-54-58-64-70 tr (= left front piece), work 8 ch, skip 60-64-69-73-75-79 tr from previous row (= sleeve), 1 tr in each of the next 77-85-93-102-113-129 tr (= back piece), 8 ch, skip 60-64-69-73-75-79 tr from previous round (= sleeve), 1 tr in each of the last 46-50-54-58-64-70 tr (= right front piece) = 185-201-217-234-257-285 tr/ch on row. Insert 1 marker in piece, NOW MEASURE PIECE FROM HERE. Work 1 row from WS with 1 tr in every tr/ch. Then work PATTERN-1 from RS - see explanation above and dec 4-2-0-5-4-2 tr evenly in first row of tr - READ DECREASE TIP = 181-199-217-229-253-283 tr. When piece measures 12 cm, adjust so that next row is a row with tr, dec 6-12-12-6-6-6 tr evenly = 175-187-205-223-247-277 tr. Continue with pattern as before. When piece measures 19-20-21-22-23-24 cm – adjust so that next row is a row with tr, inc 12 tr evenly. Repeat inc every 3 cm 5-5-5-5-6-6 more times = 247-259-277-295-331-361 tr. Work pattern as before until piece measures 44-45-46-47-48-49 cm from marker. Fasten off. SLEEVE: Sleeve is worked in the round, top down. Beg by working mid under sleeve as follows: Work 1 dc in 5th ch of the 8 ch work in armhole on body, 3 ch (= 1 tr), work 1 tr in each of the next 3 ch, work 1 tr in every tr over sleeve, work 1 tr in each of the remaining 4 ch under sleeve = 68-72-77-81-83-87 tr. Insert 1 marker thread mid under sleeve. Insert 1 marker in piece, NOW MEASURE PIECE FROM HERE. Leave marker in piece, move marker thread when working. SIZE S-M: Work 1 tr in every tr and dec 2-0 tr evenly = 66-72 tr. SIZE L-XL-XXL-XXXL: Work 1 tr in every tr and inc 1-3-1-3 tr evenly = 78-84-84-90 tr. ALL SIZES: READ ALL OF THE FOLLOWING SECTION BEFORE CONTINUING! WORK PATTERN AND DEC AT THE SAME TIME: PATTERN: Work 1 tr in every tr until 5-7-9-9-9-9 round with tr have been worked in total. Work PATTERN-2 - see explanation above. DECREASE: When piece measures 4 cm, adjust so that next round is 1 round with tr, dec 6 tr evenly, repeat dec every 15-10-8-8-8-6 cm 2-3-4-4-4-5 more times = 48-48-48-54-54-54 tr. Fasten off when sleeve measures 46-45-45-44-44-43 cm. Work the other sleeve the same way. NECK EDGE: Worked back and forth from mid front. Beg from RS. Work in ch where the tr were worked (i.e. do not work over the ch skipped = 139-139-146-146-153-153 tr). Work 1 dc in each of the first 22-22-24-24-26-26 tr, * 1 htr in each of the next 3 ch, 1 tr in each of the next 3 ch, 1 dtr in each of the next 19 ch, 1 tr in each of the next 3 ch, 1 htr in each of the next 3 ch *, 1 dc in each of the next 33-33-36-36-39-39 ch, repeat from *-* 1 time, 1 dc in each of the last 22-22-24-24-26-26 ch. Work next row as follows: Work 1 dc in each of the first 26-26-28-28-30-30 sts, ** 1 htr in each of the next 3 sts, 1 tr in each of the next 3 sts, * work the next 2 dtr tog *, repeat from *-* 5 more times, 1 tr in each of the next 3 sts, 1 htr in each of the next 3 sts **, 1 dc in each of the next 39-39-42-42-45-45 sts, repeat from **-** 1 more time, finish with 1 dc in each of the last 26-26-28-28-30-30 sts = 127-127-134-134-141-141 sts. Work 1 row with 1 dc in every st. Fasten off. ASSEMBLY: Sew the buttons on to the left front band. |
||||||||||||||||||||||||||||||||||
Diagram explanations |
||||||||||||||||||||||||||||||||||
|
||||||||||||||||||||||||||||||||||
 |
||||||||||||||||||||||||||||||||||
 |
||||||||||||||||||||||||||||||||||
 |
||||||||||||||||||||||||||||||||||
Have you finished this pattern?Tag your pictures with #dropspattern #sweetmintcardigan or submit them to the #dropsfan gallery. Do you need help with this pattern?You'll find 15 tutorial videos, a Comments/Questions area and more by visiting the pattern on garnstudio.com. © 1982-2025 DROPS Design A/S. We reserve all rights. This document, including all its sub-sections, has copyrights. Read more about what you can do with our patterns at the bottom of each pattern on our site. |
||||||||||||||||||||||||||||||||||


With over 40 years in knitting and crochet design, DROPS Design offers one of the most extensive collections of free patterns on the internet - translated to 17 languages. As of today we count 320 catalogues and 12092 patterns translated into English (UK/cm). 12092
We work hard to bring you the best knitting and crochet have to offer, inspiration and advice as well as great quality yarns at incredible prices! Would you like to use our patterns for other than personal use? You can read what you are allowed to do in the Copyright text at the bottom of all our patterns. Happy crafting!
Post a comment to pattern DROPS 169-32
We would love to hear what you have to say about this pattern!
If you want to leave a question, please make sure you select the correct category in the form below, to speed up the answering process. Required fields are marked *.