
Popular categories
Looking for a yarn?


Comments / Questions (45)
![]() Carole A Bingert wrote:
Carole A Bingert wrote:
It is most certainly wrong, if not for the picture,and counting what is shown in the diagram it would have been a mess, but the written directions in round 12 SHOULD READ that there should be 3 tr in the first group of 7 dc,4 in the second, 3 in the middle, 4 in the 4th and 3 in the 5th , ending tr ch 1 in the ch before the corner for a total of 19 tr in all from corner to corner. I don't see anyone on this list successfully completing anything.
25.01.2017 - 20:09DROPS Design answered:
Dear Mrs Bingert, this is how you will work when crocheting between corners: ch 1, 1 tr around first ch, (1 ch, skip 1 dc, 1 tr in next dc), repeat from (-) 17 times in total, ch 1, 1 tr around ch, 1 ch = 19 tr between the corners. Happy crocheting!
26.01.2017 - 09:48
![]() Carole A Bingert wrote:
Carole A Bingert wrote:
Will you go over this again and post corrections to the pattern? Starting with round 11 there are mistakes in ALL the following rounds as to number of repeats and total stitches. I am finishing with common sense, but there are so many mistakes!
25.01.2017 - 15:44DROPS Design answered:
Dear Mr Bingert, number of sts in written pattern is matching diagram and is correct. This pattern has already made several times succesfully. You are welcome to ask your DROPS Store for any further individual assistance. Happy crocheting!
25.01.2017 - 17:00
![]() Anja wrote:
Anja wrote:
Bei mir haben sich die Quadrate - wie bereits bei Frau Großbichler -auch immer nach innen gewölbt. Nach mehreren Versuchen habe ich jetzt einfach die Reihe 6 weggelassen und nun ist alles in Ordnung. Jetzt sieht das Häkelquadrat auch wie in der Abbildung aus.
15.01.2017 - 00:34
![]() Marion Sanders wrote:
Marion Sanders wrote:
Ik snap de beschrijving van de afwerking van de hals niet. kan het zijn dat de 1e en 2e toer gemixt zijn? Mvg Marion
19.10.2016 - 11:11DROPS Design answered:
Hoi Marion. Nee, het zou correct moeten zijn. Je haakt twee toeren om de hals: de eerste als de 2e toer in A.2 (dwz, 1 stk, 1 l) en de tweede toer haak je als de 3e toer in A.2. Middenvoor en middenachter haak je de 3 stk (je hebt 1 l, 1 stk, 1 l middenvoor en middenachter), volgens het telpatroon haak je 1 stk in elke l en elk st = 3 st middenvoor/achter, die dan samen moeten worden gehaakt.
19.10.2016 - 12:26Yvette Erkens wrote:
Hallo lieve mensen, Ik heb de poncho klaar gestreken en al maar hij blijft in het midden bol staan. Ik heb verschillende garens en naalden gebruikt maar het blijft iedere keer hetzelfde. Voor de rest ben ik heel blij ermee
23.09.2016 - 07:16
![]() M.Großbichler wrote:
M.Großbichler wrote:
Ich versuche gerade diesen wunderschönen Poncho zu häkeln, doch das Quadrat wölbt sich in der Mitte. Ich häkle eingentlich recht locker. Der erste Versuch war mit Häkelnadel Nr. 5, der zweite Versuch innen mit Häkelnadel 4, außen mit Häkelnadel Nr. 5. Beim dritten Versuch habe ich in der Reihe 6 jeweils eine Luftmasche je Luftmaschenbogen mehr gemacht. Ich bin ratlos, warum sich das Quadrat bei mir so wölbt und nicht flach liegt. Könnt ihr bitte helfen :)
29.08.2016 - 10:16DROPS Design answered:
Hallo Frau Großbichler, das ist etwas schwierig zu sagen, warum es bei Ihnen nicht klappt, wir haben noch keine weiteren Rückmeldungen dieser Art bekommen. Vielleicht können Sie versuchen das Quadrat etwas zu spannen?
29.08.2016 - 12:58
![]() Duvivier Isabelle wrote:
Duvivier Isabelle wrote:
Bonjour, très très beau modèle. Par contre, j ai dû recommander 50g de beige. La quantité renseignée (50g) n était pas suffisante.
13.08.2016 - 19:51
![]() Marianne Madsen wrote:
Marianne Madsen wrote:
Synes det er irriterende at der ikke er garn nok til at færdiggøre ponchoen. Jeg bestilte over nettet og det giver jo 2 gange forsendelsesudgift fordi man skal bestille 2 nøgler mere, det er ikke i orden.
30.07.2016 - 16:17Kerry wrote:
Hi With this pattern is there a picture of the whole square flat like in the photo of the woman wearing it. I can when stuck look at the picture and see what is happening in it. sometimes reading written patterns is hard for me when so many people speak of patterns differently.
28.07.2016 - 00:23DROPS Design answered:
Dear Kerry, you can see a picture of one of the square at top of the pattern aand also a diagram at the bottom of the pattern in addition to the written pattern. Happy crocheting!
28.07.2016 - 09:05
![]() Susanne Nilsson wrote:
Susanne Nilsson wrote:
Garn åtgången stämmer inte, man behöver 1 nystan till av vardera färg 02 och 11. Lite jobbigt när man beställt via nätet.
15.07.2016 - 00:34
|
||||||||||||||||||||||||||||||||||||||||
Midsummer Joy#midsummerjoyponcho |
||||||||||||||||||||||||||||||||||||||||
|
|
||||||||||||||||||||||||||||||||||||||||
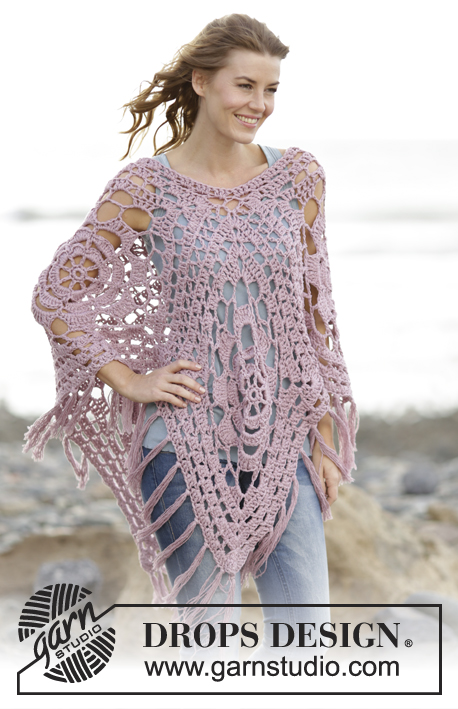
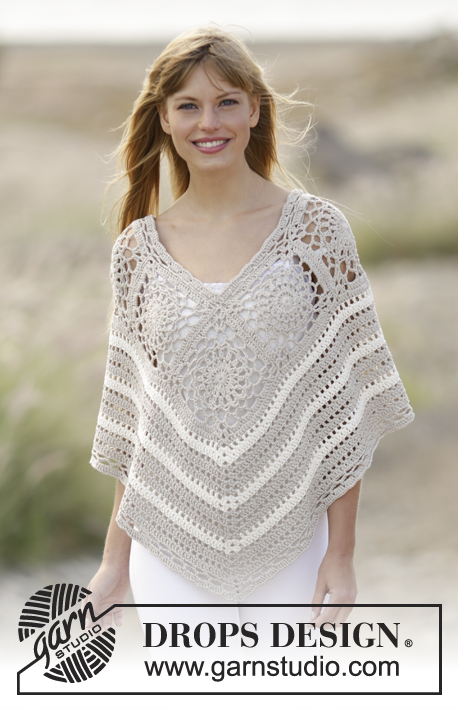
Crochet DROPS poncho with squares in ”Bomull-Lin”. One-size
DROPS 167-14 |
||||||||||||||||||||||||||||||||||||||||
|
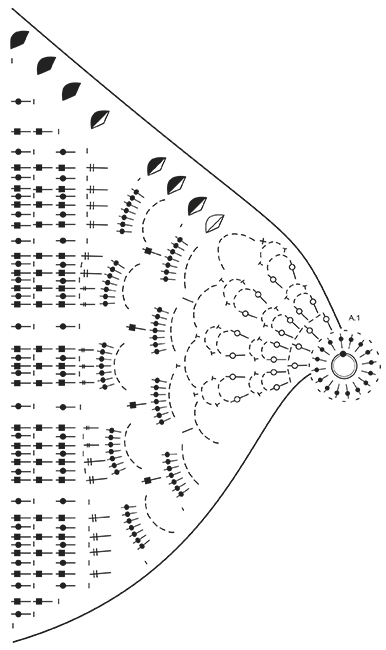
COLOURS SQUARE: Cast on + ROUND 1: beige, ROUND 2: light beige, ROUND 3-6: beige, ROUND 7: off white, ROUND 8-10: light beige and ROUND 11-15: off white. COLOURS EDGE: ROUND 1-3: light beige, ROUND 4-5: off white TR-GROUP: Work 1 tr around next ch/ch-space but wait with last YO and pull through (= 2 sts on hook), work 1 tr more around same ch/ch-space but on last pull through, pull yarn through all sts on hook. PATTERN: See diagrams A.1 and A.2. COLOUR CHANGE TIP: To get a nice transition when changing colour change colour when last YO and pull through on round remains, then pull last YO with new colour through all sts on hook. CROCHET INFO: Replace first tr at beg of every tr round with 3 ch, finish the round with 1 sl st in 3rd ch from beg of round. ---------------------------------------------------------- PONCHO: Work 4 large squares as explained below. Then work squares tog into a poncho. Work a neck edge at and an edge at the bottom around the poncho at the end. SQUARE 1: Work 4 ch on hook size 5 mm with beige and form a ring with 1 sl st in first ch. READ COLOURS SQUARE AND COLOUR CHANGE TIP. Then work according to diagram A.1, i.e. work as follows: ROUND 1: 4 ch (= 1 tr + 1 ch), * 1 tr in ring, 1 ch *, repeat from *-* a total of 15 times, switch to light beige and finish with 1 sl st in 3rd ch from beg of round (= 16 tr with 1 ch between each). ROUND 2: 1 sl st around first ch, 3 ch (= 1 tr), work 1 tr around same ch, * work 2 ch, around next ch work TR-GROUP – see explanation above *, repeat from *-* 15 times in total, work 2 ch, switch to beige and finish with 1 sl st in 3rd ch at beg of round (= 16 tr-groups with 2 ch between each). ROUND 3: 1 sl st around first ch-space, 3 ch (= 1 tr), 1 tr around same ch-space, 3 ch, 1 tr-group around same ch-space, * around next ch-space work 1 tr-group + 3 ch + 1 tr-group *, repeat from *-* 15 times in total and finish with 1 sl st in 3rd ch at beg of round. ROUND 4: 1 sl st around first ch-space, 4 ch (= 1 dc + 3 ch), 1 dc around same ch-space, * around next ch-space work 1 dc + 3 ch + 1 dc *, repeat from *-* 15 times in total and finish with 1 sl st in 1st ch at beg of round. ROUND 5: 1 sl st around first ch-space, 3 ch (= 1 tr), 1 tr + 4 ch + 1 tr-group around same ch-space, * around next ch-space work 1 tr-group + 4 ch + 1 tr-group *, repeat from *-* 15 times in total and finish with 1 sl st in 3rd ch at beg of round. ROUND 6: 1 sl st around first ch-space, 5 ch (= 1 dc + 4 ch), 1 dc around same ch-space, * around next ch-space work 1 dc + 4 ch + 1 dc *, repeat from *-* 15 times in total, switch to off white and finish with 1 sl st in 1st ch at beg of round. ROUND 7: Work sl sts until middle of first ch-space, 9 ch (= 1 dc + 8 ch), * (1 dc around next ch-space, 6 ch), repeat from (-) 3 times in total **, 1 dc around next ch-space, 8 ch *, repeat from *-* 4 times in total but finish last repetition after **. Switch to light beige and work 1 sl st in first ch at beg of round. ROUND 8: Work sl sts until middle of first ch-space, 4 ch (= 1 dtr), 1 dtr + 3 ch + 2 dtr around same ch-space (= corner), * 5 ch, 1 htr around next ch-space, 5 ch, 1 dc around next ch-space, 5 ch, 1 htr around next ch-space, 5 ch **, around next ch-space work 2 dtr + 3 ch + 2 dtr *, repeat from *-* 4 times in total but finish last repetition after **, finish with 1 sl st in 4th ch at beg of round. ROUND 9: Work 1 sl st in next tr and 1 sl st around ch-space in the corner, 4 ch (= 1 dtr), 1 dtr + 3 ch + 2 dtr around same ch-space (= corner), * 1 ch, then work 7 tr around each of the next 4 ch-spaces, 1 ch **, around next ch-space work 2 dtr + 3 ch + 2 dtr *, repeat from *-* 4 times in total but finish last repetition after **, finish with 1 sl st in 4th ch at beg of round. ROUND 10: Work 1 sl st in next tr and 1 sl st around ch-space in the corner, 4 ch (= 1 dtr), 1 dtr + 3 ch + 2 dtr around same ch-space (= corner), * (6 ch, 1 tr in 4th tr in first/next tr-group), repeat from (-) 4 times in total, 6 ch **, around next ch-space work 2 dtr + 3 ch + 2 dtr (= corner) *, repeat from *-* 4 times in total but finish last repetition after **, switch to off white and finish with 1 sl st in 4th ch at beg of round. ROUND 11: Work 1 sl st in next tr and 1 sl st around ch-space in the corner, 4 ch (= 1 dtr), 1 dtr + 3 ch + 2 dtr around same ch-space (= corner), * 1 ch, then work 7 tr around each of the next 5 ch-spaces, 1 ch **, around next ch-space work 2 dtr + 3 ch + 2 dtr (= corner) *, repeat from *-* 4 times in total but finish last repetition after **, finish with 1 sl st in 4th ch at beg of round. ROUND 12: Work 1 sl st in next tr and 1 sl st around ch-space in the corner, 4 ch (= 1 dtr), 1 dtr + 3 ch + 2 dtr around same ch-space (= corner), * 1 ch, 1 dtr around first ch, (1 ch, skip 1 tr, 1 dtr in next tr), repeat from (-) 17 times in total, 1 ch, 1 dtr around ch, 1 ch **, around next ch-space work 2 dtr + 3 ch + 2 dtr *, repeat from *-* 4 times but finish last repetition after **, finish with 1 sl st in 4th ch at beg of round. ROUND 13: Work 1 sl st in next tr and 1 sl st around ch-space in the corner, 3 ch (= 1 tr), 1 tr + 3 ch + 2 tr around same ch-space (= corner), * 1 ch, then work 1 tr around every ch and 1 tr in every tr until next corner (= 39 tr between corners), 1 ch **, around next ch-space work 2 tr + 3 ch + 2 tr (= corner) *, repeat from *-* 4 times in total but finish last repetition after **, finish with 1 sl st in 3rd ch at beg of round. ROUND 14: Work 1 sl st in next tr and 1 sl st around ch-space in the corner, 3 ch (= 1 tr), 1 tr + 3 ch + 2 tr around same ch-space (= corner), * 1 ch, 1 tr around first ch, (1 ch, skip 1 tr, 1 tr in next tr), repeat from (-) 19 times in total, 1 ch, 1 tr around ch, 1 ch **, around next ch-space work 2 tr + 3 ch + 2 tr *, repeat from *-* 4 times but finish last repetition after **, finish with 1 sl st in 3rd ch at beg of round. ROUND 15: Work 1 sl st in next tr and 1 sl st around ch-space in the corner, 3 ch (= 1 tr), 1 tr + 3 ch + 2 tr around same ch-space (= corner), * 1 ch, then work 1 tr around every ch and 1 tr in every tr until next corner (= 43 tr between corners), 1 ch **, around next ch-space work 2 tr + 3 ch + 2 tr (= corner) *, repeat from *-* 4 times in total but finish last repetition after **, finish with 1 sl st in 3rd ch at beg of round. Fasten off. Square measures approx. 40 x 40 cm. NOTE: If you want a bigger poncho repeat ROUND 14-15 until desired measurements. ASSEMBLY: Place squares as shown in chart. Place 2 squares on top of each other WS against WS, and crochet them tog with light beige as follows: Work 1 dc around ch-space in the corner on first square, 1 ch, 1 dc around ch-space in the corner on second square, * 2 ch, skip 2 tr on first square, 1 dc in next tr on first square, 2 ch, skip 2 tr on second square, 1 dc in next tr on second square *, repeat from *-* until next corner, finish with 2 ch before transition to next square. Fasten off. NECK EDGE: Work a finishing edge around the neck on hook size 5 mm with light beige as follows - READ CROCHET INFO: Work 2nd round in A.2 but mid front and mid back where there are ch-spaces work 1 tr around every ch-space with 1 ch between each. Work 3rd round in A.2 but mid front and mid back work the middle 3 tr tog as follows: Work 1 tr but wait with last pull through (= 2 loops on hook), work next tr but wait with last pull through (= 3 loops on hook), work next tr but on last pull through, pull yarn through all 4 loops on hook. Fasten off. EDGE AROUND THE BOTTOM OF PONCHO: Work a finishing edge around the bottom of poncho on hook size 5 mm as follows - READ COLOURS EDGE and CROCHET INFO: Beg with light beige and work pattern according to diagram A.2, i.e. work as follows: NOTE: To continue the edge into a nice tip as on squares it is important to continue inc mid front and mid back as before, i.e. around the middle ch-space mid front and mid back work 2 ch + 2 tr + 3 ch + 2 tr + 2 ch on every round the same way as on the squares. ROUND 1: Work 1 tr in every tr around the entire poncho but where 2 squares meet and where there are ch-spaces work 2 tr around every ch-space. ROUND 2: * 1 tr in first/next tr, 1 ch, skip 1 tr *, repeat from *-* the entire round but continue tip mid front and mid back as explained above. ROUND 3: Work 1 tr in every tr and 1 tr around every ch but continue tip mid front and mid back. Switch to off white. ROUND 4: 1 tr, 3 ch, 1 sl st in the first of the 3 ch, work 2 tr in same st (= 1 tr-group with picot), * 1 ch, skip 3 tr, in next tr work 1 tr, 3 ch, 1 sl st in the first of the 3 ch, work 2 tr in same tr *, repeat from *-* the entire round but make sure that it matches nicely with tip mid front and mid back. ROUND 5: * 6 ch, skip tr-group, 1 dc around next ch *, repeat from *-* the entire round. Fasten off. |
||||||||||||||||||||||||||||||||||||||||
Diagram explanations |
||||||||||||||||||||||||||||||||||||||||
|
||||||||||||||||||||||||||||||||||||||||
|
||||||||||||||||||||||||||||||||||||||||

|
||||||||||||||||||||||||||||||||||||||||
Have you finished this pattern?Tag your pictures with #dropspattern #midsummerjoyponcho or submit them to the #dropsfan gallery. Do you need help with this pattern?You'll find 13 tutorial videos, a Comments/Questions area and more by visiting the pattern on garnstudio.com. © 1982-2025 DROPS Design A/S. We reserve all rights. This document, including all its sub-sections, has copyrights. Read more about what you can do with our patterns at the bottom of each pattern on our site. |
||||||||||||||||||||||||||||||||||||||||


With over 40 years in knitting and crochet design, DROPS Design offers one of the most extensive collections of free patterns on the internet - translated to 17 languages. As of today we count 314 catalogues and 11820 patterns translated into English (UK/cm). 11820
We work hard to bring you the best knitting and crochet have to offer, inspiration and advice as well as great quality yarns at incredible prices! Would you like to use our patterns for other than personal use? You can read what you are allowed to do in the Copyright text at the bottom of all our patterns. Happy crafting!
Post a comment to pattern DROPS 167-14
We would love to hear what you have to say about this pattern!
If you want to leave a question, please make sure you select the correct category in the form below, to speed up the answering process. Required fields are marked *.