
Looking for a yarn?


Comments / Questions (11)
![]() Pascale wrote:
Pascale wrote:
Je n’ai pas compris ce que voulait dire « 1er rang = sur l’envers », au début de l’ouvrage. Après réflexion, j’ai commencé par un rang envers. Et c’est au moment de tricoter en rond que j’ai compris. Donc j’ai dû défaire 2 rangs pour me retrouver dans le bon sens. Je regrette que les explications n’aient pas été plus détaillées, comme dans certains modèles. C’est la 1ère fois qu’elle je me retrouve bloquée avant même de commencer 😁
17.11.2022 - 07:57
![]() Rafael wrote:
Rafael wrote:
Hello again! Thanks for the immediate replies so far. Please could you elaborate on your last message as I am a beginner? My question is that I did put both pieces on the same needle and hence I have two tails. I will be using one of these tails to knit in the round but what am I supposed to do with the other tail?
24.06.2020 - 16:16DROPS Design answered:
Dear Rafael, after you have worked first piece (back piece) and put aside, you can cut the yarn (you then just have to weave it in). Then you work front piece and you work both pieces together in the round with the same ball (= the one from front piece). Happy knititng!
24.06.2020 - 17:08
![]() Rafael wrote:
Rafael wrote:
Hello! According to pattern, I've done the front and back pieces of the poncho and now I am supposed to slip stc them together in the same needle. How do I do it? I've seen a couple of videos of what slip stc is but how do I to put them together? I'm a bit confused with that part. Should I slip stc the sides of each piece together? Should I to do something with the stics that were kept "alive"? Could someone guide me through? Thank you very much.
22.06.2020 - 18:25DROPS Design answered:
Dear Rafael, work one row from Right side over stitches on front piece, then at the end of this row, work the stitches of back piece from right sided and, when the last of the stitches on back piece has been worked, insert a marker on the needle (= to mark beg of round) and work stitches on front piece = you have joined pieces in the round, continue now knitting all stitches (as before). Happy knitting!
23.06.2020 - 08:58
![]() Rafael wrote:
Rafael wrote:
Hello! In the pattern it says "leave it aside" about the front piece and the same goes for the back piece as well. Does that mean that I have to cast off the last row of each piece? Because later on pattern says that they need to be joined together with slip stitch. So I'm a bit confused. Thanks.
23.12.2019 - 12:49DROPS Design answered:
Dear Rafael, the phrase +leave it (or put it) aside means that you should either leave the stitches on the needle and make the other pieces with another one, or put the stitches on a stitch holder or a piece of leftover yarn, while making the other bits. It is important that you dont bind off the stitches, but keep them "alive" so you can continue knitting them later. Happy Knitting!
24.12.2019 - 17:02
![]() Belén Ramón wrote:
Belén Ramón wrote:
Podría mandarme a que talla corresponde cada L o XL . Si la L corresponde a talla 46 o 48.... desgraciadamente varía depende de los fabricantes. Creo que sería muy útil. Gracias!!!!
04.12.2019 - 17:34DROPS Design answered:
Hola Belen. Bajo cada modelo tienes un diagrama de la prenda con las medidas en cm, que es mejor orientación que las tallas. Ante de la duda entre dos tallas, siempre recomendamos elegir la talla más grande . No se puede concretar la correspondencia a las tallas porque esta varia dependiendo del país.
09.12.2019 - 23:54
![]() Rafael wrote:
Rafael wrote:
Hello! pattern suggets: "Work 3 rows in GARTER ST . K 1 row. " Could you please explain to me that? I know that garter st is a pattern rather than a technique and K stands for knit stitch which is the standard knitting stitch (i saw the videos that you also include here). My question is: Do I knit all stitches for the next 3 rows after casting on and then i knit 1 more row? or do i create 3 ridges through garter stitch, which essentially means to knit 6 rows and then knit 1 more row?
21.11.2019 - 19:49DROPS Design answered:
Dear Rafael, you should in fact work 3 ridges (= knit 6 rows), then work one more row knitting all stitches, and on next row (8th row from the cast on), work in stocking stitch with 5 sts in garter stitch on each side. Pattern will be edited. Thank you, Happy knitting!
22.11.2019 - 08:07Ylva Forss wrote:
Jag beställde rundstickor nr 5, 40 cm ( trä, kantiga). De har inte kommit. Skulle komma v. 11. Jag har redan betalat dem.
21.03.2017 - 13:25DROPS Design answered:
Hej Ylva. Du kan bedre kontakte butikken hvor du har bestilt for at höre hvor lang tid der gaar endnu.
21.03.2017 - 14:47YlvavForss wrote:
Håller på att sticka denna poncho och jag stickar slätstickning nerifrån, enl. instruktionerna skall jag börja sticka mönsterstickning då arbetet mäter 34 cm i mitt fall, men nu måste väl arbetet i sin helhet vara 15 + 34?
17.03.2017 - 18:23
![]() Claudia Carolina wrote:
Claudia Carolina wrote:
Mi affascina questo modello e il filato non l'ho ancora usato, sono molto curiosa e spero prossimamente sperimentare l'emozione "Neuquén". Grazie Drops per tanto spunti meravigliosi. Claudia
22.03.2016 - 11:46
![]() Claudia Carolina wrote:
Claudia Carolina wrote:
Mi affascina questo modello e il filato non l'ho ancora usato, sono molto curiosa e spero prossimamente sperimentare l'emozione "Neuquén". Grazie Drops per tanto spunti meravigliosi. Claudia
22.03.2016 - 11:46
|
|||||||||||||||||||
Neuqu |
|||||||||||||||||||
|
|
|||||||||||||||||||
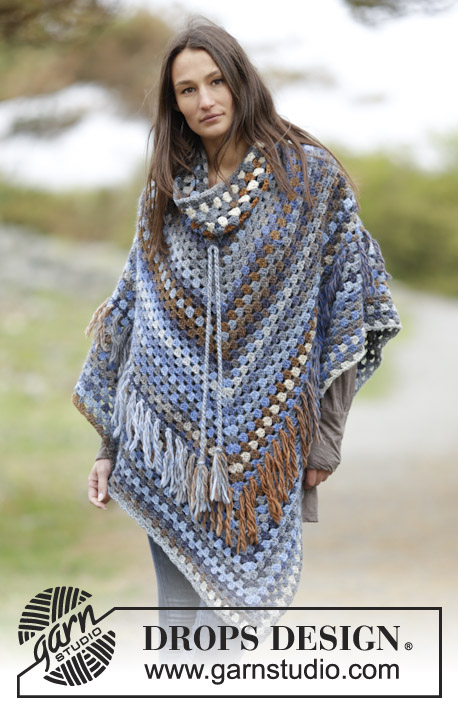
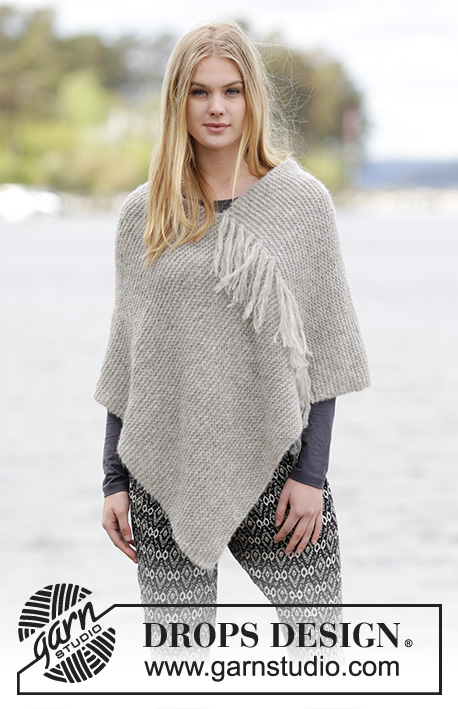
Knitted DROPS poncho with Nordic pattern in ”Nepal”. Size: S - XXXL.
DROPS Extra 0-1164 |
|||||||||||||||||||
|
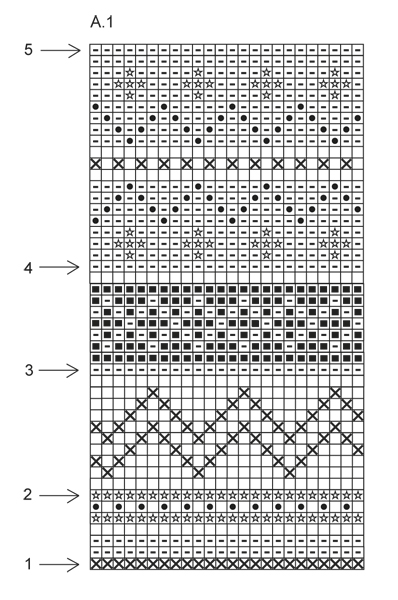
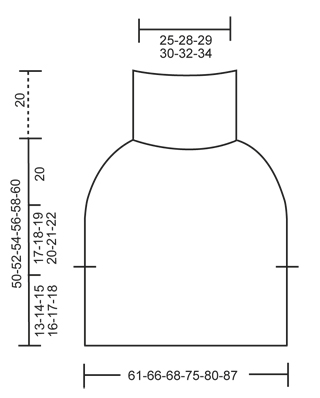
GARTER ST (back and forth): K all rows. 1 ridge = 2 rows K. PATTERN: See diagram A.1. Work entire pattern in stocking st. KNITTING TIP: To avoid the knitting tension to tighten when working pattern, it is important not to tighten the strands on back side of piece. Switch to a higher needle no when working pattern if the pattern is somewhat tight. DECREASE TIP: To calculate how often dec should be done, use the total no of sts on round (e.g. 264 sts) and divide by no of dec to be done (e.g. 32) = 8.25. I.e. in this example K approx. every 7th and 8th st tog. INCREASE TIP: Inc 1 st by making 1 YO, on next round work YO twisted (i.e. work in back loop of st instead front) to avoid holes. ---------------------------------------------------------- PONCHO: Work back and forth on circular needle up to vent, then work in the round. BACK PIECE (up to vent): Worked back and forth on circular needle. Cast on 106-114-118-130-138-150 sts on circular needle size 5 mm with light grey. Work 3 ridges in GARTER ST - see explanation above (1st row = WS). K 1 row. Then work in stocking st with 5 sts in garter st in each side of piece. REMEMBER THE KNITTING TENSION When piece measures 13-14-15-16-17-18 cm, dec 1 edge st in each side, adjust so that next row is worked from RS = 104-112-116-128-136-148 sts. Put piece aside and work front piece up to vent. FRONT PIECE (up to vent): Cast on and work as back piece. BODY: Worked in the round. Slip sts front and back piece on to same circular needle = 208-224-232-256-272-296 sts. Then work in stocking st and light grey until piece measures 30-32-34-36-38-40 cm. Then work pattern in the round according to diagram A.1 while AT THE SAME TIME on round marked with arrow 1 in diagram dec 6-8-8-10-10-12 sts evenly - READ DECREASE TIP and KNITTING TIP = 202-216-224-246-262-284 sts. Continue pattern. On round marked with arrow 2 in diagram dec 18-24-24-30-30-36 sts evenly = 184-192-200-216-232-248 sts. Continue pattern. On round marked with arrow 3 in diagram dec 32-32-32-36-44-48 sts evenly = 152-160-168-180-188-200 sts. Continue pattern. On round marked with arrow 4 in diagram dec 32-34-36-42-44-50 sts evenly = 120-126-132-138-144-150 sts. Continue pattern. On round marked with arrow 5 in diagram (= last round) dec 34-30-34-36-36-34 sts evenly = 86-96-98-102-108-116 sts. Work 1 round with light grey while inc 4-6-4-6-6-4 sts evenly - READ INCREASE TIP = 90-102-102-108-114-120 sts. Then work rib in the round = K 2/P 4 on a short circular needle. Loosely cast off with K over K and P over P when rib measures approx. 20 cm. |
|||||||||||||||||||
Diagram explanations |
|||||||||||||||||||
|
|||||||||||||||||||
 |
|||||||||||||||||||
 |
|||||||||||||||||||
Have you finished this pattern?Tag your pictures with #dropspattern or submit them to the #dropsfan gallery. Do you need help with this pattern?You'll find 20 tutorial videos, a Comments/Questions area and more by visiting the pattern on garnstudio.com. © 1982-2025 DROPS Design A/S. We reserve all rights. This document, including all its sub-sections, has copyrights. Read more about what you can do with our patterns at the bottom of each pattern on our site. |
|||||||||||||||||||


With over 40 years in knitting and crochet design, DROPS Design offers one of the most extensive collections of free patterns on the internet - translated to 17 languages. As of today we count 320 catalogues and 12090 patterns translated into English (UK/cm). 12090
We work hard to bring you the best knitting and crochet have to offer, inspiration and advice as well as great quality yarns at incredible prices! Would you like to use our patterns for other than personal use? You can read what you are allowed to do in the Copyright text at the bottom of all our patterns. Happy crafting!
Post a comment to pattern DROPS Extra 0-1164
We would love to hear what you have to say about this pattern!
If you want to leave a question, please make sure you select the correct category in the form below, to speed up the answering process. Required fields are marked *.