
Looking for a yarn?


Comments / Questions (73)
![]() Mona Lien wrote:
Mona Lien wrote:
Hei. Lurer på om det kan være feil i mønstret. Når man skal begynne på mønster A.4. står det at man skal strikke 11 m før ( str XXL) diagrammet. Tror ikke det er tatt høyde for at 1 maske i hver side blir brukt til raglan fellingen av de 65 på bakstykket. Mønstret kommer ikke midt på ryggen. 1 maske til raglan+ 11 rett+43 masker( mønster A.4) Da blir det 9 masker rett + 1 maske raglan igjen på andre siden. Og da kommer i mønstret midt på. Håper forklaringen min er forståelig.
24.02.2015 - 21:37Anna Ivanova wrote:
Thank you! So much!
21.02.2015 - 19:29Anna Ivanova wrote:
O, thank you so so much, i am so happy i don't have to start over :) Thank you for the great site and support!
18.02.2015 - 10:13Anna Ivanova wrote:
Hello! I have started this and i was a bit confused on diagram A1. The holes are on row 6 from the diagram. This means If i want to make the holes on RS row, i have to start the diagram with WS row. In this way instead of K all rows, i have to P all rows until the holes row, which is not the first choice for garter stitch and is not specified. Does this make sense? Please help! Thank you!
18.02.2015 - 07:19DROPS Design answered:
Dear Mrs Ivanova, 1st row in A.1 is worked from RS and hole row is worked from WS, but pattern match perfectly, last row in A.1 is a WS row to continue then from RS. Happy knitting!
18.02.2015 - 09:42
![]() Corneillie Christine wrote:
Corneillie Christine wrote:
Prachtig model !!! Zo lief ,om er onmiddellijk aan te willen beginnen . Hopelijk komt het patroon vlug uit !
16.02.2015 - 23:28
![]() Ada Bartoli wrote:
Ada Bartoli wrote:
Quando arriva la spiegazione del modello? distinti saluti
16.02.2015 - 16:27
![]() Ann De Jonge wrote:
Ann De Jonge wrote:
In 1 woord gezegd prachtig, hopelijk vlug beschrijving en patroon dat ik wol kan bestellen bij Drops.
11.02.2015 - 20:09
![]() Zuzana Gulašová wrote:
Zuzana Gulašová wrote:
Nádherné
10.02.2015 - 01:23
![]() Anne wrote:
Anne wrote:
Nydelig jakke. Når kommer oppskriften?
08.02.2015 - 14:49
![]() Brandy wrote:
Brandy wrote:
Trop joli
08.02.2015 - 13:58
|
|||||||||||||||||||
Peach Macaroon#peachmacaroonsweater |
|||||||||||||||||||
 |
 |
||||||||||||||||||
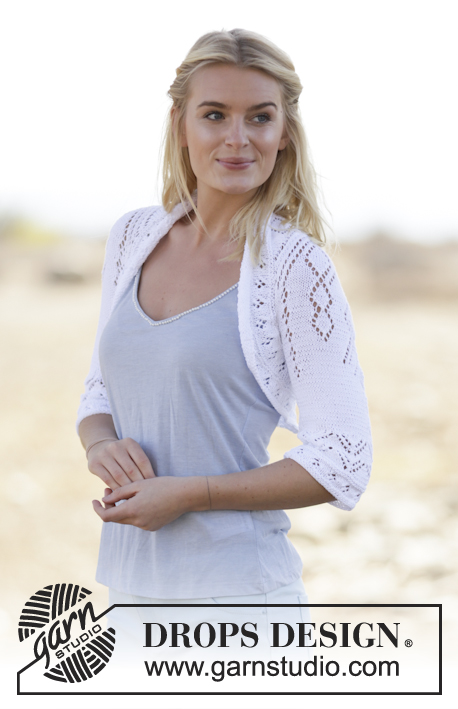
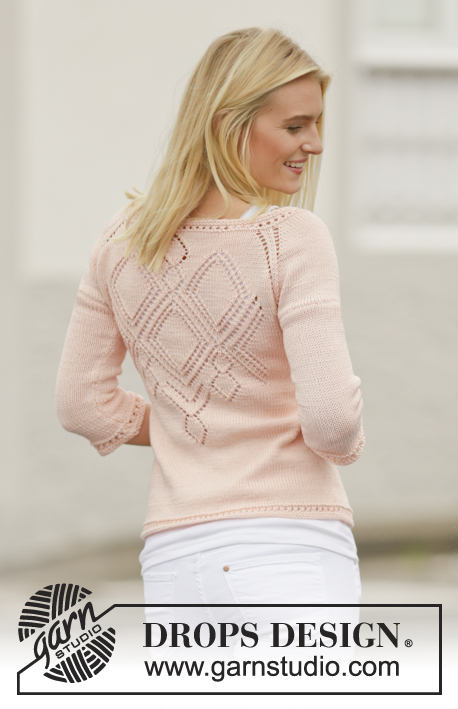
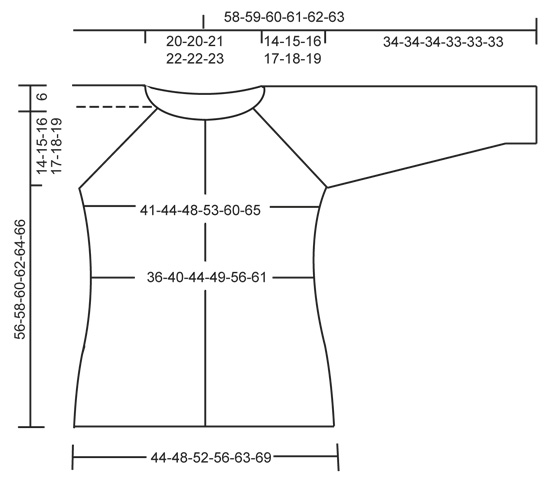
Knitted DROPS jacket with lace pattern and raglan in ”Muskat”. Worked top down. Size: S - XXXL.
DROPS 160-23 |
|||||||||||||||||||
|
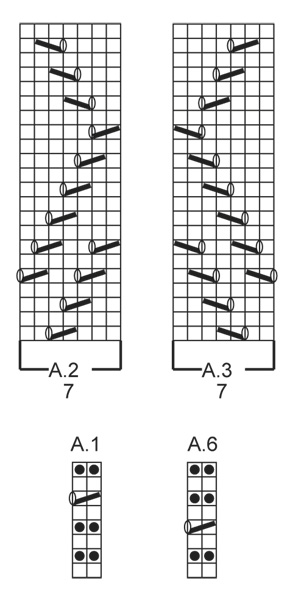
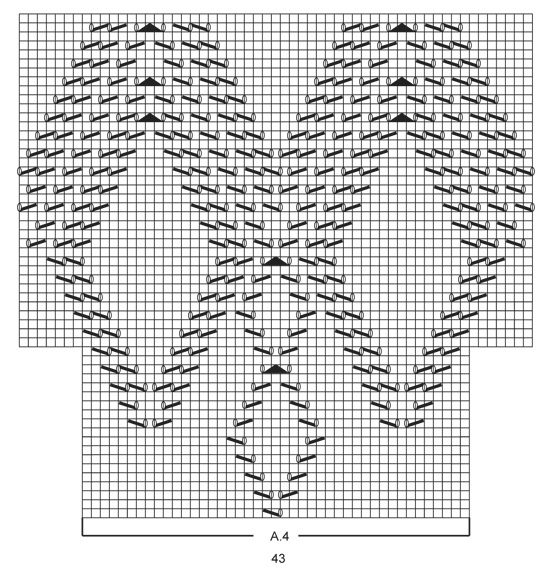
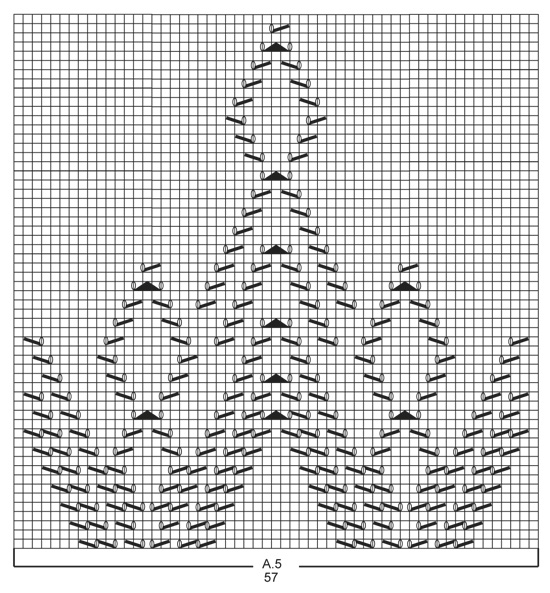
PATTERN: See diagrams A.1 to A.6. The diagrams show all rows in pattern seen from RS. DECREASE TIP: Dec 1 st before marker as follows: Work until 2 sts remain before marker, slip 1 st as if to K, K 1, psso. Dec 1 st after marker as follows: K 2 tog. BAND STS: Work band (= 6 sts) as follows: ROW 1 (= RS): K 6. ROW 2: K 6. Repeat 1st-2nd row 5 times in total (= 5 ridges). ROW 11 (= RS): * K 2 tog, 1 YO *, repeat from *-* 3 times in total, work reversed in the other side of piece, i.e.: 1 YO, K 2 twisted tog (= eyelet row). ROW 12: K all sts, do not work YOs twisted; they should make holes. RAGLAN: Inc differently for raglan in the different sizes: SIZE S-M: Inc on every row from RS (= every other row) as follows: Inc 1 sts each side of each marker (= 8 sts inc) as follows: 1 YO, K 1 twisted, K 1( = st with marker), K 1 twisted, 1 YO. Do not work YOs twisted on next row, they should make holes, repeat inc every other row 17-19 more times. SIZE L-XL-XXL-XXXL: Inc on every row from RS (= every other row) as follows: Inc 2 sts each side of each marker (= 16 sts inc in total) as follows: 1 YO, K 1, 1 YO, K 1 twisted, K 1(= st with maker), K 1 twisted, 1 YO, K 1, 1 YO (the first and last YO work P twisted on next row, it should not make a hole, P the 2 middle YO, they should make holes). Repeat inc on every row from RS 1-1-1-3 more times. Then inc on every row from RS (= every other row) as follows: Inc 1 st on each side of each marker (= 8 sts inc in total) as follows: YO, K 1 twisted, K 1 (= st with maker), K 1 twisted, YO. Do not P YOs twisted on next row, they should make holes, repeat inc every other row 19-20-22-21 times in total. INCREASE TIP: Inc 1 st by making a YO. On next row P YO twisted (i.e. work in the back loop of st instead of front) to avoid holes. KNITTING TIP: Picture deviate from pattern, there is no seam on sleeve in pattern. ---------------------------------------------------------- YOKE: Worked back and forth on circular needle, top down. Cast on 147-147-153-157-157-161 sts (incl 6 band sts in each side of piece) on circular needle size 3.5 mm with Muskat. Work 6 BAND STS - see explanation above, A.1 (= 2 sts) until 7 sts remain, K 1, finish with 6 band sts. When A.1 has been worked 1 time vertically, switch to circular needle size 4 mm. Work the 6 band sts like this until finished measurements. On next row from RS, 6 band sts, A.2 (= 7 sts), K until 13 sts remain - AT THE SAME TIME inc 14-18-12-20-40-44 sts evenly, A.3 (= 7 sts), ending with 6 band sts = 161-165-165-177-197-205 sts. On next row (= from WS) insert 4 markers in the piece as follows: 6 band sts, A.3, P 15-16-17-20-25-28 sts (= front piece), P 1 and insert 1st marker in this st, P 28-28-26-26-26-24 (= sleeve), P 1 st and insert 2nd marker in this st, P 45-47-49-55-65-71 sts (= back piece), P 1 st and insert 3rd marker in this st, P 28-28-26-26-26-24 sts(= sleeve), P 1 and insert 4th marker in this st, P 15-16-17-20-25-28 sts (= front piece), A.2 and finish with 6 band sts. REMEMBER THE KNITTING TENSION! A.2-A.3 is worked like this until finished measurements. Then work as follows (from RS) - AT THE SAME TIME inc for RAGLAN - see explanation above. Work 6 band sts, A.2, K until 1-1-2-2-2-2 st remains before 1st marker, work RAGLAN - see explanation above, K until 1-1-2-2-2-2 sts remain before 2nd marker, work raglan, K 0-1-1-4-9-12, A.4 (= 43 sts), K until 1-1-2-2-2-2 st remains before 3rd marker, work raglan, K until 1-1-2-2-2-2 sts remain before 4th marker, work raglan, work in stocking st until 13 sts remain, A.3 (= 7 sts), finish with 6 band sts. Work the inc sts in stocking st until they can be worked in pattern as shown in A.4. When A.4 has been worked 1 time vertically, work A.5 (= 57 sts) over A.4. After all inc are done there are 305-325-349-369-405-437 sts on needle. Piece measures approx. 14-15-16-17-18-19 cm. Continue with pattern and stocking st as before AT THE SAME TIME work as follows on next row from RS: Work 6 band sts, A.2 as before, 33-36-40-44-51-57 sts in stocking st (= front piece), insert the next 66-70-74-76-80-84 sts on a stitch holder for sleeve, cast on 6-6-6-8-8-8 sts under sleeve (insert marker in the middle of the new sts), work the next 81-87-95-103-117-129 sts (= back piece) as before, slip the next 66-70-74-76-80-84 sts on a stitch holder for sleeve, cast on 6-6-6-8-8-8 sts under sleeve (insert a marker in the middle of the new sts), 33-36-40-44-51-57 sts in stocking st (= front piece), A.3 as before, finish with 6 band sts = 185-197-213-233-261-285 sts remain on needle. Insert 1 marker in piece, NOW MEASURE PIECE FROM HERE. Continue with pattern and stocking st over the remaining sts. When piece measures 3 cm, dec 1 st on each side of each markers in the side (= 4 sts dec) - READ DECREASE TIP! Repeat dec every 2½-4-4-4-4-4 cm 5-3-3-3-3-3 more times = 161-181-197-217-245-269 sts. Work as before until piece measures 18-19-20-21-22-23 cm. When A.5 has been worked 1 time vertically, work in stocking st over all sts. Then inc 1 st on each side of each markers in the sides (= 4 sts inc) - READ INCREASE TIP! Repeat inc every 2 cm 8-7-7-7-7-7 more times = 197-213-229-249-277-301 sts. When piece measures 40-41-42-43-44-45 cm (adjust so that next row is from RS), switch to circular needle size 3.5 mm. Then work as follows: 6 band sts, work A.6 (= 2 sts) until 7 sts remain, 1 st in stocking st and 6 band sts. When A.6 has been worked 1 time vertically, cast off. SLEEVE: Worked in the round on double pointed needles. Insert 1 marker in piece, NOW MEASURE PIECE FROM HERE. Slip sts from stitch holder back on double pointed needles size 4 mm and cast on 6-6-6-8-8-8 new sts under sleeve (insert a marker in the middle of the new sts) = 72-76-80-84-88-92 sts - see KNITTING TIP. Work in stocking st. When piece measures 3 cm, dec 1 st on each side of marker mid under sleeve (= 2 sts dec), repeat dec every 2-1½-1½-1½-1-1 cm 12-13-14-15-17-18 more times = 46-48-50-52-52-54 sts. When piece measures 32-32-32-31-31-31 cm (shorter measurements in the larger sizes because of wider shoulders), switch to double pointed needle size 3.5 mm. Work A.6. Cast off when A.6 has been worked 1 time vertically. Work the other sleeve the same way. ASSEMBLY: Sew the opening under the sleeves. Sew on buttons, button in eyelet row for band sts. Fasten the top button in neck on left band in first eyelet row, skip 2 eyelet rows, fasten the next button, then fasten the other button in every other eyelet row. |
|||||||||||||||||||
Diagram explanations |
|||||||||||||||||||
|
|||||||||||||||||||
 |
|||||||||||||||||||
 |
|||||||||||||||||||
 |
|||||||||||||||||||
 |
|||||||||||||||||||
Have you finished this pattern?Tag your pictures with #dropspattern #peachmacaroonsweater or submit them to the #dropsfan gallery. Do you need help with this pattern?You'll find 25 tutorial videos, a Comments/Questions area and more by visiting the pattern on garnstudio.com. © 1982-2025 DROPS Design A/S. We reserve all rights. This document, including all its sub-sections, has copyrights. Read more about what you can do with our patterns at the bottom of each pattern on our site. |
|||||||||||||||||||


With over 40 years in knitting and crochet design, DROPS Design offers one of the most extensive collections of free patterns on the internet - translated to 17 languages. As of today we count 320 catalogues and 12093 patterns translated into English (UK/cm). 12093
We work hard to bring you the best knitting and crochet have to offer, inspiration and advice as well as great quality yarns at incredible prices! Would you like to use our patterns for other than personal use? You can read what you are allowed to do in the Copyright text at the bottom of all our patterns. Happy crafting!
Post a comment to pattern DROPS 160-23
We would love to hear what you have to say about this pattern!
If you want to leave a question, please make sure you select the correct category in the form below, to speed up the answering process. Required fields are marked *.