
Looking for a yarn?


Comments / Questions (33)
![]() Marta wrote:
Marta wrote:
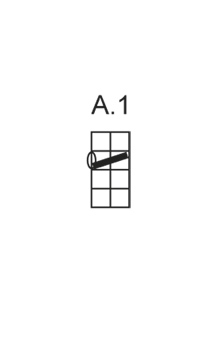
Can someone explain please K 2 tog, 1 YO between 2 sts in diagram A1?
27.03.2015 - 15:13DROPS Design answered:
Dear Marta, on row 3 in A.1, work *K2 tog, YO* all the round - number of sts should be constant, each decrease will be compensated by the YO. Happy crocheting!
30.03.2015 - 14:29
![]() Germana wrote:
Germana wrote:
Bellissimo questo modellino ma non si potrebbe dare indicazioni con i ferri diritti. Io i ferrri circolari non li so usare. germana
18.02.2015 - 10:51
![]() Anna wrote:
Anna wrote:
Pierwsze skojarzenie jakie przyszło mi do głowy na widok tego projektu to: LAZUR - pozdrawiam Ania
04.02.2015 - 19:08
![]() Sabine wrote:
Sabine wrote:
Warte schon ganz ungeduldig auf die Anleitung. Sieht einfach und sehr effektvoll aus.
24.01.2015 - 13:49
![]() Annie wrote:
Annie wrote:
L'empiècement est juste sublime
13.01.2015 - 18:21
![]() Maryse wrote:
Maryse wrote:
Très beau motif... et belle couleur, en plus!
06.01.2015 - 20:15
![]() Corry Neele wrote:
Corry Neele wrote:
Mooi door zijn eenvoud. Perfect model. Zowel zonder mouw, als met lange mouw.
05.01.2015 - 21:12
![]() Rosy wrote:
Rosy wrote:
Petit haut parfait pour les vacances d'été
29.12.2014 - 17:44
![]() Kathy wrote:
Kathy wrote:
I really like the look out this for something to pack when traveling. Appears comfortable and easy to create.
29.12.2014 - 02:55
![]() Encarna Acevedo wrote:
Encarna Acevedo wrote:
Perfecto , no se me escapa para este verano , gracias sois geniales
20.12.2014 - 22:08
|
|||||||
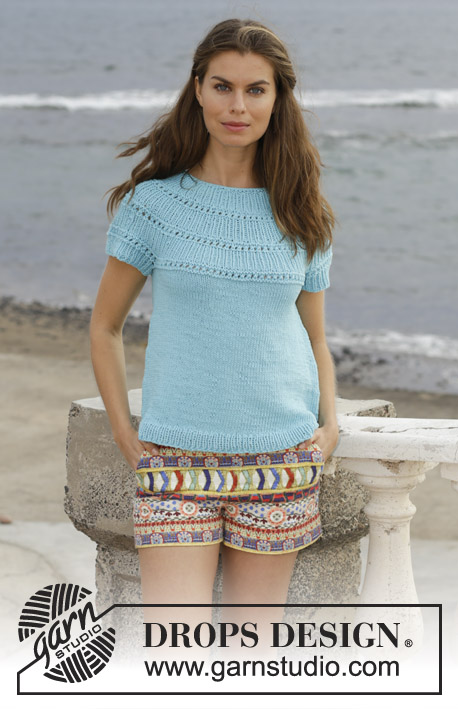
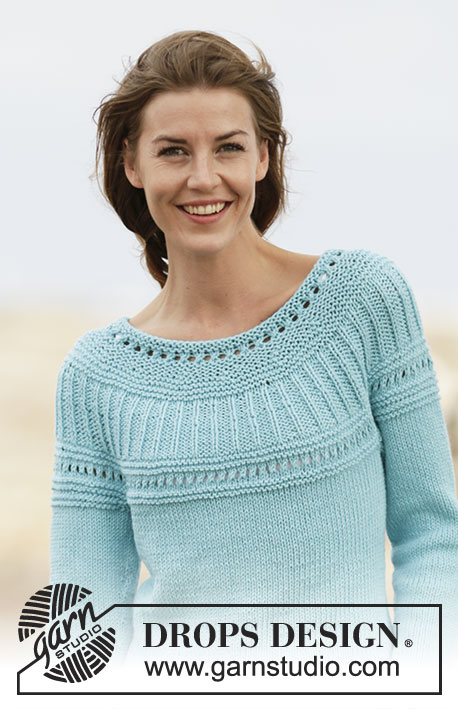
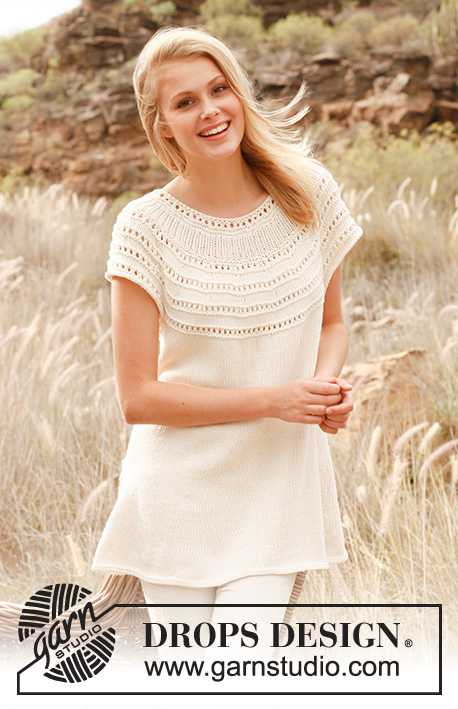
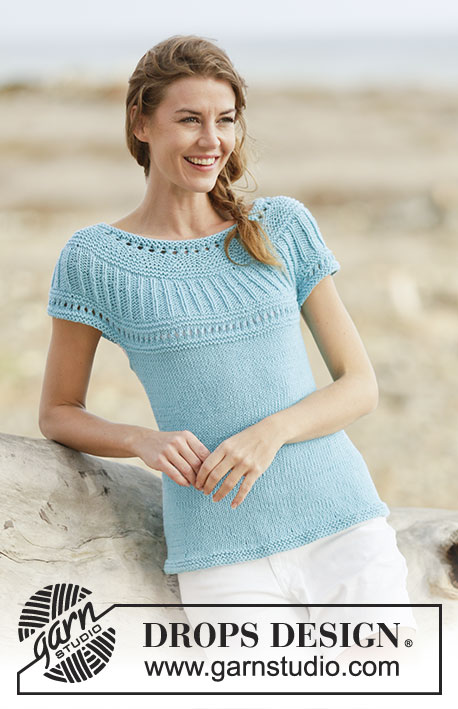
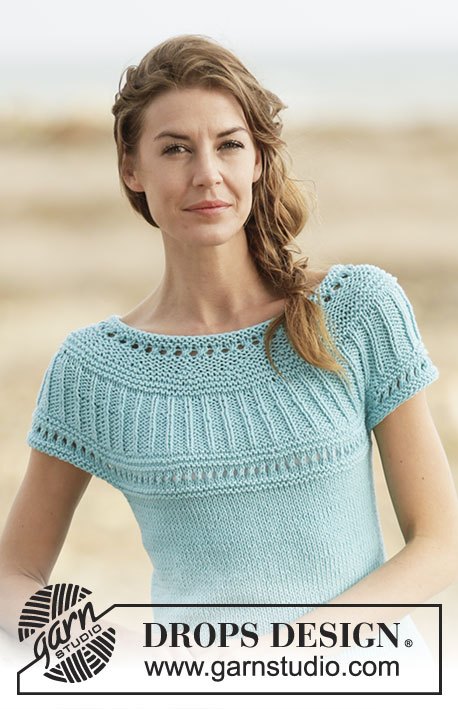
Athena#athenatop |
|||||||
 |
 |
||||||
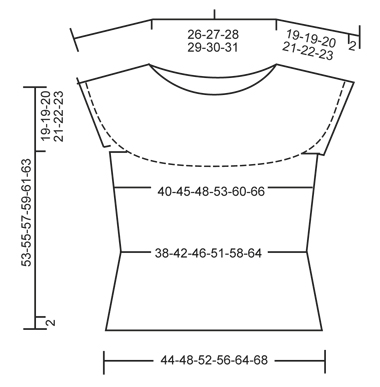
Knitted DROPS top with round yoke,in stocking st, garter st with lace pattern, worked top down in ”Paris”. Size: S - XXXL.
DROPS 161-11 |
|||||||
|
GARTER ST (worked in the round): 1 ridge = 2 rounds. * K 1 round and P 1 round *, repeat from *-*. PATTERN: See diagram A.1. INCREASE TIP 1: Inc 1 st by making 1 YO, on next round work YO twisted (i.e. work in back loop of st instead front) to avoid holes. INCREASE TIP 2: Inc with YO on each side of 2 sts in each side (the marker sits inbetween these sts). Knit YO twisted on next round. DECREASE TIP: Dec as follows before 1 st in stocking st and marker: K 2 tog. Dec after marker and 1 st in stocking st as follows: Slip 1 st as if to K, K 1, psso. ---------------------------------------------------------- TOP: Worked in the round on circular needle, top down. Rounds start mid back. YOKE: Cast on 92-96-100-104-108-112 sts on circular needle size 4.5 mm with Paris. Work 2 ridges in GARTER ST - see explanation above. Switch to circular needle size 5 mm and work A.1, AT THE SAME TIME on first round in diagram inc 12-16-18-18-20-20 sts evenly - READ INCREASE TIP 1 = 104-112-118-122-128-132 sts. When A.1 has been worked vertically, switch back to circular needle size 4.5 mm. Work in garter st AT THE SAME TIME inc 10 sts evenly on 2nd ridge and 6-7-13-15-21-26 sts evenly on 5th ridge (NOTE: Inc on a round with K) = 120-129-141-147-159-168 sts. REMEMBER THE KNITTING TENSION When 7-7-8-8-8-10 ridges have been worked in total, piece measures approx. 7-7-8-8-8-9 cm, switch to circular needle size 5 mm. Work 2 rounds in stocking st. Now work rib as follows: * K 1, P 2 *, repeat from *-* the entire round. When rib measures 2 cm, inc by making 1 YO before K st in every section P the entire round (= 40-43-47-49-53-56 sts inc) = 160-172-188-196-212-224 sts. On next round P YOs twisted (i.e. work in back loop of st instead of front) to avoid holes. Continue with K 1/P 3. Repeat inc before every st with K when rib measures 4-4-4-5-6-6 cm = 200-215-235-245-265-280 sts. Continue with K 1/P 4 until rib measures 6-6-6-7-8-8 cm in total. Work 2 rounds in stocking st. Now switch to circular needle size 4.5 mm. Work 2 ridges while AT THE SAME TIME on first round inc 8-11-11-15-21-28 sts evenly = 208-226-246-260-286-308 sts. Switch to circular needle size 5 mm and continue with A.1. When A.1 has been worked vertically, switch to circular needle size 4.5 mm. Work 2 ridges while AT THE SAME TIME on first round inc 8-10-10-16-22-28 sts evenly = 216-236-256-276-308-336 sts. Now continue on circular needle size 5 mm as follows: Work the first 30-34-37-41-47-52 sts (= back piece), slip the next 48-50-54-56-60-64 sts on a stitch holder (= sleeve), cast on 8 new sts under sleeve, work the next 60-68-74-82-94-104 sts (= front piece), slip the next 48-50-54-56-60-64 sts on a stitch holder (= sleeve), cast on 8 new sts under sleeve, work the remaining 30-34-37-41-47-52 sts (= back piece) on round. BODY: There are now 136-152-164-180-204-224 sts for body. Insert a marker in each side of body where new sts were cast on under sleeves (= 4 new sts on each side of marker). MEASURE PIECE FROM HERE. Continue in stocking st. When piece measures 4 cm, dec on each side of each markers (= 4 sts dec) - READ DECREASE TIP! Repeat dec when piece measures 11-10-9-8-7-6 cm = 128-144-156-172-196-216 sts. When piece measures 18-17-16-15-14-13 cm, inc 1 st on each side of each marker - READ INCREASE TIP 2 (= 4 sts inc). Repeat inc every 2-2½-3-3-3½-4 cm 4 more times = 148-164-176-192-216-236 sts. When piece measures 32-33-34-35-36-37 cm, inc 10-8-11-10-14-8 st evenly = 158-172-187-202-230-244 sts. Switch to circular needle size 4.5 mm and work 3 ridges. Loosely cast off. SLEEVE EDGE: Slip sts from stitch holder back on double pointed needles size 4.5 mm (= 48-50-54-56-60-64 sts). Pick up 1 st in each of the 8 sts cast on under sleeve = 56-58-62-64-68-72 sts. Loosely cast off all sts. Repeat on the edge of the other sleeve. |
|||||||
Diagram explanations |
|||||||
|
|||||||
 |
|||||||
 |
|||||||
Have you finished this pattern?Tag your pictures with #dropspattern #athenatop or submit them to the #dropsfan gallery. Do you need help with this pattern?You'll find 23 tutorial videos, a Comments/Questions area and more by visiting the pattern on garnstudio.com. © 1982-2025 DROPS Design A/S. We reserve all rights. This document, including all its sub-sections, has copyrights. Read more about what you can do with our patterns at the bottom of each pattern on our site. |
|||||||


With over 40 years in knitting and crochet design, DROPS Design offers one of the most extensive collections of free patterns on the internet - translated to 17 languages. As of today we count 320 catalogues and 12092 patterns translated into English (UK/cm). 12092
We work hard to bring you the best knitting and crochet have to offer, inspiration and advice as well as great quality yarns at incredible prices! Would you like to use our patterns for other than personal use? You can read what you are allowed to do in the Copyright text at the bottom of all our patterns. Happy crafting!
Post a comment to pattern DROPS 161-11
We would love to hear what you have to say about this pattern!
If you want to leave a question, please make sure you select the correct category in the form below, to speed up the answering process. Required fields are marked *.