
Looking for a yarn?


Comments / Questions (33)
![]() Marjan wrote:
Marjan wrote:
Ik wil de trui in averechtse tricotsteek breien. Heb ik extra materiaal nodig? met vriendelijke groet, Marjan
18.01.2018 - 16:38DROPS Design answered:
Hoi Marjan, Je hebt daarvoor verder geen extra materiaal nodig, maar je moet wel even een proeflapje maken om te kijken of de stekenverhouding klopt als je hem in averechtse tricot breit.
20.01.2018 - 12:33
![]() Gry wrote:
Gry wrote:
Nydelig genser, men strikkefastheten stemmer ikke. Ser at mange har problemer med den. Har nå gått ned en pinnestørrelse og får 16 m på 10cm. 😡
28.07.2016 - 10:06
![]() Morgane Gourdon wrote:
Morgane Gourdon wrote:
Bonjour Je m'apperçois au bout de 40cm de haut que la largeure du tricot ne fait pas 48cm mais dans les 56cm alors que j'ai bien 19m pour un carré de 10/10 cm... ou est l'érreur? :)
27.03.2016 - 22:54DROPS Design answered:
Bonjour Mme Gourdon, veillez bien à bien conserver la même tension que celle que vous aviez pour votre échantillon, pour avoir le même ratio 19 m = 10 cm de large et bien avoir vos 93 m = 48 cm. Bon tricot!
29.03.2016 - 10:09
![]() Sophie V wrote:
Sophie V wrote:
Bonjour, le modèle indique d'utiliser des aiguilles n°4, mais sur les fiches des 2 laines conseillées pour ce modèle (Air et Brushed Alpaca Silk) il est indiqué que ces laines se tricotent en n°5. Pour quelle raison?
16.02.2016 - 16:21DROPS Design answered:
Bonjour Sophie V, on tricote ici volontairement avec des aiguilles plus fines, pensez à bien vérifier votre échantillon et adaptez la taille des aiguilles si besoin pour avoir 19 m en fausses côtes anglaises = 10 cm de large. Bon tricot!
17.02.2016 - 08:59
![]() Cindy Allain wrote:
Cindy Allain wrote:
Bonjour, je ne sais pas quelle taille faire, je taille du 40 en haut, quelle taille me conseillez vous ? M ou L ? Merci d'avance
28.08.2015 - 15:13DROPS Design answered:
Bonjour Mme Allain, cliquez ici pour savoir comment trouver votre taille. Bon tricot!
28.08.2015 - 16:54
![]() Bettina wrote:
Bettina wrote:
Jeg er igang med denne opskrift og har fundet en lille regnefejl. Da jeg er rimelig nybegynder kan jeg ikke lige gennemskue om den har betydning for resten. Når man har strikket 45-50 cm tager man 2x5 masker ind = 10 masker. Dertil øger man i hver side 1 maske = 8 masker mindre end oprindeligt. Men i alle størrelser har i regnet 9 masker mindre end oprindeligt.
19.08.2015 - 11:02Adelle wrote:
I'm having trouble with the neck edge instructions. Pattern says "Beg in right side of right front piece and pick up approx. 64-72 sts from RS along neck edge." Is this for the whole neck edge or just for the right side? 72 stitches for whole neck edge makes the neck too tight but there are no other instructions given. Help!
19.06.2015 - 14:29DROPS Design answered:
Dear Adelle, you pick up sts along whole neckline starting in right side of right front piece (= from RS) along whole neckline: right front piece, back piece and end on left front piece. You can adjust number of sts if required, take care it won't be too large and keep the correct shape. Happy knitting!
19.06.2015 - 18:25Margit wrote:
Hei! Onkohan tässä ohjeessa virhe, kun olen ottanut jo puikot nro 3 käyttön ja silti 19 silmukkaa = 13,5 cm? Minun käsialallani jopa numeron S silmukkamäärällä takakappaleesta tulee useita senttejä liian leveä, vaikka haluan tehdä kokoa L olevan puseron. Kiitos vastauksesta!
05.03.2015 - 20:12DROPS Design answered:
Hei! On hyvin tärkeää, että neuletiheys on oikea. Kokeile vielä vaihtaa puikkoihin nro 2,5 tai 2.
12.03.2015 - 16:19Margit Alasalmi wrote:
Hei! Onkohan ohjeessa virhe, kun olen jo vaihtanut puikon numeroon 3 ja silti 19 silmukkaa = 13,5 cm? Minun käsialallani jopa koon S silmukkamäärällä tulee useita senttejä liian leveä takakappale, vaikka haluan tehdä kokoa L olevan puseron. - I hope it is OK for me to ask my question in Finnish. If not, please tell me so I'll try in English. Thanks!
05.03.2015 - 20:07
![]() Aina wrote:
Aina wrote:
Normalt sett strikker jeg stramt og må øke pinnestørrelse i forhold til anbefaling. Bruker jeg anbefalt pinnestørrelse her, får jeg 19 masker i falsk patent på 14 cm. Da vil det si at jeg bruker langt flere nøster en det som står i oppskrifta. Er det feil i antall masker, nøster eller strikkefasthet?
13.11.2014 - 19:07DROPS Design answered:
Hej Aina, strikkefastheden bør stemme... prøv at bruge et pinde nummer mindre og se om du kan få 19 m på 10 cm.
25.11.2014 - 12:08
|
|
Brume#brumesweater |
|
|
|
|
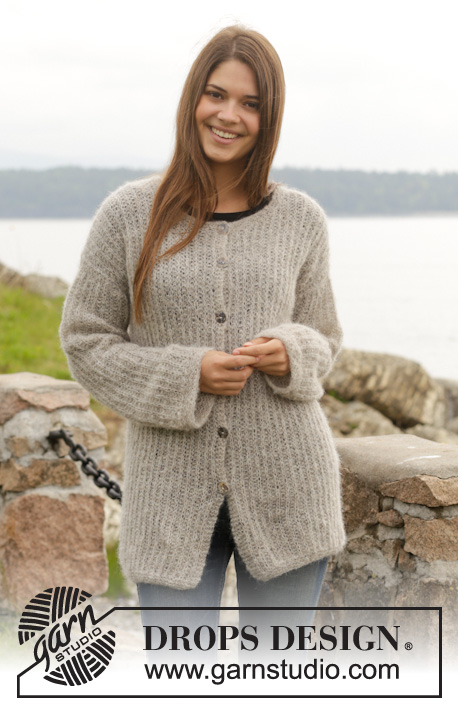
Knitted DROPS jumper with false English rib in "Air" or "Brushed Alpaca Silk". Size: S - XXXL.
DROPS 158-25 |
|
|
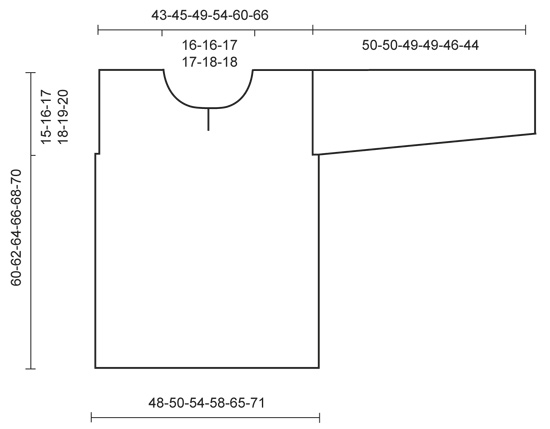
GARTER ST (back and forth on needle): K all rows. 1 ridge = 2 rows K. MEASURING TIP: All measurements must be done when piece is held up because the texture makes the piece elastic. FALSE ENGLISH RIB (back and forth on needle + 1 edge st in garter st in each side): Row 1: 1 edge st in garter st, * K 1, 1 YO, slip 1 st as if to P (with yarn behind piece) *, repeat from *-* until 2 sts remain, finish with K 1 and 1 edge st in garter st. Row 2: 1 edge st in garter st, * K 1, P tog YO and slipped st *, repeat from *-* until 2 sts remain, finish with K 1 and 1 edge st in garter st. Repeat 1st and 2nd row upwards. DECREASE TIP (applies to sleeve): Dec 1 st in each side by K 2 tog inside 1 edge st in garter st. Work sts in the side that do not fit the pattern in garter st. -------------------------------------------------------- JUMPER: BACK PIECE: Worked back and forth on circular needle. Cast on 93-97-105-113-125-137 sts on circular needle size 4 mm with 2 strands Air or Brushed Alpaca Silk. Then continue piece with 1 strand. Work in GARTER ST – see explanation above – until piece measures 2 cm. REMEMBER THE KNITTING TENSION! Then work FALSE ENGLISH RIB - see explanation above. READ MEASURING TIP! When piece measures 45-46-47-48-49-50 cm, cast off 5 sts in each side. On next row cast on 1 edge st in each side which is worked in garter st until finished measurements = 85-89-97-105-117-129 sts. Continue to work until piece measures 56-58-60-62-64-66 cm. Work the first 27-29-32-36-41-47 sts as before, cast off the middle 31-31-33-33-35-35 sts and work the rest of row. Then finish each shoulder separately as follows: On next row dec 1 more st towards the neck = 26-28-31-35-40-46 sts. Work until piece measures 60-62-64-66-68-70 cm. K 1 row from WS and cast off with K on next row. Work the same way on the other side. FRONT PIECE: Cast on and work as back piece until piece measures 40-42-44-46-48-50 cm, then work in garter st over the middle 7 sts. When piece measures 43-45-47-49-51-53 cm, cast off the middle of these sts in garter st, and finish shoulder separately with 3 sts in garter st towards mid front = 46-48-52-56-62-68 sts on each side. Work until piece measures 45-46-47-48-49-50 cm, then cast off 5 sts towards the side, on next row cast on 1 edge st in garter st as on back piece = 42-44-48-52-58-64 sts. When piece measures 50-52-54-56-58-60 cm, cast off for neck as follows: 6-6-7-7-8-8 sts 1 time, 3 sts 1 time, 2 sts 3 times and 1 st 1 time. After neck dec, there are 26-28-31-35-40-46 sts on needle. Work until piece measures 60-62-64-66-68-70 cm, K 1 row from WS and cast off with K from RS. Work the same way on the other side. ASSEMBLY: Sew tog shoulder seams inside cast-off edges. NECK EDGE: Worked back and forth on circular needle with Air or Brushed Alpaca Silk. Beg in right side of right front piece and pick up approx. 64-72 sts from RS along neck edge. K 1 row from WS. K 1 row and at the same time dec for 1 buttonhole by K tog 3rd and 4th st and making a YO. K 1 row from WS, K YO to make a hole. Work 1 ridge and cast off with 2 strands from RS. SLEEVES: Worked back and forth on circular needle, top down. Beg from RS and pick up 60-80 sts with circular needle size 4 mm and Air or Brushed Alpaca Silk. Pick up st between dec for armhole (NOTE: Do not work over the dec sts for armhole). P 1 row - AT THE SAME TIME adjust no of sts to 57-61-65-69-73-77 and cast on 5 new sts in each side of piece = 67-71-75-79-83-87 sts. Then work piece in false English rib with 1 edge st in garter st in each side - AT THE SAME TIME when piece measures 3 cm, cast off 1 st in each side - READ DECREASE TIP. Repeat dec every 4-4-3-3-3-2 cm 9-10-11-12-13-14 times in total = 49-51-53-55-57-59 sts. Work until sleeve measures 48-48-47-47-44-42 cm. Work in garter st over all sts for 2 cm and cast off 2 strands. Knit another sleeve the same way. ASSEMBLY: Sew sleeves tog inside 1 edge st, sew sts cast on on sleeve to sts cast off for armhole on body. Finally sew down along the side of front piece and back piece. Sew on button at the top of left front piece. |
|
 |
|
Have you finished this pattern?Tag your pictures with #dropspattern #brumesweater or submit them to the #dropsfan gallery. Do you need help with this pattern?You'll find 25 tutorial videos, a Comments/Questions area and more by visiting the pattern on garnstudio.com. © 1982-2025 DROPS Design A/S. We reserve all rights. This document, including all its sub-sections, has copyrights. Read more about what you can do with our patterns at the bottom of each pattern on our site. |


With over 40 years in knitting and crochet design, DROPS Design offers one of the most extensive collections of free patterns on the internet - translated to 17 languages. As of today we count 320 catalogues and 12091 patterns translated into English (UK/cm). 12091
We work hard to bring you the best knitting and crochet have to offer, inspiration and advice as well as great quality yarns at incredible prices! Would you like to use our patterns for other than personal use? You can read what you are allowed to do in the Copyright text at the bottom of all our patterns. Happy crafting!
Post a comment to pattern DROPS 158-25
We would love to hear what you have to say about this pattern!
If you want to leave a question, please make sure you select the correct category in the form below, to speed up the answering process. Required fields are marked *.