
Looking for a yarn?


Comments / Questions (64)
![]() Katrine wrote:
Katrine wrote:
Hej. Jeg kan se at både en Ane, Kristin og Kine har spurgt det samme som jeg bøvler med, men jeg synes ikke rigtig at kunne finde svar. Når man skal begynde på ærmerne står der at jeg skal starte med fm, men gør jeg dette kommer der to rækker med fm, og da følger jeg jo ikke strukturen korrekt, hvad er meningen?
20.02.2016 - 20:56DROPS Design answered:
Hej Katrine, du skal sørge for at fortsætte mønsteret, som du har hæklet hele vejen. God fornøjelse!
09.03.2016 - 15:27
![]() Kristi M wrote:
Kristi M wrote:
Can you clarify the meaning of work in both ch-spaces in this section: "AT THE SAME TIME on 1st row from RS (i.e. row with dc) inc for raglan as follows: Work 2 dc + 2 ch + 2 dc in every ch-space in every raglan line (= 16 dc inc on row - NOTE: Work in both ch-spaces)" Does this mean to work the ch2 from WS and ch2 from RS as one stitch? Thanks
13.01.2016 - 04:51DROPS Design answered:
Dear Kristi, that's correct, you crochet around the 2 ch-spaces from the 2 rounds below. Happy crocheting!
13.01.2016 - 10:17
![]() MATHIAN wrote:
MATHIAN wrote:
Bonjour, Je ne comprends pas comment faire le 2ème rg de la bordure. Que veut dire "1B entre chaque m" ? Entre quelles mailles ? Merci !
12.10.2015 - 09:59DROPS Design answered:
Bonjour Mme Mathian, au 2ème rang de la bordure, crochetez 1 B entre chaque maille du rang précédent (piquez entre les brides et entre les ms et les brides et non dans chacune des m), mais crochetez 1 B dans l'arceau de 2 ml. Bon crochet!
12.10.2015 - 10:26
![]() Marie wrote:
Marie wrote:
Hei På bærestykket skriver dere at det skal være 144 masker før det felles av til ermer. Jeg får det kun til å bli 144 staver, ikke masker. Når jeg teller med luftmaskene blir det 152 masker. Skal det stå masker eller er det staver?
08.10.2015 - 12:27DROPS Design answered:
Hej Marie, Ja jeg holder med om at det lyder til at du skal tælle staver. God fornøjelse!
26.11.2015 - 15:33
![]() Manuela wrote:
Manuela wrote:
Ich habe den Overall nachgearbeitet. Hatte aber Probleme, weil es zwischen den Beinen spannt, dadurch, dass es keinen Zwickel gibt. Hab nach längerem Probieren eine Lösung gefunden. Gibt es von Ihnen irgendwelche Anregungen?
15.06.2015 - 10:48
![]() Nathalie Olsen wrote:
Nathalie Olsen wrote:
Sliter med å få det rette antal masker i bærestket, hekler den for 12/18mdr. Får alt rett helt fram til der jeg skal ha 64 st på raden. Når jeg kommer til der jeg skal ha 160 m har jeg bare 152m og jeg har heklet fram til dit fire ganger nå og får samme tallet 152. Jeg har telt over alle omgangene når jeg har holdt på og sørget for å få med meg alle maskene fra forrige omgang pluss de 16 jeg skal ha for økningene i raglanlinje. Så lurer virkelig på hvor feilen er.
24.05.2015 - 12:18DROPS Design answered:
Hej Nathalie, Svært at sige hvor det er gået galt, men øger du én gang til så har du 160 m som der står i opskriften og så er det bare at fortsætte efter beskrivningen. God fornøjelse!
25.05.2015 - 09:46
![]() Elisabeth wrote:
Elisabeth wrote:
Hvilken farge skal dressen sys sammen med?
22.04.2015 - 22:32DROPS Design answered:
Hej Elisabeth. Brug den hvide, den er mest neutral.
23.04.2015 - 13:43
![]() Kjersti wrote:
Kjersti wrote:
Hei, jeg skjønner ikke hvordan man hekler beina - skal de hekles frem og tilbake og så syes sammen senere, eller skal man hekle rundt?
22.04.2015 - 15:22DROPS Design answered:
Hej Kjersti. Se mit svar paa dit spörgsmaal herunder.
22.04.2015 - 15:41
![]() Kjersti wrote:
Kjersti wrote:
Hei, jeg skjønner ikke hvordan man hekler beina - skal de hekles frem og tilbake og så syes sammen senere, eller skal man hekle rundt?
21.04.2015 - 22:14DROPS Design answered:
Hei Kersti. Du skal hekle benene frem og tilbage, og derefter syes de sammen: Fortsett med strukturrader og striper frem og tilbake over de første 38-42-45-51 (54-61) m på raden (dvs over halvparten av m). Men jeg kan se at vi mangler at skrive at bensömmen skal syes sammen i MONTERING. Det skal vi faa tilföjet hurtigst muligt.
22.04.2015 - 13:55
![]() Tina wrote:
Tina wrote:
Hvordan hopper man over masker, uten å klippe tråden? Kjm fram til neste steg i oppskriften???
08.12.2014 - 20:49DROPS Design answered:
Hei Tina. Du skal ikke klippe traaden eller hekle kjm. Du skal hoppe over og fortsaette i maskerne derefter.
09.12.2014 - 16:29
|
|
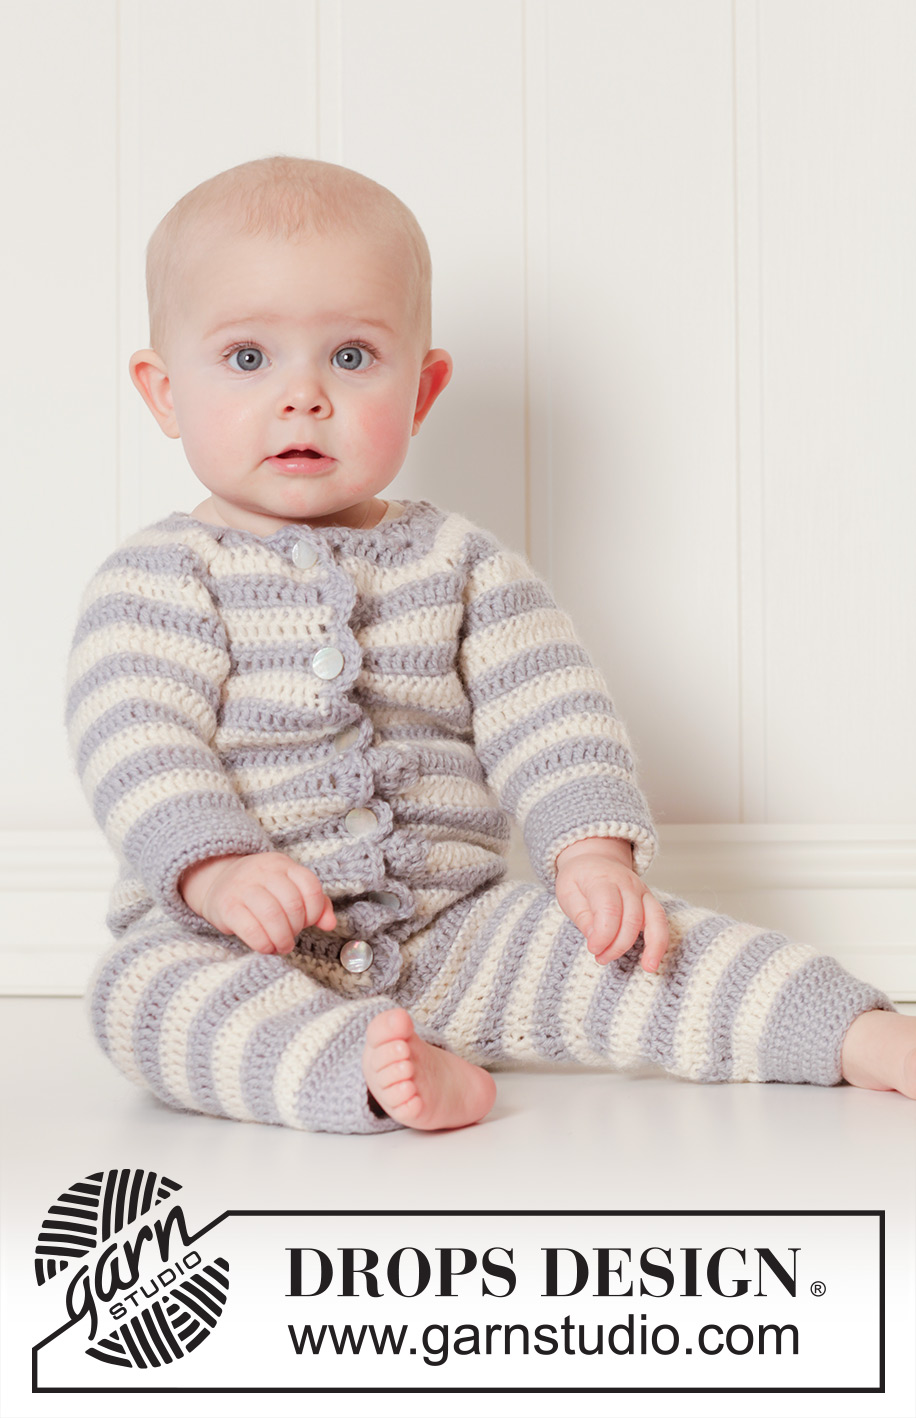
Baby Blues#babybluesoverall |
|
 |
 |
Crochet baby overall with raglan and stripes in DROPS Karisma. Size 0 - 4 years.
DROPS Baby 25-34 |
|
|
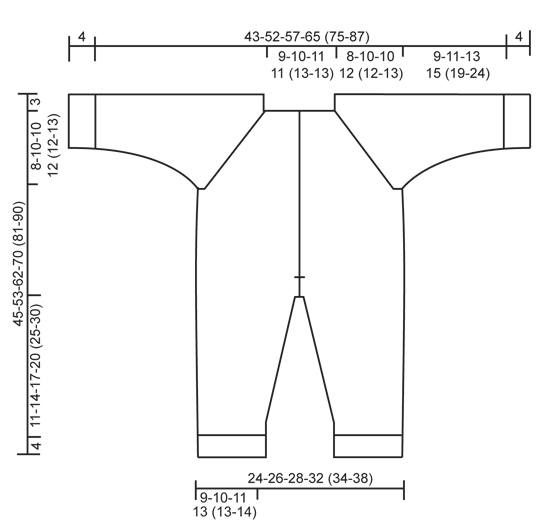
CROCHET INFO: Replace first dc at beg of every dc row with 1 ch, finish row with 1 dc in 3rd ch from beg of previous row. Replace first tr at beg of every tr row with 3 ch, finish row with 1 tr in ch from beg of previous row. TEXTURE ROWS: * 1 row dc (worked from WS), 1 row tr (worked from RS) *, repeat from *-* (1 row dc + 1 row tr = 1 texture row). STRIPES: Work entire suit in stripes as follows: * 1 row dc from WS with off white and then 1 row tr from RS with off white, 1 row dc from WS with light blue grey and then 1 row tr from RS with light blue grey *, repeat from *-*. INCREASE TIP: Inc 1 dc/tr by working 2 dc/tr in same st. DECREASE TIP: Work 1 dc/tr but wait with last pull through (= 2 sts on hook), then work next dc/tr but on last pull through, pull yarn through all sts on hook = 1 dc/tr dec. ---------------------------------------------------------- SUIT: The piece is worked top down. Worked back and forth from mid front. YOKE: Work 37-41-45-45 (49-49) LOOSE ch on hook size 4.5 mm with light blue grey. Work 1 dc in 2nd ch from hook, then work 1 dc in every ch the entire row = 36-40-44-44 (48-48) dc. Turn piece and work 1 row with dc back from WS while AT THE SAME TIME inc 8 dc evenly – READ INCREASE TIP = 44-48-52-52 (56-56) dc on row. Now insert 4 markers in piece for raglan as follows (beg mid front – NOTE: Do NOT work while inserting markers): Skip 6-7-8-8 (9-9) dc (= left front piece), insert 1 marker in next dc, skip 8 dc (= sleeve), insert 1 marker in next dc, skip 12-14-16-16 (18-18) dc (= back piece), insert 1 marker in next dc, skip 8 dc (= sleeve) and insert last marker in next dc (there are now 6-7-8-8 (9-9) dc on right front piece after last marker). READ ALL OF THE FOLLOWING SECTION BEFORE CONTINUING: Work next row as follows from RS: Work 1 tr in every dc but in every dc with marker work 2 tr + 2 ch + 2 tr = 56-60-64-64 (68-68) tr on row. Then work TEXTURE ROWS and STRIPES – see explanation above (work back and forth with 1 dc/tr in every st from previous row but on every row with dc from WS work 2 ch over the 2 ch from previous row in raglan lines). AT THE SAME TIME on 1st row from RS (i.e. row with tr) inc for raglan as follows: Work 2 tr + 2 ch + 2 tr in every ch-space in every raglan line (= 16 tr inc on row - NOTE: Work in both ch-spaces). Repeat inc on every row from RS 3-4-4-5 (5-6) more times (= 4-5-5-6 (6-7) times in total) = 120-140-144-160 (164-180) sts. REMEMBER THE CROCHET TENSION! After last inc for raglan work 1 row with dc from WS as before. Work next row as follows from RS: Work 1 tr in each of the first 16-19-20-22 (23-25) dc (= left front piece), skip the next 28-32-32-36 (36-40) dc (= sleeve), work 4-4-4-6 (6-8) ch, work 1 tr in each of the next 32-38-40-44 (46-50) dc (= back piece), skip the next 28-32-32-36 (36-40) dc (= sleeve), work 4-4-4-6 (6-8) ch and work 1 tr in each of the last 16-19-20-22 (23-25) dc (= right front piece). Then finish body and sleeves separately. BODY: NOW MEASURE PIECE FROM HERE! Work 1st row from WS – work 1 dc in every tr from previous row and 1 dc in each of the 4-4-4-6 (6-8) ch under each armhole = 72-84-88-100 (104-116) dc on row. Continue back and forth with texture rows and stripes as before – remember CROCHET INFO! AT THE SAME TIME on 1st row (= tr from RS), inc 4-0-2-2 (4-6) tr evenly = 76-84-90-102 (108-122) tr. When piece measures approx. 24-29-34-39 (44-48) cm from neck (i.e. approx. 27-32-37-42 (47-51) cm from shoulder) – adjust so that last row is 1 row with off white and tr from RS, finish opening for band mid front. Insert a marker in each side. Continue back and forth as before. When piece measures 27-32-38-43 (49-53) cm from neck (and 30-35-41-46 (52-56) cm from shoulder), divide for legs and finish each leg separately. LEG: Insert 1 marker – NOW MEASURE PIECE FROM HERE. Continue with texture rows and stripes back and forth over the first 38-42-45-51 (54-61) sts on row (i.e. over half of sts). When leg measures 2 cm from marker, dec 1 dc/tr in each side - READ DECREASE TIP. Repeat dec every 2-2-3-3½ (3½-3½) cm 4-4-4-4 (5-7) more times (= 5-5-5-5 (6-8) times in total) = 28-32-35-41 (42-45) sts. When leg measures 11-14-17-20 (25-30) cm from marker, switch to light blue grey and work dc back and forth for 4 cm. Fasten off. Leg measures approx. 15-18-21-24 (29-34) cm and entire suit measures approx. 45-53-62-70 (81-90) cm from shoulder. Work the other leg the same way. SLEEVE: = 28-32-32-36 (36-40) sts. Insert 1 marker here – NOW MEASURE PIECE FROM HERE. Work first row as follows from RS (continue stripes as before): Work 2-2-2-3 (3-4) ch, work 1 tr in every st and work 2-2-2-3 (3-4) ch. Turn piece, work 1 dc in 2nd ch from hook, work 1 dc in each of the next 0-0-0-1 (1-2) ch, 1 dc in every tr from previous row and 1 dc in each of the 2-2-2-3 (3-4) ch from beg of previous row = 32-36-36-42 (42-48) sts on row. Continue the texture rows and stripes back and forth as before. AT THE SAME TIME when sleeve measures 2 cm from marker, dec 1 st in each side - READ DECREASE TIP. Repeat dec every 2-2-2½-2 (2-2) cm 3-4-4-7 (7-9) more times (= 4-5-5-8 (8-10) times in total) = 24-26-26-26 (26-28) sts. When sleeve measures 9-11-13-15 (19-24) cm from marker, switch to light blue grey. Work dc back and forth for 4 cm, fasten off. Sleeve measures 13-15-17-19 (23-28) cm from marker. Work the other sleeve the same way. ASSEMBLY: Sew sleeve seams tog edge to edge in front loop of outermost sts. Sew the openings under the sleeves. Fold if desired the edge at the bottom of sleeves. Sew the opening mid front from markers where band ends and down to dividing for legs - sew in front loop of outermost st. LEFT BAND: Beg from WS at the bottom on left front piece with light blue grey and work 1 dc in tr at the edge on the off white stripe, * work 2 tr + 2 ch + 2 tr in next tr (i.e. in tr at the edge on light blue grey stripe), 1 dc in next tr (i.e. in tr at the edge on off white stripe) *, repeat from *-* up along left front piece to neck and finish with 1 sl st at the edge on corner by neck. Turn piece and work as follows back from RS: 3 ch (= 1 tr), then work 1 tr between every st and 1 tr in ch-space in every tr-group. Fasten off. Fasten band at the bottom by dividing for legs. RIGHT BAND AND NECK EDGE: Work as left band but beg from RS at the bottom on right front piece, work as left band up to neck but instead of finishing with 1 sl st in the corner by neck, continue edge around the neck as follows: Work 1 dc in every st along the neck until 3 sts remain before raglan line, skip these 3 sts and work 4 tr in st in raglan line, skip the next 3 sts and continue with 1 dc in every st until 3 sts remain before next raglan line, skip these 3 sts and work 4 tr in st in next raglan line. Continue like this around the neck and finish with 1 sl st at the edge on row. Turn piece and work 2nd row as on left band. Fasten off. MORE ASSEMBLY: Sew the buttons on to the left band. Beg with 1 button in the upper light blue grey stripe, then place 1 button in every other light blue grey stripe. Button through hole on the inside of "fan" on band. |
|
 |
|
Have you finished this pattern?Tag your pictures with #dropspattern #babybluesoverall or submit them to the #dropsfan gallery. Do you need help with this pattern?You'll find 10 tutorial videos, a Comments/Questions area and more by visiting the pattern on garnstudio.com. © 1982-2025 DROPS Design A/S. We reserve all rights. This document, including all its sub-sections, has copyrights. Read more about what you can do with our patterns at the bottom of each pattern on our site. |
|


With over 40 years in knitting and crochet design, DROPS Design offers one of the most extensive collections of free patterns on the internet - translated to 17 languages. As of today we count 320 catalogues and 12094 patterns translated into English (UK/cm). 12094
We work hard to bring you the best knitting and crochet have to offer, inspiration and advice as well as great quality yarns at incredible prices! Would you like to use our patterns for other than personal use? You can read what you are allowed to do in the Copyright text at the bottom of all our patterns. Happy crafting!
Post a comment to pattern DROPS Baby 25-34
We would love to hear what you have to say about this pattern!
If you want to leave a question, please make sure you select the correct category in the form below, to speed up the answering process. Required fields are marked *.