
Looking for a yarn?


Comments / Questions (64)
![]() Charlotte wrote:
Charlotte wrote:
Kan det virkelig passe at man skal springe ærmehullerne over på hver eneste række? Så der ender med at være en hel buket af garn under hvert ærme?
28.02.2019 - 20:01DROPS Design answered:
Hei Charlotte. Du hekler 4-4-4-6 (6-8) luftmasker, hopper over 28-32-32-36 (36-40) fastmasker og fortsetter videre med staver. Når du så neste omgang kommer til under ermet hekler du staver over luftmaskene du la opp under ermet på samme måte som resten av bolen. De maskene du hoppet over er de maskene du senere hekler erme i. God fornøyelse
04.03.2019 - 11:34
![]() Ailsa Wood wrote:
Ailsa Wood wrote:
When you get to the 4ch at the arms do you leave them separate from the rest or are the all crocheted together thanks
13.02.2019 - 02:58DROPS Design answered:
Dear Mrs Wood, after you have skipped the stitches for sleeves and crochet 4 chains over these stitches, you crochet the BODY, ie crochet 1 dc in each stitch from previous row (front piece, the 4 chains for armhole, back piece, in the 4 chains for armhole, front piece) = 74-116 dc (see size). On next row (= tr), increase evenly to 76-122 tr. Happy crocheting!
13.02.2019 - 09:26
![]() Christina Maisano wrote:
Christina Maisano wrote:
In the body of the pattern it says “ finish opening for band mid front”. I’m not sure what I’m supposed to do for this. Could you please clarify? Thank you Christina
08.10.2018 - 13:07DROPS Design answered:
Dear Mrs Maisano, the opening for band is finished when piece measures approx. 24-29-34-39 (44-48) cm from neck. Inser a mrker in each side and continue back and forth as before. There will be a seam from the marker to the bottom of body (before dividing for legs) - and a crocheted edge from the neck to the marker. Happy crocheting!
08.10.2018 - 14:23Natalie wrote:
I have attempted to try this pattern to no avail. i get to the part of 1st lot of raglan to the last of the increases and end up with too few stitches. I am attempting 6/9 month. i am ending up with 128 instead of 144. Am i supposed to do 2sc + 2ch + 2 sc in both ch spaces?
23.08.2018 - 01:52DROPS Design answered:
Hi Natalie, You work 1 tr in each stitch apart from the raglan lines. You work 2 tr + 2 ch + 2 tr in both chain-spaces on each side of the stitches with markers, an increase of 16 tr on the row and you work these increases a total of 5 times in your size. This leaves you with 144 stitches. Hope this helps and happy crocheting!
23.08.2018 - 07:25
![]() Tzivia Weinbaum wrote:
Tzivia Weinbaum wrote:
It doesn't say on the pattern how many slip stitches to make my chain???
17.11.2017 - 02:09DROPS Design answered:
Dear Tzivia, you start with 37-41-45-45 (49-49) chain stitches (depends on which size you need to make). For more information please see description under the Yoke. Happy crocheting!
17.11.2017 - 07:44
![]() PaOla wrote:
PaOla wrote:
Sicuramente potevo anche arrivarci....sono entrata in confusione e ho disturbato inutilmente...... grazie x la pazienza Paola
21.08.2017 - 14:59
![]() Paola wrote:
Paola wrote:
Buongiorno non capisco questo "Lavorare 2 m.a + 2 cat + 2 m.a in ogni arco di cat in ogni raglan (= 16 m.a aumentate - ATTENZIONE: Lavorare nei 2 archi)" quali sono i due archi! Ne ritrovo solo uno... Grazie
20.08.2017 - 14:22DROPS Design answered:
Buongiorno Paola. Deve lavorare nei due archi di catenelle dei due giri sotto. Buon lavoro!
20.08.2017 - 17:58
![]() Paola wrote:
Paola wrote:
Grazie!!!!
28.07.2017 - 22:42
![]() Paola wrote:
Paola wrote:
Salve, mi serve consiglio x fare taglia 3/6 mesi. Vedo che non viene indicata, anche in altri modelli. C'è qualche trucco x fare questa taglia di mezzo.? Nelle misure indicate ad es. X lunghezza si passa da 53 cm (taglia 1/3) a 62 cm (taglia 6/9) Grazie mille!
28.07.2017 - 18:21DROPS Design answered:
Buongiorno Paola. Potrebbe per esempio lavorare una lunghezza di 57 cm o misurare un capo analogo . Generalmente si consiglia di lavorare i vestiti per bimbi piccoli in una taglia più grande per poter essere indossati un po' di più. Buon lavoro.
28.07.2017 - 19:07
![]() Sanne wrote:
Sanne wrote:
Jag förstår inte hur jag ska göra armarna. I armhålan är det fm och resten är också fm senaste varvet. Det är alltså meningen att jag ska börja i armhålan? Och virka fram och tillbaka för att sedan sy ihop när klart.. Men hur börjar jag? Om jag gör massa luftmaskor som de står i beskrivningen så blir det ju stora hål... Tacksam för snabbt svar
12.05.2017 - 11:55DROPS Design answered:
Hej Sanne, jo men du skall börja som det står i mönstret med 2 lm(se din str), sedan 1 fm i varje m och 4 lm (se din str). Det blir ett mindre hål under ärmen, men det syr du när du kommer till monteringen. Lycka till!
12.05.2017 - 12:27
|
|
Baby Blues#babybluesoverall |
|
 |
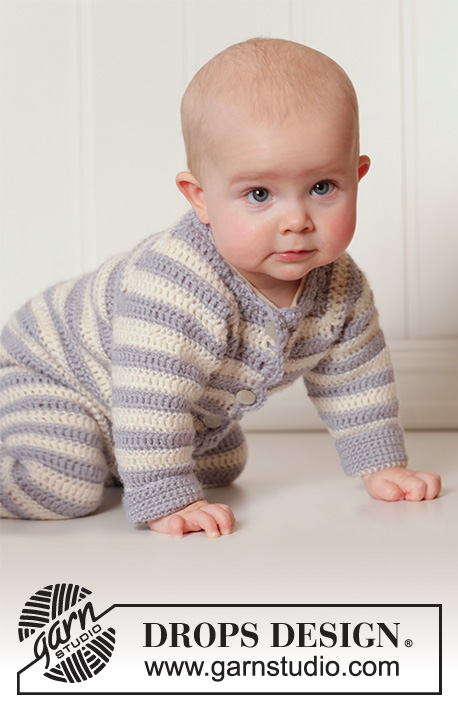 |
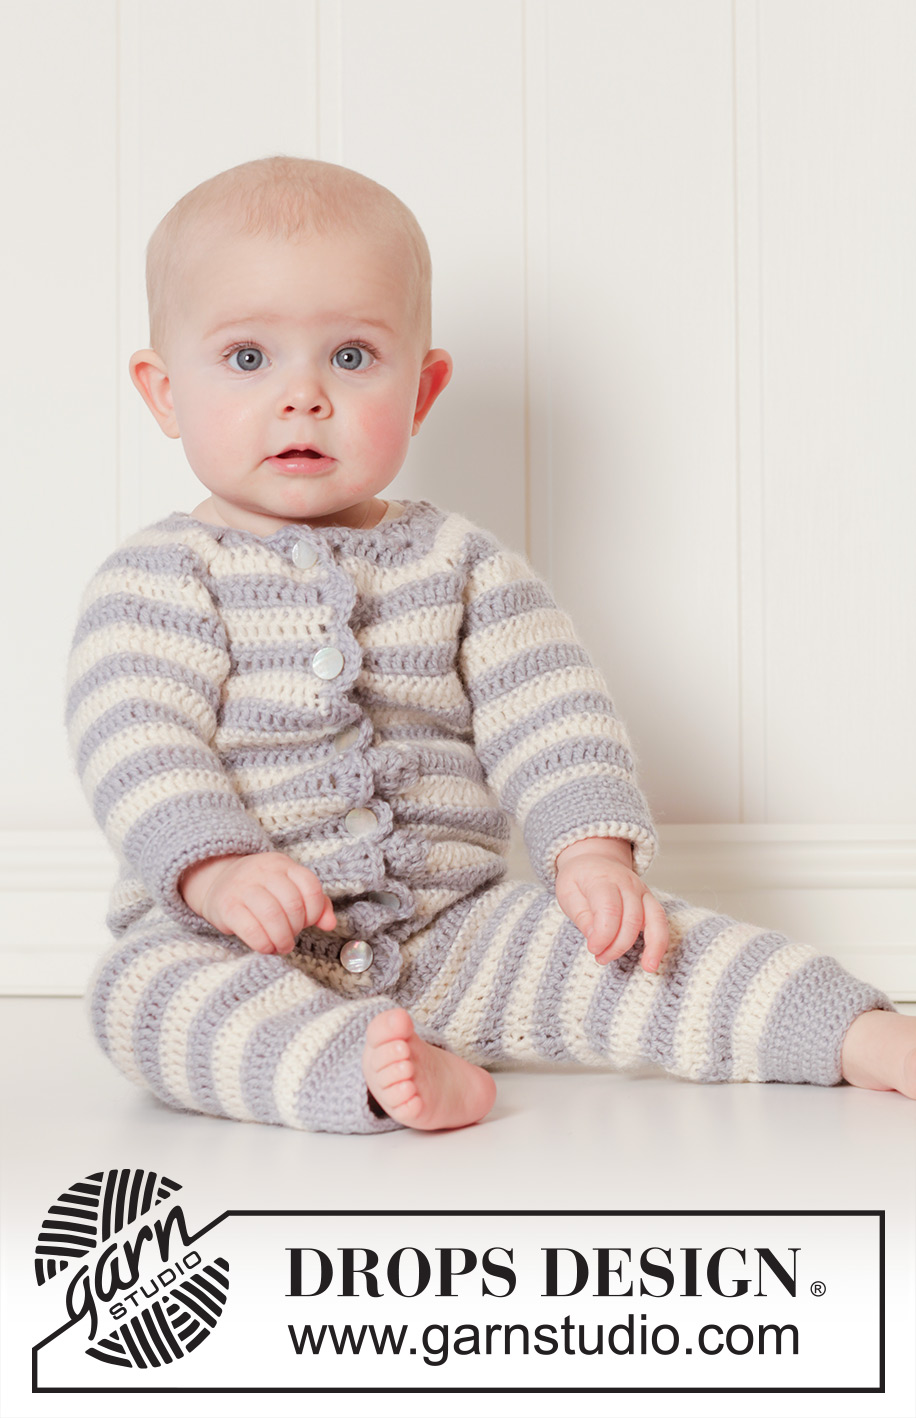
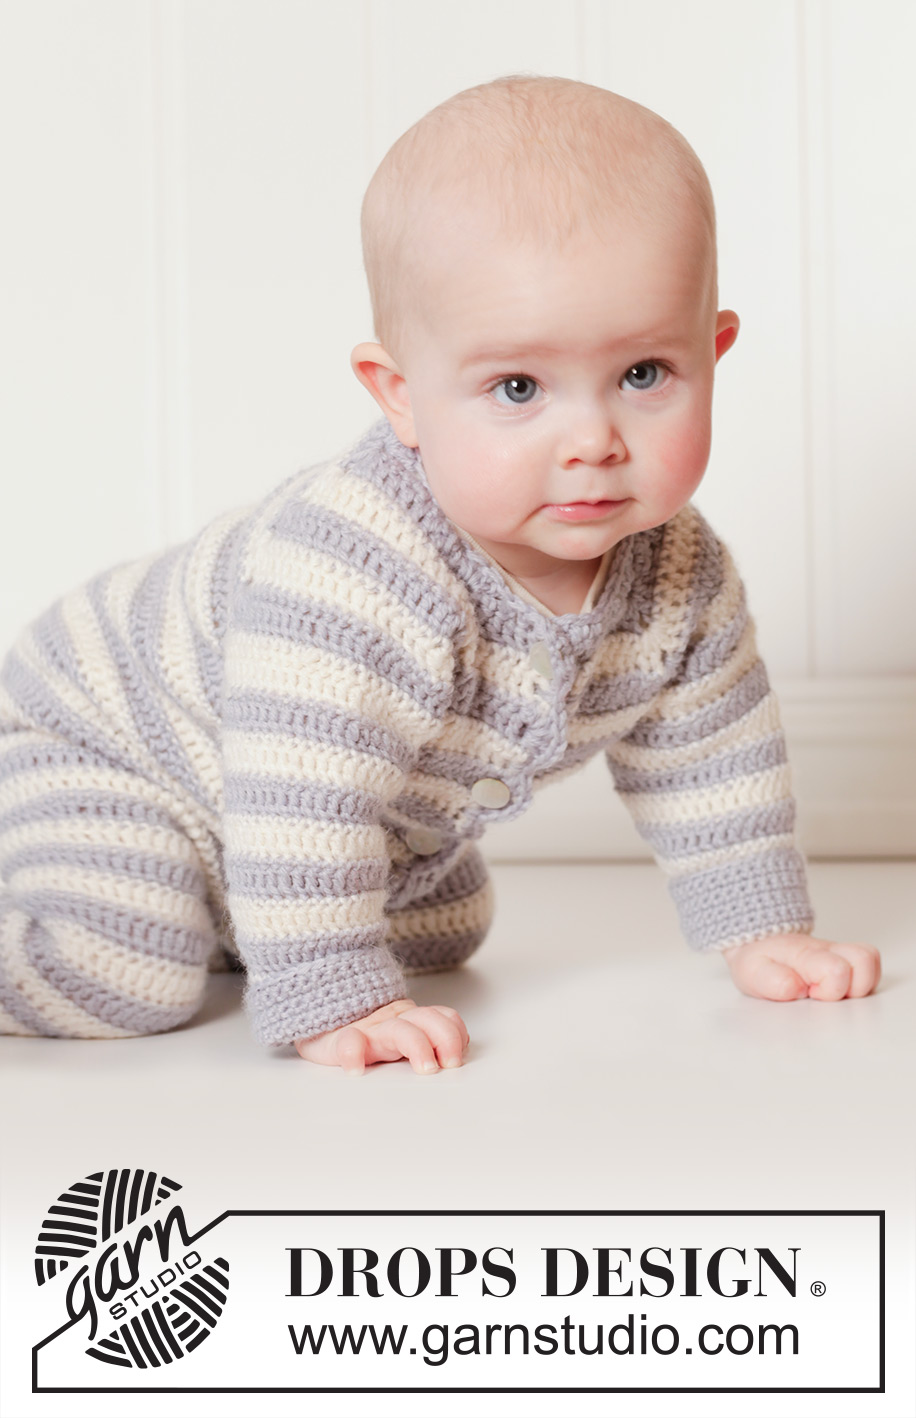
Crochet baby overall with raglan and stripes in DROPS Karisma. Size 0 - 4 years.
DROPS Baby 25-34 |
|
|
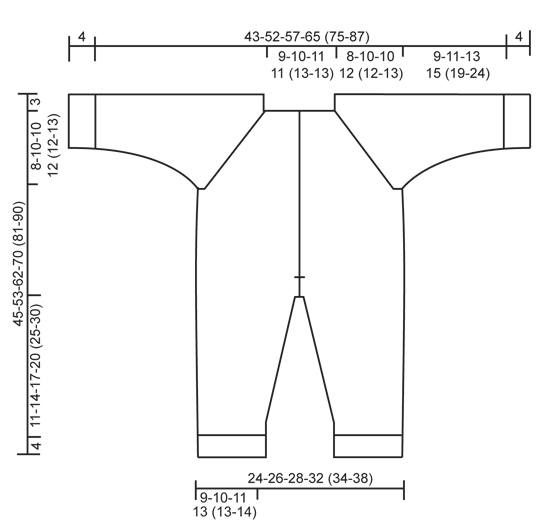
CROCHET INFO: Replace first dc at beg of every dc row with 1 ch, finish row with 1 dc in 3rd ch from beg of previous row. Replace first tr at beg of every tr row with 3 ch, finish row with 1 tr in ch from beg of previous row. TEXTURE ROWS: * 1 row dc (worked from WS), 1 row tr (worked from RS) *, repeat from *-* (1 row dc + 1 row tr = 1 texture row). STRIPES: Work entire suit in stripes as follows: * 1 row dc from WS with off white and then 1 row tr from RS with off white, 1 row dc from WS with light blue grey and then 1 row tr from RS with light blue grey *, repeat from *-*. INCREASE TIP: Inc 1 dc/tr by working 2 dc/tr in same st. DECREASE TIP: Work 1 dc/tr but wait with last pull through (= 2 sts on hook), then work next dc/tr but on last pull through, pull yarn through all sts on hook = 1 dc/tr dec. ---------------------------------------------------------- SUIT: The piece is worked top down. Worked back and forth from mid front. YOKE: Work 37-41-45-45 (49-49) LOOSE ch on hook size 4.5 mm with light blue grey. Work 1 dc in 2nd ch from hook, then work 1 dc in every ch the entire row = 36-40-44-44 (48-48) dc. Turn piece and work 1 row with dc back from WS while AT THE SAME TIME inc 8 dc evenly – READ INCREASE TIP = 44-48-52-52 (56-56) dc on row. Now insert 4 markers in piece for raglan as follows (beg mid front – NOTE: Do NOT work while inserting markers): Skip 6-7-8-8 (9-9) dc (= left front piece), insert 1 marker in next dc, skip 8 dc (= sleeve), insert 1 marker in next dc, skip 12-14-16-16 (18-18) dc (= back piece), insert 1 marker in next dc, skip 8 dc (= sleeve) and insert last marker in next dc (there are now 6-7-8-8 (9-9) dc on right front piece after last marker). READ ALL OF THE FOLLOWING SECTION BEFORE CONTINUING: Work next row as follows from RS: Work 1 tr in every dc but in every dc with marker work 2 tr + 2 ch + 2 tr = 56-60-64-64 (68-68) tr on row. Then work TEXTURE ROWS and STRIPES – see explanation above (work back and forth with 1 dc/tr in every st from previous row but on every row with dc from WS work 2 ch over the 2 ch from previous row in raglan lines). AT THE SAME TIME on 1st row from RS (i.e. row with tr) inc for raglan as follows: Work 2 tr + 2 ch + 2 tr in every ch-space in every raglan line (= 16 tr inc on row - NOTE: Work in both ch-spaces). Repeat inc on every row from RS 3-4-4-5 (5-6) more times (= 4-5-5-6 (6-7) times in total) = 120-140-144-160 (164-180) sts. REMEMBER THE CROCHET TENSION! After last inc for raglan work 1 row with dc from WS as before. Work next row as follows from RS: Work 1 tr in each of the first 16-19-20-22 (23-25) dc (= left front piece), skip the next 28-32-32-36 (36-40) dc (= sleeve), work 4-4-4-6 (6-8) ch, work 1 tr in each of the next 32-38-40-44 (46-50) dc (= back piece), skip the next 28-32-32-36 (36-40) dc (= sleeve), work 4-4-4-6 (6-8) ch and work 1 tr in each of the last 16-19-20-22 (23-25) dc (= right front piece). Then finish body and sleeves separately. BODY: NOW MEASURE PIECE FROM HERE! Work 1st row from WS – work 1 dc in every tr from previous row and 1 dc in each of the 4-4-4-6 (6-8) ch under each armhole = 72-84-88-100 (104-116) dc on row. Continue back and forth with texture rows and stripes as before – remember CROCHET INFO! AT THE SAME TIME on 1st row (= tr from RS), inc 4-0-2-2 (4-6) tr evenly = 76-84-90-102 (108-122) tr. When piece measures approx. 24-29-34-39 (44-48) cm from neck (i.e. approx. 27-32-37-42 (47-51) cm from shoulder) – adjust so that last row is 1 row with off white and tr from RS, finish opening for band mid front. Insert a marker in each side. Continue back and forth as before. When piece measures 27-32-38-43 (49-53) cm from neck (and 30-35-41-46 (52-56) cm from shoulder), divide for legs and finish each leg separately. LEG: Insert 1 marker – NOW MEASURE PIECE FROM HERE. Continue with texture rows and stripes back and forth over the first 38-42-45-51 (54-61) sts on row (i.e. over half of sts). When leg measures 2 cm from marker, dec 1 dc/tr in each side - READ DECREASE TIP. Repeat dec every 2-2-3-3½ (3½-3½) cm 4-4-4-4 (5-7) more times (= 5-5-5-5 (6-8) times in total) = 28-32-35-41 (42-45) sts. When leg measures 11-14-17-20 (25-30) cm from marker, switch to light blue grey and work dc back and forth for 4 cm. Fasten off. Leg measures approx. 15-18-21-24 (29-34) cm and entire suit measures approx. 45-53-62-70 (81-90) cm from shoulder. Work the other leg the same way. SLEEVE: = 28-32-32-36 (36-40) sts. Insert 1 marker here – NOW MEASURE PIECE FROM HERE. Work first row as follows from RS (continue stripes as before): Work 2-2-2-3 (3-4) ch, work 1 tr in every st and work 2-2-2-3 (3-4) ch. Turn piece, work 1 dc in 2nd ch from hook, work 1 dc in each of the next 0-0-0-1 (1-2) ch, 1 dc in every tr from previous row and 1 dc in each of the 2-2-2-3 (3-4) ch from beg of previous row = 32-36-36-42 (42-48) sts on row. Continue the texture rows and stripes back and forth as before. AT THE SAME TIME when sleeve measures 2 cm from marker, dec 1 st in each side - READ DECREASE TIP. Repeat dec every 2-2-2½-2 (2-2) cm 3-4-4-7 (7-9) more times (= 4-5-5-8 (8-10) times in total) = 24-26-26-26 (26-28) sts. When sleeve measures 9-11-13-15 (19-24) cm from marker, switch to light blue grey. Work dc back and forth for 4 cm, fasten off. Sleeve measures 13-15-17-19 (23-28) cm from marker. Work the other sleeve the same way. ASSEMBLY: Sew sleeve seams tog edge to edge in front loop of outermost sts. Sew the openings under the sleeves. Fold if desired the edge at the bottom of sleeves. Sew the opening mid front from markers where band ends and down to dividing for legs - sew in front loop of outermost st. LEFT BAND: Beg from WS at the bottom on left front piece with light blue grey and work 1 dc in tr at the edge on the off white stripe, * work 2 tr + 2 ch + 2 tr in next tr (i.e. in tr at the edge on light blue grey stripe), 1 dc in next tr (i.e. in tr at the edge on off white stripe) *, repeat from *-* up along left front piece to neck and finish with 1 sl st at the edge on corner by neck. Turn piece and work as follows back from RS: 3 ch (= 1 tr), then work 1 tr between every st and 1 tr in ch-space in every tr-group. Fasten off. Fasten band at the bottom by dividing for legs. RIGHT BAND AND NECK EDGE: Work as left band but beg from RS at the bottom on right front piece, work as left band up to neck but instead of finishing with 1 sl st in the corner by neck, continue edge around the neck as follows: Work 1 dc in every st along the neck until 3 sts remain before raglan line, skip these 3 sts and work 4 tr in st in raglan line, skip the next 3 sts and continue with 1 dc in every st until 3 sts remain before next raglan line, skip these 3 sts and work 4 tr in st in next raglan line. Continue like this around the neck and finish with 1 sl st at the edge on row. Turn piece and work 2nd row as on left band. Fasten off. MORE ASSEMBLY: Sew the buttons on to the left band. Beg with 1 button in the upper light blue grey stripe, then place 1 button in every other light blue grey stripe. Button through hole on the inside of "fan" on band. |
|
 |
|
Have you finished this pattern?Tag your pictures with #dropspattern #babybluesoverall or submit them to the #dropsfan gallery. Do you need help with this pattern?You'll find 10 tutorial videos, a Comments/Questions area and more by visiting the pattern on garnstudio.com. © 1982-2025 DROPS Design A/S. We reserve all rights. This document, including all its sub-sections, has copyrights. Read more about what you can do with our patterns at the bottom of each pattern on our site. |
|


With over 40 years in knitting and crochet design, DROPS Design offers one of the most extensive collections of free patterns on the internet - translated to 17 languages. As of today we count 320 catalogues and 12094 patterns translated into English (UK/cm). 12094
We work hard to bring you the best knitting and crochet have to offer, inspiration and advice as well as great quality yarns at incredible prices! Would you like to use our patterns for other than personal use? You can read what you are allowed to do in the Copyright text at the bottom of all our patterns. Happy crafting!
Post a comment to pattern DROPS Baby 25-34
We would love to hear what you have to say about this pattern!
If you want to leave a question, please make sure you select the correct category in the form below, to speed up the answering process. Required fields are marked *.