
Looking for a yarn?


Comments / Questions (64)
![]() Helga Eitel wrote:
Helga Eitel wrote:
Overall 25-34 für 2 Jahre: 49 bzw. 48 M., dann 8 M. zunehmen = 56 M. 4 Markierer anbringen ab hört. Mitte. 9 M. überspringen, Mark. nächste M., also 10 M. 8 M. überspr. Mark. nächste M., also 9 M. 18 M. 8M. überspringen, = 19 u. 9 M.nötig. Verbleibt 1 Masche anstatt 9 M. Was mache ich falsch??
04.01.2022 - 09:35DROPS Design answered:
Liebe Frau Eitel, es fehlen Ihnen die letzte Markierung nach den 8 M für die 2. Ärmel und vor den 9 letzten Maschen. Es sind insgesamt 4 Markeirungen. Viel Spaß beim häkeln!
04.01.2022 - 12:18
![]() Tuva Lövhall Gollmer wrote:
Tuva Lövhall Gollmer wrote:
Försöker virka strl 12-18 mån. Om jag har 52m och ökar med 16m blir det ju 68m? Hur skulle jag få det till 64m? Och ska jag alltså inte räkna lm förutom i början på varven?
25.08.2021 - 13:38DROPS Design answered:
Hei Tuva. Du har 52 masker. Det er 48 masker + 4 masker med merker. Disse 4 maskene blir til 16 masker. 16+48 = 64 masker. Du regner ikke med luftmaskene mellom stavene. mvh DROPS design
27.08.2021 - 10:47
![]() Amanda wrote:
Amanda wrote:
Handler om en anden opskrift, hvis man har en opskrift liggende på norsk, kan man så få jer til at oversæt til dansk?
21.08.2021 - 08:18DROPS Design answered:
Hej Amanda. Nej det kan du dessvärre inte, men om det är en av våra opskrifter så finns de på dansk här på hemsidan. Mvh DROPS Design
24.08.2021 - 13:22
![]() Monika wrote:
Monika wrote:
Ich würde diesen schönen Strampler gerne nacharbeiten. Und auch andere Drops-Babysachen. Au Immer denke ich, dass der HALSAUSSCHNITT viel zu eng ist. Können Sie mir bitte sagen, WIEVIEL ZENTIMETER der Auschnitt bei der Größe 3 Monate hat? Nur die Angabe der Maschenzahl nützt mir nichts. VIELEN DANK! Für baldigen Antwort! Und für die vielen schönen Anleitungen!
25.06.2021 - 23:48DROPS Design answered:
Liebe Monika, in die 2. Größe haben Sie 48 fM bei der 1. Reihe (= beim Halsauschnitt) = 30 cm flach gemessen und dann ca 10 cm flach gemessen (siehe Maßszkizze) -mit einere Maschenprobe von 16 Stb/fM = 10 cm - hier lesen Sie mehr über Maschenprobe. Viel Spaß beim häkeln!
28.06.2021 - 07:26
![]() Jess wrote:
Jess wrote:
No entiendo a qué se refiere en dónde dice el patrón “ abertura para el borde del centro del frente”. Agradeceré me puedan explicar. Muchas gracias.
03.11.2020 - 04:21DROPS Design answered:
Hola Jess, se refiere a la abertura en el centro del delantero, en la parte inferior, entre el final de las cenefas y las piernas.
19.11.2020 - 11:52
![]() Anette wrote:
Anette wrote:
Hej Drops. Jeg forstår simpelthen ikke logikken i ærmet når det skal hækles. kan det passe at hele ærmet skal være åbent ligesom benene, og så syes sammen bagefter? kan ikke få det til at gå op, så håber i kan hjælpe mig lidt på vej. hækler den i den mindste størrelse.
25.06.2020 - 13:12DROPS Design answered:
Hei Anette. Ja, det stemmer. Du hekler ermet frem og tilbake til ferdig mål og så sys ermsømmene kant i kant i ytterste ledd av ytterste maske. God Fornøyelse!
29.06.2020 - 09:08
![]() Steffi wrote:
Steffi wrote:
Ik ben nog maar net begonnen aan het patroon maar zit nu al vast. Er staat bij het gedeelte PAS dat er tegelijkertijd gelijkmatig 8 steken gemeerderd moeten worden. Maar ik begrijp niet goed waar deze gemeerderd moeten worden. (Begin van toer, midden of einde toer)
06.04.2020 - 11:18DROPS Design answered:
Dag Steffi,
Als er staat dat er gelijkmatig gemeerderd moet worden, doe je dit verdeeld over de toer, zodat er tussen de meerderingen ongeveeer een gelijk aantal steken zitten en de meerderingen niet allemaal bij elkaar zitten.
13.04.2020 - 11:16
![]() Lisa Watson wrote:
Lisa Watson wrote:
This is the worst written pattern I have ever reAd. Sounds like an amateur wrote it.
23.02.2020 - 05:02DROPS Design answered:
Dear Mrs Watson, The DROPS patterns are knitted and crocheted by thousands and thousands of people around the world. We understand however that in certain countries, with different knitting/crochet traditions than Scandinavia, our patterns might be written in a way that differs from what some are used to. But of course we want everyone to understand our patterns, so that’s why we have created an extensive library of tutorial videos as well as step by step lessons that explain how to follow the techniques we use and how to read the diagrams in our patterns. Give them a try!
24.02.2020 - 10:11
![]() Gry wrote:
Gry wrote:
Hei! Forstår ikke helt hvordan jeg skal hekle venstre stolpe. Har heklet opp til hals, snudd arbeidet, heklet 3lm og så 1st i første lm-bue. Så står det at jeg skal hekle 1st mellom hver maske. Hva betyr dette? Skal jeg hekle 1st på annenhver maske fram til lm-buen?
06.08.2019 - 12:05DROPS Design answered:
Hei Gry. Du skal hekle 1 stav mellom hver maske (ikke i masken som vanlig), og når du kommer til stavgruppen (2 staver, 2 luftmaske, 2 staver) hekler du om luftmaskebuen (rundt de 2 luftmaskene). God Fornøyelse!
02.09.2019 - 09:56
![]() Maryana wrote:
Maryana wrote:
Hello. Question for sleeve: How can i knit first row as follows from WS (continue stripes as before), if there WS is already knit and i need to start with the RS? WS knitted at the end of the section YOKE: "After last inc for raglan work 1 row with sc from WS as before. " In next RS we skip the next 28-32-32-36 (36-40) sc (= sleeve).
07.07.2019 - 08:09DROPS Design answered:
Dear Maryanna, a correction has been added under sleeve, you will work first row from RS with first dc then sc on next row from WS. Thank you. Happy crocheting!
05.08.2019 - 16:06
|
|
Baby Blues#babybluesoverall |
|
 |
 |
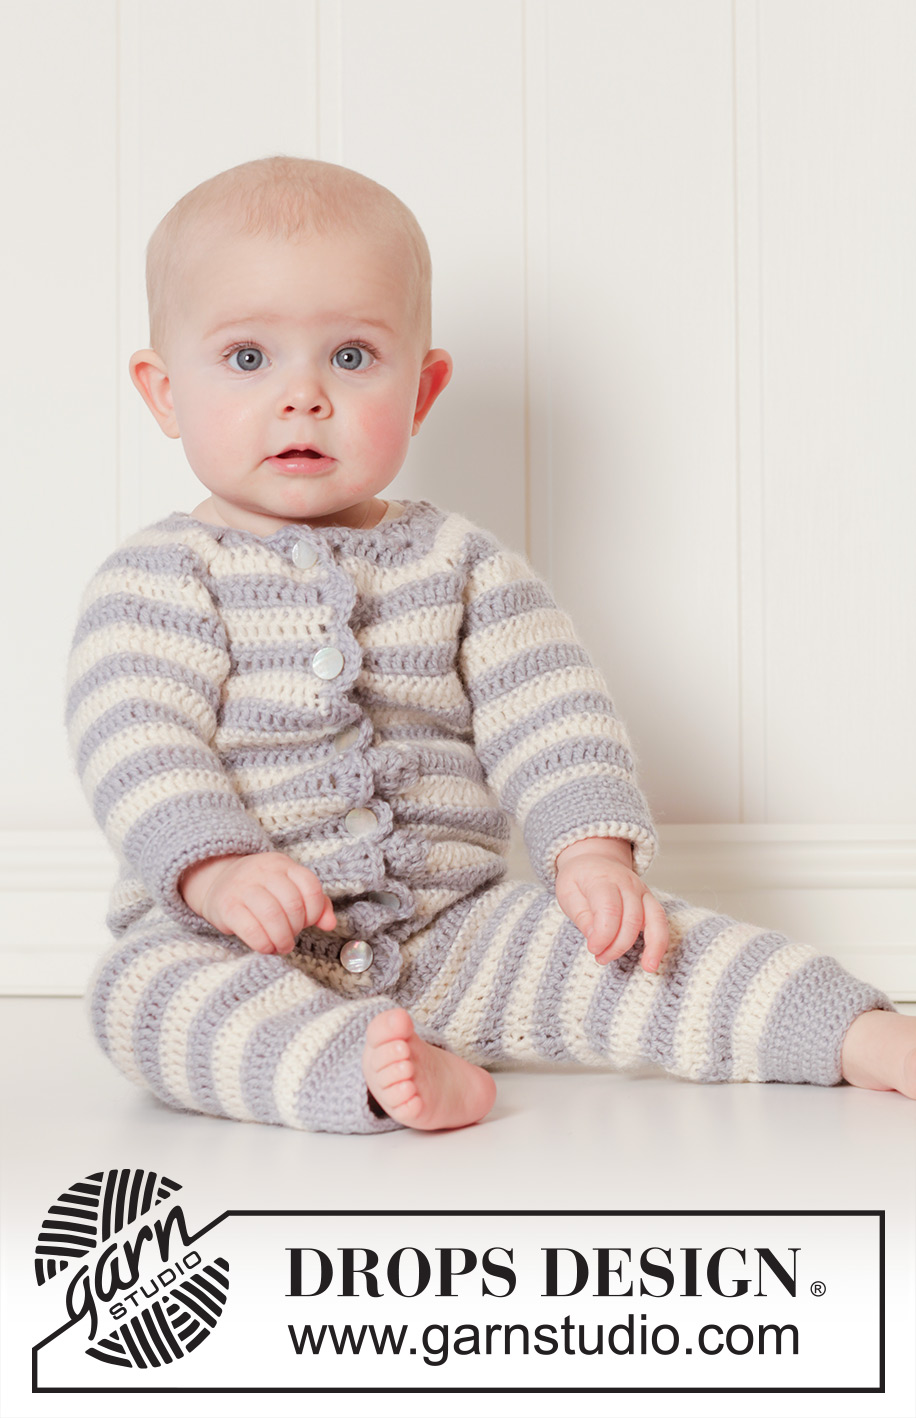
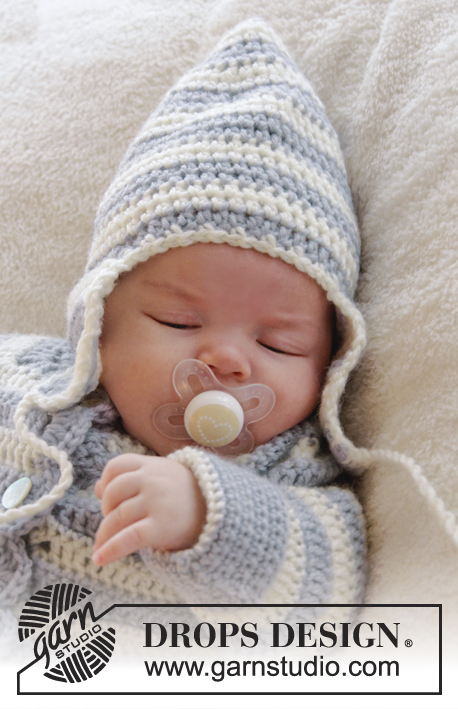
Crochet baby overall with raglan and stripes in DROPS Karisma. Size 0 - 4 years.
DROPS Baby 25-34 |
|
|
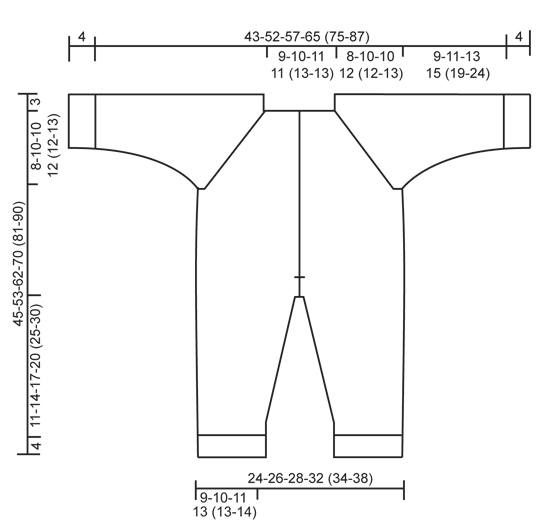
CROCHET INFO: Replace first dc at beg of every dc row with 1 ch, finish row with 1 dc in 3rd ch from beg of previous row. Replace first tr at beg of every tr row with 3 ch, finish row with 1 tr in ch from beg of previous row. TEXTURE ROWS: * 1 row dc (worked from WS), 1 row tr (worked from RS) *, repeat from *-* (1 row dc + 1 row tr = 1 texture row). STRIPES: Work entire suit in stripes as follows: * 1 row dc from WS with off white and then 1 row tr from RS with off white, 1 row dc from WS with light blue grey and then 1 row tr from RS with light blue grey *, repeat from *-*. INCREASE TIP: Inc 1 dc/tr by working 2 dc/tr in same st. DECREASE TIP: Work 1 dc/tr but wait with last pull through (= 2 sts on hook), then work next dc/tr but on last pull through, pull yarn through all sts on hook = 1 dc/tr dec. ---------------------------------------------------------- SUIT: The piece is worked top down. Worked back and forth from mid front. YOKE: Work 37-41-45-45 (49-49) LOOSE ch on hook size 4.5 mm with light blue grey. Work 1 dc in 2nd ch from hook, then work 1 dc in every ch the entire row = 36-40-44-44 (48-48) dc. Turn piece and work 1 row with dc back from WS while AT THE SAME TIME inc 8 dc evenly – READ INCREASE TIP = 44-48-52-52 (56-56) dc on row. Now insert 4 markers in piece for raglan as follows (beg mid front – NOTE: Do NOT work while inserting markers): Skip 6-7-8-8 (9-9) dc (= left front piece), insert 1 marker in next dc, skip 8 dc (= sleeve), insert 1 marker in next dc, skip 12-14-16-16 (18-18) dc (= back piece), insert 1 marker in next dc, skip 8 dc (= sleeve) and insert last marker in next dc (there are now 6-7-8-8 (9-9) dc on right front piece after last marker). READ ALL OF THE FOLLOWING SECTION BEFORE CONTINUING: Work next row as follows from RS: Work 1 tr in every dc but in every dc with marker work 2 tr + 2 ch + 2 tr = 56-60-64-64 (68-68) tr on row. Then work TEXTURE ROWS and STRIPES – see explanation above (work back and forth with 1 dc/tr in every st from previous row but on every row with dc from WS work 2 ch over the 2 ch from previous row in raglan lines). AT THE SAME TIME on 1st row from RS (i.e. row with tr) inc for raglan as follows: Work 2 tr + 2 ch + 2 tr in every ch-space in every raglan line (= 16 tr inc on row - NOTE: Work in both ch-spaces). Repeat inc on every row from RS 3-4-4-5 (5-6) more times (= 4-5-5-6 (6-7) times in total) = 120-140-144-160 (164-180) sts. REMEMBER THE CROCHET TENSION! After last inc for raglan work 1 row with dc from WS as before. Work next row as follows from RS: Work 1 tr in each of the first 16-19-20-22 (23-25) dc (= left front piece), skip the next 28-32-32-36 (36-40) dc (= sleeve), work 4-4-4-6 (6-8) ch, work 1 tr in each of the next 32-38-40-44 (46-50) dc (= back piece), skip the next 28-32-32-36 (36-40) dc (= sleeve), work 4-4-4-6 (6-8) ch and work 1 tr in each of the last 16-19-20-22 (23-25) dc (= right front piece). Then finish body and sleeves separately. BODY: NOW MEASURE PIECE FROM HERE! Work 1st row from WS – work 1 dc in every tr from previous row and 1 dc in each of the 4-4-4-6 (6-8) ch under each armhole = 72-84-88-100 (104-116) dc on row. Continue back and forth with texture rows and stripes as before – remember CROCHET INFO! AT THE SAME TIME on 1st row (= tr from RS), inc 4-0-2-2 (4-6) tr evenly = 76-84-90-102 (108-122) tr. When piece measures approx. 24-29-34-39 (44-48) cm from neck (i.e. approx. 27-32-37-42 (47-51) cm from shoulder) – adjust so that last row is 1 row with off white and tr from RS, finish opening for band mid front. Insert a marker in each side. Continue back and forth as before. When piece measures 27-32-38-43 (49-53) cm from neck (and 30-35-41-46 (52-56) cm from shoulder), divide for legs and finish each leg separately. LEG: Insert 1 marker – NOW MEASURE PIECE FROM HERE. Continue with texture rows and stripes back and forth over the first 38-42-45-51 (54-61) sts on row (i.e. over half of sts). When leg measures 2 cm from marker, dec 1 dc/tr in each side - READ DECREASE TIP. Repeat dec every 2-2-3-3½ (3½-3½) cm 4-4-4-4 (5-7) more times (= 5-5-5-5 (6-8) times in total) = 28-32-35-41 (42-45) sts. When leg measures 11-14-17-20 (25-30) cm from marker, switch to light blue grey and work dc back and forth for 4 cm. Fasten off. Leg measures approx. 15-18-21-24 (29-34) cm and entire suit measures approx. 45-53-62-70 (81-90) cm from shoulder. Work the other leg the same way. SLEEVE: = 28-32-32-36 (36-40) sts. Insert 1 marker here – NOW MEASURE PIECE FROM HERE. Work first row as follows from RS (continue stripes as before): Work 2-2-2-3 (3-4) ch, work 1 tr in every st and work 2-2-2-3 (3-4) ch. Turn piece, work 1 dc in 2nd ch from hook, work 1 dc in each of the next 0-0-0-1 (1-2) ch, 1 dc in every tr from previous row and 1 dc in each of the 2-2-2-3 (3-4) ch from beg of previous row = 32-36-36-42 (42-48) sts on row. Continue the texture rows and stripes back and forth as before. AT THE SAME TIME when sleeve measures 2 cm from marker, dec 1 st in each side - READ DECREASE TIP. Repeat dec every 2-2-2½-2 (2-2) cm 3-4-4-7 (7-9) more times (= 4-5-5-8 (8-10) times in total) = 24-26-26-26 (26-28) sts. When sleeve measures 9-11-13-15 (19-24) cm from marker, switch to light blue grey. Work dc back and forth for 4 cm, fasten off. Sleeve measures 13-15-17-19 (23-28) cm from marker. Work the other sleeve the same way. ASSEMBLY: Sew sleeve seams tog edge to edge in front loop of outermost sts. Sew the openings under the sleeves. Fold if desired the edge at the bottom of sleeves. Sew the opening mid front from markers where band ends and down to dividing for legs - sew in front loop of outermost st. LEFT BAND: Beg from WS at the bottom on left front piece with light blue grey and work 1 dc in tr at the edge on the off white stripe, * work 2 tr + 2 ch + 2 tr in next tr (i.e. in tr at the edge on light blue grey stripe), 1 dc in next tr (i.e. in tr at the edge on off white stripe) *, repeat from *-* up along left front piece to neck and finish with 1 sl st at the edge on corner by neck. Turn piece and work as follows back from RS: 3 ch (= 1 tr), then work 1 tr between every st and 1 tr in ch-space in every tr-group. Fasten off. Fasten band at the bottom by dividing for legs. RIGHT BAND AND NECK EDGE: Work as left band but beg from RS at the bottom on right front piece, work as left band up to neck but instead of finishing with 1 sl st in the corner by neck, continue edge around the neck as follows: Work 1 dc in every st along the neck until 3 sts remain before raglan line, skip these 3 sts and work 4 tr in st in raglan line, skip the next 3 sts and continue with 1 dc in every st until 3 sts remain before next raglan line, skip these 3 sts and work 4 tr in st in next raglan line. Continue like this around the neck and finish with 1 sl st at the edge on row. Turn piece and work 2nd row as on left band. Fasten off. MORE ASSEMBLY: Sew the buttons on to the left band. Beg with 1 button in the upper light blue grey stripe, then place 1 button in every other light blue grey stripe. Button through hole on the inside of "fan" on band. |
|
 |
|
Have you finished this pattern?Tag your pictures with #dropspattern #babybluesoverall or submit them to the #dropsfan gallery. Do you need help with this pattern?You'll find 10 tutorial videos, a Comments/Questions area and more by visiting the pattern on garnstudio.com. © 1982-2025 DROPS Design A/S. We reserve all rights. This document, including all its sub-sections, has copyrights. Read more about what you can do with our patterns at the bottom of each pattern on our site. |
|


With over 40 years in knitting and crochet design, DROPS Design offers one of the most extensive collections of free patterns on the internet - translated to 17 languages. As of today we count 320 catalogues and 12094 patterns translated into English (UK/cm). 12094
We work hard to bring you the best knitting and crochet have to offer, inspiration and advice as well as great quality yarns at incredible prices! Would you like to use our patterns for other than personal use? You can read what you are allowed to do in the Copyright text at the bottom of all our patterns. Happy crafting!
Post a comment to pattern DROPS Baby 25-34
We would love to hear what you have to say about this pattern!
If you want to leave a question, please make sure you select the correct category in the form below, to speed up the answering process. Required fields are marked *.