
Looking for a yarn?


Comments / Questions (109)
![]() Dale wrote:
Dale wrote:
I really like the looks of this pullover and would love to have the pattern. how do i download it so i can print it out? thank you
13.12.2018 - 21:30DROPS Design answered:
Hi Dale. There is no download function on our page, unfortunately. However there is a print button: right above "Pattern instructions". Happy knitting
14.12.2018 - 07:26
![]() Christiane Gagnon wrote:
Christiane Gagnon wrote:
Je suis à bordures de manches faut-il que je relie mes nouvelles mailles au dessous de bras mais comment je tricote en rond avec les mailles rabattues précédemment ?
29.04.2018 - 13:29DROPS Design answered:
Bonjour Mme Gagnon, quand la bordure de la 1ère manche est faite (les 10 m sont rabattues au milieu sous la manche), mettez ces mailles en attente et tricotez la 2ème bordure de manche de la même façon. Glissez ensuite les mailles des manches sur la même aiguille circulaire que le dos et le devant (cf vidéo) pour tricoter l'empiècement en rond. Bon tricot!
30.04.2018 - 10:55
![]() Sylvette Cosandey wrote:
Sylvette Cosandey wrote:
Bonjour! concerné 147 2 rangs raccourcis: on commence au milieu du dos/ tricoter jusqu'à xx xx mailles avant le marqueur. De quel marqueur parlez-vous car vous demandez de placer un marqueur au MILIEU DEVANT?? et j'ai le marqueur au MILIEU dos merci beaucoup
21.01.2018 - 21:29DROPS Design answered:
Bonjour Mme Cosandey, la réhausse pour l'encolure dos se commence à partir du marqueur du milieu dos, tricotez sur l'endroit à partir du milieu dos jusqu'à ce qu'il reste x m avant le marqueur du milieu devant, tournez et tricotez le rang retour sur l'envers jusqu'à ce qu'il reste x m avant le marqueur du milieu devant (= vous aurez quelques mailles non tricotées au milieu devant, le même nombre de chaque côté de ce marqueur-ci). Tournez, et continuez ainsi en allers et retours en laissant toujours plus de mailles non tricotées avant le marqueur du milieu devant à la fin de chaque rang sur l'endroit et sur l'envers. Bon tricot!
22.01.2018 - 10:28
![]() Luisa wrote:
Luisa wrote:
Boa noite; estou um pouco confusa com esta indicação no encaixe ( Começar a meio das costas e tricotar 1 carreira meia e, AO MESMO TEMPO, distribuir 10-2-12-2-2-6 ), não consigo aplicar esta distribuição.Muito Obrigada
17.07.2015 - 22:06DROPS Design answered:
Boa tarde, Basta dividir o número total de malhas pelo número de diminuições que deve fazer. Ex: Tamanho S: 248 malhas x 10 diminuições: 24. Diminui 1 malha depois de tricotar 23 malhas. Repete até ter feito todas as diminuições. Bom tricô!
28.07.2015 - 16:46
![]() Annette Balk wrote:
Annette Balk wrote:
Ich habe diese Tunika fertig gestrickt und sie passt wunderbar! Eine wunderbar einfache Anleitung! Ich fange jetzt mit dem nächsten an, weil es so einen Spaß macht mit diesen Anleitungen zu stricken! Besonders toll finde ich, dass es die auch in großen Größen gibt (XXXL)! Bitte weiter so!
09.02.2015 - 13:40
![]() Krümel wrote:
Krümel wrote:
Wenn ich den Nacken hochstricke und dann nur 2 Rd komplett, habe ich vorne ehrerbietig einen v- Ausschnitt und nicht wie auf dem Bild zu sehen etwa 8 Rd rippenmuster. Ist die Anleitung hier korrekt? Warum sehe ich auf dem Bild mind. 4cm, wo nur 2 rd gestrickt werden sollen?
14.12.2014 - 20:16DROPS Design answered:
Sie stricken das Rippenmuster ja bereits vorher ein kleines Stück, bevor Sie den Markierer anbringen und die verkürzten R stricken. Ein V-Ausschnitt sollte sich auch nicht ergeben - wenn Sie wieder in Runden stricken, sollte sich eine Rundung wie auf dem Foto ergeben. Sie können zur Sicherheit ein Video zu verkürzten R anschauen, unter "Tipps & Hilfe" finden Sie Videos zu verkürzten R.
15.12.2014 - 14:56
![]() Torunn Sanne wrote:
Torunn Sanne wrote:
Hei! Jeg har kjøpt drops cotton light og ønsker å strikke modell NR. 147-2 til et barnebarn på 7-8 år. Er det mulig å få oppskrift på denne tunikaen til str. 8 år??? Mvh Torunn
30.11.2014 - 22:35DROPS Design answered:
Hei Torunn. Vi kan desvaerre ikke hjaelpe dig med at tilpasse modellen. Du kan pröve selv med hjaelp af strikkefastheden (antal m x p per 10 cm) eller pröv at faa hjaelp i din strikkeforretning. God fornöjelse.
01.12.2014 - 14:42
![]() Salla wrote:
Salla wrote:
Ohjeessa etu- ja takakappaleen osuuden lopussa kainaloiden kohdassa on epäselvyys. Ohjeessa lukee kun työn pituus on n. 49-50-51-52-53-54cm, neulo kummankin sivun keskimmäisillä 14 s:lla 4krs ainaoikeaa (eli neulo kummankin merkkilangan molemmin puolin 4 s:lla ainaoikeaa, muilla silmukoilla neulotaan sileää neulettä kuten aiemmin). Eli neulotaanko sitä ainaoikeaa 7 s:lla vai 4 s:lla merkkien molemmin puolin? Ei aukea nyt tämä kohta ohjeesta.
21.04.2014 - 19:27DROPS Design answered:
Hei! Ohjeessa oli virhe. Tämä on nyt korjattu, eli 7 silmukalla merkkilangan molemmin puolin neulotaan ainaoikeaa.
23.04.2014 - 16:50
![]() Mara wrote:
Mara wrote:
Vielen Dank für die rasche Antwort.Nach etwas Übung, habe ich die Verkürzte Reihen doch ohne Löcher gestrickt bekommen. Super schöne Tunika,die auch von Strickanfänger gut gestickt werden kann. Vielen Dank...
13.03.2014 - 23:33
![]() Mara wrote:
Mara wrote:
Hallo liebe Stickfreunde,ich habe die Tunika auch angefangen zu stricken. Bin jetzt am letzten Teil angekommen und komme nicht weiter. Kann mir jemand genauer erklären, wie das Stück am Hals, wo man hin und her stricken muss dass der Hals höher wird, gestrickt wird.so wie es hier geschrieben ist, gibt das ja unschöne Löcher, wenn ich dann die Runde wieder stricke. Lg. Mara
12.03.2014 - 09:02DROPS Design answered:
Liebe Mara, um Löcher bei verkürzten R zu vermeiden, schauen Sie sich am besten ein Video an. Unter "Tipps & Hilfe" => "Videoanleitungen" => "Strickvideos" finden Sie Anleitungen zu verkürzten R, z.B. "Verkürzte Reihen mit Umschlag". Gutes Gelingen!
13.03.2014 - 10:24
|
|||||||||||||
Kristin#kristintunic |
|||||||||||||
 |
 |
||||||||||||
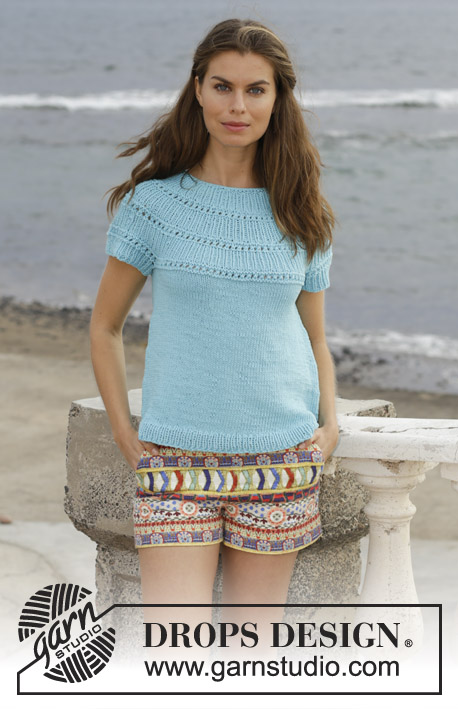
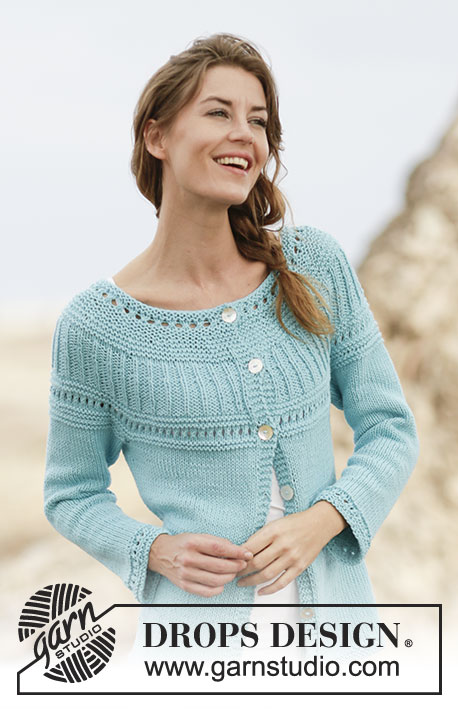
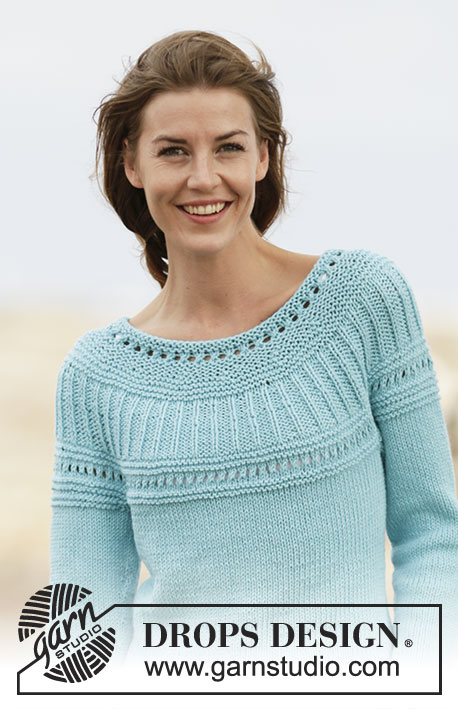
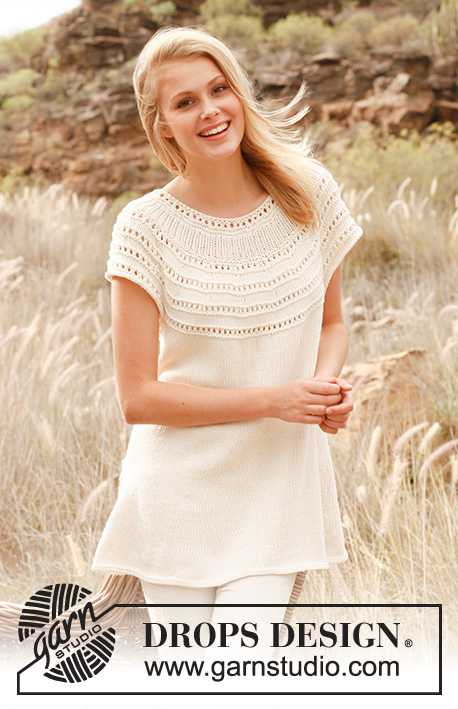
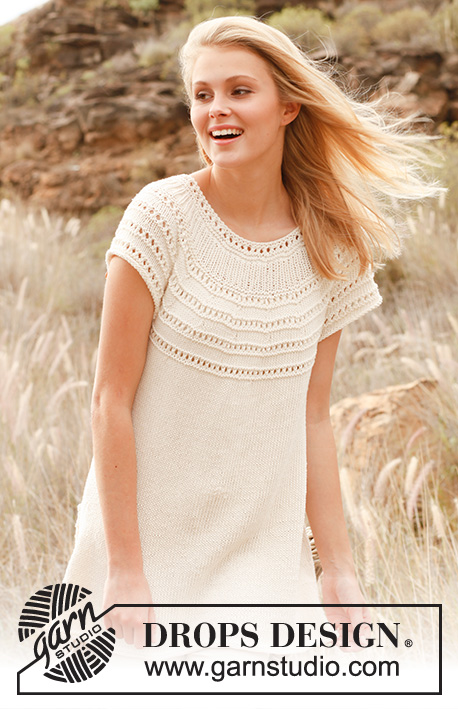
Knitted DROPS sleeveless tunic with round yoke in ”Cotton Light”. Size: S - XXXL.
DROPS 147-2 |
|||||||||||||
|
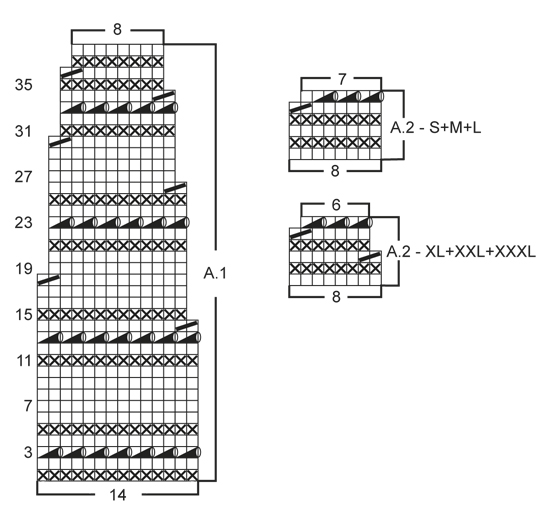
GARTER ST (in the round on needle): 1 ridge = 2 rounds. * K 1 round and P 1 round *, repeat from *-*. DECREASE TIP: Dec as follows before marker: K 2 tog. Dec as follows after marker: Slip 1 st as if to K, K 1, psso. PATTERN: See diagrams A.1 and A.2. ---------------------------------------------------------- BODY: Worked in the round on circular needle. Cast on 216-236-260-284-308-336 sts on circular needle size 3 mm with Cotton Light. Work 2 ridges in GARTER ST - see explanation above. Switch to circular needle size 4 mm and continue in stocking st. REMEMBER THE KNITTING TENSION. When piece measures 6-7-8-8-8-8 cm, insert 1 marker at beg of round and 1 marker after 108-118-130-142-154-168 sts (= in the sides on body). Now dec 1 st on each side of both markers – READ DECREASE TIP (= 4 sts dec). Repeat dec every 4½-4-3½-3½-3-3 cm 9-10-11-12-13-14 more times (= 10-11-12-13-14-15 dec in total) = 176-192-212-232-252-276 sts. When piece measures approx. 49-50-51-52-53-54 cm, work 2 ridges over the middle 14 sts in each side (i.e. 7 sts in garter st on each side of both markers, work the other sts in stocking st as before). On next round cast off 10 sts in each side for armholes (i.e. cast off 5 sts on each side of both markers) = 78-86-96-106-116-128 sts remain on front and back piece. Put piece aside and knit the sleeve edges. SLEEVE EDGE: Worked in the round on double pointed needles. Cast on 56-58-60-66-70-74 sts on double pointed needles size 4 mm with Cotton Light. Work 2 ridges. On next round cast off the 10 sts mid under sleeve (i.e. 5 sts at beg and 5 sts at the end of round) = 46-48-50-56-60-64 sts. Put piece aside and knit another sleeve edge. YOKE: Slip sleeve edges on to same circular needle size 4 mm as body (without working sts) = 248-268-292-324-352-384 sts. Insert 1 marker – NOW MEASURE PIECE FROM HERE. Beg mid back and K 1 round while AT THE SAME TIME dec 10-2-12-2-2-6 sts evenly = 238-266-280-322-350-378 sts. Then work pattern according to diagram A.1 (= 17-19-20-23-25-27 repetitions on round). When A.1 has been worked, 136-152-160-184-200-216 sts remain on needle. Then work rib = K 1/P 1. AT THE SAME TIME when rib measures 1-2-3-4-5-6 cm, insert 1 marker in the middle st at the front. Now work an elevation at the back of neck with short rows - beg from RS mid back and continue with rib back and forth on needle as follows: Work until 24-26-28-30-32-34 sts remain before st with marker, turn and work from WS until 24-26-28-30-32-34 sts remain before st with marker in the other side, turn piece. Work until 30-32-34-36-38-40 sts remain before st with marker, turn piece and work until 30-32-34-36-38-40 sts remain before st with marker in the other side. Turn piece, work until 36-38-40-42-44-46 sts remain before st with marker, turn piece and work until 36-38-40-42-44-46 sts remain before st with marker in the other side. Turn piece, work until 42-44-46-48-50-52 sts remain before st with marker, turn piece and work until 42-44-46-48-50-52 sts remain before st with marker in the other side, turn and work until mid back. Continue working in the round over all sts again. Work 2 rounds rib. Then work pattern according to A.2 (choose diagram for your size) AT THE SAME TIME dec 8 sts evenly on 1st round = 128-144-152-176-192-208 sts. When A.2 has been worked, 112-126-133-132-144-156 sts remain on needle. Switch to circular needle size 3 mm and K 1 round while AT THE SAME TIME dec 28-38-41-36-44-50 sts evenly = 84-88-92-96-100-106 sts. P 1 round and K 1 round, before loosely casting off with P. ASSEMBLY: Sew the openings under the sleeves. |
|||||||||||||
Diagram explanations |
|||||||||||||
|
|||||||||||||
 |
|||||||||||||
 |
|||||||||||||
Have you finished this pattern?Tag your pictures with #dropspattern #kristintunic or submit them to the #dropsfan gallery. Do you need help with this pattern?You'll find 28 tutorial videos, a Comments/Questions area and more by visiting the pattern on garnstudio.com. © 1982-2025 DROPS Design A/S. We reserve all rights. This document, including all its sub-sections, has copyrights. Read more about what you can do with our patterns at the bottom of each pattern on our site. |
|||||||||||||


With over 40 years in knitting and crochet design, DROPS Design offers one of the most extensive collections of free patterns on the internet - translated to 17 languages. As of today we count 320 catalogues and 12092 patterns translated into English (UK/cm). 12092
We work hard to bring you the best knitting and crochet have to offer, inspiration and advice as well as great quality yarns at incredible prices! Would you like to use our patterns for other than personal use? You can read what you are allowed to do in the Copyright text at the bottom of all our patterns. Happy crafting!
Post a comment to pattern DROPS 147-2
We would love to hear what you have to say about this pattern!
If you want to leave a question, please make sure you select the correct category in the form below, to speed up the answering process. Required fields are marked *.