
Popular categories
Looking for a yarn?


Comments / Questions (266)
![]() Jolanda wrote:
Jolanda wrote:
Dank u wel voor het antwoord
02.11.2017 - 11:18
![]() Jolanda wrote:
Jolanda wrote:
Ik begrijp de regel niet voor de mouw er staat minder cm voor de grootste maten kunt u uitleg geven? Vriendelijke groet jolanda
31.10.2017 - 20:27DROPS Design answered:
Hoi Jolanda, Met deze zin (die tussen haakjes staat) hoef je niks mee te doen. Het is aanvullende informatie en geeft aan dat je voor de grotere maten een minder hoge mouw hebt.
01.11.2017 - 18:45Erin Owen wrote:
Hello, I am wondering where to go to get corresponding measurements for the sizes. Your patterns state "Size: S - M - L - XL - XXL - XXXL", but what measurements go with the different sizes? Is the XL a 52, or a 42? I looked, but cannot find it on your site. Thank you very much for your help.
11.09.2017 - 04:46DROPS Design answered:
Dear Mrs Owen, you will find a measurement chart at the bottom of the pattern, with all measurements in cm taken flat from side to side. Compare these to a similar garment the receiver likes the shape to find out the matching size. Read more about sizing here. Happy knitting!
11.09.2017 - 09:08
![]() Aune Anthoni wrote:
Aune Anthoni wrote:
Mistä löytyy puuttuva A 4 mallipiirros.?
05.09.2017 - 15:41DROPS Design answered:
Pieni piirros A.4 löytyy mittapiirroksen vierestä.
08.09.2017 - 14:07
![]() Heidi Wolden wrote:
Heidi Wolden wrote:
Leter etter A4 mønster i oppskriften. Er det noe jeg har misforstått?
17.08.2017 - 20:20DROPS Design answered:
Hei Heidi. Diagram A.4 finner du under ermet på målskissen. Det er et lite diagram, viser 2 masker x 4 pinner. God Fornøyelse videre på denne flotte jakken.
18.08.2017 - 06:52
![]() Sif Andersen wrote:
Sif Andersen wrote:
Hej Jeg er gået igang med mønsteret. Jeg synes at selve "kablerne" på billedet ser mere "tykke" ud, hvorimod mit bliver mere flat og usynligt. Det er strikket korrekt, men tænker om jeg måske strikker det for stramt'? Har i nogle gode råd her? :-) Kh Sif
03.08.2017 - 09:02
![]() Janice Paterson wrote:
Janice Paterson wrote:
Thank you! Also - my son is quite tall 6' 4" ... and I'm knitting a size Large. To give a little more length in the body, would it make sense for me to add 2-3 cm (or more?) onto the piece from the beginning of the work to the armhole? Thanks again!
21.07.2017 - 07:17DROPS Design answered:
Dear Patterson, sure you can knit longer before armhole so that you will get the correct total length and keep the measurement for armhole to avoid them for being too deep. Note that you will then require more yarn than the amount given in this size. Happy knitting!
21.07.2017 - 08:41
![]() Janice Paterson wrote:
Janice Paterson wrote:
Hi - I've just started this pattern and am very excited to make the sweater - it's gorgeous!! I've just finished the rib for the back piece and starting on the pattern. My question is ... for the back piece, when it says "Continue to work like this until piece measures 49cm (for Size Large) ... does this mean 49cm from the start of the ribbing, or just from the start of the pattern where I change to size 4mm needles? Thank you
20.07.2017 - 03:40DROPS Design answered:
Dear Mrs Patterson, continue until piece measures 49 cm from cast on row. Happy knitting!
20.07.2017 - 09:43
![]() Frendo Valérie wrote:
Frendo Valérie wrote:
Bonjour, pourriez-vous m'expliquer clairement comment faire les augmentations du col châle ? Qu'Est-ce qu'une section ? Urgent svp. Merci
18.07.2017 - 11:49DROPS Design answered:
Bonjour Mme Frendo, pour le col châle, vous tricotez d'abord en côtes 2/2 avec 1 m point mousse de chaque côté mais à 5-6 cm de hauteur, augmentez 1 m env dans chacune des 14-16 sections en mailles envers du milieu dos (= les 14-16 sections 2 m env centrales), et continuez en côtes 2 m end/3 m env dans ces 14-16 sections en m env, et en côtes 2 m end/2 m env avant et après cette partie du col. Bon tricot!
18.07.2017 - 14:18
![]() Mari-anne wrote:
Mari-anne wrote:
Hej. jag undrar vad det är för symbol i diagramet A.1b, hittar ingen förklaring. Pyramid formade tecknet. Och det gäller mönster 173-3 det gäller mönster på dropps design.se dam kardigan. Tack på förhand. Mvh mari-anne
17.07.2017 - 14:39DROPS Design answered:
Hej! Detta är två svarta trianglar som står mitt emot varandra, du stickar alltså så här: 1 m på flätst framför arb, 1 am, 1 rm från flätst, 1 m på flätst bakom arb, 1 rm, 1 am från flätst.
18.07.2017 - 13:27
|
||||||||||||||||
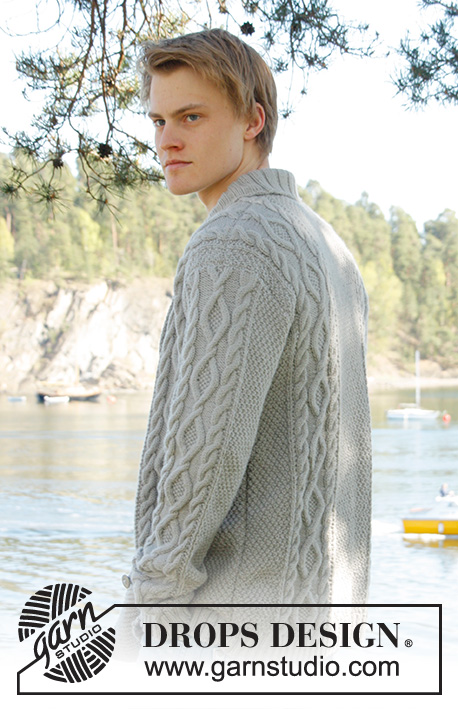
Rambling Man#ramblingmancardigan |
||||||||||||||||
 |
 |
|||||||||||||||
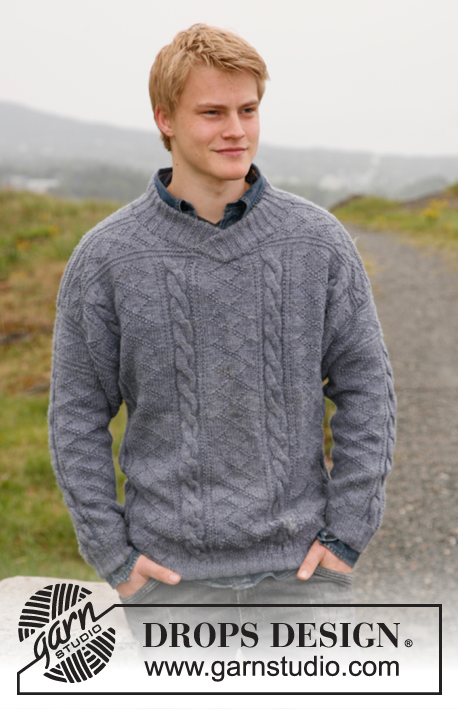
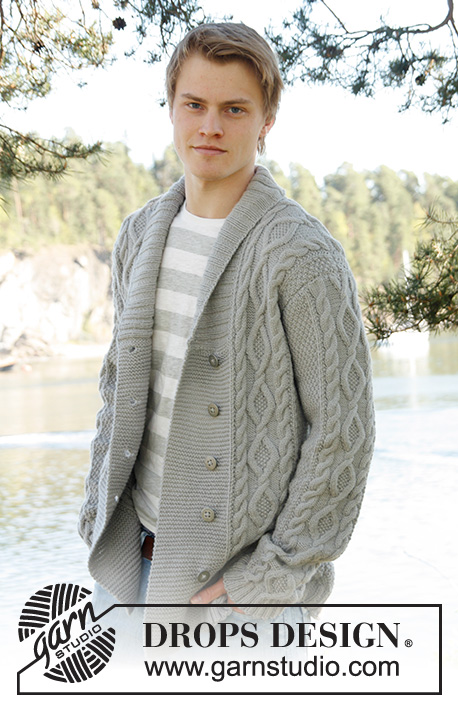
Men's knitted jacket in DROPS Lima, with cable pattern and shawl collar. Size: S - XXXL.
DROPS Extra 0-850 |
||||||||||||||||
|
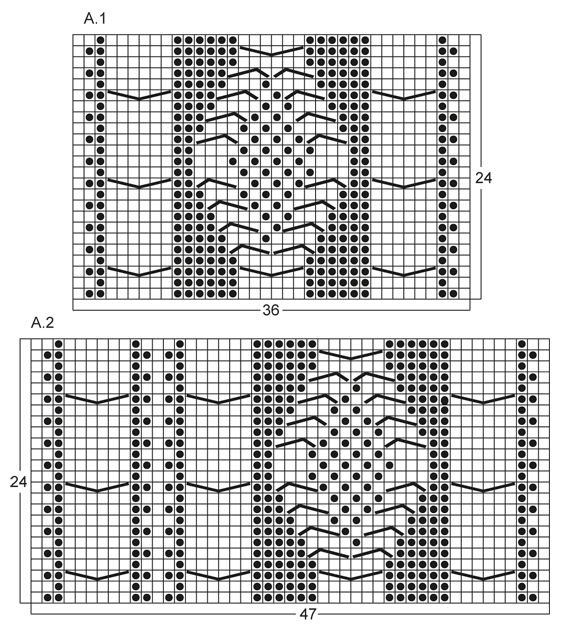
KNITTING TIPS: This design is written with button holes on right front edge, if you wish standard button holes for men, you can make the button holes on left front edge. GARTER ST (back and forth on needle): K all rows. NOTE: All edge sts are worked in garter st. PATTERN: See diagram A.1 to A.4, diagrams show all rows in 1 pattern repetition from RS. SHORT ROWS: RIGHT FRONT PIECE: Work 1 short row on row 3 of every pattern repetition vertically until finished measurements as follows: On 3rd row in pattern (= RS), work 26-26-26-26-30-30 band sts, turn and K back. Then work over all sts on row as before. LEFT FRONT PIECE: Work 1 short row on row 2 of every pattern repetition vertically until finished measurements as follows: On 2nd row in pattern (= WS), work 26-26-26-26-30-30 band sts, turn and K back. Then work over all sts on row as before. BUTTON HOLES: Cast off for 5 button holes from RS on right band. 1 BUTTON HOLE = cast off 7th and 8th st from mid front and cast on 2 new sts on next row over these sts. Cast off for button holes when piece measures: SIZE S: 14, 22, 30, 38 and 46 cm SIZE M: 15, 23, 31, 39 and 47 cm SIZE L: 16, 24, 32, 40 and 48 cm SIZE XL: 17, 25, 33, 41 and 49 cm SIZE XXL: 18, 26, 34, 42 and 50 cm SIZE XXXL: 19, 27, 35, 43 and 51 cm INCREASE TIP: Inc 1 st by making 1 YO, on next row work YO twisted (i.e. work in back loop of st instead front) to avoid holes. ---------------------------------------------------------- BACK PIECE: Worked back and forth on needle. Cast on 136-156-168-180-196-204 sts (incl 1 edge st in each side) on circular needle size 3.5 mm with Lima. Work rib as follows (1st row = RS): 1 edge st in GARTER ST - see explanation above, * K 2, P 2 *, repeat from *-*, finish with K 2 and 1 edge st in garter st. Continue to work like this until rib measures 5-5-5-6-6-6 cm. On last row from WS, P while AT THE SAME TIME dec 20-22-24-26-26-26 sts evenly = 116-134-144-154-170-178 sts. Then switch to needle size 4 mm and work next row from RS as follows: 1 edge st in garter st, 8-16-20-24-20-24 sts in A.4, work A.1 one time in size S - XL, work A.2 one time in size XXL and XXXL, 26-28-30-32-34-34 sts in A.4, then work A.1 one time in size S - XL, work A.3 one time in size XXL and XXXL, finish with 8-16-20-24-20-24 sts in A.4 and 1 edge st in garter st. REMEMBER THE KNITTING TENSION! Continue to work like this until piece measures 47-48-49-50-51-52 cm. Then cast off for armholes at the beg of every row in each side as follows: Cast off 3 sts 0-1-1-2-2-2 times, 2 sts 1-1-1-2-2-2 times, 1 st 4-7-9-8-4-8 times = 104-110-116-118-142-142 sts. Continue with pattern as before until piece measures 66-68-70-72-74-76 cm. Now cast off the middle 20-22-24-26-28-28 sts for neck and finish each part separately. Cast off 2 sts on next row from neck = 40-42-44-44-55-55 sts remain on shoulder. Continue with pattern as before. When piece measures 68-70-72-74-76-78 cm, loosely cast off sts with K over K and P over P. RIGHT FRONT PIECE: Worked back and forth on needle. Cast on 83-91-95-99-111-115 sts (incl 1 edge st in the side) on circular needle size 3.5 mm with Lima. Work rib as follows (1st row = RS): 26-26-26-26-30-30 sts in garter st (= band sts), * K 2, P 2 *, repeat from *-*, finish with 1 edge st in garter st. Continue with rib and band sts in garter st until rib measures 5-5-5-6-6-6 cm. On last row from WS, P over all sts in rib while AT THE SAME TIME dec 12-12-12-12-13-13 sts evenly (do not dec over band sts) = 71-79-83-87-98-102 sts. Then switch to needle size 4 mm and work next row from RS as follows: 26-26-26-26-30-30 band sts, work A.1 one time in size S - XL, work A.3 one time in size XXL and XXXL, 8-16-20-24-20-24 sts in A.4 and 1 edge in garter st. On next row from RS (= 3rd row in pattern) work SHORT ROWS - read explanation above. Continue with pattern and band sts at the front - while AT THE SAME TIME work 1 short row on 3rd row in every pattern repetition vertically until finished measurement. When piece measures 14-15-16-17-18-19 cm, cast off for BUTTON HOLES on right band - see explanation above! Continue to work until piece measures 47-48-49-50-51-52 cm. Then cast off at beg of next row from RS as follows: Cast off the first 25-25-25-25-29-29 sts, insert a marker (this marks where to beg the knit up for collar), work the rest of row. Then cast off for armhole on every row from WS as follows: 3 sts 0-1-1-2-2-2 times, 2 sts 1-1-1-2-2-2 times, 1 st 4-7-9-8-4-8 times = 40-42-44-44-55-55 sts remain on shoulder. Continue with pattern as before. When piece measures 68-70-72-74-76-78 cm, loosely cast off sts with K over K and P over P. LEFT FRONT PIECE: Cast on and work rib as on right front piece but reversed (i.e. * P 2, K 2 *, repeat from *-*) with 26-26-26-26-30-30 band sts in garter st. Continue to work until rib measures 5-5-5-6-6-6 cm. On last row from WS, P over all sts in rib while AT THE SAME TIME dec 12-12-12-12-13-13 sts evenly (do not dec over band sts) = 71-79-83-87-98-102 sts. Then switch to needle size 4 mm and work next row from RS as follows: 1 edge st in garter st, 8-16-20-24-20-24 sts in A.4, work A.1 one time in size S - XL, work A.2 one time in size XXL and XXXL, 26-26-26-26-30-30 band sts in garter st. On next row from WS (= 2nd row in pattern) work SHORT ROWS - read explanation above. Continue to work the same way as on right front piece but without button holes. SLEEVE: Worked back and forth on needle. Cast on 74-78-82-86-90-90 sts (incl 1 edge st in each side) on circular needle size 3.5 mm with Lima. Work rib as follows (1st row = RS): 1 edge st in garter st, * K 2, P 2 *, repeat from *-* and finish with 1 edge st in garter st. Continue to work like this until rib measures 5-5-5-6-6-6 cm. On last row from WS, P while AT THE SAME TIME dec 12-14-16-18-18-18 sts evenly = 62-64-66-68-72-72 sts. Then switch to needle size 4 mm and work next row from RS as follows: 1 edge st in garter st, 12-13-14-15-17-17 sts in A.4, work A.1 one time, 12-13-14-15-17-17 sts in A.4, finish with 1 edge st in garter st. AT THE SAME TIME when piece measures 6 cm, inc 1 st inside 1 edge st in each side - Read INCREASE TIP above. NOTE: Work the inc sts in A.4. Repeat inc every 3½-3-2½-2½-2½-2½ cm a total of 14-15-16-17-16-17 times = 90-94-98-102-104-106 sts. Continue until piece measures 54-53-51-50-48-48 cm (shorter measurements in the larger sizes because of longer sleeve cap and broader shoulder width), cast off at beg of every row in each side: 3 sts 1-1-1-2-2-2 times, 2 sts 1-1-2-2-2-2 times and 1 st 2-2-3-3-4-4 times. Then cast off 2 sts in each side until piece measures 61-61-60-60-59-59 cm, then cast off 3 sts 2 times in each side. When piece measures approx. 62-62-61-61-60-60 cm, loosely cast off sts with K over K and P over P. ASSEMBLY: Sew shoulder seams and sew in sleeves inside 1 edge st. Sew sleeve and side seams in one inside 1 edge st. Sew buttons on to left front piece, approx. 2½ cm from last K st in pattern. SHAWL COLLAR: Knit up sts from RS inside 1 edge st on circular needle size 3.5 mm. Start mid front at marker on right front piece as follows: Knit up approx. 60-70 sts up to shoulder, then 30-40 sts along the neck and 60-70 sts down along left front piece until marker = 150-180 sts. K 1 row from WS while AT THE SAME TIME adjusting no of sts to 144-148-156-164-172-180. Then work rib on next row from RS as follows: 1 sts in garter st, * K 2, P 2 *, repeat from *-* and finish with K 2 and 1 st in garter st. Continue like this until collar measures approx. 5-5-5-6-6-6 cm. Now inc 1 st in each of the middle 14-14-14-16-16-16 P-sections seen from RS (= back of neck) = 158-162-170-180-188-196 sts. Continue until collar measures approx. 12-12-12-12-14-14 cm, then loosely cast off with K over K and P over P. Fasten collar with stitches at the bottom in each side towards band from WS (so that the seam is not visible from RS) – sew edge to edge to avoid a chunky seam. |
||||||||||||||||
Diagram explanations |
||||||||||||||||
|
||||||||||||||||

|
||||||||||||||||
|
||||||||||||||||
Have you finished this pattern?Tag your pictures with #dropspattern #ramblingmancardigan or submit them to the #dropsfan gallery. Do you need help with this pattern?You'll find 23 tutorial videos, a Comments/Questions area and more by visiting the pattern on garnstudio.com. © 1982-2025 DROPS Design A/S. We reserve all rights. This document, including all its sub-sections, has copyrights. Read more about what you can do with our patterns at the bottom of each pattern on our site. |
||||||||||||||||


With over 40 years in knitting and crochet design, DROPS Design offers one of the most extensive collections of free patterns on the internet - translated to 17 languages. As of today we count 314 catalogues and 11820 patterns translated into English (UK/cm). 11820
We work hard to bring you the best knitting and crochet have to offer, inspiration and advice as well as great quality yarns at incredible prices! Would you like to use our patterns for other than personal use? You can read what you are allowed to do in the Copyright text at the bottom of all our patterns. Happy crafting!
Post a comment to pattern DROPS Extra 0-850
We would love to hear what you have to say about this pattern!
If you want to leave a question, please make sure you select the correct category in the form below, to speed up the answering process. Required fields are marked *.