
Popular categories
Looking for a yarn?


Comments / Questions (266)
![]() Hope Raymond wrote:
Hope Raymond wrote:
Could you please help me with the down loading [printing] of Pattern Drops Extra 0/850?
06.06.2018 - 23:59DROPS Design answered:
Dear Mrs Raymond, make sure you won't select any pages to be printed but really print all pages so that you would have the whole pattern. Happy knitting!
07.06.2018 - 09:02
![]() Ling wrote:
Ling wrote:
Hej Jag undrar om jag kan använda dropp cotton merino till detta kofta. Är rdrops Lima lika Mjuka som cotton Merino Ling
27.05.2018 - 08:12DROPS Design answered:
Hej, jo det går bra ett ersätta Lima med Cotton Merino. Lima innehåller ull och känns en aning strävare än Cotton Merino.
28.05.2018 - 17:53
![]() Barbara Dasselaar wrote:
Barbara Dasselaar wrote:
Moin, in der Anleitung heißt es zu den verkürzten Reihen: "Bei jeder 3./2. Reihe des Musterrapports verkürzte Reihe...."! Wie genau ist das zu verstehen? Das Muster besteht ja aus 24 R., heißt das also, in der 3./2. Reihe stricken und dann erst wieder 24 R. später oder in JEDER 3./2. Reihe des Musters??? Ist etwas missverständlich formuliert. Frdl.Gruß
19.04.2018 - 11:23DROPS Design answered:
Liebe Frau Dasselaar, die verkürzten Reihen werden jedesmal 3. Reihe (= rechter Vorderteil) / 2. Reihe (linker Vorderteil) gestrickt wird, dh 1 Mal in jedem Rapport in der Höhe. Viel Spaß beim stricken!
19.04.2018 - 11:43
![]() Gerig wrote:
Gerig wrote:
Ich habe eine Frage wegen dieser Jacke. Bei der Blende oben heißt es 26 Maschen abkettenund markieren, was muss ich markieren. Wo wird der Kragen angesetzt. Ich bin schon am Vorderteil am stricken
15.04.2018 - 23:14DROPS Design answered:
Liebe Frau Gerig, der Markierer setzen Sie nach den 25 abgeketteten Maschen ein. Für den Kragen werden Sie dann die Maschen am Vorderteil auffassen: vom Markierer am rechten Vorderteil bis Markierer am linken Vorderteil (siehe KRAGEN). Viel Spaß beim stricken!
16.04.2018 - 10:02
![]() Jeanette Rosberg wrote:
Jeanette Rosberg wrote:
Oh ber om ursäkt jag har löst det Tvättade glasögon 👓 sen såg jag
11.04.2018 - 06:07
![]() Jeanette Rosberg wrote:
Jeanette Rosberg wrote:
Jag har gjort mudden och ska börja med mönster nu. Jag har 144 maskor och ska sticka 1 kantmask Sen 20 maskor Sen A4 (2 maskor) Sen A1 (36 maskor) 30 maskor A4 (2) A1 (36) 20 A4 (2) 1 kantmask Min mattematik fick detta till 150 Var räknar jag fel?
10.04.2018 - 16:35DROPS Design answered:
Hej Jeanette, se här - L = 144 m. 1 kantm rille, 20 m A.4, strikk A.1=36m, 30 m A.4, A.1=36m, 20 m A.4 og 1 kantm rille. = 144 m God fornøjelse!
26.04.2018 - 10:47Rushd wrote:
The pattern ask for circular needle for rib and straight needle for pattern .my question is can I use circular needle for pattern as well? Will it alter the pattern?
08.03.2018 - 18:51DROPS Design answered:
Dear Mrs Rushd, as long as you keep the correct tension with larger needle you can use either a straight one or a circular one. Happy knitting!
09.03.2018 - 08:52
![]() Maggi Page wrote:
Maggi Page wrote:
Pattern asks you to use A.4 chart but only 1-3 are displayed. Please advise
15.01.2018 - 10:25DROPS Design answered:
Dear Mrs Page, you will find A.4 at the right side of measurement chart (below sleeve), it's a small diagram worked over 2 sts and 4 rows. Happy knitting!
15.01.2018 - 10:47Miriam Aguilar wrote:
Buenas tardes Tengo duda en cuestión de las mangas en que momento se debe de empezar a aumentar los puntos ya que ya tengo terminado el resorte y empece con la aguja numero 4 la figura A4 y A1
14.12.2017 - 02:05DROPS Design answered:
Hola Miriam, los aumentos en las mangas comienzan cuando la labor mide 6 cm.
17.12.2017 - 17:57
![]() Ines wrote:
Ines wrote:
Hallo, Ich habe gerade ein paar??? im Kopf. Warum soll ich an der Armkugel 2x3; 2x2; 3x1 abnehmen und dann noch einmal .... bis ich bei 61cm angekommen bin?
23.11.2017 - 14:14DROPS Design answered:
Liebe Ines, so wird der Armkugel gestrickt: am Anfang jeder Reihe (Hin- sowie Rückreihe) 3 M 1 x, 2 M 1 x, 1 M 2x abketten, dann 2 M am Anfang jeder Reihe (Hin- sowie Rückreihe) abketten bis die Ärmel 61 cm misst, dann 3 M 2x am Anfang jeder Reihe abketten und endlich die restlichen Maschen abketten. Viel Spaß beim stricken!
23.11.2017 - 14:23
|
||||||||||||||||
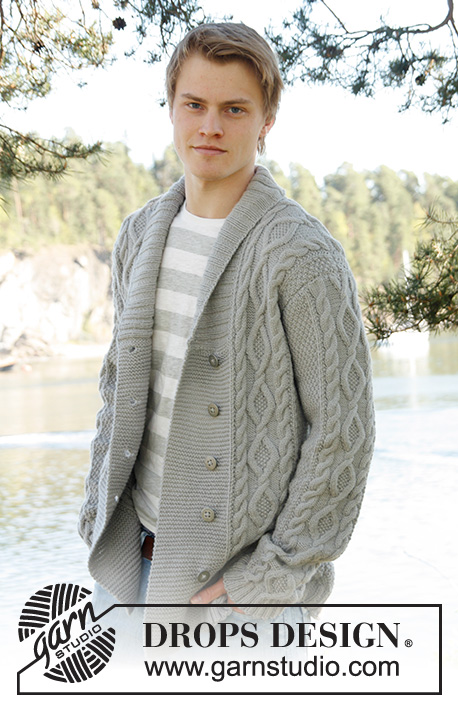
Rambling Man#ramblingmancardigan |
||||||||||||||||
 |
 |
|||||||||||||||
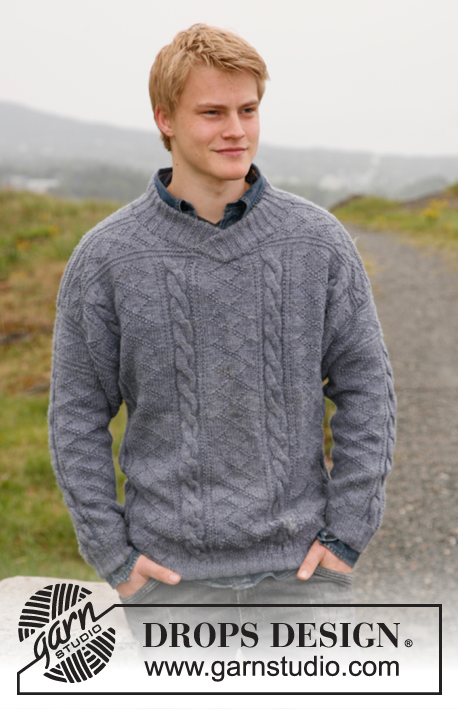
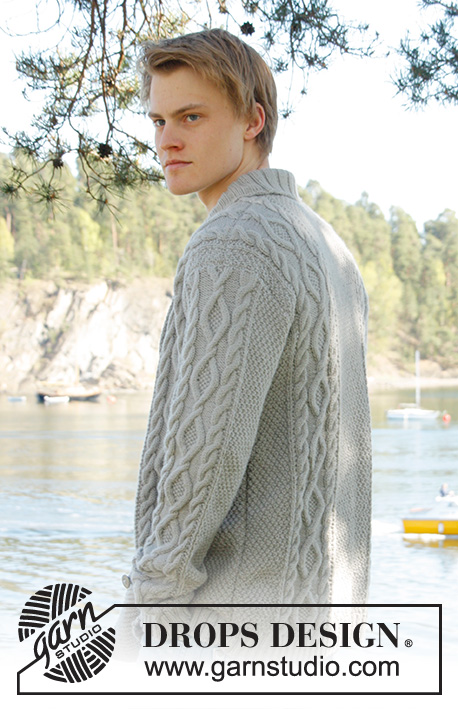
Men's knitted jacket in DROPS Lima, with cable pattern and shawl collar. Size: S - XXXL.
DROPS Extra 0-850 |
||||||||||||||||
|
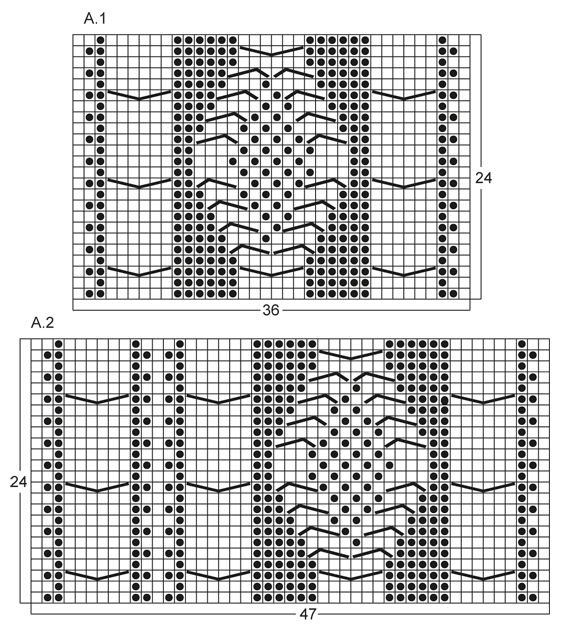
KNITTING TIPS: This design is written with button holes on right front edge, if you wish standard button holes for men, you can make the button holes on left front edge. GARTER ST (back and forth on needle): K all rows. NOTE: All edge sts are worked in garter st. PATTERN: See diagram A.1 to A.4, diagrams show all rows in 1 pattern repetition from RS. SHORT ROWS: RIGHT FRONT PIECE: Work 1 short row on row 3 of every pattern repetition vertically until finished measurements as follows: On 3rd row in pattern (= RS), work 26-26-26-26-30-30 band sts, turn and K back. Then work over all sts on row as before. LEFT FRONT PIECE: Work 1 short row on row 2 of every pattern repetition vertically until finished measurements as follows: On 2nd row in pattern (= WS), work 26-26-26-26-30-30 band sts, turn and K back. Then work over all sts on row as before. BUTTON HOLES: Cast off for 5 button holes from RS on right band. 1 BUTTON HOLE = cast off 7th and 8th st from mid front and cast on 2 new sts on next row over these sts. Cast off for button holes when piece measures: SIZE S: 14, 22, 30, 38 and 46 cm SIZE M: 15, 23, 31, 39 and 47 cm SIZE L: 16, 24, 32, 40 and 48 cm SIZE XL: 17, 25, 33, 41 and 49 cm SIZE XXL: 18, 26, 34, 42 and 50 cm SIZE XXXL: 19, 27, 35, 43 and 51 cm INCREASE TIP: Inc 1 st by making 1 YO, on next row work YO twisted (i.e. work in back loop of st instead front) to avoid holes. ---------------------------------------------------------- BACK PIECE: Worked back and forth on needle. Cast on 136-156-168-180-196-204 sts (incl 1 edge st in each side) on circular needle size 3.5 mm with Lima. Work rib as follows (1st row = RS): 1 edge st in GARTER ST - see explanation above, * K 2, P 2 *, repeat from *-*, finish with K 2 and 1 edge st in garter st. Continue to work like this until rib measures 5-5-5-6-6-6 cm. On last row from WS, P while AT THE SAME TIME dec 20-22-24-26-26-26 sts evenly = 116-134-144-154-170-178 sts. Then switch to needle size 4 mm and work next row from RS as follows: 1 edge st in garter st, 8-16-20-24-20-24 sts in A.4, work A.1 one time in size S - XL, work A.2 one time in size XXL and XXXL, 26-28-30-32-34-34 sts in A.4, then work A.1 one time in size S - XL, work A.3 one time in size XXL and XXXL, finish with 8-16-20-24-20-24 sts in A.4 and 1 edge st in garter st. REMEMBER THE KNITTING TENSION! Continue to work like this until piece measures 47-48-49-50-51-52 cm. Then cast off for armholes at the beg of every row in each side as follows: Cast off 3 sts 0-1-1-2-2-2 times, 2 sts 1-1-1-2-2-2 times, 1 st 4-7-9-8-4-8 times = 104-110-116-118-142-142 sts. Continue with pattern as before until piece measures 66-68-70-72-74-76 cm. Now cast off the middle 20-22-24-26-28-28 sts for neck and finish each part separately. Cast off 2 sts on next row from neck = 40-42-44-44-55-55 sts remain on shoulder. Continue with pattern as before. When piece measures 68-70-72-74-76-78 cm, loosely cast off sts with K over K and P over P. RIGHT FRONT PIECE: Worked back and forth on needle. Cast on 83-91-95-99-111-115 sts (incl 1 edge st in the side) on circular needle size 3.5 mm with Lima. Work rib as follows (1st row = RS): 26-26-26-26-30-30 sts in garter st (= band sts), * K 2, P 2 *, repeat from *-*, finish with 1 edge st in garter st. Continue with rib and band sts in garter st until rib measures 5-5-5-6-6-6 cm. On last row from WS, P over all sts in rib while AT THE SAME TIME dec 12-12-12-12-13-13 sts evenly (do not dec over band sts) = 71-79-83-87-98-102 sts. Then switch to needle size 4 mm and work next row from RS as follows: 26-26-26-26-30-30 band sts, work A.1 one time in size S - XL, work A.3 one time in size XXL and XXXL, 8-16-20-24-20-24 sts in A.4 and 1 edge in garter st. On next row from RS (= 3rd row in pattern) work SHORT ROWS - read explanation above. Continue with pattern and band sts at the front - while AT THE SAME TIME work 1 short row on 3rd row in every pattern repetition vertically until finished measurement. When piece measures 14-15-16-17-18-19 cm, cast off for BUTTON HOLES on right band - see explanation above! Continue to work until piece measures 47-48-49-50-51-52 cm. Then cast off at beg of next row from RS as follows: Cast off the first 25-25-25-25-29-29 sts, insert a marker (this marks where to beg the knit up for collar), work the rest of row. Then cast off for armhole on every row from WS as follows: 3 sts 0-1-1-2-2-2 times, 2 sts 1-1-1-2-2-2 times, 1 st 4-7-9-8-4-8 times = 40-42-44-44-55-55 sts remain on shoulder. Continue with pattern as before. When piece measures 68-70-72-74-76-78 cm, loosely cast off sts with K over K and P over P. LEFT FRONT PIECE: Cast on and work rib as on right front piece but reversed (i.e. * P 2, K 2 *, repeat from *-*) with 26-26-26-26-30-30 band sts in garter st. Continue to work until rib measures 5-5-5-6-6-6 cm. On last row from WS, P over all sts in rib while AT THE SAME TIME dec 12-12-12-12-13-13 sts evenly (do not dec over band sts) = 71-79-83-87-98-102 sts. Then switch to needle size 4 mm and work next row from RS as follows: 1 edge st in garter st, 8-16-20-24-20-24 sts in A.4, work A.1 one time in size S - XL, work A.2 one time in size XXL and XXXL, 26-26-26-26-30-30 band sts in garter st. On next row from WS (= 2nd row in pattern) work SHORT ROWS - read explanation above. Continue to work the same way as on right front piece but without button holes. SLEEVE: Worked back and forth on needle. Cast on 74-78-82-86-90-90 sts (incl 1 edge st in each side) on circular needle size 3.5 mm with Lima. Work rib as follows (1st row = RS): 1 edge st in garter st, * K 2, P 2 *, repeat from *-* and finish with 1 edge st in garter st. Continue to work like this until rib measures 5-5-5-6-6-6 cm. On last row from WS, P while AT THE SAME TIME dec 12-14-16-18-18-18 sts evenly = 62-64-66-68-72-72 sts. Then switch to needle size 4 mm and work next row from RS as follows: 1 edge st in garter st, 12-13-14-15-17-17 sts in A.4, work A.1 one time, 12-13-14-15-17-17 sts in A.4, finish with 1 edge st in garter st. AT THE SAME TIME when piece measures 6 cm, inc 1 st inside 1 edge st in each side - Read INCREASE TIP above. NOTE: Work the inc sts in A.4. Repeat inc every 3½-3-2½-2½-2½-2½ cm a total of 14-15-16-17-16-17 times = 90-94-98-102-104-106 sts. Continue until piece measures 54-53-51-50-48-48 cm (shorter measurements in the larger sizes because of longer sleeve cap and broader shoulder width), cast off at beg of every row in each side: 3 sts 1-1-1-2-2-2 times, 2 sts 1-1-2-2-2-2 times and 1 st 2-2-3-3-4-4 times. Then cast off 2 sts in each side until piece measures 61-61-60-60-59-59 cm, then cast off 3 sts 2 times in each side. When piece measures approx. 62-62-61-61-60-60 cm, loosely cast off sts with K over K and P over P. ASSEMBLY: Sew shoulder seams and sew in sleeves inside 1 edge st. Sew sleeve and side seams in one inside 1 edge st. Sew buttons on to left front piece, approx. 2½ cm from last K st in pattern. SHAWL COLLAR: Knit up sts from RS inside 1 edge st on circular needle size 3.5 mm. Start mid front at marker on right front piece as follows: Knit up approx. 60-70 sts up to shoulder, then 30-40 sts along the neck and 60-70 sts down along left front piece until marker = 150-180 sts. K 1 row from WS while AT THE SAME TIME adjusting no of sts to 144-148-156-164-172-180. Then work rib on next row from RS as follows: 1 sts in garter st, * K 2, P 2 *, repeat from *-* and finish with K 2 and 1 st in garter st. Continue like this until collar measures approx. 5-5-5-6-6-6 cm. Now inc 1 st in each of the middle 14-14-14-16-16-16 P-sections seen from RS (= back of neck) = 158-162-170-180-188-196 sts. Continue until collar measures approx. 12-12-12-12-14-14 cm, then loosely cast off with K over K and P over P. Fasten collar with stitches at the bottom in each side towards band from WS (so that the seam is not visible from RS) – sew edge to edge to avoid a chunky seam. |
||||||||||||||||
Diagram explanations |
||||||||||||||||
|
||||||||||||||||

|
||||||||||||||||
|
||||||||||||||||
Have you finished this pattern?Tag your pictures with #dropspattern #ramblingmancardigan or submit them to the #dropsfan gallery. Do you need help with this pattern?You'll find 23 tutorial videos, a Comments/Questions area and more by visiting the pattern on garnstudio.com. © 1982-2025 DROPS Design A/S. We reserve all rights. This document, including all its sub-sections, has copyrights. Read more about what you can do with our patterns at the bottom of each pattern on our site. |
||||||||||||||||


With over 40 years in knitting and crochet design, DROPS Design offers one of the most extensive collections of free patterns on the internet - translated to 17 languages. As of today we count 314 catalogues and 11820 patterns translated into English (UK/cm). 11820
We work hard to bring you the best knitting and crochet have to offer, inspiration and advice as well as great quality yarns at incredible prices! Would you like to use our patterns for other than personal use? You can read what you are allowed to do in the Copyright text at the bottom of all our patterns. Happy crafting!
Post a comment to pattern DROPS Extra 0-850
We would love to hear what you have to say about this pattern!
If you want to leave a question, please make sure you select the correct category in the form below, to speed up the answering process. Required fields are marked *.