
Popular categories
Looking for a yarn?


Comments / Questions (266)
Maggi Page wrote:
Doing the largest size ready to shape armholes. require further information. ( at the beg of every row in each side as follows bind off 3 sts 0-1-1-2-2-2 times, 2 sts 1-1-1-2-2-2 times, 1 st 4-7-9-8-4-8 times does that mean cast off 3 sts at beg of next 4 rows. followed by 2 sts at beg of next 4rows etc
26.10.2018 - 15:19DROPS Design answered:
Dear Mrs Page, correct, you should have cast off a total of 3 sts x 2 + 2 sts x 2 + 1 st x 8 on each side. Happy knitting!
26.10.2018 - 16:28Rushd Khatib wrote:
Am stuck at collar. Am not getting as to how much stitches i have to increase and where? Do i have to increase all stitches at once?
24.10.2018 - 16:24DROPS Design answered:
Dear Mrs Khatib, mark the middle 14-16 P-sections on collar and increase 1 stitch in each of these P-sections = you will increase 14-16 sts in total and continue working ribbing K2/P2 as before over the sts before these 14-16 P-sections and after these, and work K2/P3 (from RS) over the middle 14-16 P-sections. Happy knitting!
25.10.2018 - 08:05
![]() Linda Contino wrote:
Linda Contino wrote:
Hi its Linda again. I am getting close to finishing the back and have completed 28 3/8" of the back and I now need to bind off the middle 26 sts for neck and finish each part separately then I need to bind off 2 sts on next row from neck =44 sts remaining on shoulder. i am a bit confused how to proceed with these rows namely "bind off the middle 26 sts for neck and finish each part separately". Any help is much appreciated. Thank you. Linda
06.10.2018 - 21:10DROPS Design answered:
Hi Linda, Once you have bound off the stitches for the neck you work one shoulder at a time, binding off 2 more stitches on the neck-side of the shoulder you are working on the next row. When you have finished this shoulder, cut the strand and work the other shoulder, again binding off 2 more stitches on the neck side on the first row. I hope this helps and happy knitting!
08.10.2018 - 08:19
![]() Annelies Staal wrote:
Annelies Staal wrote:
Ik ben met patroon A3 begonnen maar ik vraag me nu af. Is alleen de heengaande naald het patroon en de teruggaande naald averecht of moet ik in de teruggaande naald ook het patroon volgen?
20.09.2018 - 14:53
![]() ESPUGNE-DARSES Jacqueline wrote:
ESPUGNE-DARSES Jacqueline wrote:
Col châle : Que veux dire augmenter maintenant 1 m dans chacune des "14 sections envers centrales" (encolure dos) vu sur l'endroit. Remerciements.
18.09.2018 - 17:18DROPS Design answered:
Bonjour Mme Espugne-Darses, marquez la partie des côtes au milieu du col avec 14 fois 2 m envers, vous allez augmenter 1 m env dans ces sections 2 m env des côtes, vous aurez ainsi toujours 2 m end/ 2 m env avant et après, et 14 fois 2 m end/ 3 m env au milieu du col. Bon tricot!
19.09.2018 - 09:09
![]() Linda Contino wrote:
Linda Contino wrote:
Hi, i completed working 19 3/4\" of the back to the cardigan and now I need to begin to bind off to shape armholes. The pattern states that I bind off at the beg. of every row in each side. For how many rows do I follow this binding off at the beg. of every row in each side? And when I bind off do I bind off as a K stitch or do I bind off as a pattern stitch? Thanks
30.08.2018 - 23:26DROPS Design answered:
Hi Linda, You bind off on each side as follows: 3 stitches 1 time (so 2 consecutive rows), 2 stitches 1 time and 1 stitch 9 times. You bind off with a pattern stitch. Happy knitting!
31.08.2018 - 07:47
![]() Annelies Staal wrote:
Annelies Staal wrote:
Ik ga het vest breien in de maat XXXL. Over de buik is dat de goede maat. Ik heb het vermoeden dat de boord erg ruim wordt en daardoor zal lubberen. Mijn idee is om de boord op te zetten met de steken van XL of evt XXl en dan uiteindelijk wél te minderen tot 178 resp. 102 steken voor het patroon in XXXL. Ik wil de boordaanpassing doen voor voor- achterpand(en)en waarschijnlijk ook de mouw. Is dat een goed idee?
23.08.2018 - 15:56DROPS Design answered:
Dag Annelies, Ja, je kan de boord inderdaad wat strakker maken, als je maar op het juiste aantal steken zit wanneer je aan de kabel begint.
23.08.2018 - 17:44
![]() Anthea wrote:
Anthea wrote:
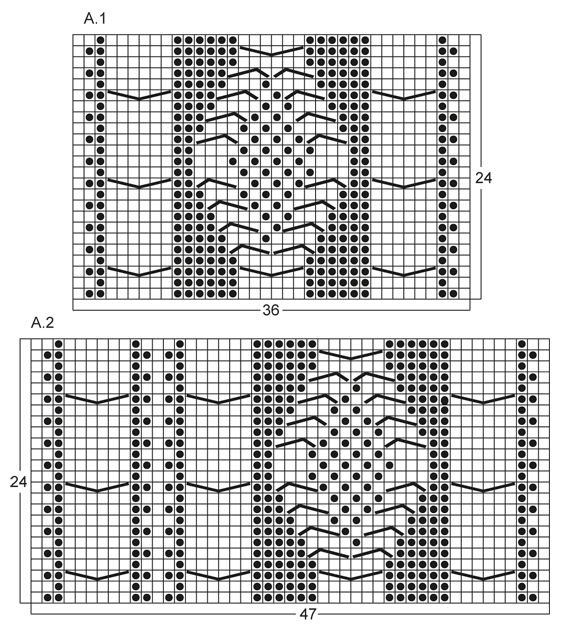
Waarom wordt patroon A.4 niet gewoon dubbele gerstekorrelsteek genoemd? Ik denk dat patroon A.1-3 overzichtelijker zouden zijn als de dambordstukjes in het midden één teken zouden krijgen met de uitleg 'gerstekorrelsteek', waarbij dan wordt aangegeven of men met recht of averecht begint. Ik print patronen zelf liever niet uit, maar dit soort patronen op een scherm bekijken is nogal vermoeiend.
26.07.2018 - 14:38DROPS Design answered:
Dag Anthea, In dit geval is er door het designteam voor gekozen om de gerstekorrel in een teltekening te zetten. Als je alleen de telpatronen af wilt drukken en niet het hele patroon, kun je dat doen door eerst met de rechter muisknop op de afbeelding te klikken en dan te kiezen voor 'Afbeelding openen in een nieuw tabblad'
29.07.2018 - 10:50
![]() Quinton wrote:
Quinton wrote:
Je voudrais réaliser ce modèle avec des aiguilles en 4. 1/2pour les cotes et 5.1/2 pour le reste et dimension du bas de la manche (largeur).pouvez vous m,envoyer ces explications par mail.merci
08.07.2018 - 07:22DROPS Design answered:
Bonjour Mme Quinton, ce modèle se tricote sur la base d'un échantillon de 21 m x 28 rangs, si vous n'avez pas la bonne tension, regardez parmi les modèles correspondant à votre échantillon, nous ne sommes malheureusement pas en mesure de pouvoir adapter chaque modèle à chaque demande individuelle. Pour toute assistance complémentaire, merci de bien vouloir contacter le magasin où vous avez acheté votre laine. Bon tricot!
09.07.2018 - 08:29Rushd wrote:
I have made the sweater with Large size instruction but unfortunatly the needle size n yarn did not match n it ended up in very big n heavy one. I almosy had to use 19 balls of 100 gms each. So my question is if i use larger size needle 5.5 mm and 6 mm respectively since my yarn is thick one will it be ok?
25.06.2018 - 12:17DROPS Design answered:
Dear Mrs Rushd, this pattern has been written for a tension of 21 sts x 28 rows = 10 x 10 cm, we are unfortunately unable to adjust every single pattern to each individual request, for any individual assistance, you are welcome to contact the store where you bought your yarn. Happy knitting!
25.06.2018 - 15:56
|
||||||||||||||||
Rambling Man#ramblingmancardigan |
||||||||||||||||
 |
 |
|||||||||||||||
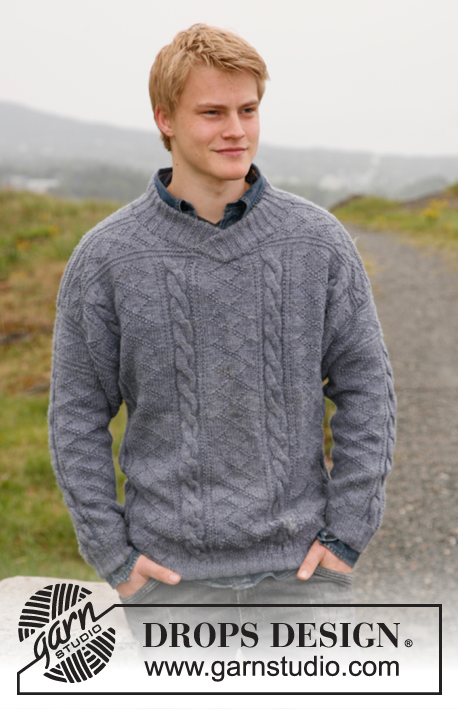
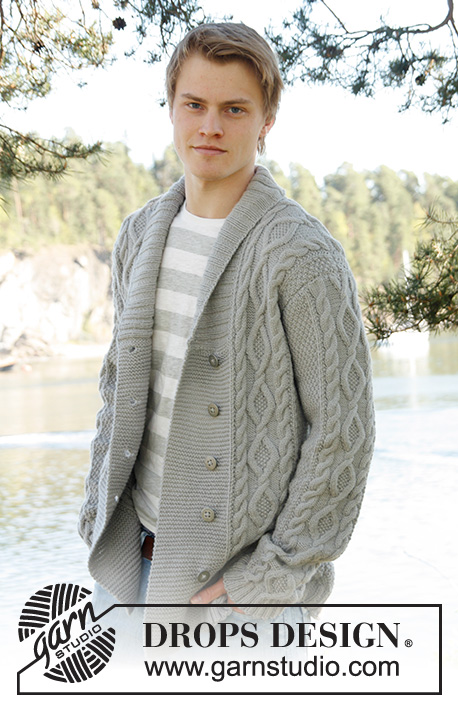
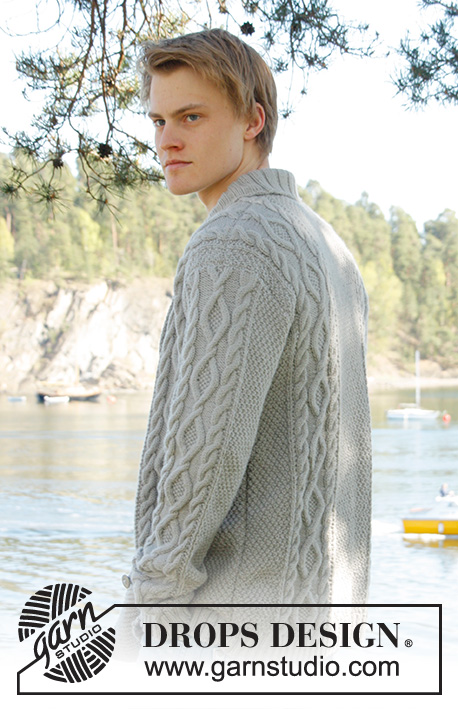
Men's knitted jacket in DROPS Lima, with cable pattern and shawl collar. Size: S - XXXL.
DROPS Extra 0-850 |
||||||||||||||||
|
KNITTING TIPS: This design is written with button holes on right front edge, if you wish standard button holes for men, you can make the button holes on left front edge. GARTER ST (back and forth on needle): K all rows. NOTE: All edge sts are worked in garter st. PATTERN: See diagram A.1 to A.4, diagrams show all rows in 1 pattern repetition from RS. SHORT ROWS: RIGHT FRONT PIECE: Work 1 short row on row 3 of every pattern repetition vertically until finished measurements as follows: On 3rd row in pattern (= RS), work 26-26-26-26-30-30 band sts, turn and K back. Then work over all sts on row as before. LEFT FRONT PIECE: Work 1 short row on row 2 of every pattern repetition vertically until finished measurements as follows: On 2nd row in pattern (= WS), work 26-26-26-26-30-30 band sts, turn and K back. Then work over all sts on row as before. BUTTON HOLES: Cast off for 5 button holes from RS on right band. 1 BUTTON HOLE = cast off 7th and 8th st from mid front and cast on 2 new sts on next row over these sts. Cast off for button holes when piece measures: SIZE S: 14, 22, 30, 38 and 46 cm SIZE M: 15, 23, 31, 39 and 47 cm SIZE L: 16, 24, 32, 40 and 48 cm SIZE XL: 17, 25, 33, 41 and 49 cm SIZE XXL: 18, 26, 34, 42 and 50 cm SIZE XXXL: 19, 27, 35, 43 and 51 cm INCREASE TIP: Inc 1 st by making 1 YO, on next row work YO twisted (i.e. work in back loop of st instead front) to avoid holes. ---------------------------------------------------------- BACK PIECE: Worked back and forth on needle. Cast on 136-156-168-180-196-204 sts (incl 1 edge st in each side) on circular needle size 3.5 mm with Lima. Work rib as follows (1st row = RS): 1 edge st in GARTER ST - see explanation above, * K 2, P 2 *, repeat from *-*, finish with K 2 and 1 edge st in garter st. Continue to work like this until rib measures 5-5-5-6-6-6 cm. On last row from WS, P while AT THE SAME TIME dec 20-22-24-26-26-26 sts evenly = 116-134-144-154-170-178 sts. Then switch to needle size 4 mm and work next row from RS as follows: 1 edge st in garter st, 8-16-20-24-20-24 sts in A.4, work A.1 one time in size S - XL, work A.2 one time in size XXL and XXXL, 26-28-30-32-34-34 sts in A.4, then work A.1 one time in size S - XL, work A.3 one time in size XXL and XXXL, finish with 8-16-20-24-20-24 sts in A.4 and 1 edge st in garter st. REMEMBER THE KNITTING TENSION! Continue to work like this until piece measures 47-48-49-50-51-52 cm. Then cast off for armholes at the beg of every row in each side as follows: Cast off 3 sts 0-1-1-2-2-2 times, 2 sts 1-1-1-2-2-2 times, 1 st 4-7-9-8-4-8 times = 104-110-116-118-142-142 sts. Continue with pattern as before until piece measures 66-68-70-72-74-76 cm. Now cast off the middle 20-22-24-26-28-28 sts for neck and finish each part separately. Cast off 2 sts on next row from neck = 40-42-44-44-55-55 sts remain on shoulder. Continue with pattern as before. When piece measures 68-70-72-74-76-78 cm, loosely cast off sts with K over K and P over P. RIGHT FRONT PIECE: Worked back and forth on needle. Cast on 83-91-95-99-111-115 sts (incl 1 edge st in the side) on circular needle size 3.5 mm with Lima. Work rib as follows (1st row = RS): 26-26-26-26-30-30 sts in garter st (= band sts), * K 2, P 2 *, repeat from *-*, finish with 1 edge st in garter st. Continue with rib and band sts in garter st until rib measures 5-5-5-6-6-6 cm. On last row from WS, P over all sts in rib while AT THE SAME TIME dec 12-12-12-12-13-13 sts evenly (do not dec over band sts) = 71-79-83-87-98-102 sts. Then switch to needle size 4 mm and work next row from RS as follows: 26-26-26-26-30-30 band sts, work A.1 one time in size S - XL, work A.3 one time in size XXL and XXXL, 8-16-20-24-20-24 sts in A.4 and 1 edge in garter st. On next row from RS (= 3rd row in pattern) work SHORT ROWS - read explanation above. Continue with pattern and band sts at the front - while AT THE SAME TIME work 1 short row on 3rd row in every pattern repetition vertically until finished measurement. When piece measures 14-15-16-17-18-19 cm, cast off for BUTTON HOLES on right band - see explanation above! Continue to work until piece measures 47-48-49-50-51-52 cm. Then cast off at beg of next row from RS as follows: Cast off the first 25-25-25-25-29-29 sts, insert a marker (this marks where to beg the knit up for collar), work the rest of row. Then cast off for armhole on every row from WS as follows: 3 sts 0-1-1-2-2-2 times, 2 sts 1-1-1-2-2-2 times, 1 st 4-7-9-8-4-8 times = 40-42-44-44-55-55 sts remain on shoulder. Continue with pattern as before. When piece measures 68-70-72-74-76-78 cm, loosely cast off sts with K over K and P over P. LEFT FRONT PIECE: Cast on and work rib as on right front piece but reversed (i.e. * P 2, K 2 *, repeat from *-*) with 26-26-26-26-30-30 band sts in garter st. Continue to work until rib measures 5-5-5-6-6-6 cm. On last row from WS, P over all sts in rib while AT THE SAME TIME dec 12-12-12-12-13-13 sts evenly (do not dec over band sts) = 71-79-83-87-98-102 sts. Then switch to needle size 4 mm and work next row from RS as follows: 1 edge st in garter st, 8-16-20-24-20-24 sts in A.4, work A.1 one time in size S - XL, work A.2 one time in size XXL and XXXL, 26-26-26-26-30-30 band sts in garter st. On next row from WS (= 2nd row in pattern) work SHORT ROWS - read explanation above. Continue to work the same way as on right front piece but without button holes. SLEEVE: Worked back and forth on needle. Cast on 74-78-82-86-90-90 sts (incl 1 edge st in each side) on circular needle size 3.5 mm with Lima. Work rib as follows (1st row = RS): 1 edge st in garter st, * K 2, P 2 *, repeat from *-* and finish with 1 edge st in garter st. Continue to work like this until rib measures 5-5-5-6-6-6 cm. On last row from WS, P while AT THE SAME TIME dec 12-14-16-18-18-18 sts evenly = 62-64-66-68-72-72 sts. Then switch to needle size 4 mm and work next row from RS as follows: 1 edge st in garter st, 12-13-14-15-17-17 sts in A.4, work A.1 one time, 12-13-14-15-17-17 sts in A.4, finish with 1 edge st in garter st. AT THE SAME TIME when piece measures 6 cm, inc 1 st inside 1 edge st in each side - Read INCREASE TIP above. NOTE: Work the inc sts in A.4. Repeat inc every 3½-3-2½-2½-2½-2½ cm a total of 14-15-16-17-16-17 times = 90-94-98-102-104-106 sts. Continue until piece measures 54-53-51-50-48-48 cm (shorter measurements in the larger sizes because of longer sleeve cap and broader shoulder width), cast off at beg of every row in each side: 3 sts 1-1-1-2-2-2 times, 2 sts 1-1-2-2-2-2 times and 1 st 2-2-3-3-4-4 times. Then cast off 2 sts in each side until piece measures 61-61-60-60-59-59 cm, then cast off 3 sts 2 times in each side. When piece measures approx. 62-62-61-61-60-60 cm, loosely cast off sts with K over K and P over P. ASSEMBLY: Sew shoulder seams and sew in sleeves inside 1 edge st. Sew sleeve and side seams in one inside 1 edge st. Sew buttons on to left front piece, approx. 2½ cm from last K st in pattern. SHAWL COLLAR: Knit up sts from RS inside 1 edge st on circular needle size 3.5 mm. Start mid front at marker on right front piece as follows: Knit up approx. 60-70 sts up to shoulder, then 30-40 sts along the neck and 60-70 sts down along left front piece until marker = 150-180 sts. K 1 row from WS while AT THE SAME TIME adjusting no of sts to 144-148-156-164-172-180. Then work rib on next row from RS as follows: 1 sts in garter st, * K 2, P 2 *, repeat from *-* and finish with K 2 and 1 st in garter st. Continue like this until collar measures approx. 5-5-5-6-6-6 cm. Now inc 1 st in each of the middle 14-14-14-16-16-16 P-sections seen from RS (= back of neck) = 158-162-170-180-188-196 sts. Continue until collar measures approx. 12-12-12-12-14-14 cm, then loosely cast off with K over K and P over P. Fasten collar with stitches at the bottom in each side towards band from WS (so that the seam is not visible from RS) – sew edge to edge to avoid a chunky seam. |
||||||||||||||||
Diagram explanations |
||||||||||||||||
|
||||||||||||||||

|
||||||||||||||||
|
||||||||||||||||
Have you finished this pattern?Tag your pictures with #dropspattern #ramblingmancardigan or submit them to the #dropsfan gallery. Do you need help with this pattern?You'll find 23 tutorial videos, a Comments/Questions area and more by visiting the pattern on garnstudio.com. © 1982-2025 DROPS Design A/S. We reserve all rights. This document, including all its sub-sections, has copyrights. Read more about what you can do with our patterns at the bottom of each pattern on our site. |
||||||||||||||||


With over 40 years in knitting and crochet design, DROPS Design offers one of the most extensive collections of free patterns on the internet - translated to 17 languages. As of today we count 314 catalogues and 11820 patterns translated into English (UK/cm). 11820
We work hard to bring you the best knitting and crochet have to offer, inspiration and advice as well as great quality yarns at incredible prices! Would you like to use our patterns for other than personal use? You can read what you are allowed to do in the Copyright text at the bottom of all our patterns. Happy crafting!
Post a comment to pattern DROPS Extra 0-850
We would love to hear what you have to say about this pattern!
If you want to leave a question, please make sure you select the correct category in the form below, to speed up the answering process. Required fields are marked *.