
Looking for a yarn?


Comments / Questions (71)
![]() Tiziana wrote:
Tiziana wrote:
Hallo, Bin jetzt beim ärmel stricken und nach dem beidseitigen fünften aufnehmen habe ich schon über 60 Maschen auf der Nadel für Grösse 6-9 Mt. Wie kann das sein? Wie strickt man die aufgenommenen Maschen ins Muster? Danke im Voraus für eine Antwort.
05.01.2019 - 10:53DROPS Design answered:
Liebe Tiziana, nach der Krausrippen haben Sie 46 M, nach 4 cm nehmen Sie 2 M zu = 48 M + 2 M x 5 Mal = 58 M (46 + 2 M x 6). Viel Spaß beim stricken!
07.01.2019 - 09:47
![]() Lis-Beth Engström wrote:
Lis-Beth Engström wrote:
Jag har stickat 2 cm på tröjan med Baby Merino och får en masktäthet på 30-31 maskor på 10 cm mönster. Bör jag byta till grövre stickor? Garnet känns för tunt för stickor 3,5. Bör jag börja om från början? Vänliga Hälsningar Lis-Beth
30.11.2018 - 11:54DROPS Design answered:
Hei Lis-Beth. Om ikke du har den riktige strikkefastheten vil dette påvirke målene på plagget. Om du har 30-31 masker isteden for 28 vil plagget bli mindre enn angitt. Pinnenummer er kun veiledende, det er strikkefastheten som avgjør hvilke pinner du må bruke. Er du i tvil så strikk en prøvelapp å se (enten i bjørnebærmønster eller i riller - begge fasthetene står oppgitt). God fornøyelse.
30.11.2018 - 15:11
![]() Tiziana wrote:
Tiziana wrote:
Habe das Muster gestrickt. Auf dem youtube video ist das brombeermuster ganz klar, aber es stimmt nicht so ganz mit dem diagrammmuster überein. Ist das möglich?
22.11.2018 - 15:59DROPS Design answered:
Liebe Tiziana, bei M.1 stricken Sie die 1. /3. Reihe bei der Hinreihe (= Zunahme/Abnahme), dann werden Sie bei der 2./4. Reihe (= Rückreihe) rechts stricken, so bekommen Sie das gleiche Muster. Viel Spaß beim stricken!
23.11.2018 - 09:44
![]() Hanna wrote:
Hanna wrote:
Hej. I beskrivning för M.1 står det på ett annat sätt än instruktions videon visar. Blir de samma mönster, eller vilket ska man välja för bäst resultat?
15.08.2018 - 09:09DROPS Design answered:
Hej Hanna, du följer diagrammet, men i videon ser du hur man kan sticka 3 m i én m och hur man kan sticka 3 am tillsammans. Lycka till!
15.08.2018 - 09:29
![]() Ria wrote:
Ria wrote:
Kan ik het vestje ookbreien op 2 pennen?
21.06.2018 - 10:15DROPS Design answered:
Dag Ria, Er worden vaak rondbreinaalden gebruikt omdat dan de steken er beter op passen. Het is een beetje afhankelijk van de maat dus, maar als alle steken op rechte naalden passen, kun je hem prima op rondbreinaalden breien. In deze link vind je meer informatie over het aanpassen van een patroon om met rechte naalden te breien.
25.06.2018 - 10:34
![]() Monica Ekekrantz wrote:
Monica Ekekrantz wrote:
Hur beställer jag mönstret på ovanstående babyset.?
28.03.2018 - 17:21DROPS Design answered:
Hej, mönstret är gratis, bara att klicka på bilden.
03.04.2018 - 17:20
![]() Monica Ekekrantz wrote:
Monica Ekekrantz wrote:
Har inte provat mönstret än. Återkommer senare.
28.03.2018 - 17:05
![]() Simone Vita wrote:
Simone Vita wrote:
Onde encontro o vídeo de como fazer a calça?
17.03.2018 - 23:53DROPS Design answered:
Terá de ver cada um dos vídeos para as diferentes técnicas para poder fazer a calça. Bom tricô!
22.03.2018 - 12:31
![]() Duimelotje wrote:
Duimelotje wrote:
, ik snap het, goed uitgelegd, dank u wel. groet
04.03.2018 - 17:54
![]() Duimelotje wrote:
Duimelotje wrote:
Hoe kan ik volgens het telpatroon 3 steken in 1 steek breien als volgt: 1av./1omslag/1av. en dan 1 steek overhouden??
04.03.2018 - 10:25DROPS Design answered:
Hoi Duimelotje, Je breit 3 steken in 1 steek, door 1 averecht te breien, 1 omslag te maken en nog 1 averecht te breien in dezelfde steek. Hierdoor heb je 2 steken gemeerderd. (Bij het symbool met een horizontale streep over 3 steken, minder je weer 2 steken.) Wat bedoel je met 1 steek overhouden? Dat staat er niet bij, bij de telpatronen.
04.03.2018 - 16:47
|
|||||||||||||
Blueberry#blueberryset |
|||||||||||||
 |
 |
||||||||||||
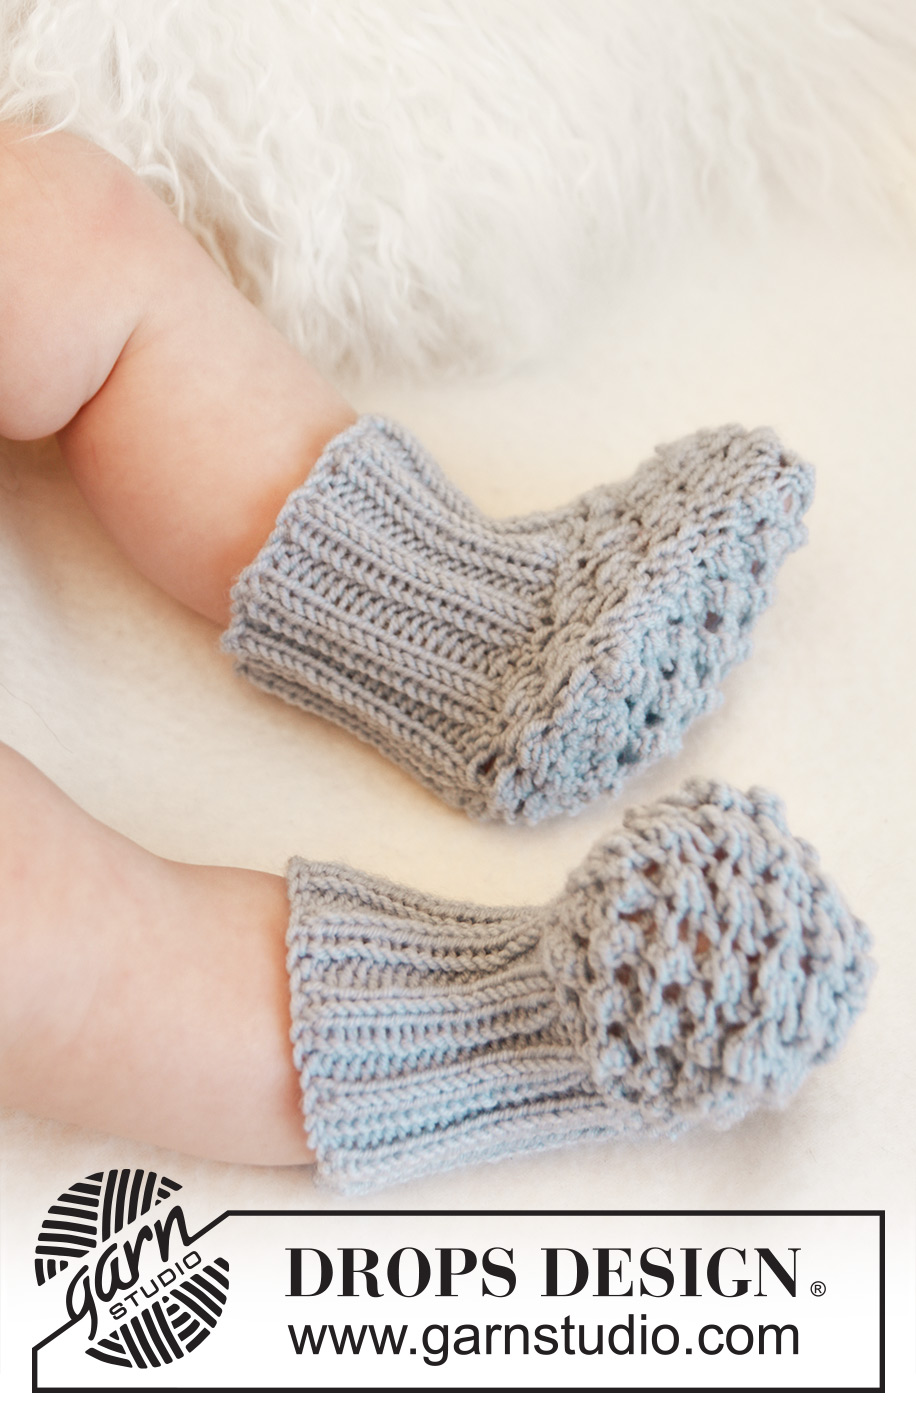
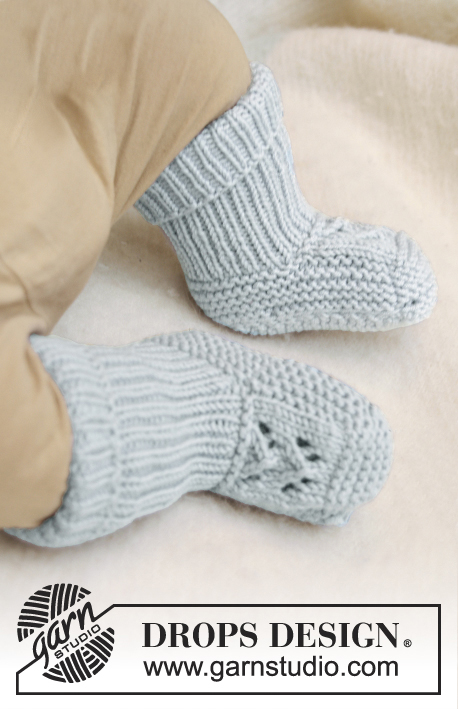
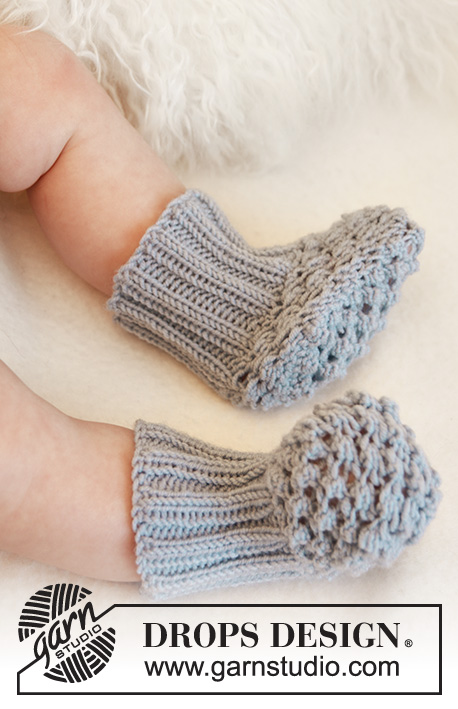
Set of knitted socks, pants and jacket with round yoke and blackberry pattern for baby and children in DROPS Alpaca
DROPS Baby 21-24 |
|||||||||||||
|
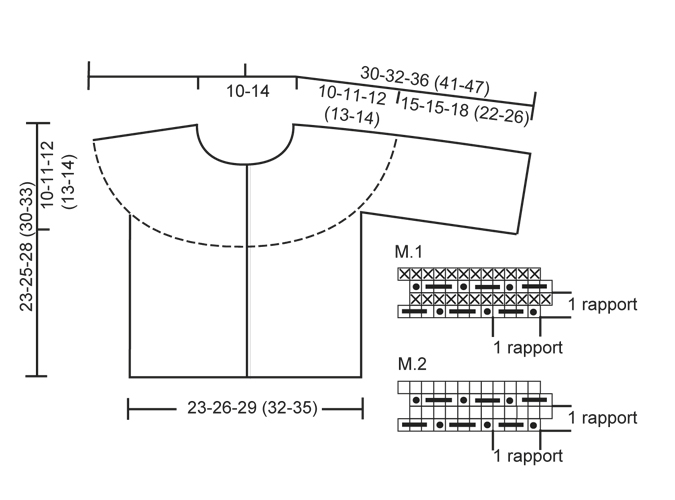
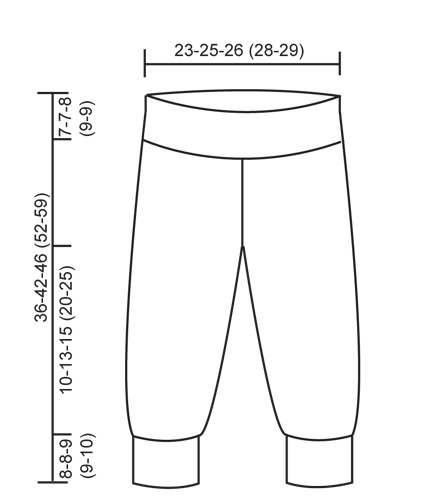
GARTER ST (back and forth on needle): K all rows. GARTER ST (in the round on double pointed needles/circular needle): * K 1 round and P 1 round *, repeat from *-*. PATTERN: See diagram M.1. The diagram shows the pattern from RS. 1st row = RS: DECREASE TIP: Dec as follows 3 sts before marker: K 2 tog, K 1. Dec as follows after marker: K 1, slip 1 st as if to K, K 1, psso. BUTTON HOLES: Cast off for button holes on right band. 1 button hole = cast off 3rd and 4th st from edge and cast on 2 new sts on next row over these sts. Cast off for button holes when piece measures: Size 1/3 months: 5, 10, 14, 19 and 23 cm Size 6/9 months: 5, 10, 15, 20 and 25 cm Size 12/18 months: 6, 12, 17, 23 and 28 cm Size 2 years: 6, 12, 18, 24 and 30 cm Size 3/4 years: 6, 13, 20, 27 and 33 cm NOTE: Cast off for last button hole when 2 rows in garter st on band remain before neck edge. ------------------------------------------------------- JACKET: BODY: Worked back and forth on circular needle from mid front. Cast on 120-134-150 (164-178) sts (incl 5 band sts in each side towards mid front) on circular needle size 3 mm with Alpaca. Work 4 rows in GARTER ST - see explanation above (1st row = RS). AT THE SAME TIME on last row, inc 18-20-24 (26-28) sts evenly = 138-154-174 (190-206) sts. Then work diagram M.1 with 5 band sts in garter st in each side. Remember BUTTON HOLES on right band - see explanation above. REMEMBER THE KNITTING TENSION! When piece measures approx. 13-14-16 (17-19) cm - adjust after 3rd row in diagram M.1 - work next row as follows from WS: Work 33-37-42 (46-50) sts (= left front piece), cast off 8 sts for armhole, work 56-64-74 (82-90) sts (= back piece), cast off 8 sts for armhole and work 33-37-42 (46-50) sts (= right front piece). Put piece aside and work the sleeves. SLEEVE: Worked back and forth on circular needle. Cast on 38-38-40 (42-45) sts (includes 1 edge st in each side) on needle size 3 mm with Alpaca. Work 8 rows in garter st (1st row = RS). AT THE SAME TIME on last row, inc 8-8-10 (8-9) sts evenly = 46-46-50 (50-54) sts. Then work diagram M.1 with 1 edge st in garter st in each side. AT THE SAME TIME when piece measures 4-4-5 (6-6) cm, inc 1 st in each side. Repeat inc every 3-2-1½ (1½-2) cm a total of 4-6-8 (10-10) times = 54-58-66 (70-74) sts – work the inc sts gradually in diagram M.1, work the sts that do not fit in pattern in garter st. When piece measures approx. 15-15-18 (22-26) cm - adjust after 3rd row in diagram M.1 - cast off 5 sts in each side (cast off at beg and end of row) = 44-48-56 (60-64) sts remain on needle. Put piece aside and knit another sleeve. YOKE: Slip sleeves on to same circular needle as body where armholes were cast off = 210-234-270 (294-318) sts. K 1 row from RS while AT THE SAME TIME dec 34-37-43 (46-49) sts evenly (do not dec over bands) = 176-197-227 (248-269) sts. K 1 row from WS. Then work in garter st back and forth over all sts while AT THE SAME TIME on 1st row dec 11-11-12 (12-13) sts evenly (do not dec over bands). Repeat dec every 6th row (from RS) a total of 8-9-10 (11-11) times = 88-98-107 (116-126) sts remain on needle. When piece measures approx. 23-25-28 (30-33) cm - adjust so that next row is worked from WS - dec 20-22-23 (24-34) sts evenly = 68-76-84 (92-92) sts remain on needle. NECK EDGE: Work as follows seen from from RS: 5 sts in garter st, * K 2, P 2 *, repeat from *-* and finish with K 2 and 5 sts in garter st. When neck edge measures 3-3-4 (4-4) cm, cast off with K over K and P over P. ASSEMBLY: Sew the sleeve seams inside 1 edge st. Sew the openings under the sleeves. Sew on buttons. ------------------------------------------------------------------- PANTS: LEG: Worked in the round on double pointed needles. LOOSELY cast on 56-60-64 (68-72) sts on double pointed needles size 2.5 mm with Alpaca. Insert a marker at beg of round = inside of leg. K 1 round, then work rib = K 2/P 2. When piece measures 8-8-9 (9-10) cm, switch to double pointed needles size 3 mm. K 1 round while AT THE SAME TIME dec 8-8-10 (12-12) sts evenly = 48-52-54 (56-60) sts. Then work in GARTER ST - see explanation above. When piece measures 9-9-10 (10-11) cm, inc 1 st on each side of marker. Repeat inc every 4th-6th-7th (10th-13th) round a total of 9 times = 66-70-72 (74-78) sts. Continue in garter st. When piece measures approx. 16-19-22 (27-33) cm (make sure all inc are finished), divide at inside of leg and finish the piece back and forth on needle (to make it easier to slip the legs on the same circular needle). Cast on 1 new st in each side for seam = 68-72-74 (76-80) sts. When piece measures 18-21-24 (29-35) cm, cast off 3 sts in each side = 62-66-68 (70-74) sts. Put piece aside and knit another leg the same way. PANTS: Slip both legs on the same circular needle size 3 mm = 124-132-136 (140-148) sts. Insert a marker mid front. Work in garter st in the round on needle – AT THE SAME TIME dec 1 st on each side of marker mid front – READ DECREASE TIP. Repeat dec on every other round a total of 6-6-6 (4-4) times = 112-120-124 (132-140) sts. When piece measures 29-35-38 (43-50) cm, K 1 round while AT THE SAME TIME inc 24-24-24 (28-28) sts evenly = 136-144-148 (160-168) sts. Switch to circular needle size 2.5 mm and work rib = K 2/P 2 for 7-7-8 (9-9) cm. LOOSELY cast off with K over K and P over P. Pants measures approx. 36-42-46 (52-59) cm. ASSEMBLY: Sew tog the opening between the legs. ------------------------------------------------------------------- SOCKS: PATTERN: See diagrams M.1 and M.2. The diagrams show the pattern from RS. SOCK: Worked in the round on double pointed needles. Cast on 40-44-44 (48-48) sts on double pointed needles size 3 mm with Alpaca. K 1 round, then work rib = K 2/P 2 for 6-7-7 (8-8) cm. K 1 round while AT THE SAME TIME dec 4 sts evenly = 36-40-40 (44-44) sts. Keep the middle 12 sts at the front of sock (= upper piece) on needle, slip the remaining 24-28-28 (32-32) sts on a stitch holder. Work diagram M.1 back and forth over the 12 sts on upper piece for approx. 3-3½-4 (5-6) cm – adjust after one whole repetition of diagram M.1 vertically. Cut the thread. Keep the 12 sts on needle, knit up 8-10-10 (12-16) sts along one side of upper piece, slip the 24-28-28 (32-32) sts from stitch holder back on needle and knit up 8-10-10 (12-16) sts along the other side over upper piece = 52-60-60 (68-76) sts – NOTE: This is done without working the sts. Start round mid back and work diagram M.2 in the round over all sts for approx. 1½-2-2½ (3-3½) cm – finish either after 1st or 3rd row in diagram M.2. P 1 round and then cast off all sts except the 12 sts on upper piece. Work diagram M.1 back and forth for sole over these sts for approx. 9-10-11 (13-15) cm – adjust after one whole repetition. Cast off and sew sole to sock - sew edge to edge to avoid a chunky seam. |
|||||||||||||
Diagram explanations |
|||||||||||||
|
|||||||||||||
 |
|||||||||||||
 |
|||||||||||||
Have you finished this pattern?Tag your pictures with #dropspattern #blueberryset or submit them to the #dropsfan gallery. Do you need help with this pattern?You'll find 16 tutorial videos, a Comments/Questions area and more by visiting the pattern on garnstudio.com. © 1982-2025 DROPS Design A/S. We reserve all rights. This document, including all its sub-sections, has copyrights. Read more about what you can do with our patterns at the bottom of each pattern on our site. |
|||||||||||||


With over 40 years in knitting and crochet design, DROPS Design offers one of the most extensive collections of free patterns on the internet - translated to 17 languages. As of today we count 320 catalogues and 12092 patterns translated into English (UK/cm). 12092
We work hard to bring you the best knitting and crochet have to offer, inspiration and advice as well as great quality yarns at incredible prices! Would you like to use our patterns for other than personal use? You can read what you are allowed to do in the Copyright text at the bottom of all our patterns. Happy crafting!
Post a comment to pattern DROPS Baby 21-24
We would love to hear what you have to say about this pattern!
If you want to leave a question, please make sure you select the correct category in the form below, to speed up the answering process. Required fields are marked *.