
Looking for a yarn?


Comments / Questions (63)
![]() DOMINIQUE AMBROSET wrote:
DOMINIQUE AMBROSET wrote:
Merci pour la réponse le rang 1 et 2 c'est un aller retour sans tourner le 3 et 4 je m'arrête et je tourne donc je ne finis jamais mes rangs et de même pour le 5 et 6 la série à répéter ce sont ces 6 rangs à répéter 3 fois j'ai beaucoup de ma à comprendre ces rangs raccourcis je commence la manche par le haut ? merci mme AMBROSET
25.04.2022 - 17:05DROPS Design answered:
Bonjour Mme Ambroset, tricotez ainsi: 2 rangs sur toutes les mailles, 1 rang jusqu'à ce qu'il reste 2 mailles, tournez et tricotez le rang "retour", et continuez ainsi en tricotant 2 mailles en moins à chaque fois (= vous tricotez à chaque fois 2, 4, 6,8,10, etc.. mailles en moins, mais en commençant toujours par les côtes anglaises) jusqu'à ce qu'il ne vous reste à tricoter que les 19 premières mailles: les 2 m point mousse + les 17 m côtes anglaises, vous tricotez alors 2 rangs sur ces 19 mailles et vous reprenez la série des rangs raccourcis au début et tricotez ainsi 3 fois au total. Bon tricot!
26.04.2022 - 09:25
![]() AMBROSET wrote:
AMBROSET wrote:
Bonjour Pour ce modèle concernant le devant droit ou gauche une fois que j'ai monté mes mailles et fait le 1er rang avec les 17 mailles de côtes anglaises comment je fais en même temps les rangs raccourcis. pour le rang 1 et 2 des raccourcis quand vous dites tricoter toutes les mailles , tourner et tricoter le rang suivant, cela veut dire que l'on fait des rangs allers et retours. les rangs raccourcis ne se font que sur les côtes anglaises ? Merci pour votre aide Mme AMBROSET
24.04.2022 - 17:02DROPS Design answered:
Bonjour Mme Ambroset, non les rangs raccourcis se font uniquement dans les mailles point mousse (on voit les démarcations des rangs raccourcis du devant gauche sur la photo); autrement dit, vous tricotez les rangs raccourcis en commençant sur l'endroit (les 2 m point mousse et les 17 mailles côtes anglaises seront tricotées tous les rangs) et pour le devant gauche, vous commencerez les rangs raccourcis sur l'envers. Bon tricot!
25.04.2022 - 08:11
![]() AMBROSET wrote:
AMBROSET wrote:
Bonjour Pour les emmanchures vous dites de rabattre de chaque côté un certain nombre de mailles et ensuite de diminuer, faut il le faire de la même façon c'est à dire au bord de chaque rang ou alors diminuer dans le rang Merci pour votre aide Mme AMBROSET
11.04.2022 - 14:21DROPS Design answered:
Bonjour Mme Ambroset, diminuez pour les emmanchures dos de chaque côté, 1 maille au début + 1 maille à la fin du rang, tous les rangs sur l'endroit 2-3-4-4-5-6 fois au total (tricotez par exemple ensemble à l'endroit les 2 premières + les 2 dernières mailles du rang sur l'endroit). Bon tricot!
19.04.2022 - 08:07
![]() AMBROSET wrote:
AMBROSET wrote:
Bonjour je ne comprends pas pour vos côtes anglaises au 1er rang vous dites de faire 2 mailles point mousse puis faire ensuite les côtes anglaises et terminer pour une maille lisière point mousse. Pour les rangs suivants doit on continuer à faire ces mailles (2 mailles point mousse et la maille lisière) merci pour votre réponse Mme AMBROSET
20.03.2022 - 16:39DROPS Design answered:
Bonjour Mme Ambroset, tout à fait, vous allez répéter la partie entre les * des côtes anglaises puis répéter les rangs 2 et 3 avec 1 ou 2 mailles point mousse au début/à la fin du rang en fonction du rang, mais conservez bien ces 2 mailles point mousse d'un côté de la bordure du bas du dos. Bon tricot!
21.03.2022 - 08:41
![]() Ambroset wrote:
Ambroset wrote:
Pour ce modèle les explications sont elles les mêmes pour les deux laines proposées (coton et merino) nolbres de mailles et grosseur d'aiguille Merci pour votre réponse Cordialement
21.02.2022 - 12:27DROPS Design answered:
Bonjour Mme Ambroset, oui, elles sont les memes. Bon tricot!
21.02.2022 - 12:28
![]() Anies wrote:
Anies wrote:
Polski not translated. szkoda
16.02.2020 - 09:55DROPS Design answered:
Już gotowy! Jak będziesz w przyszłości miała pytanie/prośbę o tłumaczenie, to w formularzu zaznacz PYTANIE, a nie KOMENTARZ, wtedy szybciej odpowiemy. A propos, czy już zagłosowałaś na nową kolekcję DROPS Jesień/Zima, zapraszamy serdecznie!
05.06.2020 - 17:48
![]() Eva wrote:
Eva wrote:
Das Muster haut vorn und hinten nicht hin. Die Vorderteile lassen sich nur mit Gewalt und diversen Spanntricks an das Rückteil anpassen und schlagen trotzdem Beulen. Ich kann diese Anleitung auf keinen Fall empfehlen. Bin gerade am Aufribbeln - die Arbeit von einer Woche für nix. Ärgerlich!
19.11.2018 - 11:33DROPS Design answered:
Liebe Eva, es tut uns leid, daß Sie mit der Jacke nicht zufrieden sind, nehmen Sie bitte Kontakt mit Ihrem DROPS Laden auf und zeigen Sie ihnen Ihr Strickstück, sicher können Sie Ihnen weiterhelfen.
19.11.2018 - 13:23
![]() Eva wrote:
Eva wrote:
Ich habe schon häufig Kleidungsstücke mit verkürzten Reihen gestrickt, aber bei dieser Jacke hier stimmt die Anleitung einfach nicht. Egal, wie ich es anstellte, die Rundung passt sich unten nicht wirklich perfekt an, Die Nähte zwischen Vorder- und Rückenteil lassen sich einfach nicht passgenau zusammenfügen. Sehr hilfreich wäre vielleicht ein paar weitere detailliertere Fotos, mit deren Hilfe sich erkennen ließe, wie das Ganze gedacht ist
17.11.2018 - 10:25
![]() Carole wrote:
Carole wrote:
In back: "Knit up 82-... sts (includes 1 edge st in each side) ...downwards)" -- I'm rewording & my question is am I understanding the process correctly. -- with right side facing you & edge with 3 garter sts down (=bottom of back) & 1 garter st up, pick up & knit xx stitches--pick up stitches just inside the 1 garter edge stitch. When you start knitting, do one edge stitch at either end for easier joining at sides.
04.04.2017 - 04:38DROPS Design answered:
Dear Carole, that's how you will work, pick up along the English rib piece (towards the 1 edge st) and work all sts in garter st. Happy knitting!
04.04.2017 - 10:18
![]() Gurli Vang wrote:
Gurli Vang wrote:
Der er fejl i .opskriften til model 128-4- Der mangler at der skal strikkes et lige stykke til nederste k på forstykkerne,som skal passe med de masker der strikkes ret, når stykket har den længte der svarer til maskerne rundes kantensom beskrevet. Det er rigtig ærgeligt nårder er fejl i opskriften. Specielt for nybegynder der så kan miste lysten til at strikke. venligst Gurli Vang
28.02.2016 - 11:37
|
|
Say it with a Smile#sayitwithasmilecardigan |
|
 |
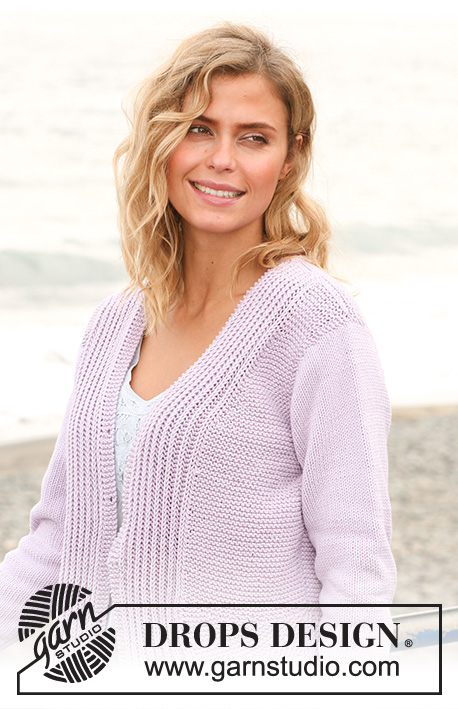 |
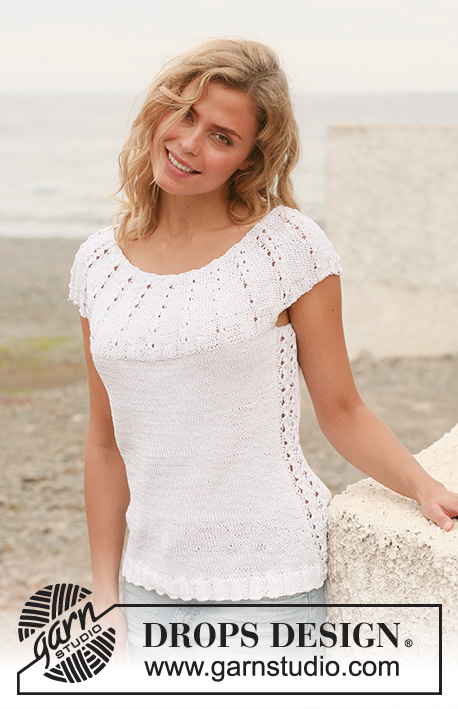
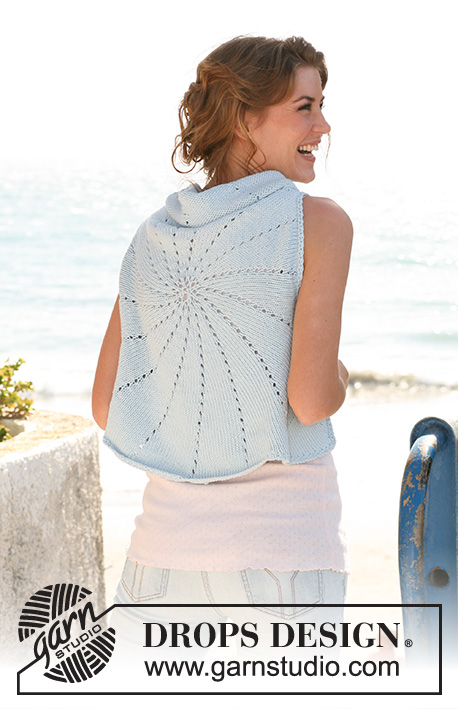
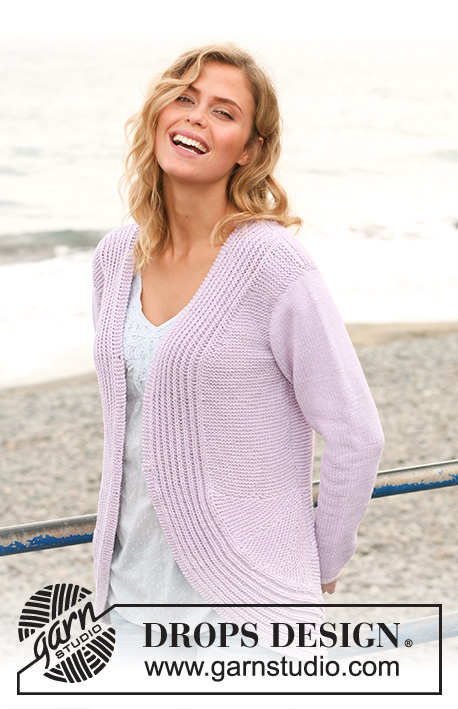
Knitted DROPS jacket in garter st with short rows and English rib in ”Merino Extra Fine” or ”Cotton Light”. Size: S - XXXL.
DROPS 128-4 |
|
|
GARTER ST (back and forth on needle): K all rows. ENGLISH RIB (back and forth on needle): ROW 1 (= RS): 1 st in garter st, * K 1, 1 YO, slip 1 st as if to P *, repeat from *-* a total of 7 times, finish with K 1 and 1 st in garter st. ROW 2 (= WS): 1 st in garter st, * 1 YO, slip 1 st as if to P, K tog YO and slipped st *, repeat from *-* a total of 7 times, finish with 1 YO, slip 1 st as if to P, 1 st in garter st. ROW 3 (= RS): 1 st in garter st, * K tog YO and slipped st, 1 YO, slip 1 st as if to P *, repeat from *-* a total of 7 times, K tog YO and slipped st, 1 st in garter st. Repeat 2nd and 3rd row upwards. SHORT ROWS: Work short rows on front piece to get a rounded edge on the piece. 1 repetition of short rows (= 28-30-32-34-36-40 rows) is worked as follows: 1st/2nd row: Work all sts, turn and work back. 3rd/4th row: Work until 2 sts remain, turn and work back. 5th/6th row: Work until 4 sts remain, turn and work back. Continue like this by working until 2 sts more remain on every turn until only the sts in English rib + 2 sts in garter st towards mid front are to be worked (= 19 sts). Now work 2 rows over the sts in English rib + 2 sts in garter st towards mid front. Repeat the repetition of short rows a total of 3 times vertically. -------------------------------------------------------- JACKET: The back piece is worked in 2 parts. First work a part in English rib which becomes a part of the bottom edge of back piece. Then knit up sts from the long side of this part. Then work upwards in garter st. BOTTOM EDGE (BACK PIECE): Worked back and forth on needle. Cast on 20 sts on pointed needles size 4 mm with Merino Extra Fine. Work 1st row from RS as follows: 2 sts in garter st, ENGLISH RIB - see explanation above - over the next 17 sts and 1 edge st in garter st. Continue with pattern until piece measures 42-46-50-55-61-67 cm, finish after 2nd row in English rib. Work next row from RS as follows: 3 sts in garter st, * K tog YO and slipped st, P 1 *, repeat from *-* a total of 7 times, K tog YO and slipped st, finish with K 1 and 1 edge st in garter st. LOOSELY cast off with K over K and P over P. Height of bottom edge is now approx. 12 cm and length is approx. 43-47-51-56-62-68 cm. BACK PIECE: Worked back and forth on needle. Knit up 82-90-98-108-120-132 sts (incl 1 edge st in each side) from RS inside 1 edge st on part in English rib (i.e. the 3 sts in garter st from bottom edge are turned downwards) on pointed needles size 4 mm with Merino Extra Fine. Work in GARTER ST - see explanation above! REMEMBER THE KNITTING TENSION! When piece measures 48-49-50-51-52-53 cm, cast off and dec for armholes at the beg of every row in each side as follows: 3 sts 1 time, 2 sts 1-2-3-5-7-9 times and dec 1 st 2-3-4-4-5-6 times = 68-70-72-74-76-78 sts. When piece measures 64-66-68-70-72-74 cm (it measures 16-17-18-19-20-21 cm from first cast off for armholes) cast off the middle 18-20-22-24-26-28 sts for neck and finish each shoulder separately. Then dec 1 st on next row from neck = 24 sts remain for shoulder in all sizes. Cast off when piece measures 66-68-70-72-74-76 cm. RIGHT FRONT PIECE: Worked back and forth on needle. Cast on 45-47-49-51-53-57 sts (incl 1 edge st in the side and 2 sts in garter st towards mid front) on pointed needles size 4 mm with Merino Extra Fine. K 1 row from WS, then work as follows - from RS: 2 sts in garter st, English rib over the next 17 sts, the last 26-28-30-32-34-38 sts in garter st. Continue like this upwards, while AT THE SAME TIME working SHORT ROWS - see explanation above. Work a total of 3 repetitions with short rows. Continue in English rib and garter st over all sts on every row. When piece measures 48-49-50-51-52-53 cm (adjust to match back piece) cast off for armhole in the side as on back piece, AT THE SAME TIME dec for neck from RS inside 19 sts (2 sts in garter st + English rib) by K 2 tog, dec every 1-1-1½-1½-2½-3 cm a total of 14-13-12-10-7-6 times. After all cast offs and dec, 24 sts remain on needle in all sizes. Continue in garter st and English rib until piece measures 17-18-19-20-21-22 cm, measured from first cast off for armhole (finish after 2nd row in English rib). Work next row from RS as follows: 3 sts in garter st, * K tog YO and slipped st, P 1 *, repeat from *-* a total of 7 times, K tog YO and slipped st, work the remaining sts as before. On next row cast off with K over K and P over P, piece now measures approx. 66-68-70-72-74-76 cm. LEFT FRONT PIECE: Work as right front piece but reversed. SLEEVE: Worked back and forth on needle. Cast on 46-48-50-52-54-56 sts (incl 1 edge st in each side) on pointed needles size 4 mm with Merino Extra Fine. Work 6 rows in garter st. Switch to needle size 4.5 mm. Then work in stocking st. When piece measures 8 cm, inc 1 st in each side. Repeat inc every 5-4-3½-3-2½-2 cm a total of 8-10-11-13-14-16 times = 62-68-72-78-82-88 sts. When piece measures 48-48-47-47-45-44 cm (NOTE! Shorter measurements in the larger sizes because of longer sleeve cap and broader shoulder width), cast off for sleeve cap at beg of every row in each side as follows: 3 sts 1 time, 2 sts 2 times, 1 st 6-8-9-10-13-16 times. Then cast off 2 sts in each side until piece measures 56-57-57-58-58-59 cm, then cast off 3 sts 1 time in each side. Cast off. Now sleeve measures approx. 57-58-58-59-59-60 cm. ASSEMBLY: Sew the shoulder seams. Sew in sleeves and sew under arm and side seams in one inside 1 edge st. |
|
 |
|
Have you finished this pattern?Tag your pictures with #dropspattern #sayitwithasmilecardigan or submit them to the #dropsfan gallery. Do you need help with this pattern?You'll find 17 tutorial videos, a Comments/Questions area and more by visiting the pattern on garnstudio.com. © 1982-2025 DROPS Design A/S. We reserve all rights. This document, including all its sub-sections, has copyrights. Read more about what you can do with our patterns at the bottom of each pattern on our site. |
|


With over 40 years in knitting and crochet design, DROPS Design offers one of the most extensive collections of free patterns on the internet - translated to 17 languages. As of today we count 320 catalogues and 12093 patterns translated into English (UK/cm). 12093
We work hard to bring you the best knitting and crochet have to offer, inspiration and advice as well as great quality yarns at incredible prices! Would you like to use our patterns for other than personal use? You can read what you are allowed to do in the Copyright text at the bottom of all our patterns. Happy crafting!
Post a comment to pattern DROPS 128-4
We would love to hear what you have to say about this pattern!
If you want to leave a question, please make sure you select the correct category in the form below, to speed up the answering process. Required fields are marked *.