
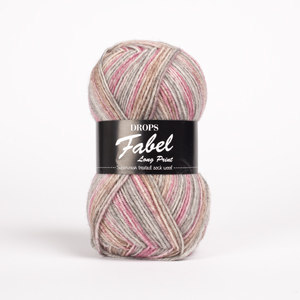
Looking for a yarn?


Comments / Questions (145)
![]() Pernilla Lindgren wrote:
Pernilla Lindgren wrote:
Hej jag undrar vilken sida som är upp och vilken som är ner är det markör 1 eller 16 för jag får det inte att stämma på vilken sida som det ska ökas mest på tack för hjälpen
01.04.2015 - 11:46DROPS Design answered:
Hej Pernilla, markör 1 är mot midjan och 16 är ner. Du stickar nerifrån och upp till markör 1, vänd och tillbaka ner igen. Upp till markör 2 vänd och tillbaka. Du får flest varv nederst och större vidd. Lycka till!
15.05.2015 - 11:37
![]() Renate Feineis wrote:
Renate Feineis wrote:
Liebes Drops Team, ich bin gerade an der Stelle angekommen, wo die Ärmel auf die Rundstricknadel aufgenommen werden. Wenn ich das Kleid an mir "anlege" würde das Kleid viel zu kurz oder die Achsel hängt irgendwo unterhalb der Brust :-(.Gestrickt habe ich Rock, dann kommt gleich darauf die weiße Lochkante und dann 12cm hoch.Aktuell hängt die Lochkante irgendwo vor der Brust, was mir falsch erscheint. Wo hab ich was vergessen? Ich hoffe Ihr könnt mir helfen. Danke!!!!! Gruß Renate
15.03.2015 - 18:52DROPS Design answered:
Sie haben nichts vergessen, das Oberteil ist tatsächlich sehr kurz. Sie können das an sich selbst nachmessen, der Teil ab dem Auffassen der M hat nur eine Länge von insges. 29 cm. Damit kommen Sie darauf, dass die Lochreihe in etwa knapp unter der Brust sitzt. Die Maße sind so beabsichtigt, wir hatten schon Rückfragen dazu. Das Kleid hängt sich durch das Garngewicht noch etwas aus, vielleicht messen Sie es daher nun noch einmal hängend. Sie können den Teil aber auch verlängern, indem Sie nach der Loch-R die Abstände zwischen den Zun. vergrößern - also statt alle 1,5 cm z.B. alle 2 cm zunehmen, das müssten Sie anhand Ihrer Maße errechnen. Der Garnverbrauch wird dadurch größer.
16.03.2015 - 10:02
![]() Anne Gro Høgetveit wrote:
Anne Gro Høgetveit wrote:
Hei. Denne kjolen ser lengre ut på bildet enn målene tilsier. Jeg har kjøpt garn og oppdaget etterpå at den var såpass kort. Min mor skal strikke kjolen for meg, hun er vant til å lese og strikke oppskrifter. Hvordan kan kjolen forlenges? F.eks. 10 cm. Mvh Anne Gro Høgetveit Sendt fra en Samsung Mobil.
27.01.2015 - 21:26DROPS Design answered:
Hej Anne, Man kan følge opskriften til skørtet på en af de større størrelser i længden og så følge sig egen størrelse i bredden. Ellers spørger du din lokale garnbutik, de hjælper gerne til. God fornøjelse!
28.01.2015 - 11:06
![]() Katharina wrote:
Katharina wrote:
Kann ich für das Kleid auch " Fabel Print" benutzen? Sieht das Maschenbild dann genau so schön aus wie mit "Fabel"? Danke.
08.12.2014 - 13:28DROPS Design answered:
Der Farbwechsel bei Fabel Print ist kürzer und wirkt dadurch "unruhiger" als bei dem im Modell verwendeten Fabel Long Print, es werden sich dann nicht so breite Farbstreifen innerhalb des bunten Teils ergeben. Die Wolle ist ansonsten gleich, aber es ist natürlich Geschmackssache, ob einem die Farbgebung von Fabel Print gefällt. Anhand der Farbkarten bekommen Sie einen Eindruck, wie Fabel Print im Gegensatz zu Fabel Long Print wirkt.
08.12.2014 - 15:24
![]() Lotte Kyvik wrote:
Lotte Kyvik wrote:
Jeg lure på det samme som hansine,- at det skal være 12 cm når det felles til ærmehul, og ifølge diagrammet skal det være 17 cm etterpå. Hvilket betyr at bilen blir 29 cm, hvilket virker veldig kort når man måler fra livet og opp???
03.11.2014 - 22:09DROPS Design answered:
Hej Lotte, Hvis du ser på måleskitsen, så ser du at målene til bæretykket ikke starter ved taljen men lige under brystet. Så det stemmer at bærestykket skal være 29 cm i str M. God fornøjelse!
25.11.2014 - 09:05
![]() Ana Isabel wrote:
Ana Isabel wrote:
Me gustaría hacer este patrón pero no lo entiendo. Por qué se montan en dos agujas circulares? para que se usa aguja circular sui se trabaja como una aguja normal?
30.10.2014 - 14:20DROPS Design answered:
Hola Ana. Este modelo se trabaja con ag circulares para tener espacio suficiente para todos los pts. La primera fila se monta con dos ag para tener el borde más elástico.
30.10.2014 - 23:57
![]() Hilde Birkeland wrote:
Hilde Birkeland wrote:
Ser det er en hvit stripe som er strikket inn på bolen og på bærestykket. Det står ikke i oppskriften at jeg skal bytte farge. Men syntes at det var fint med den, så lurte på hvordan jeg kan justere mønsteret og strikke den inn? Takk
03.08.2014 - 20:29DROPS Design answered:
Hei Hilde. Jo, det er starten på BOL: Start fra retten ved sidesømmen og strikk opp 1 m i hver rille rundt hele skjørtets åpning på rundp 2,5 med natur... osv.
04.08.2014 - 15:44
![]() Gitte Agerlund wrote:
Gitte Agerlund wrote:
Kan man vælge frit ml de forskellige Fabel garn typer? Eller er det kun den type der er link til i opskriften?
28.06.2014 - 13:30DROPS Design answered:
Hej Gitte. Du kan bruge alle farver og typer i DROPS Fabel. Du kan ikke bruge DROPS Big Fabel - den er tykkere.
01.07.2014 - 14:25
![]() Lin Janson wrote:
Lin Janson wrote:
How does the sizing refer to English, I'm a size 14
19.05.2014 - 21:45DROPS Design answered:
Dear Mrs Janson, you will find at the end of the pattern a measurement chart with all measures taken flat from side to side for each size. Compare these to a similar garment you have and like the shape to find the matching size. Happy knitting!
20.05.2014 - 09:03
![]() M. Wicht wrote:
M. Wicht wrote:
Hallo, ich habe noch eine Frage: Können Sie mir sagen wieviel, ich nenne es mal Rapporte (also von dem natur-Streifen bis zum nächsten natur-Streifen) sich bei der Größe XL ergeben. Bis jetzt sind es bei mir 26 Stück.Ich bin mir so unsicher was die weite des Rockes betrifft. Lieber etwas weiter oder lieber enger stricken. Kann es leider nicht anprobieren da es für meine Tochter in Norwegen ist. Vielleicht können Sie mir weiterhelfen. Lieben Gruß und Danke im voraus. M. Wicht
10.05.2014 - 11:15DROPS Design answered:
Liebe Frau Wicht, maßgeblich ist das Taillenmaß, das ja mit der unteren Rockweite zusammenhängt. Messen Sie also möglichst genau aus, dass die Taillenweite stimmt (also bei Größe XL 53 cm, ein gesamter Umfang von 106 cm), d.h. Sie messen die kurze Seite des Gestricks, liegend. Die Taille sollte nicht zu weit werden. Sie könnten Ihre Tochter vorsichtshalber nach ihren genauen Maßen fragen. Gutes Gelingen!
10.05.2014 - 14:21
|
|
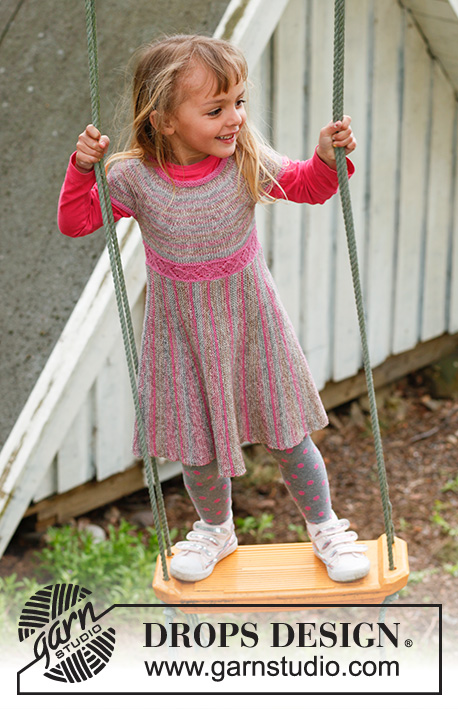
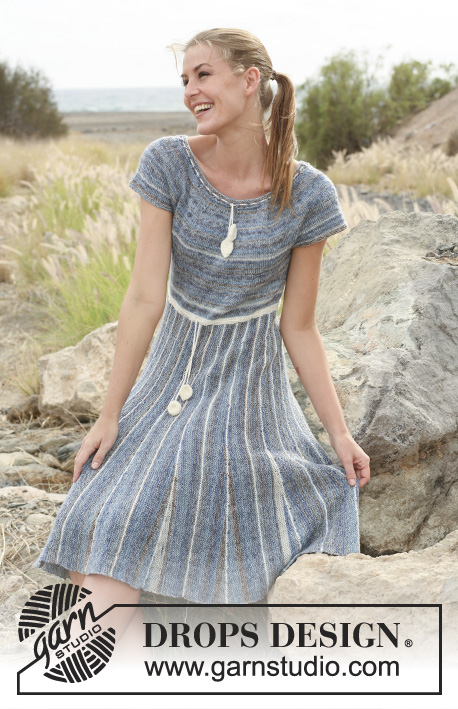
Dance With Me#dancewithmedress |
|
 |
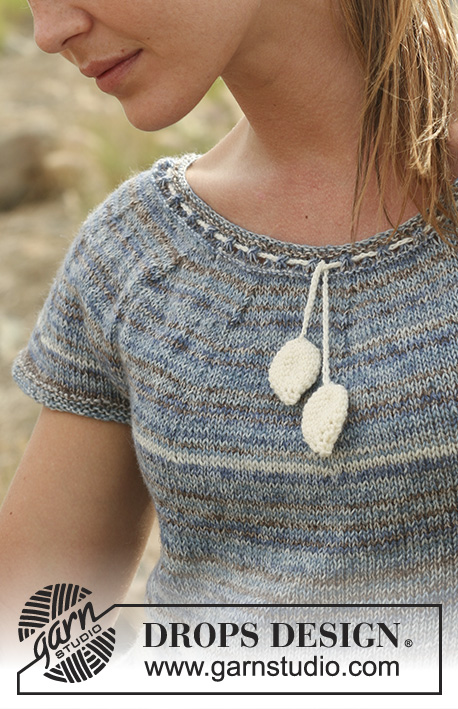 |
Knitted DROPS dress with skirt worked from side to side with short rows and stripes, and knitted top in stocking st with round yoke in "Fabel". Size: S - XXXL
DROPS 128-1 |
|
|
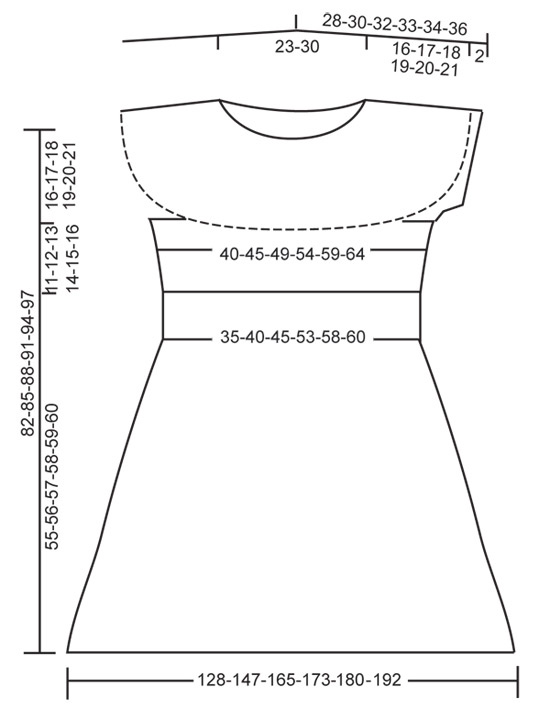
GARTER ST (in the round): *K 1 round and P 1 round*, repeat from *-*. INCREASE TIP: Inc 1 st by making 1 YO, on next row knit YO twisted (i.e. work in the back loop of st instead front) to avoid holes. DECREASE TIP: Dec by K 2 sts tog. -------------------------------------------------------- DRESS: Beg by working a skirt back and forth on circular needle from side to side. To give the skirt width at the bottom work with short rows. Then work round yoke. LOOSELY cast on 132-134-136-140-142-144 sts on 2 circular needles size 3 mm with 604, ocean view. Pull out one of the needles (to avoid a tight cast on edge) and work as explained below. The entire skirt is worked in Garter st, i.e. K all rows. Work first row as follows (from waist down = WS): Work 8-10-12-14-16-18 sts, insert MARKER 1, work 14-14-14-16-16-16 sts, insert MARKER 2, work 18 sts, insert MARKER 3, work 10 sts, insert MARKER 4, work 10 sts, insert MARKER 5, work 6 sts, insert MARKER 6, work 6 sts, insert MARKER 7, work 6 sts, insert MARKER 8, work 6 sts, insert MARKER 9, work 6 sts, insert MARKER 10, work 6 sts, insert MARKER 11, work 6 sts, insert MARKER 12, work 6 sts, insert MARKER 13, work 6 sts, insert MARKER 14, work 6 sts, insert MARKER 15, work 6 sts, insert MARKER 16, work the remaining 6 sts. Move the markers upwards when working. Continue to work with short rows (NOTE! Tighten the thread on every turn in mid of piece before continuing, to avoid holes) as follows: * Work 2 rows with 100, off white back and forth over all sts (1st row = RS), work 10-10-10-12-12-14 rows with 604, ocean view back and forth over all sts (= 12-12-12-14-14-16 rows in garter st over all sts). Then work until MARKER 1, turn and work back. Work until MARKER 2, turn and work back. Work until MARKER 3, turn and work back. Work until MARKER 4, turn and work back. Work until MARKER 5, turn and work back. Work until MARKER 6, turn and work back. Work until MARKER 7, turn and work back. Work until MARKER 8, turn and work back. Work until MARKER 9, turn and work back. Work until MARKER 10, turn and work back. Work until MARKER 11, turn and work back. Work until MARKER 12, turn and work back. Work until MARKER 13, turn and work back. Work until MARKER 14, turn and work back. Work until MARKER 15, turn and work back. Work until MARKER 16, turn and work back over the remaining 6 sts. Switch to off white and work 2 rows back and forth over all sts. Switch back to ocean view and work until MARKER 16, turn piece and work back. Then work until MARKER 15, turn and work back. Work until MARKER 14, turn piece and work back. Work until MARKER 13, turn and work back. Work until MARKER 12, turn and work back. Work until MARKER 11, turn and work back. Work until MARKER 10, turn and work back. Work until MARKER 9, turn and work back. Work until MARKER 8, turn and work back. Work until MARKER 7, turn and work back. Work until MARKER 6, turn and work back. Work until MARKER 5, turn and work back. Work until MARKER 4, turn and work back. Work until MARKER 3, turn and work back. Work until MARKER 2, turn and work back. Work until MARKER 1, turn and work back. Work 10-10-10-12-12-14 rows back and forth over all sts with ocean view *. Repeat from *-* until piece measures approx. 35-40-45-53-58-60 cm vertically (measured at the shortest when piece is flat on the table) - adjust after one whole repetition, but possibly round down to avoid longer measurements. Insert a marker (= side of dress). Repeat from *-* until piece measures approx. 35-40-45-53-58-60 cm from marker (i.e. front and back piece are the same length) then VERY LOOSELY cast off. ASSEMBLY: Sew skirt tog in the side - sew edge to edge in front loop of outermost st so that the seam is flat. BODY: Beg from RS at side seam and knit up 1 st in every ridge (2 rows in garter st) around the entire opening of the skirt on circular needle size 2.5 mm with off white. P 1 round. K 2 rounds while AT THE SAME TIME adjusting the no of sts to 168-192-216-240-264-288 on 1st round. Then work a lace edge as follows: * 1 YO, K 2 tog *, repeat from *-* the entire round. Then K 2 rounds. Then P 1 round and K 1 round. Now insert a marker in each side, i.e. at beg of round and after 84-96-108-120-132-144 sts - move the markers upwards when working. Switch to circular needle size 3 mm and ocean view and work in stocking st. AT THE SAME TIME on 2nd round, inc 1 st on each side each marker - READ INCREASE TIP! (= 4 sts inc). Repeat inc every 1½-1½-2½-2½-3-3 cm a total of 6-6-5-5-5-5 times = 192-216-236-260-284-308 sts. When piece measures 11-12-13-14-15-16 cm from where sts were knitted up for body, cast off 12 sts in each side (i.e. 6 sts on each side of both markers) = 84-96-106-118-130-142 sts remain for front and back piece. Put piece aside and knit the sleeves. SLEEVE: Worked in the round on double pointed needles. Cast on 74-79-84-89-94-99 sts on double pointed needles size 2.5 mm with ocean view. Insert a marker at beg of round (= mid under sleeve). Work 6 rounds in GARTER ST - see explanation above. Switch to double pointed needles size 3 mm and K 1 round while AT THE SAME TIME casting off 12 sts mid under sleeve (i.e. 6 sts each side of marker) = 62-67-72-77-82-87 sts. Put piece aside and knit another sleeve. YOKE: Slip sleeves on to same circular needle as body where armholes were cast off = 292-326-356-390-424-458 sts. Work in stocking st with ocean view while AT THE SAME TIME dec 6-1-5-0-4-10 sts evenly on 1st round = 286-325-351-390-420-448 sts. Insert 11-13-13-13-14-14 markers in piece with 26-25-27-30-30-32 sts between each. After 5-8-5-5-8-5 rounds in stocking st, dec 1 st before every marker - Read DECREASE TIP! Repeat dec on every 6th round a total of 6-6-7-7-7-8 times, then on every other round a total of 3-3-3-4-5-5 times = 187-208-221-247-252-266 sts. After last dec, switch to circular needle size 2.5 mm. K 2 rounds while AT THE SAME TIME adjusting the no of sts to 186-207-219-246-252-264 on last round. ELEVATION IN BACK OF NECK: Now work an elevation in back of neck, back and forth on needle as follows: Insert a marker in the middle st mid front. Start mid back and work until 19 sts remain before marker at the front, turn piece, tighten thread and work until 19 sts remain before marker in the other side. Turn piece, tighten thread and work until 46 sts remain before marker at the front, turn piece, tighten thread and work until 46 sts remain before marker in the other side. Turn piece, tighten thread and work until 67-75-79-85-87-90 sts remain before marker, turn piece, tighten thread and work back until 67-75-79-85-87-90 sts remain before marker in the other side. Turn piece, tighten thread and work until mid back. NECKLINE: P 1 round and K 2 rounds, then work lace edge as follows: * 1 YO, K 3 tog *, repeat from *-* the entire round = 124-138-146-164-168-176 sts remain on needle. K 2 rounds while AT THE SAME TIME dec 6-8-10-20-18-20 sts evenly on the last round = 118-130-136-144-150-156 sts. P 1 round and K 1 round, and then loosely cast off with P sts. Piece measures approx. 82-85-88-91-94-97 cm when flat, it will be longer when dress is worn. TIE WITH CONE: Crochet a ch-row on hook size 2.5 mm with off white until row measures approx. 130 cm (or desired measurement around waist). Then work 1 sl st in 4th ch from hook (= beg of cone). ROUND 1: Work 6 dc in ch-ring. ROUND 2: Work 2 dc in every dc = 12 dc. ROUND 3: Work * 1 dc in first dc, 2 dc in next dc *, repeat from *-* the rest of the round = 18 dc. ROUND 4-7: Work 1 dc in every dc = 18 dc. ROUND 8: Work * 1 dc in first dc, then work the next 2 dc tog *, repeat from *-* the rest of the round = 12 dc. ROUND 9: Work 1 dc in every dc = 12 dc. ROUND 10: Crochet all dc tog 2 by 2 = 6 dc. ROUND 11: Work all dc tog 2 by 2 = 3 dc. Cut the thread, baste it up and down through sts, pull the thread to tighten and fasten tightly. Crochet another cone. Beg by working 4 ch and form a ring with 1 sl st in 1st ch. Then continue as explained above. Sew this cone to the ch-row after the tie has been inserted in the lace edge. Work another tie for neck with a length of approx. 100 cm. |
|
 |
|
Have you finished this pattern?Tag your pictures with #dropspattern #dancewithmedress or submit them to the #dropsfan gallery. Do you need help with this pattern?You'll find 22 tutorial videos, a Comments/Questions area and more by visiting the pattern on garnstudio.com. © 1982-2025 DROPS Design A/S. We reserve all rights. This document, including all its sub-sections, has copyrights. Read more about what you can do with our patterns at the bottom of each pattern on our site. |
|


With over 40 years in knitting and crochet design, DROPS Design offers one of the most extensive collections of free patterns on the internet - translated to 17 languages. As of today we count 320 catalogues and 12091 patterns translated into English (UK/cm). 12091
We work hard to bring you the best knitting and crochet have to offer, inspiration and advice as well as great quality yarns at incredible prices! Would you like to use our patterns for other than personal use? You can read what you are allowed to do in the Copyright text at the bottom of all our patterns. Happy crafting!
Post a comment to pattern DROPS 128-1
We would love to hear what you have to say about this pattern!
If you want to leave a question, please make sure you select the correct category in the form below, to speed up the answering process. Required fields are marked *.