
Looking for a yarn?


Comments / Questions (48)
![]() Andrea Ogsaint wrote:
Andrea Ogsaint wrote:
Ich verstehe nicht, wie/wo man den Picot zwischen die beiden festen Maschen der Vorreihe anbringen soll, damit das Muster aussieht, wie auf dem Foto. Da ich die Wolle online gekauft habe, kann ich auch nicht im Laden nachfragen. Danke!
19.07.2015 - 23:22DROPS Design answered:
Sie häkeln die 1. R mit festen M und Picots wie folgt: 2 fM, dann 4 Lm und 1 Kett-M in die 1. dieser Luft-M (das ist der Picot), dann kommen 3 fM, die Sie jeweils in die nächsten 3 fM häkeln. Es sind also immer 3 fM zwischen den Picots. In der R danach häkeln Sie immer 1 Stb und 2 Lm und überspringen mit den 2 Lm 2 fM und den dazwischenliegenden Picot, damit ergibt sich dann das Muster wie auf dem Foto.
28.07.2015 - 16:12
![]() Linda wrote:
Linda wrote:
Er det mulig å få ei skriftlig forklaring på diagrammet?
28.04.2014 - 12:55DROPS Design answered:
Det er svärt at beskrive anderledes end diagram forklaringen. Men din lokale DROPS forhandler kan helt sikkert hjälpe dig med at forklare mönsteret. Held og lykke!
07.05.2014 - 13:18
![]() Valeria wrote:
Valeria wrote:
Ho realizzato questo cappello, molto carino, solo che la parte traforata viene con fori troppo alti, molto meglio fare tutti i giri del motivo solo con maglie alte semplici
20.04.2013 - 17:13
![]() Nina wrote:
Nina wrote:
Naja klappt gut...bis auf das schild das hängt auf der rechten seite immer nach unten bzw. rollt sich....
10.04.2013 - 12:05
![]() Nicole wrote:
Nicole wrote:
Ich verstehe das Muster, glaube ich nicht ganz. Bei mir sieht das Muster nicht so aus wie auf dem Bild. Lt. Muster soll das Picot zwischen der zweiten und dritten fM gehäkelt werden. Wie soll das gehen? Und: Wenn ich nach dem Stäbchen die 4 LM häkele und diese wie angegeben mit Kettmasche schließe, steht bei mir das Picet nach oben ab und nicht wie abgebildet nach innen. Kann mir jemand bitte schriftlich erklären wo ich wie in welche Masche stechen muß? Danke schön!
27.05.2012 - 15:09DROPS Design answered:
Darf ich Sie bitten für Hilfe beim Häkeln bzw. Erklärung der Anleitung den Laden zu kontaktieren, in dem Sie die Wolle gekauft haben? Dort hilft man Ihnen gerne weiter. Und wir sind gerne für Sie da, wenn Sie glauben, einen Fehler in der Anleitung entdeckt zu haben.
29.05.2012 - 10:13
![]() Elaine wrote:
Elaine wrote:
I cannot understand the diagram explaining the pattern M.1 in row 4 it says ch 1 ??
05.03.2012 - 01:15DROPS Design answered:
In the pattern chart there are rounds with sc. When working a round with sc, replace 1st sc on round with 1 ch and finish round with 1 sl st in ch from beg of round.
06.03.2012 - 02:04
![]() Drops Design NL wrote:
Drops Design NL wrote:
U begint de eerste toer in M.1 (alleen vasten) met 1 l - hiermee gaat u 1 st "de hoogte in". Dan haakt u gewoon verder, 1 v in iedere v tot het einde van de tr. Aan het einde van de toer verbindt u het werk met 1 hv in die l die u aan het begin heeft gemaakt. gr. Angelique
30.08.2011 - 09:13
![]() Carla wrote:
Carla wrote:
Hallo, het lukt me niet om het M1 patroon net zo te krijgen als op de foto. Kunt u mij precies uitleggen hoe ik het moet haken, ik begin met 1 st. dan een losse (die maak ik met een hv vast, is dat goed of niet. ik had dus die regel gedaan, en dan moet ik weer allemaal vasten haken, maar werd bij mij niet goed, want dat picot hing dan niet los en dat is volgens mij wel de bedoeling. Hoop dat u me nog begrijpt. Alvast bedankt.
28.08.2011 - 14:40
![]() ELaina Mc wrote:
ELaina Mc wrote:
Cute! Bright, vibrant colors are popular here right now but I've always loved neutrals.
06.02.2011 - 17:51
![]() Christine wrote:
Christine wrote:
Söt och tuff måste prova denna.
29.01.2011 - 12:03
|
|||||||||||||||||||
Let's Safari#letssafarihat |
|||||||||||||||||||
 |
 |
||||||||||||||||||
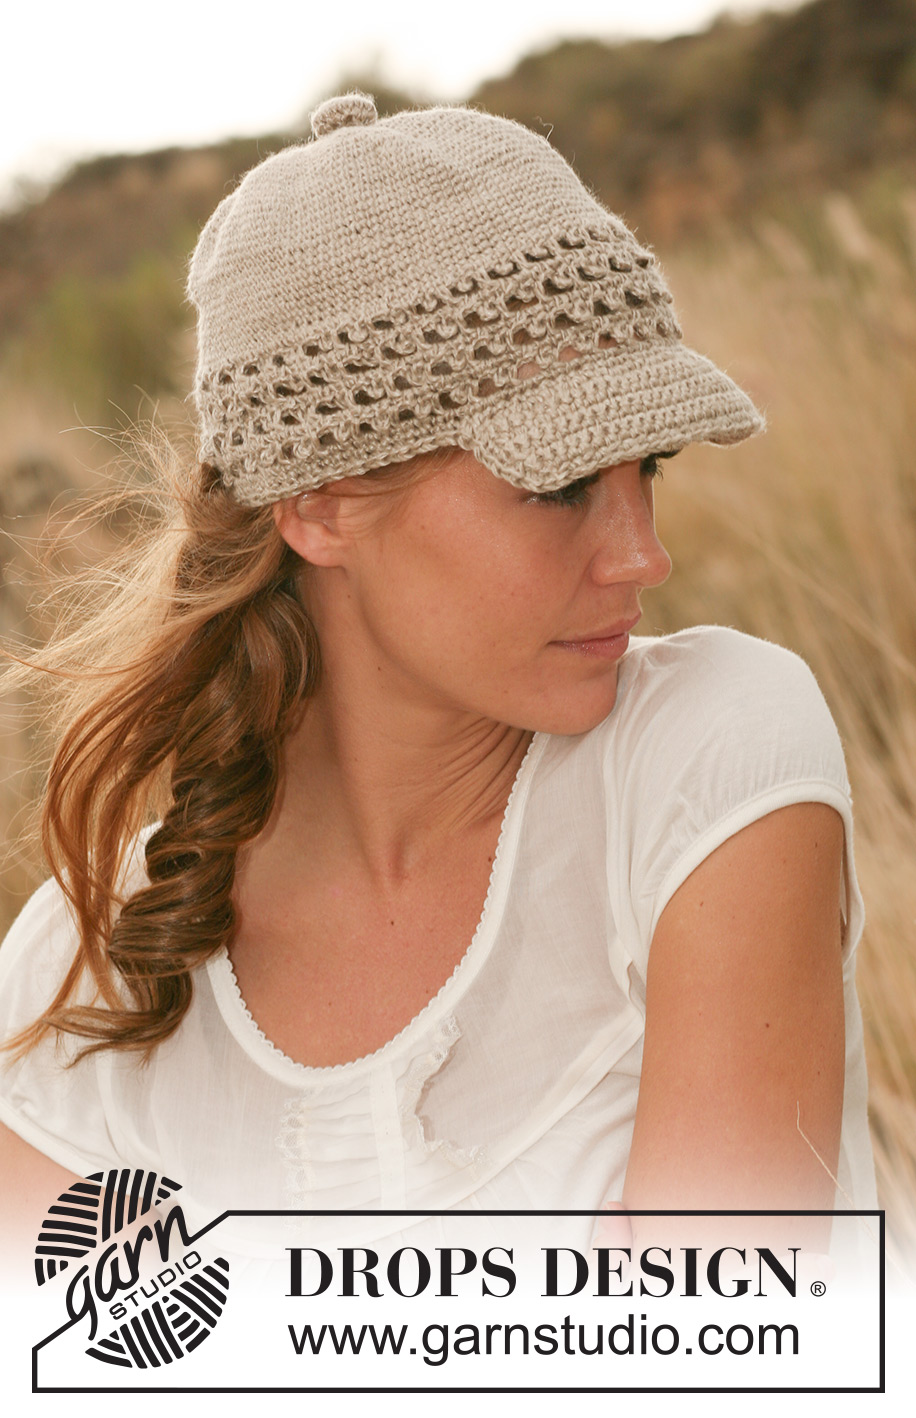
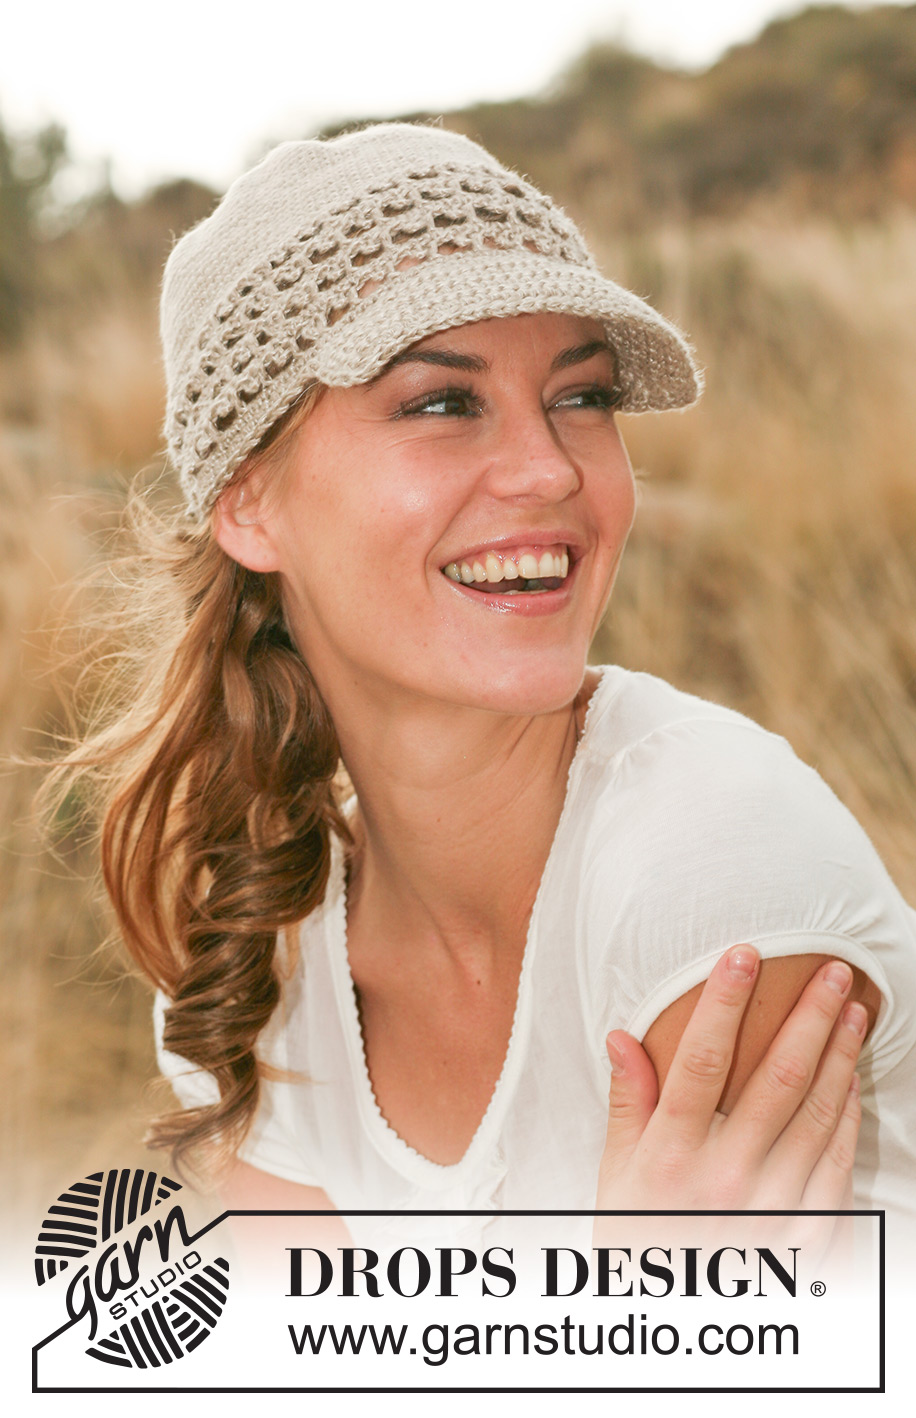
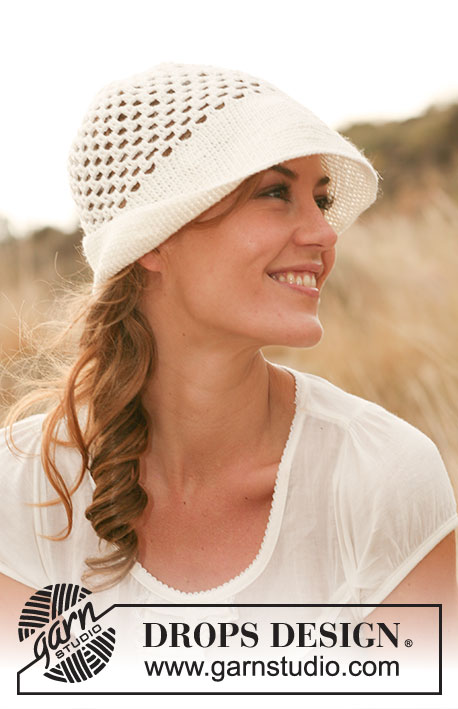
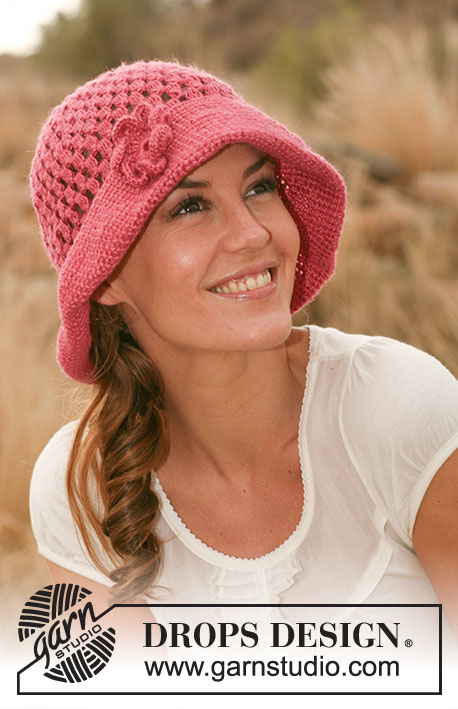
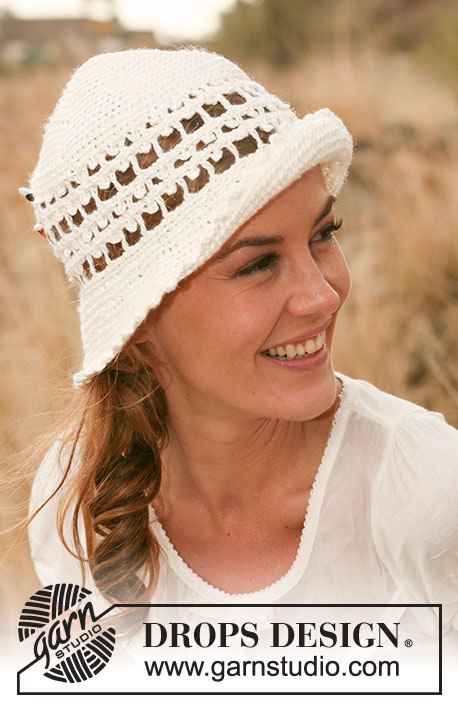
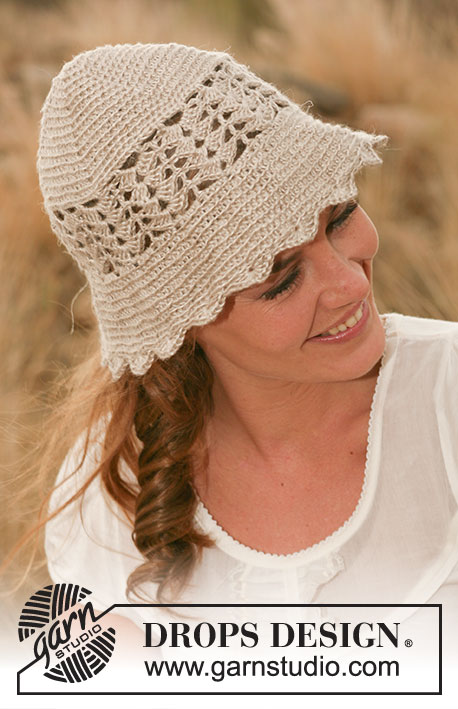
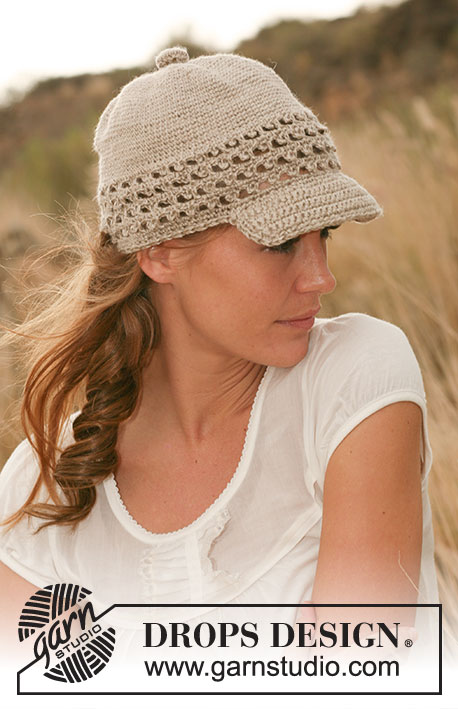
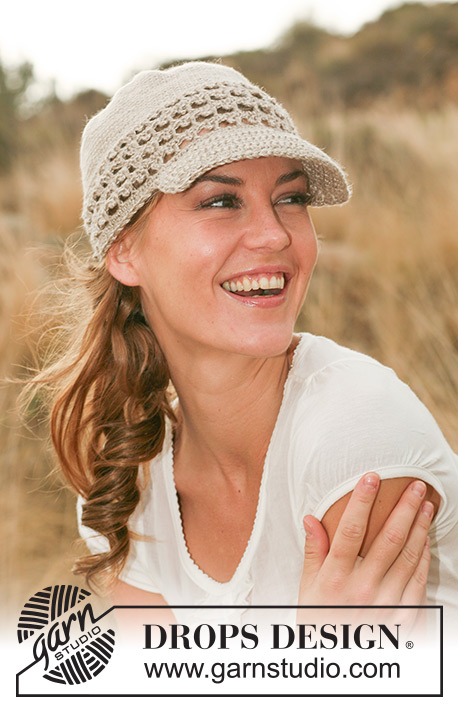
Crochet cap with brim and lace pattern border in DROPS Lin or DROPS Belle.
DROPS 127-45 |
|||||||||||||||||||
|
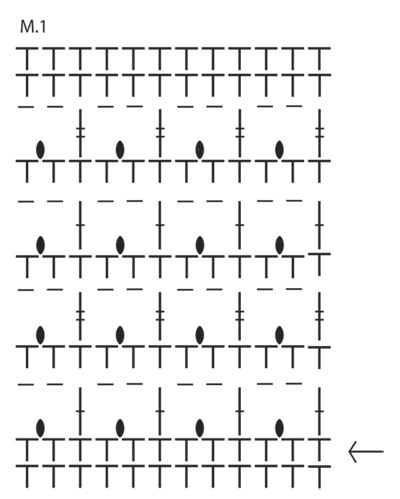
CROCHET INFO: Replace first dc at beg of every round with dc with 1 ch and finish every round with 1 sl st in ch from beg of round. INCREASE TIP: Inc 1 dc by working 2 dc in same st. DECREASE TIP: Dec 1 dc by working 1 dc but wait with last YO and last pull through (= 2 sts on hook), then work next dc but on last YO and pull through pull thread through all sts on hook = 1 dc dec. PATTERN: See diagram M.1, start of round is marked with arrow in diagram - NOTE: In M.1 replace first dc on round with dc with 1 ch and finish round with 1 sl st in ch from beg of round. Replace first tr at beg of every round with tr with 3 ch and finish every round with 1 sl st in 3rd ch from beg of round. Replace first dtr at beg of every round with dtr with 4 ch and finish every round with 1 sl st in 4th ch from beg of round. -------------------------------------------------------- HAT: The piece is worked top down. Crochet 5 ch on hook size 3 mm with 1 thread Lin or Belle and form a ring with 1 sl st in first ch. ROUND 1: Work 12 dc in ch-ring – READ CROCHET INFO! ROUND 2: * 1 dc in first st, 2 dc in next st *, repeat from *-* the rest of the round = 18 dc. ROUND 3: * 1 dc in each of the first 2 sts, 2 dc in next st *, repeat from *-* the rest of the round = 24 dc. ROUND 4: * 1 dc in each of the first 3 sts, 2 dc in next st *, repeat from *-* the rest of the round = 30 dc. Continue inc like this (= inc 6 dc on every round) until there are 96-102-108 dc on the round (i.e. so that for every round 1 dc more is worked between every 1 dc inc). Continue working 1 dc in every st until piece measures 10-11-12 cm from mid down - while AT THE SAME TIME on last round inc 3-6-9 dc evenly - READ INCREASE TIP = 99-108-117. Now work PATTERN - see explanation above. After M.1 there are still 99-108-117 dc on the round and the piece measures approx. 16-17-18 cm from mid and down. Cut and fasten the thread, beg of round = mid back. Insert a marker mid front (in sizes S + L insert marker in the middle st and in size M insert marker between the middle 2 sts). BRIM: Beg from RS, 13-15-16 sts before marker mid front and work on hook size 3 mm with 2 threads Lin as follows: * 1 dc in each of the first 2 sts, 2 dc in next st *, repeat from *-* 9-10-11 times = 36-40-44 dc. Turn piece and work back with 1 dc in every dc. Continue to work dc back and forth while AT THE SAME TIME dec 1 dc in each side on every other row a total of 3 times - READ DECREASE TIP = 30-34-38 dc. Cut and fasten the threads, brim measures approx. 3 cm. EDGE: Work 1 edge on hook size 3 with 2 threads Lin or Belle as follows: 1 dc at beg of round (= mid back), * 1 ch, skip 1 dc, 1 dc in next st *, repeat from *-* around the entire edge of cap and brim, and finish 1 sl st in dc from beg of round. BUTTON COVER: Work a cover for 1 button on hook size 3 mm with 1 thread Lin or Belle as follows: ROUND 1: Work 2 ch, then work 16 tr in the first of the 2 ch worked, finish with 1 sl st at top of first tr. ROUND 2: Work 1 dc in every tr and finish with 1 sl st in first dc on round = 16 dc. ROUND 3: Work 3 ch (= 1 tr), continue to work 1 tr in every other dc from previous round, finish with 1 sl st in 3rd ch from beg of round = 8 tr. Place button inside the cover, sew around the edge and tighten tog. Sew the button mid on top of cap. |
|||||||||||||||||||
Diagram explanations |
|||||||||||||||||||
|
|||||||||||||||||||
 |
|||||||||||||||||||
Have you finished this pattern?Tag your pictures with #dropspattern #letssafarihat or submit them to the #dropsfan gallery. Do you need help with this pattern?You'll find 8 tutorial videos, a Comments/Questions area and more by visiting the pattern on garnstudio.com. © 1982-2025 DROPS Design A/S. We reserve all rights. This document, including all its sub-sections, has copyrights. Read more about what you can do with our patterns at the bottom of each pattern on our site. |
|||||||||||||||||||


With over 40 years in knitting and crochet design, DROPS Design offers one of the most extensive collections of free patterns on the internet - translated to 17 languages. As of today we count 320 catalogues and 12094 patterns translated into English (UK/cm). 12094
We work hard to bring you the best knitting and crochet have to offer, inspiration and advice as well as great quality yarns at incredible prices! Would you like to use our patterns for other than personal use? You can read what you are allowed to do in the Copyright text at the bottom of all our patterns. Happy crafting!
Post a comment to pattern DROPS 127-45
We would love to hear what you have to say about this pattern!
If you want to leave a question, please make sure you select the correct category in the form below, to speed up the answering process. Required fields are marked *.