
Looking for a yarn?


Comments / Questions (30)
![]() W.cevaal wrote:
W.cevaal wrote:
Vraag in het patroon staat na de boord te hebben gebreid dat je moet minderen klopt dit wel en als je het wel moet doen wat wordt er bedoelt met de steken verhouding ik vindt het zo raar dat je na de boord moet minderen met vr gr mevr cevaal
11.09.2017 - 16:31DROPS Design answered:
Hallo W. Cevaal, Dat klopt, je moet bij dit minderen na de boord. Met de stekenverhouding wordt bedoelt dat je met (in dit geval) 23 steken en 30 naalden in tricotsteek uit moet komen op 10 cm breed en 10 cm hoog. Brei altijd een proeflapje en pas evt. de naalddikte aan om uit te komen op de juiste stekenverhouding.
13.09.2017 - 16:26
![]() W.cevaal wrote:
W.cevaal wrote:
Hoe moet ik het patroon aanpassen oom 4 x xl te maken mvgr w.cevaal
14.08.2017 - 15:24DROPS Design answered:
Hallo W. Cevaal, Het patroon is geschreven tot en met maat xxxl. Bedoel je met 4 keer xl: xxxxl? Als je het vest wat groter wilt maken, zou je naar eigen inzicht een aantal extra steken op kunnen zetten. Op basis van de stekenverhouding kun je uitrekenen hoeveel extra steken je op moet zetten. Als voorbeeld: Als je het achterpand 5 cm breder wilt maken moet je in dit geval 11 a 12 steken extra op zetten.
15.08.2017 - 15:47Anne wrote:
Nice pattern. But here is one thing I don't understand: it's the last decreases of the sleeves. The pattern says: "then cast off 2 sts each side until piece measures 63-63-63-64-64-65 cm. Cast off 3 sts 1 time each side, then cast off. " At the last needle cast off: how many stitches are remaining? I am recalculating because my gauge is off, that is why I like to know this. Can you help?
18.09.2016 - 13:14DROPS Design answered:
Dear Anne, simply cast off 2 sts at beg of every row both from RS and from WS until sleeve measures 63-64-65 cm (see size) then cast off 3 sts at beg of next 2 rows and cast off remaining sts. (how many sts will remain will depend on your tension in height). Happy knitting!
19.09.2016 - 09:35Anne wrote:
Nice pattern. But here is one thing I don't understand: it's the last decreases of the sleeves. The pattern says: "then cast off 2 sts each side until piece measures 63-63-63-64-64-65 cm. Cast off 3 sts 1 time each side, then cast off. " At the last needle cast off: how many stitches are remaining? I am recalculating because my gauge is off, that is why I like to know this. Do you know?
18.09.2016 - 13:10
![]() Chantal wrote:
Chantal wrote:
Bonjour, je vais bientôt commander la laine pour faire le "coast Living" (Drops 135-2) mais dans les points utilisés vous parlez uniquement de point mousse alors que dans les explications, après les côtes on doit faire en jersey. J'ai du mal à voir sur mon écran si le modèle est en jersey ou en mousse, vous pouvez m'éclairer ? Merci.
15.10.2015 - 16:14DROPS Design answered:
Bonjour Chantal, on explique au début comment tricoter le point mousse en allers et retours, mais après les côtes, on tricote 1 rang end sur l'endroit, 1 rang env sur l'envers (+ diminutions), et on continue en jersey. Bon tricot!
15.10.2015 - 16:55
![]() Hazel wrote:
Hazel wrote:
Hi, In the pattern after the ribbing it says to K1 row from RS, then K1 row from WS (while decreasing) then continue in stocking stitch. But if the 3rd row is purled the stocking stitch will be the wrong way out - so am I meant to knit 3 rows? Also, for the front piece when it says to `inc at the side as on back piece' does that mean on each side of the knitting or just on the side to be joined to the back? Thanks, Hazel
25.02.2015 - 09:03DROPS Design answered:
Dear Mrs Hazel, stop ribbing after a WS row and work as follows: K 1 row from RS, then K 1 row from WS (while dec), then continue in stocking st from RS (= K1 row from RS, P1 row from WS). The inc on front pieces have to be done towards seam with back piece, ie just one side on each front piece. Happy knitting!
25.02.2015 - 09:32
![]() Eve wrote:
Eve wrote:
Hallo Beim Ärmel -Ende: Muss ich da immer wieder 2 M. beidseitig abketten oder nur einmalig?? (3.letzte Zeile)
09.02.2015 - 20:34DROPS Design answered:
Sie ketten so lange beidseitig je 2 M ab, bis der Ärmel die angegebene Länge erreicht hat - also nicht nur einmalig. Dann ketten Sie beidseitig einmalig je 3 M ab und danach die restlichen M.
12.02.2015 - 11:47
![]() Nelli wrote:
Nelli wrote:
Hei! Eikö reunoihin tulee liian paljon silmukkoita? Normaalisti otetaan kolme silmukkaa, yks välin jne. Onko silmukkamäärä oikein? Kiitos
06.01.2015 - 14:55DROPS Design answered:
Hei! Silmukkamäärä on oikein, reunoista poimitaan runsas määrä silmukoita.
09.01.2015 - 16:26
![]() Marian Gossen wrote:
Marian Gossen wrote:
Er moeten knoopsgaten worden gebreid in het linker voorpand, en op het laatst ook nog in de afwerkbies? Twee knoopsgaten naast elkaar? Ik zie maar één rij knopen op het plaatje. Hartelijk dank voor een antwoord, groetjes, Marian.
26.12.2014 - 10:37DROPS Design answered:
Hoi Marian. Het zijn dezelfde knoopsgaten. Je maakt de knoopsgaten op de bies als die 1.5 meet, en de hoogte van de knoopsgaten staan boven aan het patroon.
15.01.2015 - 16:50
![]() Eliana wrote:
Eliana wrote:
Buenas tardes! Tengo una consulta con respecto a los patrones; cuando indican los materiales, y dice el tipo y cantidad de lana, en el caso de una misma lana, dice por ejemplo 350-350-400-450-450-500 g. No entiendo la cantidad especifica de lana a la que se refiere que necesito para realizar el patrón. Agradezco su ayuda! Saludos Eliana
24.10.2014 - 01:58DROPS Design answered:
Hola Eliana. Todos los patrones están escritos para varias tallas (S,M,L,XL etc.). Para cada talla indica la lana necesaria por orden de talla desde la más pequeña: 350-350-400- etc. (el primer nº corresponde siempre a la talla más pequeña)
25.10.2014 - 18:17
|
|
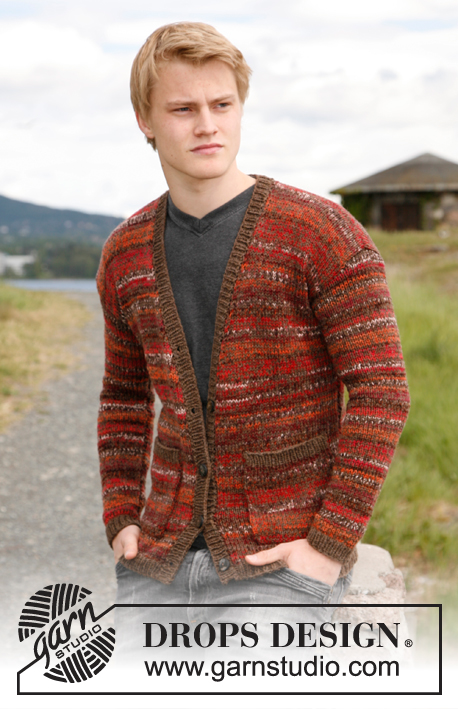
Coast Living#coastlivingcardigan |
|
|
|
|
Men's knitted cardigan with rib in DROPS Delight. Sizes S-XXXL.
DROPS 135-2 |
|
|
GARTER ST (back and forth on needle): K all rows. BUTTONHOLES: Make 6-6-7-7-7-7 buttonholes on left front band when rib measures 1,5 cm. 1 buttonhole = cast off 2 sts and cast on 2 new sts on return row above the cast off sts. Make buttonholes when front band measures (measured from bottom edge): Size S: 4, 10, 16, 22, 28 and 34 cm. Size M: 5, 11, 17, 23, 29 and 35 cm. Size L and XL: 2, 8, 14, 20, 26, 32 and 38 cm. Size XXL: 3, 9, 15, 21, 27, 33 and 39 cm. Size XXXL: 4, 10, 16, 22, 28, 34 and 40 cm. -------------------------------------------------------- BACK PIECE: Worked back and forth on the needle. Cast on 131-143-155-167-185-203 sts (includes 1 edge sts on each side) on needle size 3 mm with Delight. P 1 row on WS. Then work next row from RS as follows: 1 edge st in garter st * K3, P3*, repeat *-* and finish with K3 and 1 edge st in garter st. Continue in rib until piece measures 4 cm. Change to needle size 3.5 mm. K 1 row from RS. K 1 row from WS, at the same time dec 36-39-43-44-48-54 sts evenly = 95-104-112-123-137-149 sts. Continue in stocking st. REMEMBER THE KNITTING TENSION! AT THE SAME TIME when piece measures 9 cm inc 1 st on each side. Repeat inc on every 8-8-7-7-7-6 cm a total of 4-4-5-5-5-6 times = 103-112-122-133-147-161 sts. When piece measures 41-42-43-44-45-46 cm cast off for armholes at beg of every row each side: 4 sts 0-0-1-1-1-1 time, 3 sts 1-1-1-1-1-2 times, 2 sts 2-3-3-5-7-8 times and 1 st 2-3-3-3-4-6 times = 85-88-90-93-97-97 sts. When piece measures 58-60-62-64-66-68 cm cast off middle 31-32-32-33-35-35 sts for neck and work each shoulder separately. Cast off 1 st on neckline on next row = 26-27-28-29-30-30 sts left on shoulder. Cast off when piece measures 60-62-64-66-68-70 cm. LEFT FRONT PIECE: Worked back and forth on the needle. Cast on 68-74-80-86-92-104 sts (includes 1 edge st at the side and 1 edge st towards mid front) on needle size 3 mm with Delight. P 1 row on WS. Work next row from RS as follows: 1 edge st in garter st, * P3, K3 *, repeat *-* and finish with 1 edge st in garter st. Continue rib until piece measures 4 cm. Change to needle size 3.5 mm. K 1 row on RS. K 1 row on WS and AT THE SAME TIME dec 20-22-24-24-23-29 sts evenly = 48-52-56-62-69-75 sts. Continue in stocking st. When piece measures 9 cm inc at the side as on back piece. When piece measures 36-37-38-39-40-41 cm dec 1 st for v-neck at the beg of the row from mid front. Repeat dec every 1 cm a total of 17-17-17-18-19-19 times. AT THE SAME TIME when piece measures 41-42-43-44-45-46 cm cast off for armhole at the side as described for back piece. When all dec are made 26-27-28-29-30-30 sts remain for shoulder. Cast off when piece measures 60-62-64-66-68-70 cm. RIGHT FRONT PIECE: Work as left front piece, but mirrored. SLEEVE: Worked back and forth on the needle. Cast on 68-68-74-74-80-80 sts (includes 1 edge st on each side) on needle size 3 mm. P 1 row on WS. Then work rib as follows: 1 edge st in garter st, * K3, P3 *, repeat *-* and finish with 1 edge st in garter st. Continue until rib measures 9 cm. Change to needle size 3.5 mm. K 1 row from RS. K 1 row on WS and AT THE SAME TIME dec 13-11-15-13-14-13 sts evenly = 55-57-59-61-66-67 sts. Continue in stocking st. When piece measures 12-12-14-15-15-18 cm inc 1 st on each side. Repeat inc on every 3½-3-2½-2-2-1½ cm a total of 12-14-16-18-18-20 times = 79-85-91-97-102-107 sts. When piece measures 56-55-54-54-52-50 cm (less for the larger sizes because of longer sleeve cap and wider shoulder) cast off 3 sts at the beg of next 2 rows. Continue to cast off for sleeve cap at the beg of every row each side: 2 sts 3-4-4-4-4-4 times, 1 st 3-3-5-6-9-14 times, then cast off 2 sts each side until piece measures 63-63-63-64-64-65 cm. Cast off 3 sts 1 time each side, then cast off. Piece measures approx 64-64-64-65-65-66 cm. ASSEMBLY: Sew shoulder seams and set in sleeves. Sew sleeve and side seams at once, sew inside 1 edge st. FRONT BAND/NECK BAND: Worked back and forth on the circular needle. Pick up 418-430-442-454-466-478 sts inside 1 edge st on circular needle 3 mm with Delight (pick up along right front piece, along neckline on the back and down along left front piece). K 3 rows and AT THE SAME TIME on last row inc 35 sts evenly = 453-465-477-489-501-513 sts (the number of sts must be divisible by 6+3). Work next row from RS as follows: 3 garter sts * K3, P3 * repeat *-* and finish with K3 and 3 garter sts. When rib measures 1.5 cm make 6-6-7-7-7-7 BUTTONHOLES – see explanation above - on left front band. When front band measures approx 3 cm cast off with K over K and P over P. Sew on buttons. |
|
 |
|
Have you finished this pattern?Tag your pictures with #dropspattern #coastlivingcardigan or submit them to the #dropsfan gallery. Do you need help with this pattern?You'll find 10 tutorial videos, a Comments/Questions area and more by visiting the pattern on garnstudio.com. © 1982-2025 DROPS Design A/S. We reserve all rights. This document, including all its sub-sections, has copyrights. Read more about what you can do with our patterns at the bottom of each pattern on our site. |


With over 40 years in knitting and crochet design, DROPS Design offers one of the most extensive collections of free patterns on the internet - translated to 17 languages. As of today we count 320 catalogues and 12091 patterns translated into English (UK/cm). 12091
We work hard to bring you the best knitting and crochet have to offer, inspiration and advice as well as great quality yarns at incredible prices! Would you like to use our patterns for other than personal use? You can read what you are allowed to do in the Copyright text at the bottom of all our patterns. Happy crafting!
Post a comment to pattern DROPS 135-2
We would love to hear what you have to say about this pattern!
If you want to leave a question, please make sure you select the correct category in the form below, to speed up the answering process. Required fields are marked *.