
Popular categories
Looking for a yarn?


Comments / Questions (89)
![]() Alex Benedetti wrote:
Alex Benedetti wrote:
Aiuto, spero qualcuno possa rispondere alla mia domanda qui sotto! Sono ferma
15.04.2018 - 15:31
![]() Alex Benedetti wrote:
Alex Benedetti wrote:
Avanti con il lavoro...altra domanda. DIETRO:dopo aver intrecciato le 32 maglie centrali si dice "intrecciare ora 1 maglia da ciascun lato" Come si fa, me lo potete spiegare x entrambe le spalle. Grazieee
14.04.2018 - 17:58DROPS Design answered:
Buongiorno Alex. Può chiudere una maglia come la chiude normalmente a fine lavoro oppure può lavorare 2 maglie insieme a diritto. Buon lavoro!
15.04.2018 - 17:35
![]() Alex Benedetti wrote:
Alex Benedetti wrote:
\" Nel corso del giro successivo, intrecciare, per gli scalfi, le 6 m centrali da ciascun lato (intrecciare le 3 m che precedono e le 3 m che seguono ognuno dei due segni\"....come si fa? Ok per il SEGNO a metà dei punti ma per segno a inizio giro come si chiudono le tre maglie alla fine del giro visto che rimane sempre l'ultimo punto dopo le tre chiuse (che farebbero 6 con le tre chiuse all inizio?
05.04.2018 - 22:18DROPS Design answered:
Buonasera Alex. Può intrecciare le 3 m alla fine del giro precedente. Quindi al giro precedente, lavora finché non rimangono 3 m prima del segno, intreccia le 6 maglie, lavora fino alle 3 m che precedono il secondo segno, intreccia le 6 m e poi lavora le restanti maglie. Buon lavoro!
05.04.2018 - 22:30
![]() Aissela Laudo wrote:
Aissela Laudo wrote:
Ancora una domanda. Che metodi di inizio ( cast on, metter su i punti ) consigliate? Grazie
18.03.2018 - 22:44DROPS Design answered:
Buongiorno Aissela. Può scegliere il metodo di avvio con cui si trova meglio e che la soddisfa maggiormente. Buon lavoro!
19.03.2018 - 17:17
![]() Decrey Nicole wrote:
Decrey Nicole wrote:
Oh là là, Pour mes petites filles de 11 ans, le modèle est beaucoup trop grand ... malheur, j'ai dû adapter et ce n'est pas facile. J'ai raté.
12.03.2018 - 13:21DROPS Design answered:
Bonjour Mme Decrey, pensez toujours à bien vérifier les mesures de chaque taille pour trouver celle que vous devez suivre. Vérifiez bien votre échantillon et conserver la même tension que pour votre échantillon tout du long. Bon tricot!
12.03.2018 - 16:23
![]() Aissela Laudo wrote:
Aissela Laudo wrote:
Ancora una domanda, quando si dice : lavorare ora davanti e dietro separatamente...si intende che oil lavoro rimane srmpre sullo stesso ferro circolare e si trattano però i due pezzi diversamente (come da indicazioni) mentre si lavora l'intero ferro O si devono usare due ferri? Non ho mai fatto un lavoro di qs tipo, mi piacerbbe provarci
03.03.2018 - 13:31DROPS Design answered:
Buongiorno Aissela. Dopo aver intrecciato le maglie per gli scalfi, può mettere in attesa su un fermamaglie / filo di scarto le maglie del davanti e lasciare sui ferri quelle del dietro. Completa il dietro e poi riprende le maglie del davanti sui ferri e lavora il davanti. Buon lavoro!
03.03.2018 - 16:00
![]() Aissela Laudo wrote:
Aissela Laudo wrote:
Non so se lo avete già spiegato in altre lingue, perdono. Volevo sapere se lavorando la tunica, il lato interno del lavoro ai ferri circolari è il lato diritto (o esterno, quello che sivede per capirci) del lavoro finito o viceversa. e di conseguenza, la prima riga del motivo M1 è sul diritto o sul rovescio?.
02.03.2018 - 21:55DROPS Design answered:
Buongiorno Aissela. Quando si lavora in tondo , il lato interno del lavoro è quello che non si vede quando il capo è indossato. La prima riga del motivo viene lavorata sul diritto del lavoro. Buon lavoro!
03.03.2018 - 10:28
![]() Anna Larsson wrote:
Anna Larsson wrote:
Hej Tack för ditt svar men det jag undrade över är NÄR jag börjar med minskningen! Det står så här i mönstret: " .. När M1 är stickad en gång på höjden fortsätts det i slätstickning över alla m, samtidigt som det minskas 1 m på varje sida om varje märktråd med 10...cm mellanrum totalt 2... ggr..." Min fråga är om jag börjar med den första minskningen DIREKT efter M1 eller efter 10 cm av slätstickning? Med vänlig hälsning Anna
04.03.2017 - 06:35DROPS Design answered:
Hej Anna, du kan minska først efter ett par cm och igen efter 10 cm. Lycka till!
07.03.2017 - 09:11
![]() Anna Larsson wrote:
Anna Larsson wrote:
Hej Jag stickar "Children 15-6" stl 5 /6 och undrar om jag ska börja med minskningen direkt efter det inledande mönstret M1? Det står att man ska göra 2minskningar med 10 cm mellanrum. Ska man alltså börja med den första minskningen direkt efter M1 eller efter 10 cm?
02.03.2017 - 10:54DROPS Design answered:
Hej Anna. Jeg laeser det som du gör det paa hver 10. cm, dvs, förste gang er ved 10 cm og anden gang ved 20 cm.
02.03.2017 - 15:49
![]() Tine Friis Jensen wrote:
Tine Friis Jensen wrote:
Hej Drops. Hvad måler hatten i hovedomkreds? Der mangler i den grad, strikkede sommerhatte til voksne, mon det er noget for jeres designere, at udvikle? Gerne i tyndere garn end Muskat og lign.. :)
07.06.2016 - 18:26DROPS Design answered:
Hej Tine. Tak for dit input, jeg skal give det videre :-) Der er ikke noget omkreds meldt i opskriften, men jeg ville beregne det med strikkefastheden/antal masker. Naar du her faerdig med skyggen (naar du begynder paa M.1) har du 98 m i den lille str: 98/21 x 10 = ca 46-47 cm omkreds.
08.06.2016 - 16:18
|
|||||||||||||||||||
Kaia#kaiatop |
|||||||||||||||||||
 |
 |
||||||||||||||||||
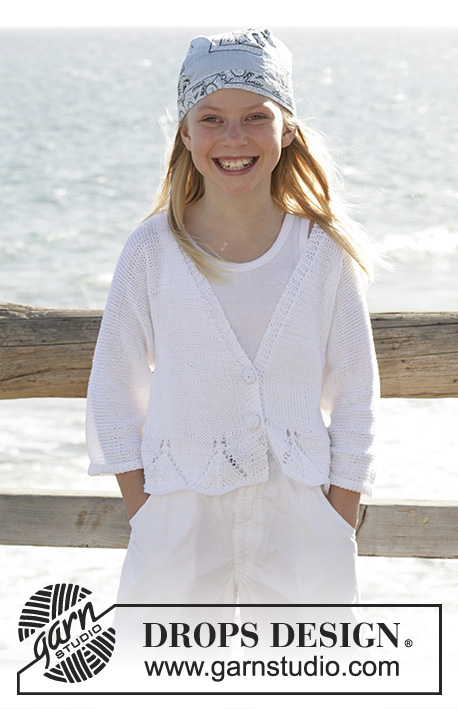
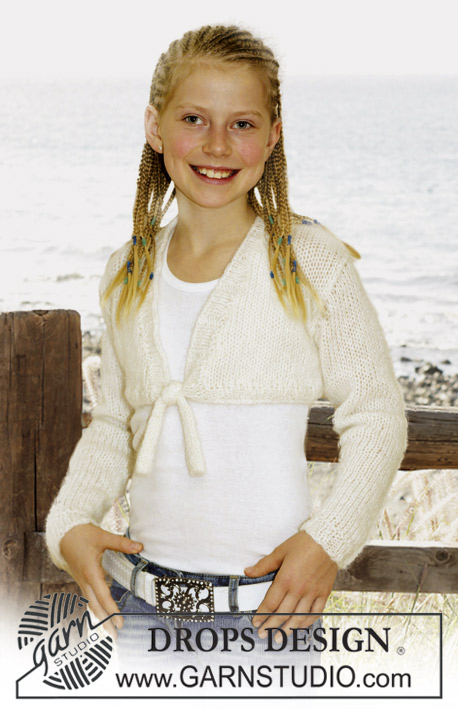
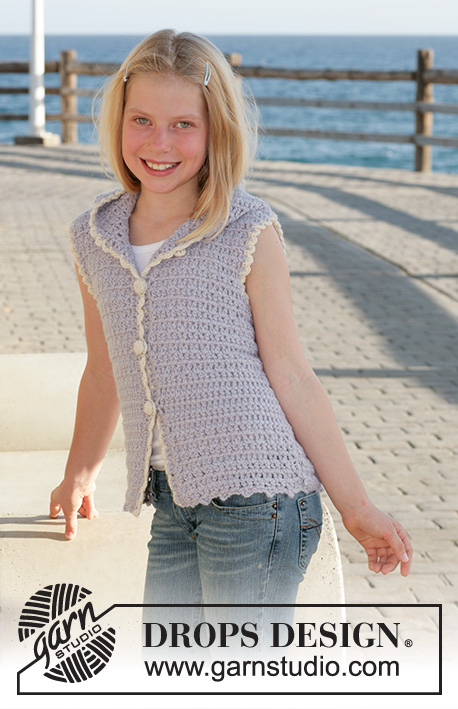
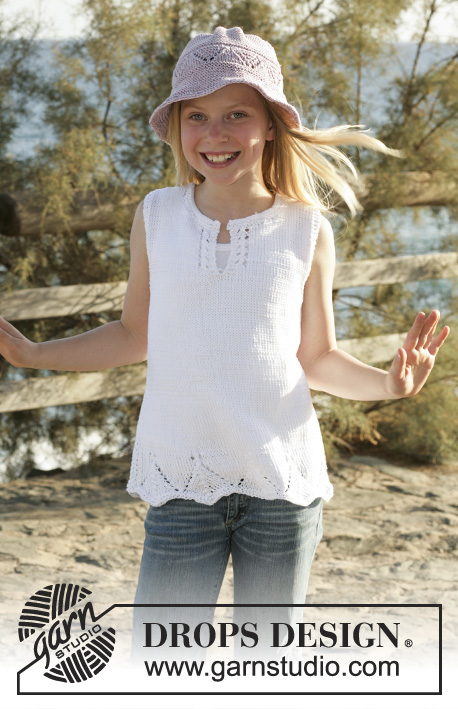
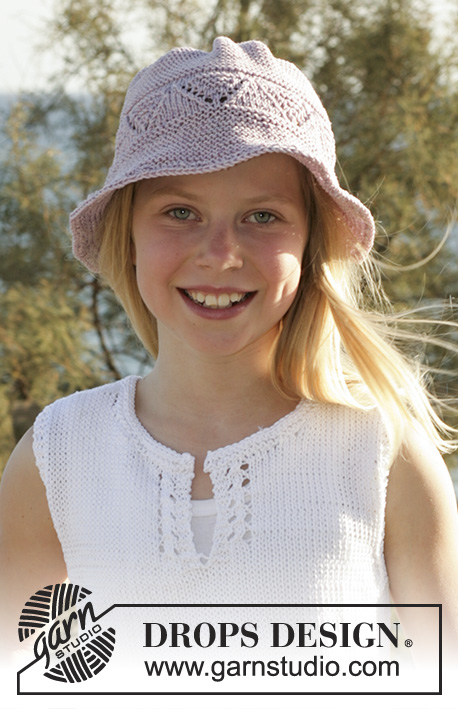
Knitted top and hat with lace pattern, in DROPS Muskat or DROPS Belle. Size children 5 to 14 years.
DROPS Children 15-6 |
|||||||||||||||||||
|
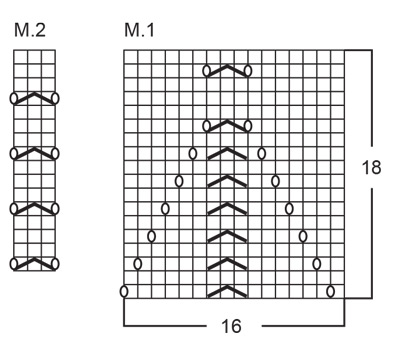
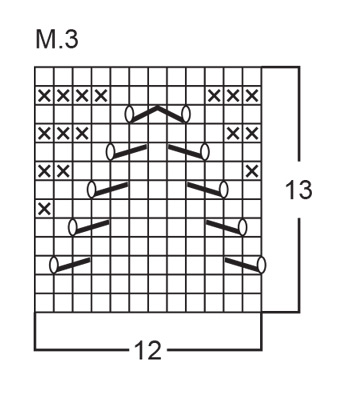
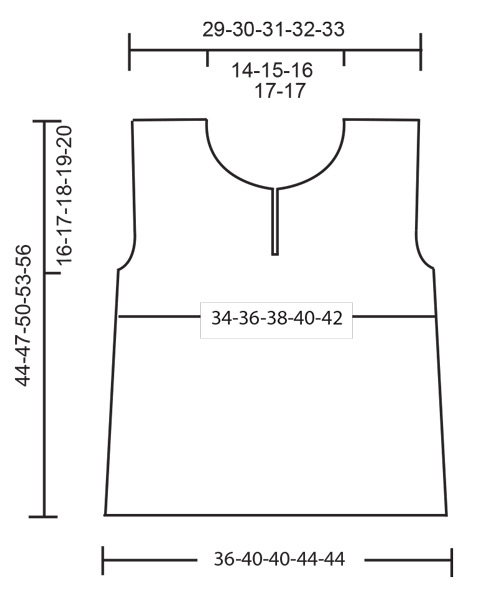
Knitting tension: 20 sts x 26 row on needles size 4.5 mm in stocking sts with Muskat or Belle = 10 x 10 cm. Pattern: See diagrams M.1 and M.2. The diagrams are shown from the RS. Garter sts round on needle: 1st round: K, 2nd round: P Garter sts back and forth: Knit on all rows. Decreasing tips (apply for the arm hole): All decreases are done from the RS. Dec as follows for the arm holes inside 4 garter sts: Before 4 garter sts: K2 tog. After 4 garter sts: slip a st as if to knit, K1, psso. Back and front piece: Knit around. Bend the circular needle double (or use 2 needles) and cast on 144-160-160-176-176 sts using 2 needles with Muskat or Belle(this will make the casting on edge more elastic). Pull out one needle. Insert a marking thread (MT) at the beg. of round and 1 MT after 72-80-80-88-88 sts (= the sides). Knit 4 rounds of garter sts – see explanation above. Continue according to M.1 – see explanation above. When M.1 is completed 1 vertical repeat continue in stocking sts over all sts. At the same time dec. 1 st each side on the MT on every 10-6-15-7-15 cm a total of 2-4-2-4-2 times (= 4 dec. on round) = 136-144-152-160-168 sts. When the piece measures 27-29-31-33-35 cm knit 2 round of garter sts over 14 sts each side (7 sts each side of the MT). On the next round cast off the mid 6 sts for the arm holes each side. Now continue each part separately. Back piece: =62-66-70-74-78 sts. Continue with 4 garter sts towards the armholes. Then dec. 1 sts for the armhole on every other row – read decreasing tips 2-3-4-5-6 times = 58-60-62-64-66 sts. When the piece measures 42-45-48-51-54 cm cast off the mid 26-28-30-32-32 sts for the neck. Continue to cast off 1 st each side of the neck = 15-15-15-15-16 sts left for each shoulder. Cast off when the piece measures 44-47-50-53-56 cm. Front piece: = 62-66-70-74-78 sts. Continue with 4 garter sts towards the arm hole: Cast off for armholes as done for the back piece. At the same time when the piece measures 30-32-34-36-38 cm knit 2 rows of garter sts over thee mid 6 sts (knit other sts as before). On the next row put half of the sts on a thread or a stitch holder and finish each side separately. Side-1: Continue the dec. for the arm holes. Knit 4 garter sts at the side and 3 garter sts towards the slit. Inside the 3 garter sts for the slit knit according to M.2 - see diagram. When the piece measures 39-42-44-47-49 cm put 8-9-10-11-11 sts at the mid front on a thread or a stitch holder for the neck. Then cast off for the neck on every other row as follows: 2 sts 2 times and 1 st 2 times = 15-15-15-15-16 sts left for each shoulder. Cast off when piece measures 44-47-50-53-56 cm. Side -2: Put sts from the thread or stitch holder back on needle. Knit as side-1 but reverse. Assembly: Sew the shoulder seams. Neck edge: Pick up approx. 66-82 sts (incl. the sts from the thread or stitch holder) around the neck on circular needles size 4.5 mm. Knit 4 rows of garter sts back and forth from the mid front. Cast off loosely. -------------------------------------------- Knitted hat with pattern in DROPS Muskat Size: 5/9 years - 10/14 years Materials: DROPS Muskat from Garnstudio. 100-100 g colour no 71, purple mix DROPS needles size 3 mm – or the needle size needed to obtain correct knitting tension. DROPS crochet hook size 3 mm (for crochet edge). Steel wire – approx 1 m fine steel wire Knitting tension: 21 sts x 46 rows on needles size 3 mm with Drops Muskat in garter sts = 10 x 10 cm Pattern: See diagram M.3. Diagrams are seen from RS. 1 row = RS Garter sts back and forth: Knit all rows. ---------------------------------------- HAT: Knit back and forth on needle. Cast on 133-145 sts loosely (incl 1 edge st each side) on needle size 3 mm with Drops Muskat, knit garter sts. When piece measures 5 cm dec 35-35 sts evenly by K2 tog approx every 3rd -4th sts = 98-110 sts. Continue in garter sts 1 cm, then knit M.3 with 1 edge st each side. After M.3 is knitted 1 time in height continuing in garter sts until piece is completed. When piece measures 14-16 cm insert 8-9 marking threads (MT) in piece from RS as follows: Knit 2-2 sts, insert 1 MT, * knit 12 sts insert 1 MT *, repeat from *-* 7-8 times in total. After last MT 12-12 sts are left, garter sts these sts. Dec 1 sts from RS on left side of all MT on every other row 11 times in total = 10-11 sts left on row. ' Pull 1 thread through remaining sts and sew on well. Sew hat tog mid back in outermost part of outer most sts to make slim and neat seam. Hat measures approx 19-21 cm in height. Tie 1 thin steel wire along the casting on edge of hat. Crochet 1 round with dc on crochet hook size 3 mm around steel wire + casting on edge, this is done to make hat firm at bottom edge. |
|||||||||||||||||||
Diagram explanations |
|||||||||||||||||||
|
|||||||||||||||||||
 |
|||||||||||||||||||
 |
|||||||||||||||||||
 |
|||||||||||||||||||
Have you finished this pattern?Tag your pictures with #dropspattern #kaiatop or submit them to the #dropsfan gallery. Do you need help with this pattern?You'll find 19 tutorial videos, a Comments/Questions area and more by visiting the pattern on garnstudio.com. © 1982-2026 DROPS Design A/S. We reserve all rights. This document, including all its sub-sections, has copyrights. Read more about what you can do with our patterns at the bottom of each pattern on our site. |
|||||||||||||||||||


With over 40 years in knitting and crochet design, DROPS Design offers one of the most extensive collections of free patterns on the internet - translated to 17 languages. As of today we count 324 catalogues and 12290 patterns translated into English (UK/cm). 12290
We work hard to bring you the best knitting and crochet have to offer, inspiration and advice as well as great quality yarns at incredible prices! Would you like to use our patterns for other than personal use? You can read what you are allowed to do in the Copyright text at the bottom of all our patterns. Happy crafting!
Post a comment to pattern DROPS Children 15-6
We would love to hear what you have to say about this pattern!
If you want to leave a question, please make sure you select the correct category in the form below, to speed up the answering process. Required fields are marked *.