Comments / Questions (73)
![]() Marie wrote:
Marie wrote:
Ne peut-on pas tricoter la veste en une seule pièce (au lieu de 2) ? Y a t il une raison autre que le nombre important de mailles à la fin, ce qui ne poserait pas de problème avec une aiguille circulaire ?
18.03.2020 - 17:48DROPS Design answered:
Bonjour Marie, la construction avec augmentations côté dos rend probablement le travail en deux parties plus simples. Bon tricot!
19.03.2020 - 09:33
![]() Gabriella wrote:
Gabriella wrote:
Per aumenti collo asimmetrico parla di aumentare verso il centro ma cosa si intende ? Verso il bordo davanti o il centro delle maglie messe sul ferro?grazie per l’aiuto gabriella
17.01.2020 - 23:21DROPS Design answered:
Buongiorno Gabriella. Abbiamo modificato leggermente il testo. Gli aumenti sono sul bordo del davanti. Buon lavoro!
18.01.2020 - 06:41
![]() Aliye Ferda Kunt wrote:
Aliye Ferda Kunt wrote:
Sorry for this but the pattern does not represent the model, this model couldn't have L, XL sizes, only the XS sizes could attend the result, starting as a shawl and it's width must be equal the most quarter of the chest size,which would be at most 21 cm. This is also rib stitches not the stockinette one. Best best regards, Ferda kunt
06.08.2019 - 14:43DROPS Design answered:
Dear Mrs Kunt, this pattern has already been worked several times succesfully, make sure your tension is right in both height and width, do not hesitate to contact the store where you bought the yarn for any individual asssitance, showing them your work may help them to assist you the best way. Happy knitting!
08.08.2019 - 10:32
![]() Ferda Kunt wrote:
Ferda Kunt wrote:
Hı, what about the reverse V at the skirt of the model, no explanation in the pattern. This is short of pattern, it doesn't represent what I see on the model. Anyway, I love this model so much Ferda
04.08.2019 - 23:05DROPS Design answered:
Dear Mrs Kunt, to shape the bottom of the jacket you will increase towards mid front and towards mid back (= before dividing for armhole, when you work each piece separately and then when you work again all stitches together). Happy knitting!
07.08.2019 - 12:12
![]() Unsoldinodicacio wrote:
Unsoldinodicacio wrote:
Grazie mille per la traduzione! considerato che il filato Highlander non eisiste più, con quale filato sarebbe meglio sostituirlo per avere una resa e una consistenza simili? grazie di nuovo
02.04.2019 - 15:47DROPS Design answered:
Buongiorno Unsoldinodicacio. Highlander è un filato del gruppo E. Può sostituirlo con Andes o Eskimo (entrambi gruppo E), oppure con 2 capi di un filati del gruppo C, oppure 4 capi di un filato gruppo A. Il risultato più simile lo ottiene con Air usato doppio. Qui trova altre indicazioni utili sulla sostituzione dei filati. Buon lavoro!
02.04.2019 - 15:59
![]() Unsoldinodicacio wrote:
Unsoldinodicacio wrote:
Salve, sarebbe possibile avere questo modello in italiano? ho provato a tradurlo ma temo di aver sbagliato qualcosa. grazie
26.02.2019 - 11:19DROPS Design answered:
Buongiorno Unsoldinodicacio. Tradurremo il modello appena possibile. Buon lavoro!
26.02.2019 - 12:04
![]() Kim Kahn wrote:
Kim Kahn wrote:
I’d like this pattern but in USA, non metric measurements. Please email it to me if it exists Many thanks.
23.01.2019 - 22:30DROPS Design answered:
Dear Mrs Kahn, this pattern is now available in US-English. Happy knitting!
25.01.2019 - 08:25
![]() Rike Wunderlich wrote:
Rike Wunderlich wrote:
Auf dem bild sieht die jacke sehr schön aus und ich würde sie mir gerne mit eskimo nachstricken. nun glaube ich aber auf dem foto zu erkennen, dass dies keine krausrippe sondern ein eifaches patentmuster ist? selbst nach einem probestrick(nach Anleitung) ergibt sich mir nur das bild einer langgezogenen krausrippe indem die linksmasche optisch dominiert. auf dembild ist doch aber die rechte masche eindeutig dominierend, oder? lg rike
11.04.2016 - 16:50DROPS Design answered:
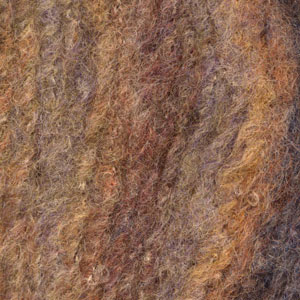
Liebe Rike, es werden nur die Randmaschen und die Ränder mit Krausrippen gestrickt, der Rest wird glatt rechts gestrickt. Highlander war ein Garn mit einer Filzoptik, daher kann man das Maschenbild auf dem Foto vielleicht nicht so gut erkennen.
12.04.2016 - 14:36
![]() Sabine wrote:
Sabine wrote:
Hallo, ich würde das Modell gern nacharbeiten, habe aber noch eine Frage: Ist die Jacke vorn und hinten gleich lang? (Neuerdings sind Jacken ja gern mal hinten kürzer als vorn, was mir nicht gefällt). Von der Skizze her würde ich sagen, ja sie ist gleich lang, aber auf dem Bild sieht es so aus, als wenn sie hinten kürzer wäre. Wäre schön, wenn Sie mir das sagen könnten. Viele Grüße von Sabine
02.06.2015 - 12:11DROPS Design answered:
Die Jacke hat zwar an den Vorderteilen und am Rückenteil einen gleich hohen Schnitt, aber da sie schräg geknöpft wird, fallen die Vorderteile als Zipfel länger nach vorne als das Rückenteil.
02.06.2015 - 23:22Zlata Tomikj wrote:
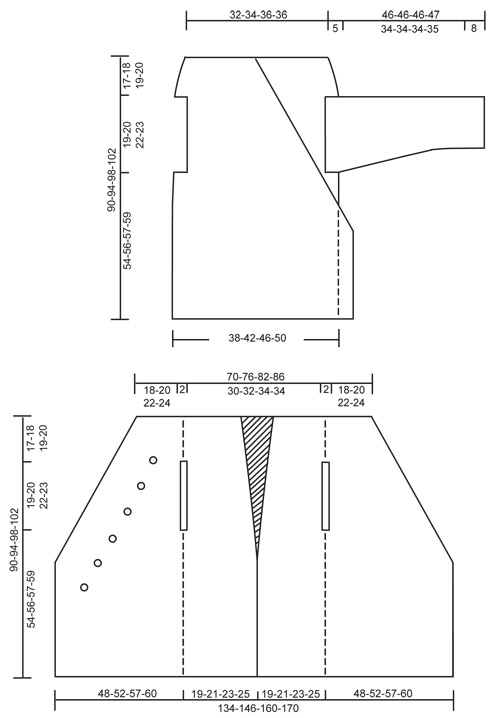
Hi, I want to knit this jacket but I can't understand the final circumference of chest for Size: S/M – M/L ? There are to much numbers in the diagram and somehow my calculation isn't right?! Ex. for S i took the back panel with 19*4 pieces=76cm chest circumference.It looks more like XS instead S. Am I doing something wrong in calculating?
26.09.2014 - 01:07DROPS Design answered:
Dear Mrs Tomikj, you will find at the bottom of the pattern a measurement chart with all measures in each size, in cm (convert here into inches taken flat from side to side. Compare these to a similar garment you like the shape to find out the matching size. Happy knitting
26.09.2014 - 08:46
DROPS 96-12 |
|
|
|
|
DROPS Long jacket with ¾ sleeves
DROPS 96-12 |
|
|
Knitting tension: 12 sts x 17 rows on needle size 8mm in stocking stitch = 10 x 10 cm Garter sts (back and forth on needle): knit all rows. Increasing tips: Inc inside 1 edge st on front piece and inside 2 edge sts on back piece. Inc by making a yo and knit into back of yo on the returning row (to avoid making a hole). Knit inc sts in stocking sts. Measurements tips: Because of the weight of the yarn, make all measurements whilst the pieces are hanging. Left front + back piece: Because of the number of sts the jacket is knitted back and forth on circular needles. The jacket is knitted from top down. Loosely cast on 35-38-41-43 sts on needle size 8 mm with Highlander and knit 4 rows garter sts (1st row = RS). At the same time insert a marking thread after the first 19-21-23-25 sts on left front (= 16-17-18-18 sts left on row towards back piece) - let the marking thread follow the piece as you progress. Read all of the following section before continuing! Continue in stocking sts, but with the 1st st on the right side of piece (= mid front) and the first 2 sts on the left side of piece (= mid back) in garter sts. Inc for sloping front: At the same time after the 4 rows in garter sts inc towards mid front on every 3rd row a total of 29-31-34-35 times – see Increasing tips. Inc mid back: At the same time when piece measures 17-13-11-8 cm – see Measurement tips – inc 1 st mid back on every 17-13-11-8 cm a total of 3-4-5-7 times – see Increasing tips. Armhole: At the same time when piece measures 17-18-19-20 cm cast off 1 st on both sides of the marking thread and continue knitting each piece separately – continue inc. as described above. When front piece and back piece measures 36-38-41-43 cm put all sts back on the same needle and cast on 2 new sts over the 2 sts cast off for armhole. Continue with inc as before. After all inc are complete = 67-73-80-85 sts on needle. When piece measures approx 89-93-97-101 cm (or desired length) – see Measurement tips – knit 1 row from the WS and cast off. Right front + back piece: Cast on and knit as left front + back piece, but mirrored. Sleeve: Knitted back and forth on circular needle. Cast on 28-30-32-34 sts (incl 1 edge st each side) on needle size 8 mm with Highlander. Knit 4 rows garter sts and continue in stocking sts. When sleeve measures 8 cm inc 1 st each side on every 6-6-5-5 cm a total of 6-6-7-7 times = 40-42-46-48 sts. When sleeve measures 43-43-43-44 cm dec for sleeve cap on every other row: 3 sts 2 times. Cast off remaining sts when sleeve measures approx 46-46-46-47 cm. Assembly: Sew left and right back pieces tog mid back – sew in the outer loop of the outermost st ( = 4 garter sts mid back). Sew sleeve seams inside 1 edge st and sew in sleeves. Crochet border: Crochet a border along the whole opening of the jacket and round the sleeve edges with crochet hook size 7 and Highlander as follows: 1 dc in first st, *2 ch, skip approx 2 - 2.5 cm, 1 dc in next st*, repeat from *-* and finish with 2 ch and 1 sl st in first dc from beginning of round – make sure the border is even and neither wavy nor too tight. Buttons: Sew on buttons on left front piece. Place the top button in line with the upper edge of the armhole approx 9-10-11-12 cm from the armhole towards mid front. Place the remaining buttons parallel with the sloping front edge – see measurement chart. There should be approx 7 to 10 cm between each button. Use the ch-loops in the crochet border as buttonholes. Crochet a buttonhole loop (approx 5-6 ch) and place this on the inside of the right front piece and sew on a button at the top of the left front edge to keep the jacket in place – try on the jacket for placing of the buttonhole loop and button. |
|

|
|
Have you finished this pattern?Tag your pictures with #dropspattern or submit them to the #dropsfan gallery. Do you need help with this pattern?You'll find 22 tutorial videos, a Comments/Questions area and more by visiting the pattern on garnstudio.com. © 1982-2025 DROPS Design A/S. We reserve all rights. This document, including all its sub-sections, has copyrights. Read more about what you can do with our patterns at the bottom of each pattern on our site. |


Post a comment to pattern DROPS 96-12
We would love to hear what you have to say about this pattern!
If you want to leave a question, please make sure you select the correct category in the form below, to speed up the answering process. Required fields are marked *.