
Popular categories
Looking for a yarn?


Comments / Questions (30)
![]() Åsa Andreasson wrote:
Åsa Andreasson wrote:
Jag har stickat den här tröjan och är så nöjd. Jag stickade den i drops karisma , färg 37 , och kid-silk , färg 28 , och det blev jättefint. Mjuk och skön och en härligt rymlig modell. En sak som jag undrar är hur man lämpligast mäter ett stickat arbete. Liggande eller hängande? Mvh Åsa
14.01.2024 - 15:07
![]() Annemieke Wicherink wrote:
Annemieke Wicherink wrote:
Het wordt een prachtige trui! Ik heb een vraag over de meerderingen op het moment dat je over gaat van de romp rondbreien naar heen en weer breien in boordsteek en een spilt krijgt. Waarom moet je dan zoveel steken meerderen komt dat om dat je overgaat een dunnere naald? Ik ben bang dat de onderkant te wijd wordt
12.01.2024 - 23:15DROPS Design answered:
Dag Annemiek,
De boordsteek trekt het werk samen en om dit te voorkomen moet je zoveel steken meerderen.
14.01.2024 - 13:03
![]() Daniela wrote:
Daniela wrote:
Hallo. Leider habe ich es nicht verstanden, warum der Halsausschnitt in Hin- und Rückreihen gestrickt wird. Wann wird dieses Loch geschlossen und wie? Danke für die Antwort.-
27.12.2023 - 21:35DROPS Design answered:
Liebe Daniela, der Halsausschnitt wird in Hin- und Rückreihen gestrickt, damit der Halsauschnitt hinten länger als der Halsausschnitt vorne wird. Am Ende der 7. Reihe wird man die mittleren Maschen für den Halsausschnitt vorne angeschlagen, dann stricken Sie in Runden = die Maschen am Ende der Reihe bis zum Markierungsfaden an der hinteren Mitte. Viel Spaß beim stricken!
02.01.2024 - 09:10
![]() Mrs Elizabeth Guymer wrote:
Mrs Elizabeth Guymer wrote:
The pattern looks great but none of the increases actually add up to the correct amount t of stitches at the end of the yoke increases - supposed to have 296 stitches but that is more than 88 x 2 for front/back added with 58 x 2 for both sleeves - where are the extra 4 supposed to be?
12.12.2023 - 18:54DROPS Design answered:
Hi Mrs Guymer, Have you inserted the markers in stitches (instead of between stitches)? That could be where your extra 4 stitches are included. Happy knitting!
13.12.2023 - 06:43
![]() Myriam wrote:
Myriam wrote:
Bonjour, je suis bloquée avec les raglans. Comment différent marqueurs manches et dos/devant? Est-ce que cela veut dire: tricoter jusqu’au 1er marqueur côté dos, faire le raglan 2, pas d’augmentation côté manche (donc au contraire du raglan 1, on augmente pas des 2 côtés du raglan? ) Je vous remercie d’avance.
10.12.2023 - 12:10DROPS Design answered:
Bonjour Myriam, vous avez 4 marqueurs, 1 entre chaque pièce pour séparer les manches du dos et du devant; pour le raglan, vous allez augmenter de part et d'autre de la maille avec un marqueur; mais vous devez augmenter davantage pour le devant/le dos que pour les manches, autrement dit, vous augmentez (raglan-1) pour le devant, le dos et les manches et en plus, vous augmenterez (raglan-2) seulement pour le devant et le dos; puis vous augmenterez alternativement 4 mailles (dos / devant seulement - raglan-1) et 8 mailles (comme avant, dos, devant et manches). Bon tricot!
11.12.2023 - 09:02
![]() Victoria wrote:
Victoria wrote:
Bonjour, Pour les augmentations du raglan 2 et les augmentations du raglan 1 pour les dos/devant : doit-on augmenter seulement de 2 mailles sur deux mailles raglan quand on arrive au dos et devant, ou doit-on augmenter de 4 mailles sur les 4 mailles raglan seulement sur les cotés dos/devant ? Merci d'avance
29.11.2023 - 11:09DROPS Design answered:
Bonjour Victoria, on va augmenter systématiquement 2 mailles pour les manches (augmentations-1) et soit 2 soit 4 mailles pour le devant et le dos (augmentations-1 + augmentations-2). Bon tricot!
29.11.2023 - 14:15
![]() Victoria wrote:
Victoria wrote:
Bonjour, Je ne comprends pas comment passer de l'encolure à l'empiècement. Je tricote le rang 7 à l'endroit, et je dois ensuite tricoter le rang 8 à l'envers jusqu'au milieu du dos seulement ? Comment passe-t-on ensuite à l'empiècement? Est-ce qu'il n'y aurait pas un côté où les jetés des raglans ne seront pas tricotés? Merci
26.11.2023 - 19:00DROPS Design answered:
Bonjour Victoria, les rangs raccourcis se composent de 7 rangs au total, le dernier rang se termine au fil marqueur du milieu dos; lorsque vous avez tricoté ces 7 rangs et monté les dernières mailles, tricotez maintenant en rond jusqu'au fil marqueur du milieu dos. Les jetés non tricotés à la fin de ce tour le seront au tour suivant. Bon tricot!
27.11.2023 - 10:01
![]() Magda wrote:
Magda wrote:
Hi! I'm absolutely in love with this pattern but it seems I can't wrap my head around the beginning. Is it really worked back and forth for first 7 or 8 rows and if yes, why exactly? Wouldn't that create a hole at back? I'm confused because there is no information if we should seam something after the neck ribbing is done or leave it as a split or count these stitches in when picking up for neck ribbing. Thank you very much for your help!
26.11.2023 - 12:00DROPS Design answered:
Dear Magda, you work back and forth to correctly shape the neckline, you are casting on new stitches at the end of each row. Later on, you will be able to check that no holes are left as you pick up stitches for the double neck. Happy knitting!
03.12.2023 - 19:06
![]() Åsa Andreasson wrote:
Åsa Andreasson wrote:
Hej. Jag har lite svårt att förstå slutet på avsnittet halsringning. Det står " sticka vidare till mitt bak. Är det nu jag ska börja sticka runt på rundstickan från rätsidan eller ska jag fortsätta fram och tillbaka, alltså sticka avgigsida fram till mitt bak och sedan börja sticka runt? Det är lite otydligt. Mvh Åsa
31.10.2023 - 19:59DROPS Design answered:
Hej Åsa, jo når du har strikket 7.pind og lagt op nye masker mod midt foran, fortsætter du rundt ifølge mønsteret :)
01.11.2023 - 11:32
![]() Helene wrote:
Helene wrote:
Bonjour, Je ne comprends pas le placement des marqueurs du premier rang. J'ai 70 mailles (je tricote en XL mais j'ai compté et le problème est le même pour toutes les tailles) et je dois les séparer : 1+16+16+16+16+1 = 66 mailles et non 70 ... pouvez vous m'expliquer ce que je manque svp ? Merci !
30.10.2023 - 11:43DROPS Design answered:
Bonjour Hélène, notez que les marqueurs sont placés dans une maille et pas entre 2 mailles, ainsi vos 66 mailles + 4 mailles avec un marqueur = 70 mailles. Bon tricot!
30.10.2023 - 18:07
|
|
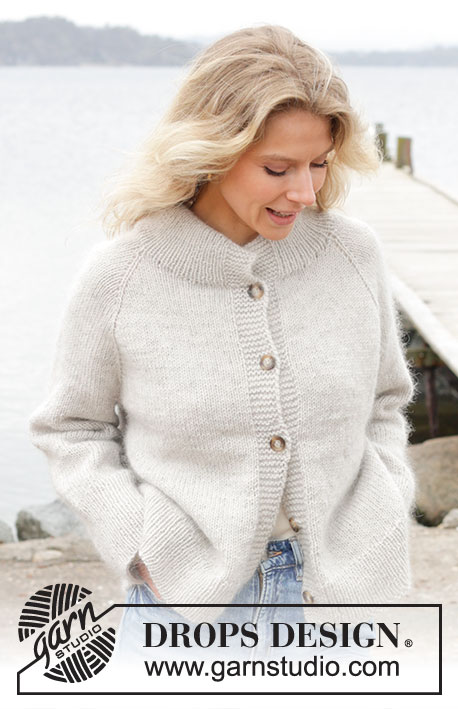
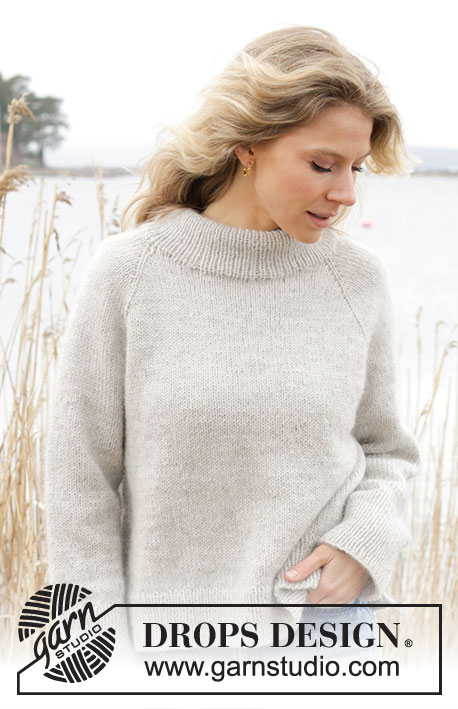
Moon Mist#moonmistsweater |
|
 |
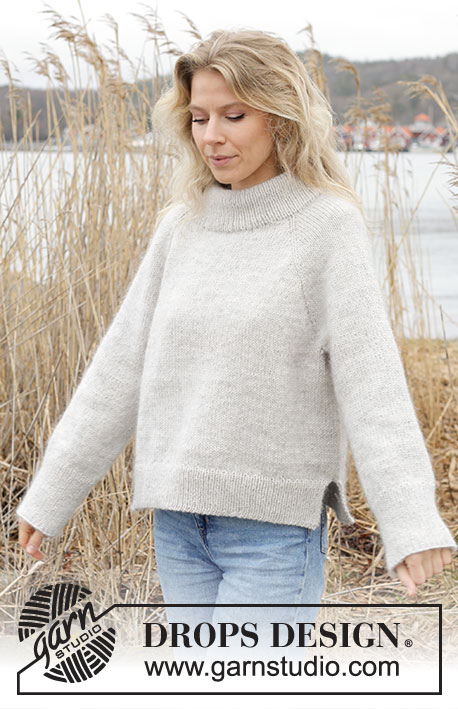 |
Knitted jumper in DROPS Lima and DROPS Kid-Silk. The piece is worked top down with raglan, double neck and split in sides. Sizes S - XXXL.
DROPS 245-7 |
|
|
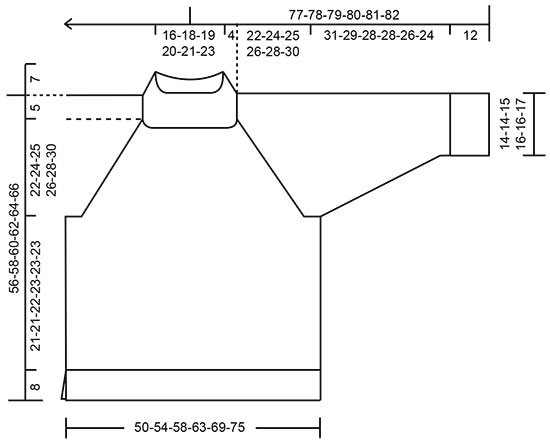
------------------------------------------------------- EXPLANATIONS FOR THE PATTERN: ------------------------------------------------------- GARTER STITCH (worked back and forth): Knit all rows. 1 ridge = knit 2 rows. RAGLAN-1: All increases are worked from the right side! Increase 1 stitch before/after the 4 marker-stitches – hereafter called raglan-stitches. The raglan-stitches are always worked in stocking stitch. Increase 1 stitch by making 1 yarn over, which is worked twisted as described below, then worked in stocking stitch. From the wrong side: BEFORE raglan-stitches: Purl the back loop – no hole. AFTER raglan-stitches: Slip the yarn over off the left needle and replace it the other way round (insert the left needle in the back when replacing it). Purl the front loop – no hole. From the right side: BEFORE raglan-stitches: Slip the yarn over off the left needle and replace it the other way round (insert the left needle in the back when replacing it). Knit the front loop (the stitch twists to the right) – no hole. AFTER raglan-stitches: Knit the back loop (the stitch twists to the left) – no hole. RAGLAN-2: Increase 1 stitch before/after the raglan-stitches on the front/back pieces (not on the sleeves). Raglan-2 is worked in addition to Raglan-1. Work as follows: BEFORE raglan-stitches: Work until there are 3 stitches left before the raglan-stitches, use left needle to pick up thread between 2 stitches from round below, pick up thread from behind and knit stitch in front loop – no hole. AFTER raglan-stitches: Work 3 stitches past the raglan-stitches (if there are yarn overs, they are not counted as stitches), use left needle to pick up thread between 2 stitches from round below, pick up thread from front and knit stitch in back loop – no hole. INCREASE TIP: Increase 1 stitch by making 1 yarn over, which is worked twisted on the next row/round to avoid a hole. DECREASE TIP (for sleeves): Decrease 1 stitch on either side of the marker-thread as follows: Work until there are 3 stitches left before the marker-thread, knit 2 together, knit 2 (marker-thread sits between these 2 stitches), slip 1 stitch knit-wise, knit 1 and pass the slipped stitch over the knitted stitch. ------------------------------------------------------- START THE PIECE HERE: ------------------------------------------------------- JUMPER – SHORT OVERVIEW OF THE PIECE. The neckline is worked first back and forth with circular needle and top down, and new stitches are cast on for neckline; then the yoke is continued in the round with circular needle from mid-back. The yoke is divided for body and sleeves and the body continued in the round with circular needle as far as the split in each side. The front and back pieces are finished back and forth with circular needle. The sleeves are worked in the round with double pointed needles/short circular needle. The neck is worked to finish. NECKLINE: Cast on 62-64-66-68-70-72 stitches with circular needle size 5 mm and 1 strand of each quality (2 strands). Insert 4 markers and 1 marker thread as follows: Count 1 stitch, insert 1 marker in the next stitch, count 16 stitches (sleeve), insert 1 marker in the next stitch, count 12-13-14-15-16-17 stitches, insert 1 marker thread (mid-back), count 12-13-14-15-16-17 stitches insert 1 marker in the next stitch, count 16 stitches (sleeve), insert 1 marker in the next stitch, = 1 stitch left after the last marker. These marker stitches are now called raglan-stitches. Work back and forth as follows: ROW 1 (right side): Knit and increase for RAGLAN-1 on each side of the 4 raglan-stitches – read description above (8 increased stitches), cast on 2 stitches at the end of the row = 72-74-76-78-80-82 stitches. ROW 2 (wrong side): Purl (yarn overs worked as described under Raglan-1), cast on 2 stitches at the end of the row = 74-76-78-80-82-84 stitches. ROW 3 (right side): Knit and increase for raglan-1 on each side of the 4 raglan-stitches (8 increased stitches), cast on 2 stitches at the end of the row = 84-86-88-90-92-94 stitches. ROW 4 (wrong side): Purl, cast on 2 stitches at the end of the row = 86-88-90-92-94-96 stitches. ROW 5 (right side): Knit, increase for raglan-1 on each side of the 4 raglan-stitches (8 stitches increased), cast on 3 stitches at the end of the row = 97-99-101-103-105-107 stitches. ROW 6 (wrong side): Purl, cast on 3 stitches at the end of the row = 100-102-104-106-108-110 stitches. ROW 7 (right side): Knit, increase for raglan-1 on each side of the 4 raglan-stitches (8 stitches increased), cast on 8-10-12-14-16-18 stitches at the end of the row = 116-120-124-128-132-136 stitches. Work to the marker-thread mid-back. The neckline is finished and you have increased 4 times for raglan-1 on each side of the 4 raglan-stitches. YOKE: Continue with stocking stitch in the round from mid-back. REMEMBER THE KNITTING TENSION. NOTE: You will now increase more stitches on the front/back pieces than on the sleeves, so you will now work raglan-2 regularly in addition to raglan-1. Read the next 3 paragraphs before continuing. Increase for raglan-1 on each side of the 4 raglan-stitches every 2nd round 3-5-8-13-13-11 times (i.e., 7-9-12-17-17-15 times including the 4 increases on the neckline). AT THE SAME TIME on the first round, increase for RAGLAN-2 on the front and back pieces – read description above (raglan-2 is worked in addition to raglan-1). Increase for raglan-2 every 12th-12th-14th-10th-8th-8th round a total of 2-2-2-4-5-6 times. You have increased for raglan-1 3-5-8-13-13-11 times after the neckline. Continue to increase for raglan-1 every 2nd round but every second increase is only worked on the front and back pieces (i.e., increase on the front/back pieces every 2nd round and on the sleeves every 4th round). Increase like this 14-14-12-8-10-14 times on the front/back pieces (7-7-6-4-5-7 times on the sleeves) – remember raglan-2. You have now increased a total of 23-25-26-29-32-35 times on the front/back pieces (including raglan-2) and 14-16-18-21-22-22 times on the sleeves. After all the increases for raglan-1 and raglan-2 there are 232-252-268-296-316-332 stitches (70-76-80-88-96-104 stitches on the front and back pieces between the raglan-stitches and 44-48-52-58-60-60 stitches on the sleeves). Continue with stocking stitch, without further increases until the piece measures 22-24-25-26-28-30 cm, measured mid-back from cast-on edge. Divide for the body and sleeves as follows: Knit 36-39-41-45-49-53 (half back piece), place the next 44-48-52-58-60-60 stitches on a thread for the sleeve, cast on 8-8-10-10-12-14 stitches (in side under sleeve), knit 72-78-82-90-98-106 (front piece), place the next 44-48-52-58-60-60 stitches on a thread for the sleeve, cast on 8-8-10-10-12-14 stitches (in side under sleeve), knit the last 36-39-41-45-49-53 stitches (half back piece). The body and sleeves are finished separately. The piece is now measured from here! BODY: = 160-172-184-200-220-240 stitches. Insert 1 marker-thread in the middle of the 8-8-10-10-12-14 cast-on stitches under each sleeve. Allow the threads to follow your work onwards – they are used when working the split in each side. Continue stocking stitch in the round until the body measures 21-21-22-23-23-23 cm from the division. Now divide at both marker-threads and finish each piece separately. Place the front piece on circular needle size 3.5 mm and leave the back piece on the needle. FRONT PIECE: = 80-86-92-100-110-120 stitches. Knit 1 row from the right side and increase 25-27-29-31-35-37 stitches evenly spaced – read INCREASE TIP = 105-113-121-131-145-157 stitches. Work first row as follows from the wrong side: 1 GARTER STITCH – read description above, * purl 1, knit 1 *, work from *-* until there are 2 stitches left, purl 1 and 1 garter stitch. Continue this rib back and forth for 8 cm. Cast off. You can use Italian cast-off. The jumper measures approx. 56-58-60-62-64-66 cm from the shoulder. BACK PIECE: Place the 80-86-92-100-110-120 stitches on circular needle size 3.5 mm and work in the same way as the front piece. SLEEVES: Place the 44-48-52-58-60-60 stitches from the thread on the one side of the piece on short circular needle/double pointed needles size 5 mm and knit up 1 stitch in each of the 8-8-10-10-12-14 stitches cast on under the sleeve = 52-56-62-68-72-74 stitches. Insert a marker-thread in the middle of the new stitches under the sleeve. Start at the marker-thread and work stocking stitch in the round. When the sleeve measures 4-4-4-2-2-3 cm, decrease 2 stitches mid under sleeve – read DECREASE TIP. Decrease like this every 7-5-3½-3-2½-2 cm a total of 4-5-7-9-10-10 times = 44-46-48-50-52-54 stitches. Continue working until the sleeve measures 31-29-28-28-26-24 cm from the division (or to desired length before the rib. There is 12 cm left). Change to double pointed needles size 3.5 mm. Knit 1 round and increase 20-20-20-20-24-24 stitches evenly spaced = 64-66-68-70-76-78 stitches. Work rib (knit 1, purl 1) for 12 cm. Cast off in the same way as on the front/back pieces. The sleeve measures approx. 43-41-40-40-38-36 cm from the division. Work the other sleeve in the same way. DOUBLE NECK: Start mid-back and knit up from the right side 100-104-108-112-116-120 stitches round the neck, with short circular needle size 3.5 mm and 1 strand of each quality (2 strands) – stitch number must be divisible by 4 – match the rib to the raglan-stitches so they continue to be knitted (seen from the right side) and you have an odd number of stitches between each raglan-stitch so the rib fits. Work rib in the round (knit 1, purl 1) for 15 cm. Cast off. Fold the neck double to the inside and fasten with a couple of stitches in each raglan-line. |
|
|
|
Have you finished this pattern?Tag your pictures with #dropspattern #moonmistsweater or submit them to the #dropsfan gallery. Do you need help with this pattern?You'll find 33 tutorial videos, a Comments/Questions area and more by visiting the pattern on garnstudio.com. © 1982-2025 DROPS Design A/S. We reserve all rights. This document, including all its sub-sections, has copyrights. Read more about what you can do with our patterns at the bottom of each pattern on our site. |
|


With over 40 years in knitting and crochet design, DROPS Design offers one of the most extensive collections of free patterns on the internet - translated to 17 languages. As of today we count 314 catalogues and 11820 patterns translated into English (UK/cm). 11820
We work hard to bring you the best knitting and crochet have to offer, inspiration and advice as well as great quality yarns at incredible prices! Would you like to use our patterns for other than personal use? You can read what you are allowed to do in the Copyright text at the bottom of all our patterns. Happy crafting!
Post a comment to pattern DROPS 245-7
We would love to hear what you have to say about this pattern!
If you want to leave a question, please make sure you select the correct category in the form below, to speed up the answering process. Required fields are marked *.