
Looking for a yarn?


Comments / Questions (30)
![]() Le Boulaire wrote:
Le Boulaire wrote:
Hallo, der Anschlag mit 94 Maschen für Gr. M kommt mir sehr groß vor! Das sind dann ungefähr 67 cm für den Rücken…meine Maschenprobe stimmt mit Ihrer Maschenprobe überein, aber 94 Maschen scheint mir viel zu viel zu sein….
30.08.2023 - 14:37DROPS Design answered:
Liebe Frau Le Boulaire, mit kleineren Nadeln braucht man für Bündchen mehr Maschen (= 94 in M) als für später glatt rechts und grösseren Nadlen (= 78 Maschen) - so haben Sie mit 14 Maschen = 10 cm, die 78 Maschen mit Nadeln 6/ die 94 M mit Nadeln 5 ca 54 cm genauso wie bei der Maßskizze. Viel Spaß beim stricken!
30.08.2023 - 16:20
![]() Kristell wrote:
Kristell wrote:
Bonjour, faut-il faire les mailles lisières uniquement sur les côtés des manches ou également près de l’encolure ? Merci d’avance
29.05.2023 - 08:46DROPS Design answered:
Bonjour Kristell, on tricote 1 maille lisière au point mousse avant les emmanchures, mais plus après. Bon tricot!
30.05.2023 - 11:05
![]() Kirsten wrote:
Kirsten wrote:
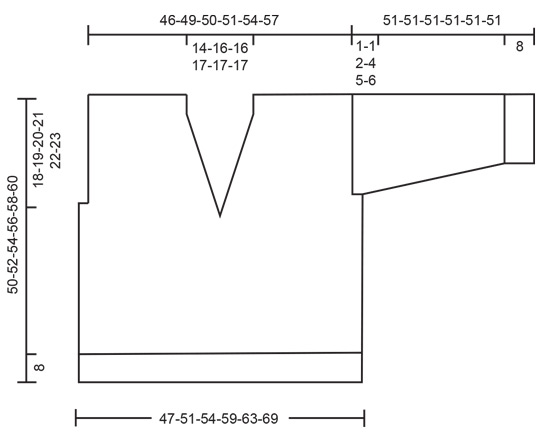
Hallo liebes Drops Team, in der Anleitung steht für Größe M 94 Maschen anschlagen, dann 2 Maschen rechts/ 2 Maschen links, mit je 1 Masche Kraus Rechts beidseitig. Sollen dann 96 Maschen angeschlagen werden? Viele Grüße Kirsten
07.05.2023 - 22:54DROPS Design answered:
Liebe Kirsten, so stricken Sie die 94 Maschen: 1 Masche kraus rechts, *2 Maschen rechts, 2 Maschen links*, von *bis* insgesamt 23 Mal stricken (über die nächsten 92 Maschen), es ist noch 1 Masche übrig, stricken Sie diese Masche rechts, so sind es; 1 +92+1=94. Viel Spaß beim stricken!
08.05.2023 - 09:32
![]() Yvonne wrote:
Yvonne wrote:
Ik had hetzelfde probleem als Katleen hieronder. Ik heb de steken rond de V-hals met een extra draad na-geweven (raar woord, maar je snapt vast wat ik bedoel ;)). Zo blijven ze wat beter bij elkaar en door het pluizige garen valt het nauwelijks op.
22.03.2023 - 20:01
![]() Yvonne wrote:
Yvonne wrote:
I agree with Mrs Eva Hargell here below: the neckline isn't very neat with just the cast off stiches. This pattern reminded me of pattern 228-11, also in Melody. I decided to add the i-cord finishing of the neckline of that pattern to this pattern. This slightly tightens the neckline so you may have to lengthen the sleeves somewhat. But since these are knitted top down anyway, you can try on the sweater and size the sleeves accordingly. (Just first knit the i-cord, then the sleeves.)
22.03.2023 - 19:57
![]() Katleen wrote:
Katleen wrote:
Hallo, Hoe kan je vermijden dat bij de aanzet van de V hals de middenste steek gaat uitrekken ? Graag uw advies.
12.03.2023 - 17:47DROPS Design answered:
Dag Katleen,
Ik snap wat je bedoeld, maar ik heb niet echt een goed advies, behalve dat je dat deel ietsje strakker breit.
14.03.2023 - 20:53
![]() Eva Hargell wrote:
Eva Hargell wrote:
Hi It is not clear from the pattern what to do with the middle meshes of the back cover at the edge of the neck. Just that you should mask off 14 meshes and as well as 2x1 and 1x2 thereafter. There will be no neat neck edge. How have you thought there that you should knit the edge?
05.03.2023 - 19:01DROPS Design answered:
Dear Mrs Hargell, cast off first the middle 14 sts, then finish each shoulder separately casting off at the beg of every row from RS on left shoulder/from WS on right shoulder: 2 sts 1 time and then 1 stitch 2 times. Happy knitting!
06.03.2023 - 10:07
![]() Yvonne wrote:
Yvonne wrote:
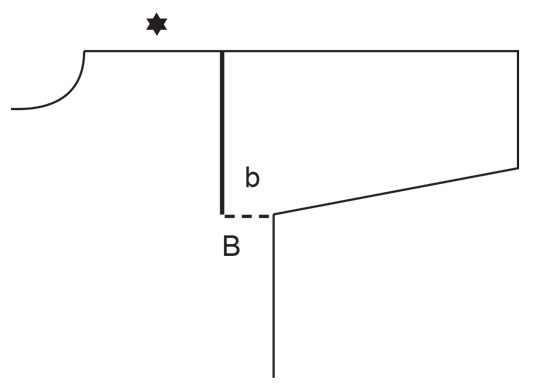
Hoi, ik heb een vraag. Boven de patroontekening van de trui staat 'Telpatroon * naai de mouwkop aan het armsgat, a tegen a, b tegen b.' Maar de steken voor de mouw worden volgens de beschrijving direct opgenomen vanaf het pand. Dan is de mouw toch aangebreid en hoeft niet meer naderhand aangenaaid te worden?
02.03.2023 - 22:30DROPS Design answered:
Dag Yvonne,
Ja dat klopt inderdaad niet helemaal. Je neemt gelijk steken op op het pand, waarmee de mouw al aan het pand vast zit. Als je klaar bent met de mouw hoef je alleen nog de onderarmnaad dicht te maken en het dwarse stukje op het pand: b tegen B.
08.03.2023 - 20:03
![]() Ann-Sofie Neikter wrote:
Ann-Sofie Neikter wrote:
Hej! Ska ärmens maskor även läggas upp på markeringen B?
18.02.2023 - 08:08DROPS Design answered:
Hej Ann-Sofie, nej du samler ikke masker op på markeringen B :)
24.02.2023 - 11:17
![]() Eva-Karin Hargell wrote:
Eva-Karin Hargell wrote:
Hi, I have chosen Drops kid silk and Drops Alpca for this pattern and is wondering if one strand of each variety is enough?
15.02.2023 - 22:54DROPS Design answered:
Dear Mrs Hargell, to replace 1 Strand Melody (yarn group D) you should use 3 strands yarn group A, ie 3 strands Kid-Silk for example or 2 x Kid-Silk + 1 Alpaca or 1 x Alpaca + 2 Kid-Silk - use the yarn converter to get the new amount of yarn required - and remember your DROPS Store can assist you even per mail or telephone. Happy knitting!
16.02.2023 - 12:02
|
||||
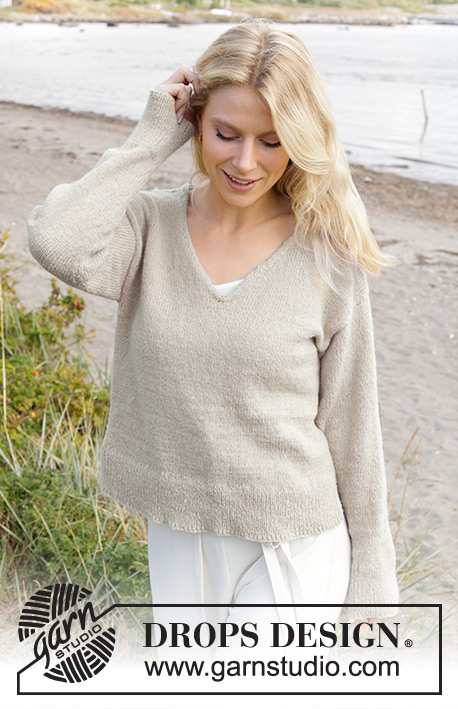
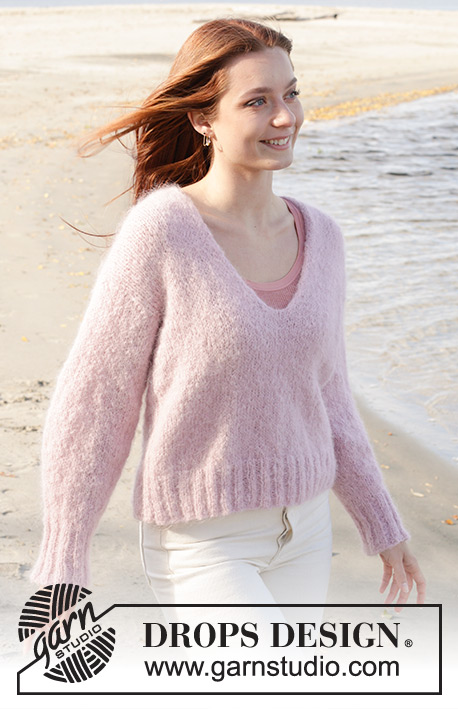
Climbing Rose Sweater#climbingrosesweater |
||||
 |
 |
|||
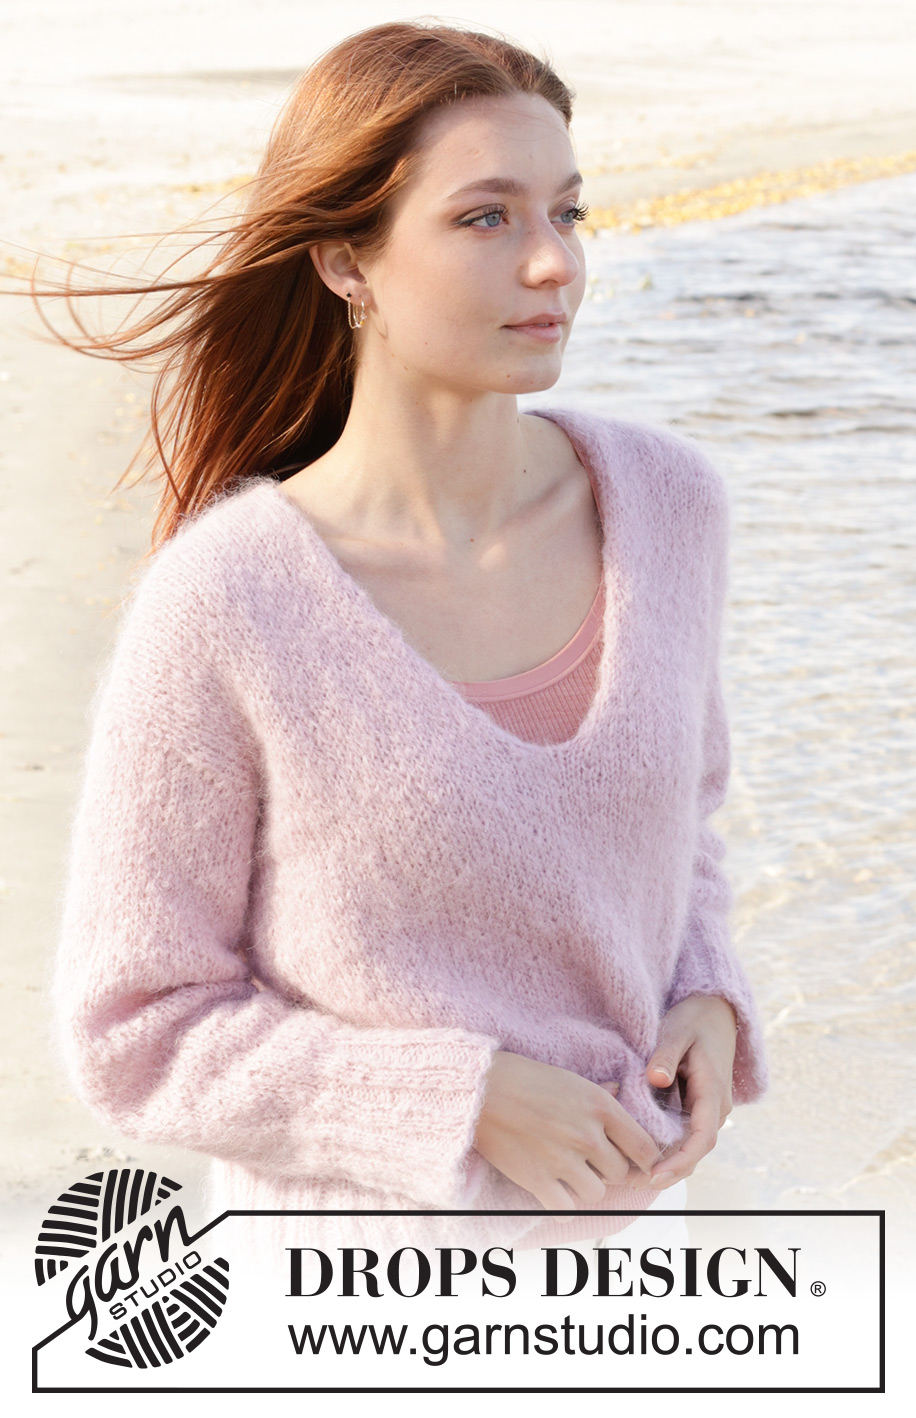
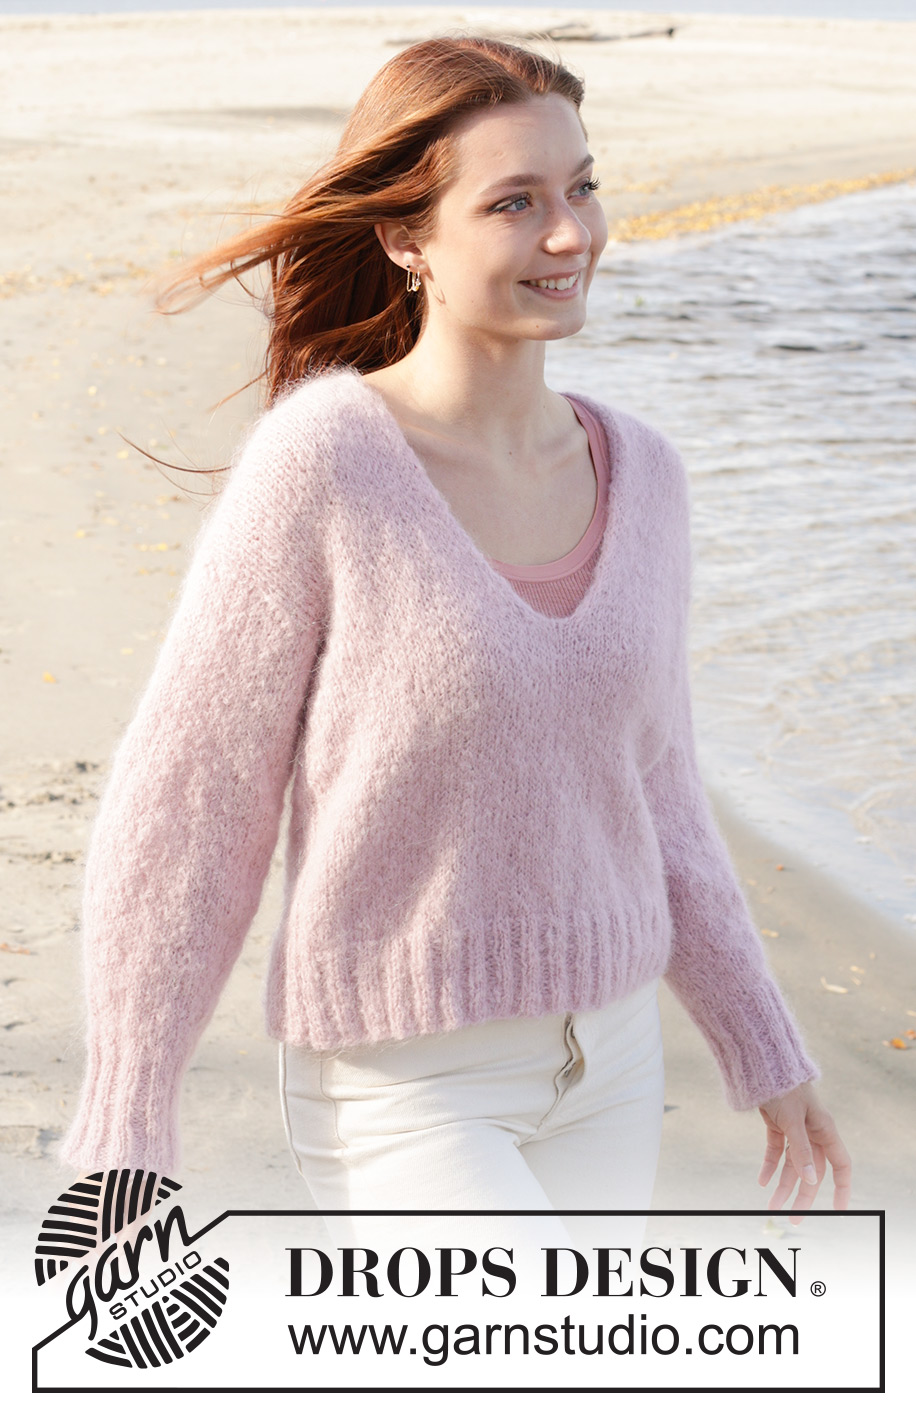
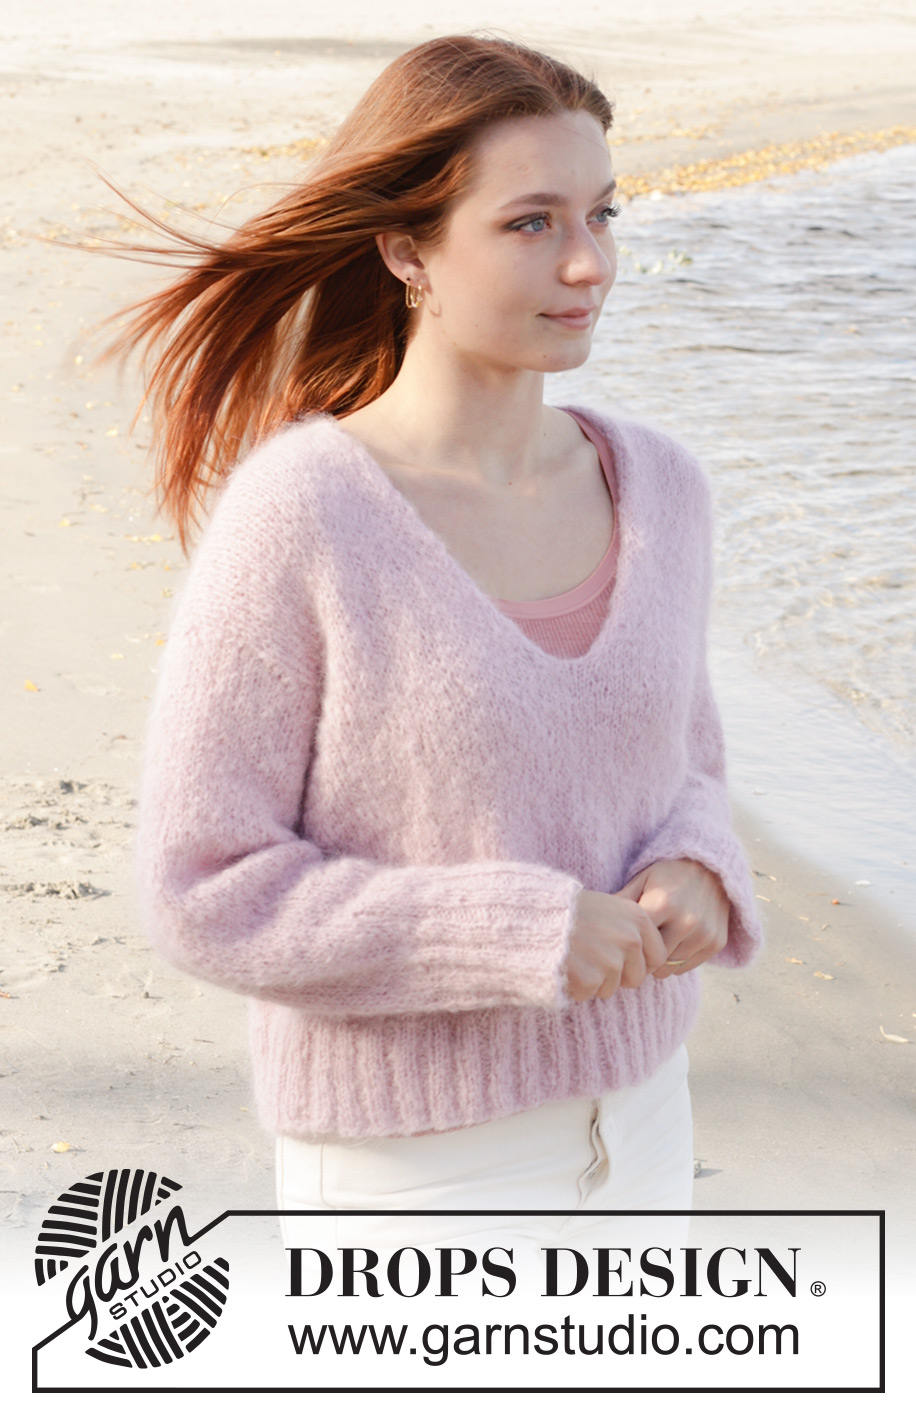
Knitted jumper in DROPS Melody. Piece is knitted bottom up with stocking stitch and V-neck. Size XS – XXL.
DROPS 240-5 |
||||
|
---------------------------------------------------------- EXPLANATION FOR THE PATTERN: ---------------------------------------------------------- GARTER STITCH (back and forth): Knit all rows. 1 ridge vertically = knit 2 rows. DECREASE TIP (applies to mid under sleeves): Decrease 1 stitch on each side of marker thread as follows: Work until 3 stitches remain before marker thread and knit 2 together, knit 2 (marker thread is between these 2 stitches), slip 1 stitch knitwise, knit 1, pass slipped stitch over stitch worked. ------------------------------------------------------- START THE PIECE HERE: ------------------------------------------------------- JUMPER - SHORT OVERVIEW OF THE PIECE: Front piece and back piece are worked back and forth on circular needle, bottom up. Pick up stitches around each armhole. First work the sleeves back and forth on circular needle and then in the round on double pointed needles / short circular needle. BACK PIECE: Cast on 82-90-94-102-110-122 stitches on circular needle size 5 mm with DROPS Melody. Purl 1 row from wrong side. Then work back and forth in rib (knit 2/purl 2) with 1 stitch in GARTER STITCH in each side- read explanation above Continue like this until rib measures 8 cm. Switch to circular needle size 6 mm. Knit 1 row from right side while decreasing 14-16-16-18-20-24 stitches evenly = 68-74-78-84-90-98 stitches. Then work in stocking stitch with 1 stitch in garter stitch in each side. REMEMBER THE KNITTING TENSION! When piece measures 32-33-34-35-36-37 cm, cast off 2-3-4-6-7-9 stitches for armholes at the beginning of the next 2 rows = 64-68-70-72-76-80 stitches. Continue in stocking stitch. When piece measures 47-49-51-53-55-57 cm, cast off the middle 12-14-14-16-16-16 stitches for neck and finish each shoulder separately. Continue as before and cast off stitches for neck at the beginning of every row from neck as follows: Cast off 2 stitches 1 time and 1 stitch 2 times = 22-23-24-24-26-28 stitches remain on shoulder. Work until piece measures 50-52-54-56-58-60 cm. Cast off knitting from right side. Work the other shoulder the same way. FRONT PIECE: Cast on the same number of stitches and work the same way as back piece until piece measures 29-30-31-32-33-34 cm = 68-74-78-84-90-98 stitches - work last row from wrong side. Now divide the piece mid front for right and left front piece as follows: Slip the last 34-37-39-42-45-49 stitches on a thread and then work over the first 34-37-39-42-45-49 stitches from right side as follows: LEFT FRONT PIECE: = 34-37-39-42-45-49 stitches. Read all of the following section before continuing, decrease for V-neck while decreasing for armholes. Work next row from right side and decrease for V-neck as follows: Work in stocking stitch until 4 stitches remain before neck, knit 2 together, work 2 stitches in stocking stitch. Decrease for V-neck every other row (every row from right side) 6-7-7-8-8-7 times in total, then every 4th row (every other row from right side) 4-4-4-4-4-5 times in total. AT THE SAME TIME when piece measures 32-33-34-35-36-37 cm, cast off 2-3-4-6-7-9 stitches for armhole at the beginning of next row from right side. When all decreases for V-neck and armhole are done 22-23-24-24-26-28 stitches remain on shoulder. Continue in stocking stitch with 1 edge stitch in garter stitch towards the side piece measures 50-52-54-56-58-60 cm in total. Cast off knitting from right side. RIGHT FRONT PIECE: Slip stitches from stitch holder back on needle = 32-34-35-36-38-40 stitches. Read all of the following section before continuing, decrease for V-neck while decreasing for armholes. Work next row from right side and decrease for V-neck as follows: Work 2 stitches in stocking stitch, slip 1 stitch knitwise, knit next stitch, pass slipped stitch over stitch worked, work the rest of row. Decrease for V-neck every other row (every row from right side) 6-7-7-8-8-7 times in total, then every 4th row (every other row from right side) 4-4-4-4-4-5 times in total. AT THE SAME TIME when piece measures 32-33-34-35-36-37 cm, cast off 2-3-4-6-7-9 stitches for armhole at the end of next row from right side. When all decreases for V-neck and armhole are done 22-23-24-24-26-28 stitches remain on shoulder. Continue in stocking stitch with 1 edge stitch in garter stitch towards the side until piece measures 50-52-54-56-58-60 cm in total. Cast off knitting from right side. ASSEMBLY: Sew shoulder seams to get a flat and nice seam. SLEEVES: Use circular needle size 6 mm and DROPS Melody. Pick up from right side 50-53-56-59-62-64 stitches - begin from the bottom of armhole. Insert 1 marker in the middle of row – measure sleeve from this marker. Work in stocking stitch back and forth until sleeve measures 1-1-2-4-5-6 cm from marker. Now put piece together on a short circular needle or double pointed needles size 6 mm - work the rest of sleeve in the round. Insert 1 marker thread at the beginning of round (mid under sleeve). Move marker thread upwards when working. Begin round at the marker thread and work in stocking stitch. When sleeve measures 4-3-3-1-1-1 cm, decrease 2 stitches mid under sleeve - read DECREASE TIP. Decrease like this every 5-4½-4½-4-3½-3½ cm 7-8-8-9-10-10 times in total = 36-37-40-41-42-44 stitches. Work until sleeve measures 43 cm from marker. Knit 1 round while increasing 12-11-12-11-14-12 stitches evenly = 48-48-52-52-56-56 stitches. Switch to double pointed needles size 5 mm. Work rib (knit 2/purl 2) for 8 cm. Cast off. Sleeve measures approx. 51 cm from marker. Work the other sleeve the same way. ASSEMBLY: Sew bottom of armholes - see chart. Sew side seams inside 1 edge stitch. |
||||
Diagram explanations |
||||
|
||||
 |
||||
 |
||||
Have you finished this pattern?Tag your pictures with #dropspattern #climbingrosesweater or submit them to the #dropsfan gallery. Do you need help with this pattern?You'll find 25 tutorial videos, a Comments/Questions area and more by visiting the pattern on garnstudio.com. © 1982-2025 DROPS Design A/S. We reserve all rights. This document, including all its sub-sections, has copyrights. Read more about what you can do with our patterns at the bottom of each pattern on our site. |
||||


With over 40 years in knitting and crochet design, DROPS Design offers one of the most extensive collections of free patterns on the internet - translated to 17 languages. As of today we count 320 catalogues and 12093 patterns translated into English (UK/cm). 12093
We work hard to bring you the best knitting and crochet have to offer, inspiration and advice as well as great quality yarns at incredible prices! Would you like to use our patterns for other than personal use? You can read what you are allowed to do in the Copyright text at the bottom of all our patterns. Happy crafting!
Post a comment to pattern DROPS 240-5
We would love to hear what you have to say about this pattern!
If you want to leave a question, please make sure you select the correct category in the form below, to speed up the answering process. Required fields are marked *.