
Popular categories
Looking for a yarn?


Comments / Questions (25)
![]() Bettina Hausager wrote:
Bettina Hausager wrote:
Jeg ønsker tørklædet længere, har prøvet at tage ekstra ud i enderne og 2x20 istedet for 2x18 men synes ikke det blir godt. Kan I hjælpe? Pft
21.10.2023 - 21:27DROPS Design answered:
Hej Bettina, du skal tage ud på samme måde som du har gjort, sjalet vil både blive højere og bredere når du fortsætter med at strikke og tage ud :)
24.10.2023 - 09:10
![]() Alida Bell wrote:
Alida Bell wrote:
Hi Drops 234-46 Thank you for pattern, I have trouble with following the pattern 3A 3B 3C. This pattern begins 3 rows down from the top beneath the 2A. ROW 1 knit ROW 2 Pearl ROW 3 Knit ROW 4 Pearl which is what it indicates on the grid/graph/pattern. Thank you Kind regards Alida Does this mean that it begins on the wrong side, ie working the pattern on the wrong side PEARL ROW??? Please can you clarify this for me.
09.10.2023 - 14:29DROPS Design answered:
Dear Mrs Bell, read the diagrams bottom up, then when starting A.3A, insert a marker before beginning A.3A, work A.3A, repeat A.3B, work A.3C and insert a marker after A.3C, you will have then the placement of pattern for the first size, just work all remaining stitches before A.3A/after A.3C because of increases in stocking stitch and line up the diagrams; And correct, from WS you will purl all stitches in A.3. Happy knitting!
09.10.2023 - 16:22
![]() Lise Simoneau wrote:
Lise Simoneau wrote:
Bonjour je ne comprend pas le point de fantaisie À.3A,A3B!A3.Est ceque la barre noir du graphique de A3A c est le graphique le 3 ieme avant dernier dans la Legendre diagramme? Merci de me répondre car je suis bloquée à cette étape .
07.10.2023 - 13:59DROPS Design answered:
Bonjour Mme Simoneau, les barres obliques des diagrammes sont les symboles 5 et 6 de la légende: dans A.3A, on tricote 2 m ens à l'end et dans A.3C, on glisse 1 m à l'end, on tricote 1 m end et on passe la maille glissée par-dessus la maille tricotée. Chacune de ces diminutions est compensée par 1 jeté pour que le nombre de mailles reste bien le bon. Attention, les jetés se tricotent différemment sur l'envers pour qu'ils soient orientés dans le bon sens. Bon tricot!
09.10.2023 - 08:32
![]() Veronika wrote:
Veronika wrote:
Erst Mal danke für den tollen Service! Ich komme mit Muster 3 nicht klar. Am Beginn jeder Reihe sind es ja zwei Maschen mehr als die Reihe zuvor. Wo beginnt denn nun das Muster? Verschiebt es sich immer um die beiden neuen Maschen nach außen oder muss ich die zugenommen Maschen ignorieren? Ich kann das Muster am Anfang nicht erkennen und auf dem Bild auch nicht so genau. Danke für die Hilfe. Veronika des Musters immer eine Masche nach innen
23.07.2023 - 15:23DROPS Design answered:
Liebe Veronika, stricken Sie die Zunahmen am Anfang und am Ende der Reihe glatt rechts, so wird A.3A immer genauso an der gleichen Stelle anfangen und A.3C (vor der Ende der Reihe) auch an der gleichen Stelle enden - zwischen der mittleren Maschen stricken Sie so viele neuen Maschen wie möglich im Muster (auch die Zunahmen). Viel Spaß beim stricken!
27.07.2023 - 12:03
![]() Strickerin wrote:
Strickerin wrote:
Hallo liebes Drops-Team,\r\nich komme mit Muster A3 A-C nicht zurecht. Obwohl ich der Anleitung genau folge und das Video zu den Zunahmen in Rückreihen geschaut habe, sehen nur die sich nach rechts neigenden Hälften des Dreiecksmusters (auf der rechten Seite meines Tuchs) so aus wie auf den Fotos zum Schal. Auch auf einem kleinen Musterstück will es nicht klappen und mir gehen die Ideen aus, was ich noch probieren könnte. Haben Sie vielleicht einen Tipp für mich? Herzliche Grüße K.
21.04.2023 - 14:02
![]() Uta wrote:
Uta wrote:
Die Wolle soll in beige gekauft werden, aber ich möchte gerne dieses Tuch wie auf dem Foto blau-beige stricken. Wie bekommt man das hin? Danke
13.01.2023 - 15:17DROPS Design answered:
Liebe Uta, am besten wenden Sie sich direkt an Ihrem DROPS Händler, dort wird man Ihnen die beste passende Farbe - auch per Telefon oder per E-Mail - empfehlen. Viel Spaß beim stricken!
13.01.2023 - 15:28
![]() Ingela Hill wrote:
Ingela Hill wrote:
Behöver hjälp med diagrammet A3A. Det blir fel hela tiden. Jag får inte zickzacken. Allt lutar åt samma håll. Särskilt på fjärde raden i diagrammet där det är en maskas mellanrum. Det blir jättekonstigt. Då får jag det inte att stämma med de första varven =( med hoptagning och omslag.) Ritat upp på rutpapper hur många gånger som helst. Hoppas ni förstår vad jag menar
01.12.2022 - 18:20DROPS Design answered:
Hei Ingela. Litt usikker på hva du helt mener, men husk å lese begge øketips og hvordan de skal strikkes og husk å lese riktig forklaring til riktig diagramikon. Strikk gjerne en liten prøvelapp av A.3a slik at du ser at det blir en sikksakk. mvh DROPS Design
05.12.2022 - 11:47
![]() Hansi Koekkoek wrote:
Hansi Koekkoek wrote:
Wat wordt er precies bedoeld met: “brei A. 3A, brei A. 3B 10 keer in totaal, A. 3C” ????
14.11.2022 - 02:10DROPS Design answered:
Dag Hansi,
Aan het begin van de naald brei je eerst A.3A, dan herhaal je 10 keer in de breedte A.3B en tot slot brei je de laatste steken voor de middelste steek op de naald in A3C. Dan brei je de middelste steek om vervolgens nog een de patronen te herhalen zoals hierboven beschreven.
14.11.2022 - 20:51
![]() Hansi Koekkoek wrote:
Hansi Koekkoek wrote:
Ik begrijp À.3A À.3B A.3C niet. Kunt u dit wat duidelijker uitleggen? Overigens een mooi patroon.
11.11.2022 - 22:36
![]() Renate wrote:
Renate wrote:
Hallo nettes Drops Team. . Nun Meine Frage.Warum werden 18 maschen aufegnommen und dann wieder abgenommen: Wenn ich das Tuch verlängeren möchte bleibt es dann bei den 18 Maschen? Vielen lieben Dank
10.11.2022 - 20:24DROPS Design answered:
Liebe Renate, man braucht mehr Maschen für die Zöpfen in A.5 als für Glattrechts, deshalb werden 18 Maschen x 2 (36 Maschen insgesamt) zugenommen dann wieder abgenommen - ja nach die gewünschte Länge sollen Sie dann vielleicht mehr als 18 M x 2 abnehmen. Viel Spaß beim stricken!
11.11.2022 - 09:07
|
||||||||||||||||||||||||||||
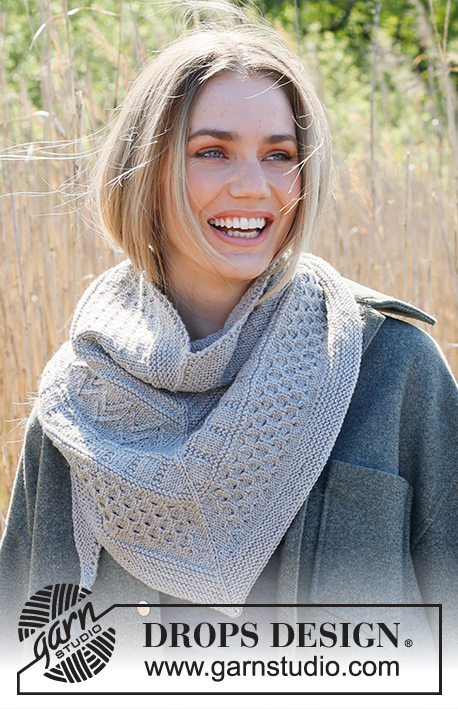
Winter Lines#winterlinesshawl |
||||||||||||||||||||||||||||
 |
 |
|||||||||||||||||||||||||||
Knitted shawl in DROPS Merino Extra Fine or DROPS Daisy. Piece is knitted top down with relief pattern.
DROPS 234-46 |
||||||||||||||||||||||||||||
|
---------------------------------------------------------- EXPLANATION FOR THE PATTERN: ---------------------------------------------------------- GARTER STITCH (back and forth): Knit all rows. 1 ridge vertically = knit 2 rows. PATTERN: See diagrams A.1 to A.5. Diagrams show all rows in pattern seen from the right side. INCREASE TIP-1 (in each side of shawl): Increase from both right side and wrong side! Increase 1 stitch by making 1 yarn over inside outermost stitch in each side. On next row knit/purl yarn over depending on pattern (it should make a hole). INCREASE TIP-2 (the middle of shawl): All increases are done from the right side. Increase by making 1 yarn over on each side of stitch with marker. Work yarn overs as follows – from wrong side: BEFORE STITCH WITH MARKER: Purl yarn over in back loop of stitch. It should not make a hole. AFTER STITCH WITH MARKER: Slip yarn over off left needle and put it back on left needle but the opposite way (insert left needle in from behind when slipping it back on needle). Purl yarn over in front loop of stitch. It should not make a hole. Then work the increased stitches in stocking stitch. ---------------------------------------------------------- START THE PIECE HERE: ---------------------------------------------------------- SHAWL - SHORT OVERVIEW OF THE PIECE: Worked back and forth on circular needle, top down. Because of the number of stitch it might be wise to distribute the stitches on several circular needle of the same size when increasing. SHAWL: Cast on 7 stitches on circular needle size 4 mm with DROPS Merino Extra Fine or DROPS Daisy. Knit 1 row from wrong side. Insert 1 marker in the middle stitch on needle - this is the middle stitch and the middle stitch is worked in stocking stitch until finished measurements. Then work and increase as follows: ROW 1 (= right side): 1 stitch in GARTER STITCH - read explanation above, increase 1 stitch - read INCREASE TIP-1, knit until middle stitch, increase 1 stitch on each side of middle stitch - read INCREASE TIP-2, knit until 1 stitch remains, increase 1 stitch - read INCREASE TIP-1, finish with 1 stitch in garter stitch (= 4 stitches increased). ROW 2 (= wrong side): 1 stitch in garter stitch, increase 1 stitch - remember INCREASE TIP-1, knit until middle stitch (work yarn overs as explained in INCREASE TIP-2), purl middle stitch, knit until 1 stitch remains, increase 1 stitch - remember INCREASE TIP-1, finish with 1 stitch in garter stitch (= 2 stitches increased). Repeat 1st and 2nd row until piece measures 5 cm in knitting direction = approx. 67 stitches on needle. REMEMBER THE KNITTING TENSION! OVERVIEW OF NEXT SECTION: Now work pattern according to diagram as explained below - read the section PATTERN below before continuing. AT THE SAME TIME continue increases the same way as before, i.e. increase 4 stitches from right side and 2 stitches from wrong side the entire piece. PATTERN: Begin each diagram from right side, after increase at the beginning of row. Work diagram as far as you can until middle stitch, work the increased stitches that do not fit the pattern in stocking stitch/garter stitch until middle stitch. Increase on each side of middle stitch as before, work the same number of stitches in stocking stitch/garter stitch after middle stitch, begin diagram so that the pattern is symmetrical on each side of middle stitch (A.3A and A.3C will not be quite symmetrical on each side of middle stitch), work diagram until increase at the end of row. Work the increased stitches in stocking stitch, work the edge stitch in each side in garter stitch and work the middle stitch in stocking stitch. Follow the order of diagrams as explained below. Work A.1 as explained above until piece measures 15 cm in knitting direction and next row is from right side. There are now approx. 151 stitches on needle. Work A.2 as explained above. When A.2 has been worked, there are approx. 181 stitches on needle and next row is worked from right side. Work A.3 as explained above (i.e. work A.3A, work A.3B 10 times in total, A.3C and work any remaining stitches before middle stitch in stocking stitch - after middle stitch work the same number of stitches in stocking stitch as before middle stitch, then work pattern the same way, i.e. A.3A, A.3B 10 times in total, A.3C). When A.3 has been worked, there are approx. 235 stitches on needle and next row is worked from right side. Work A.4 as explained above - at the same time on next to last row increase 36 stitches evenly (18 stitches on each side of middle stitch). When A.4 has been worked, there are approx. 325 stitches on needle and next row is worked from right side. Work A.5 as explained above. Work A.5 2 times in total vertically. After A.5 there are approx. 373 stitches on needle and next row is worked from right side. Work 2 rows in stocking stitch with increases as before and 1 stitch in garter stitch in each side as before - at the same time on first row (right side) decrease 36 stitches evenly (18 stitches on each side of middle stitch) = approx. 343 stitches on needle and next row is worked from right side. Then work 7 ridges in garter stitch back and forth (work middle stitch in stocking stitch), and increase the same way as before. After last row from wrong side there are approx. 385 stitches on needle. Shawl measures approx. 38 cm in knitting direction. Cast off somewhat loosely by knitting from the right side. |
||||||||||||||||||||||||||||
Diagram explanations |
||||||||||||||||||||||||||||
|
||||||||||||||||||||||||||||

|
||||||||||||||||||||||||||||
Have you finished this pattern?Tag your pictures with #dropspattern #winterlinesshawl or submit them to the #dropsfan gallery. Do you need help with this pattern?You'll find 20 tutorial videos, a Comments/Questions area and more by visiting the pattern on garnstudio.com. © 1982-2025 DROPS Design A/S. We reserve all rights. This document, including all its sub-sections, has copyrights. Read more about what you can do with our patterns at the bottom of each pattern on our site. |
||||||||||||||||||||||||||||


With over 40 years in knitting and crochet design, DROPS Design offers one of the most extensive collections of free patterns on the internet - translated to 17 languages. As of today we count 314 catalogues and 11820 patterns translated into English (UK/cm). 11820
We work hard to bring you the best knitting and crochet have to offer, inspiration and advice as well as great quality yarns at incredible prices! Would you like to use our patterns for other than personal use? You can read what you are allowed to do in the Copyright text at the bottom of all our patterns. Happy crafting!
Post a comment to pattern DROPS 234-46
We would love to hear what you have to say about this pattern!
If you want to leave a question, please make sure you select the correct category in the form below, to speed up the answering process. Required fields are marked *.