DROPS Super Sale · SAVE 30% on 5 cozy, wool yarns

How to read crochet diagrams

A crochet diagram consists of symbols, 1 symbol = 1 stitch (or a group of stitches) - the symbol definition explains what kind of stitch it is/how it is worked. The diagram shows all stitches seen from the right side (unless otherwise specified).

A typical crochet diagram looks like this:
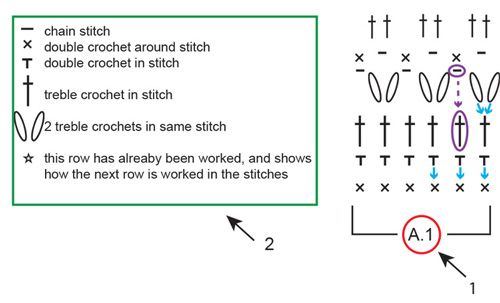
1: 1. A.1 is the name of the diagram and refers to the entire diagram - inside the square brackets. Everything inside the square brackets is 1 repeat of the diagram.
2: 2. This is the symbol definition, which explains how each symbol is worked.
Blue arrows: The symbol is worked in or around the stitch directly below itself in the diagram. Sometimes multiple stitches are worked in/around the same stitch.
Purple ovals and arrows: Not all stitches are worked in, for example: sometimes you work a chain stitch and the stitch below is skipped.

A crochet diagram is read opposite to how you would normally read: from right to left, from bottom to top. In other words: you start with the symbol in the bottom right corner, and work your way leftwards and upwards (see RED in diagram below).

If you are supposed to work several repeats of a diagram (ie: if it is to be repeated several times on the row/round), work until the end of the row of the diagram and begin again with the first symbol on the row.
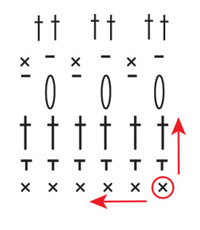
Back and forth:

When you’re working back and forth every other row is worked from the right side and every other row is worked from the wrong side. When working from the wrong side the diagram has to be read the opposite way: from left to right (see red arrow from right side, and blue arrow from wrong side below).

The row typically starts with a given number of chain stitches - the number equals the height of the following stitch, and are included to ensure you are starting from the top of the following stitch (see green circles below). If the chain stitches are included in the diagram (as in this example) all stitches are worked exactly as they appear. Sometimes the pattern includes CROCHET INFORMATION at the top of the instructions, which tells you how many chain stitches to work at the beginning of every row, and whether these chain stitches are replacing the first stitch on row (or in addition). If the chain stitches are NOT included in the diagram: follow instructions under CROCHET INFORMATION.

In the round:

When working in the round, all rounds are worked from the right side: from right to left (see red arrows below). How the round begins and ends are often displayed in a diagram of its own (see A.2 below - green square). Similar to when working back and forth, the round starts with a given number of chain stitches, equal to the height of the following stitch. At the end of the round you typically join the beginning and end of the round with a slip stitch in the last of the chain stitches at the beginning (see blue square below). In other words: the chain stitches in A.2 = the beginning of the round, while the slip stitch in A.2 = the end of the round.

If you are supposed to work several repeats of the diagram (A.1) (ie, it is repeated several times on the round) you work until the last stitch, and then begin again with the first stitch on the same row in A.1. NOTE: in this example it is ONLY A.1 that is repeated, A.2 shows how the beginning and end of the entire round is worked.

Several different diagrams worked consecutively on the row/round:

If you’re working several different diagrams after each other on the same row/round, work as follows: Work 1st row in diagram 1, continue with 1st row in diagram 2, then 1st row in diagram 3 etc. REMEMBER: if you’re working back and forth, the diagrams will have to be worked in the opposite order from the wrong side - ie: start with diagram 3, then diagram 2 and lastly diagram 1. They are also worked the opposite way, as usual.

Circular diagrams:

When working in a circle, ie you start in the middle and work your way outwards, this will often be displayed in a circular diagram. The diagram can either display the entire circle - in this case every symbol is worked exactly as it appears, or the diagram can display a fraction of a circle which is then repeated a given number of times to make a full circle.

Full circle:

In a full circle diagram you begin with the symbol in the middle of the circle: typically a small circle representing a given number of chain stitches, made into a ring with a slip stitch (see red circle below). Similar to when working in the round, the round begins with a given number of chain stitches (equal to the height of the next symbol) and ends with a slip stitch in the last of these chain stitches - ie: equivalent to A.2 in our previous example (see blue square) - NOTE: when the chain stitches are displayed in the diagram these do NOT replace any of the other symbols, and every symbol is worked exactly as they appear. If the chain stitches ARE replacing any stitch, this will have been removed from the diagram.

You work counter-clockwise: from right to left, 1 symbol after the other (see red arrow below). The stitches on the first round are typically worked AROUND the chain stitch ring, meaning you put the crochet hook THROUGH the middle of the chain stitch ring, pick up the strand and pull it back through the ring (working the stitch as usual) - You are not working the stitch IN any of the chain stitches, but rather AROUND the chain stitch ring. At the end of the round, join the beginning and end with a slip stitch, and start with the second round in the diagram: the second closest to the middle (se green arrow).

Fraction of a circle:

If the diagram is only a fraction of a circle, this is because the fraction is repeated a given number of times in the round, to make a full circle. You begin with the symbol at the bottom (see red circle) and work the same way as for FULL CIRCLE, but A.2 will be repeated a given number of times in the round. Similar to when working in the round there is typically a separate diagram illustrating how the round begins and ends (see A.1, blue square below). You begin with the diagram row closest to the chain stitch ring at the bottom, work the chain stitch(es) in A.1, then work the symbol(s) in A.2 (in the first round it is only 1 symbol) and repeat the symbol(s) in A.2 the number of times stated in the pattern.

At the end of the round you join the round with the slip stitch in A.1. When the first round is completed, continue with the next round: second closest to the chain stitch ring (see green arrow below).

Square diagrams / color diagrams:

Some crochet diagrams are displayed in a square diagram, where 1 square = 1 stitch. What type of stitch is worked will typically be explained in the pattern instructions, while the purpose of the diagram is to display what colors the stitches are worked in (see red circle below = symbol definition).

You work as explained above, depending on whether you work BACK AND FORTH, IN THE ROUND or a CIRCULAR DIAGRAM.

Comments (161)

Country flag Emelie wrote:

Svar till svaret 19/10: Det är strecken mellan diagrammen. Inte symbolerna i beskrivningen. Om du tittar på beskrivningen till Autumn ballad har strecken som skiljer diagrammen åt vändningar åt olika håll längst ner. Antingen avslutas strecket åt höger eller vänster. Det är de jag undrar varför de går åt olika håll?

19.10.2026 - 09:09

DROPS Design answered:

Hej Emelie, vi tror også at stregerne kun er for at vise overgangene i diagrammet. Skriv dit spørgsmål ind i selve opskriften, så kan vi se på det :)

20.10.2026 - 11:46

Country flag Emelie wrote:

Hej! Virkar Autumn ballad. De vertikala strecken mellan diagrammen, varför har de streck åt olika håll längst ner? Tack för svar!

17.10.2026 - 21:46

DROPS Design answered:

Hei Emelie. Usikker på hva du mener med vertikala streker. Hvilken streker og i hvilken diagram? Er det de lange vertikala strekene som bare skiller diagrammene? Tenker du på selve diagramikoner som vender ulike veier? Om det er det, så må du lese forklaringen til ikonene over diagrammene. Da forholder du deg til forklaringen til ikonen, spiller ingen rolle om ikonet vender til venstre eller til høyre i selve diagrammet. mvh DROPS Design

19.10.2026 - 07:22

Country flag Anita wrote:

Hi, I am working on the Slate Rose seat pad. On round 7 there are sc 3c sc 3c sc 3c then what appears to be a floating sc. Can you please explain how to make this without an 'anchor' ? Or perhaps direct me to a video. I can't seem to find anything similar on your videos. Thanks . Anita

02.10.2026 - 20:16

DROPS Design answered:

Dear Anita, the sc is not floating, it's worked in the middle chain space of the previous round, just as all other sc in that round. But we don't represent it as close to the chain space to make the chain spaces on each side of the sc wider and better represent what is worked over the chain space and all subsequent stitches here. So you work the sc in the chain space below. Happy crochetting!

04.10.2026 - 18:28

Country flag Brenda wrote:

I'm left handed. How do I adjust reading the chart? Do I read it just opposite of the right handed instructions making sure that the right and wrong side match the chart going the opposite direction?

14.09.2026 - 21:22

DROPS Design answered:

Dear Brenda, you just have to follow the diagrams as they are supposed to be worked, so from the right side read diagram from the right towards the left (same when working in the round) and when working from the wrong side read diagram from the left towards the right. Your yarn store might have even more tips for you, don't hesitate to contact them even per mail or telephone. Happy crocheting!

17.09.2026 - 17:55

Country flag Lene Bøndergaard wrote:

Jeg vil gerne hækle garden cobbles shawl - men hvordan kommer jeg igang? Jeg har ikke hæklet efter diagram før, og jeg kan ikke finde ud af hvordan jeg starter - kan I hjælpe mig igang? Jeg har set alle videoerne til opskriften - og kan ikke se hvad jeg skal gøre, når jeg skal starte midt på.

31.08.2026 - 16:50

DROPS Design answered:

Hei Lena. Jo, du starter med sirkelen i diagrammet som er tegnet helt nederst, midt på. Hekle 5 luftmasker og 1 kjedemaske i første luftmaske, du har nå en sirkel. Hekle i denne sirkelen. 1. rad: 4 luftmaske (= samme "høyde" som en dobbeltstav) , så 3 luftmaske, så 2 staver om sirkelen, 3 luftmasker og deretter 2 staver om samme sirkel, 3 luftmasker igjen og så avsluttes raden med 1 dobbeltstav. Vri arbeidet, og start på 2. rad / 4 luftmasker og hekle videre som diagrammet viser. Se gjerne videoene til DROPS 222-07, der ser du hvordan det hekles etter diagram (ikke samme som 242-4), men tankegangen. mvh DROPS Design

07.09.2026 - 07:23

Country flag Gisella Giar wrote:

Hello, I’m trying to cut and glow the chart pictures in a logical way to help me visualize. I know the R side is worked R to left and wrong side is worked L to R but if I glue them down next to ea. Other does it go A1a, A2, A3, A4, A1b? Or A1a, A4, A3,A4, A2 Could you also explain the order with the remaining charts for small size for the front? Thanks!

13.08.2026 - 00:20

DROPS Design answered:

Dear Mrs Giar, make sure to tell us which pattern you are working on - or just ask your question on the pattern you are working on so that we can check and help you. Thanks for your comprehension.

14.08.2026 - 07:45

Country flag Seanette Kuykendall wrote:

Working on 241-23 sizes small and and at the shoulder. The pattern says work from right side A1A, work 1 repeat of A.1B, A.1C turn & work back=19 stitches. I am not getting 19 stitches on shoulder. What am I doing wrong?

10.07.2026 - 00:11

Country flag Michele wrote:

Bonjour,Je suis gauchère et j'ai un diagramme crochet d'une droitière. Comment je lis le diagramme.merci pour votre réponse

01.07.2026 - 14:43

DROPS Design answered:

Bonjour Michèle, notez que les rangs sur l'endroit se lisent en général (sauf mention contraire dans les explications) toujours de droite à gauche et ceux sur l'envers de gauche à droite; cela devrait pouvoir vous aider à faire vos ajustements. Bon crochet!

02.07.2026 - 15:39

Country flag Elizabeth wrote:

In the Bonnie Blue 250-9 pattern how to interpret the symbol of a treble with a dot on it? My swatch working 3 trebles in to ch space from row below increases the work by 1.5 and the stitch count did not match on the row following, is this a cluster or a shell? Please explain symbols.

25.05.2026 - 23:24

DROPS Design answered:

Dear Elizabeth, the third symbol, with the dot, means" 1 treble crochet in the chain space below". So it's not exactly in the stitch. The shape below should be like a small fan or shell. Happy knitting!

25.05.2026 - 23:53

Country flag Kristin wrote:

Evening Breath crochet shawl. When round no. 6 has been crocheted, you´ll need to repeat rounds 5 and 6, until the desired length is reached. You need to crochet an increase in these two rounds, but there is no description of where and how to crochet the increase. Can you help? Many thanks and best regards.

26.03.2026 - 13:38

DROPS Design answered:

Dear Kristin, the increases are made automatically when working these 2 rows, ie at the beg + at the end of the row and in the middle of the row too, so just work diagram as you did before, you will just have automatically more sts between beg/middle of piece and middle of piece/end of row due to the increases. Happy crocheting!

27.03.2026 - 08:04

Country flag Kristin wrote:

Evening Breath heklað sjal með sólfjaðramynstri. Þegar umferð nr 6 hefur verið heklað á að endurtaka umferð 5 og 6 mar til ákveðinni hengd er náð. Það þarf að heklað útaukningu í þessum tveimur umferðum en það vantar lýsingu á því hvar og hvernig á að heklað útaukningu. Getið þið hjálpað? Kærar þakkir og kveðjur.

20.03.2026 - 19:03

DROPS Design answered:

Blessuð Kristín. Þar sem þú hefur heklað fyrstu 6 umferðirnar, hefur þú þegar aukið út í hvorri hlið. Þú heldur áfram á sama hátt. Það er að segja, þú endurtekur umferð 5 og 6, en í hvert skipti eru fleiri loftlykkjubogar á milli kantsins og miðjunnar. Gangi þér vel.

03.04.2026 - 20:47

Country flag Eva wrote:

Jag har nyss köpt garn och ett av era tröjmönster. Det är inte helt pedagogiska mönster men jag vill ändå få till det. Ni har fina mönster. Min fråga, vad betyder detta i mönstret: 1 st i var och en av de nästa 5-5-0-0-1-1 lm. Vad betyder siffrorna 5-5-0-0-1 -1?

29.12.2025 - 21:49

DROPS Design answered:

Hei Eva. En oppskrift blir gjerne skrevet i mange størrelser og da henviser de tallene til den str. du strikker. Om et plagg har disse str. XS - S - M - L - XL - XXL, vil tallene 5-5-0-0-1-1 fortelle deg at det første tallet (5) "tilhører" str XS, andre tallet (5) "tilhører" str. S, tredje tallet (0) "tilhører" str. M osv. Det samme systemet gjelder garnmengden som er oppgitt i begynnelsen av en oppskrift og målskissen (om oppskriften har det) som du ser nederst på oppskriften. mvh DROPS Design

05.01.2026 - 08:30

Country flag Hilde wrote:

Bestaat de uitleg van de steken ook in het Nederlands? Dank u

12.09.2025 - 08:49

Country flag Adelina wrote:

Buongiorno, in un giornale ho visto uno schema con tre maglie alte chiuse insieme, ma invece di essere verticali sono orizzontali. Come si eseguono per favore? Grazie

25.07.2025 - 18:02

DROPS Design answered:

Buonasera Adelina, a quale modello DROPS sta facendo riferimento? Buon lavoro!

28.07.2025 - 21:01

Country flag Jan Puddey wrote:

I have bought Bomull-Linen to make the ivory twist bag and having difficulty in interpreting one of the symbols in the pattern. It is the dash with a dot on the line. I understand the description but why it is at 90 degrees to the rest of the symbols. Nowhere in the videos or lessons can I find help to explain what I have to do.It seems very important because it determines the correct number of stitches. Thank you . Jan

18.05.2025 - 09:59

DROPS Design answered:

Dear Jan, are you referring to the symbol: 1 treble crochet around chain-space (or 1 double crochet around chain-space, if you are reading the US version)? Our charts are semi-3D, in the sense that we don't just draw the symbols but try to place and orient them as how it would look like when crochetting in the round; that's why the charts has a fan shape and the orientation of some stitches may vary to accomodate to its position. You don't need to work it differently due to its position, just take into account which stitch from the previous row it's worked on. Happy crochetting!

18.05.2025 - 12:33

Country flag Sophie wrote:

I am working the California dream pattern. A.1a diagram for example has 5 rows. Working the front piece. When the pattern starts working through the diagrams, we have 71 double crochets for the medium size. Then it says work next row as follow, begin from right side– work, one crochet in each of the one double crochet, A.1 a over the next 10 double crochet repeat A.1b over the next 30 double crochets. A.1c for the next 9 dc and 1dc in each of last 1 dc. Thats 51 stitches?! What am I missing

29.04.2025 - 01:33

DROPS Design answered:

Dear Sophie, note that you should work simultaneously the pattern and the increases, ie on the very first increase row, start working diagrams as explained over the 51 sts and increase at the same time on each side. Happy crocheting!

29.04.2025 - 09:30

Country flag Jannie Jensen wrote:

1 lige stangmaske og 1 skrå stangmaske i diagram. Hvad menes med det

12.04.2025 - 11:12

DROPS Design answered:

Hei Jannie. Hvilket diagram gjelder det? Om det er f.eks en sirkel som hekles vil stavmaskene "bøye" seg for at det skal bli en sirkel. Ikonet vil ha samme forklaring selv om de står litt ulikt. mvh DROPS Design

22.04.2025 - 09:17

Country flag Jacinthe wrote:

Merci pour votre réponse. Voici pour être plus précise, pour le Patron 173-37. Que veut dire 6 fois en largeur? Merci

18.02.2025 - 16:58

DROPS Design answered:

Bonjour Jacinthe, lorsqu'il est indiqué que vous devez crocheter 6 fois A.1 au-dessus des 12 premières brides (par ex.), cela signifie que vous allez crocheter les 12 mailles suivantes en répétant 6 fois les 2 mailles de A.1 . Bon crochet!

19.02.2025 - 08:14

Country flag Jacinthe Delisle wrote:

Que veut dire 6 fois en largeur dans un patron au crochet?

13.02.2025 - 16:33

DROPS Design answered:

Bonjour Mme Delisle, il faut probablement répéter 6 fois tout le rang/tout le tour les indications précédente, mais pour une réponse plus précise, n'hésitez pas à poser la question sous le modèle concerné, nous pourrons ainsi vérifier et confirmer la réponse. Merci pour votre compréhension. Bon crochet!

14.02.2025 - 09:32

Country flag Ida Weiss wrote:

Hello, I am working on the following: DROPS 200-32 - beach paradise poncho DROPS design: Pattern z-851. I cannot follow the diagram instructions at all. Is is possible to have the instructions written out row by row as they are at the beginning of the pattern? Thank you, Ida Weiss

30.10.2024 - 17:35

DROPS Design answered:

Dear Mrs Weiss, this pattern has only diagrams and written pattern explaining how to work them, so just look at the description of each symbol and work the diagrams as explained in the written pattern, diagrams are read from the right towards the left on every round. Happy crocheting!

31.10.2024 - 09:56

Leave a comment or question to this lesson

Your email address will not be published. Required fields are marked *.











