
Popular categories
Looking for a yarn?


How to read crochet diagrams
A crochet diagram consists of symbols, 1 symbol = 1 stitch (or a group of stitches) - the symbol definition explains what kind of stitch it is/how it is worked. The diagram shows all stitches seen from the right side (unless otherwise specified).
A typical crochet diagram looks like this:
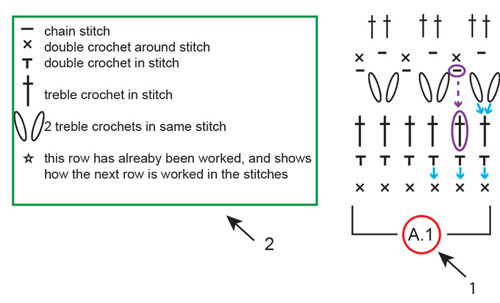
1: 1. A.1 is the name of the diagram and refers to the entire diagram - inside the square brackets. Everything inside the square brackets is 1 repeat of the diagram.
2: 2. This is the symbol definition, which explains how each symbol is worked.
Blue arrows: The symbol is worked in or around the stitch directly below itself in the diagram. Sometimes multiple stitches are worked in/around the same stitch.
Purple ovals and arrows: Not all stitches are worked in, for example: sometimes you work a chain stitch and the stitch below is skipped.
A crochet diagram is read opposite to how you would normally read: from right to left, from bottom to top. In other words: you start with the symbol in the bottom right corner, and work your way leftwards and upwards (see RED in diagram below).
If you are supposed to work several repeats of a diagram (ie: if it is to be repeated several times on the row/round), work until the end of the row of the diagram and begin again with the first symbol on the row.
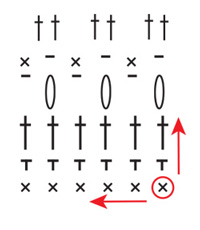
Back and forth:
When you’re working back and forth every other row is worked from the right side and every other row is worked from the wrong side. When working from the wrong side the diagram has to be read the opposite way: from left to right (see red arrow from right side, and blue arrow from wrong side below).
The row typically starts with a given number of chain stitches - the number equals the height of the following stitch, and are included to ensure you are starting from the top of the following stitch (see green circles below). If the chain stitches are included in the diagram (as in this example) all stitches are worked exactly as they appear. Sometimes the pattern includes CROCHET INFORMATION at the top of the instructions, which tells you how many chain stitches to work at the beginning of every row, and whether these chain stitches are replacing the first stitch on row (or in addition). If the chain stitches are NOT included in the diagram: follow instructions under CROCHET INFORMATION.

In the round:
When working in the round, all rounds are worked from the right side: from right to left (see red arrows below). How the round begins and ends are often displayed in a diagram of its own (see A.2 below - green square). Similar to when working back and forth, the round starts with a given number of chain stitches, equal to the height of the following stitch. At the end of the round you typically join the beginning and end of the round with a slip stitch in the last of the chain stitches at the beginning (see blue square below). In other words: the chain stitches in A.2 = the beginning of the round, while the slip stitch in A.2 = the end of the round.
If you are supposed to work several repeats of the diagram (A.1) (ie, it is repeated several times on the round) you work until the last stitch, and then begin again with the first stitch on the same row in A.1. NOTE: in this example it is ONLY A.1 that is repeated, A.2 shows how the beginning and end of the entire round is worked.

Several different diagrams worked consecutively on the row/round:
If you’re working several different diagrams after each other on the same row/round, work as follows: Work 1st row in diagram 1, continue with 1st row in diagram 2, then 1st row in diagram 3 etc. REMEMBER: if you’re working back and forth, the diagrams will have to be worked in the opposite order from the wrong side - ie: start with diagram 3, then diagram 2 and lastly diagram 1. They are also worked the opposite way, as usual.

Circular diagrams:
When working in a circle, ie you start in the middle and work your way outwards, this will often be displayed in a circular diagram. The diagram can either display the entire circle - in this case every symbol is worked exactly as it appears, or the diagram can display a fraction of a circle which is then repeated a given number of times to make a full circle.
Full circle:
In a full circle diagram you begin with the symbol in the middle of the circle: typically a small circle representing a given number of chain stitches, made into a ring with a slip stitch (see red circle below). Similar to when working in the round, the round begins with a given number of chain stitches (equal to the height of the next symbol) and ends with a slip stitch in the last of these chain stitches - ie: equivalent to A.2 in our previous example (see blue square) - NOTE: when the chain stitches are displayed in the diagram these do NOT replace any of the other symbols, and every symbol is worked exactly as they appear. If the chain stitches ARE replacing any stitch, this will have been removed from the diagram.
You work counter-clockwise: from right to left, 1 symbol after the other (see red arrow below). The stitches on the first round are typically worked AROUND the chain stitch ring, meaning you put the crochet hook THROUGH the middle of the chain stitch ring, pick up the strand and pull it back through the ring (working the stitch as usual) - You are not working the stitch IN any of the chain stitches, but rather AROUND the chain stitch ring. At the end of the round, join the beginning and end with a slip stitch, and start with the second round in the diagram: the second closest to the middle (se green arrow).

Fraction of a circle:
If the diagram is only a fraction of a circle, this is because the fraction is repeated a given number of times in the round, to make a full circle. You begin with the symbol at the bottom (see red circle) and work the same way as for FULL CIRCLE, but A.2 will be repeated a given number of times in the round. Similar to when working in the round there is typically a separate diagram illustrating how the round begins and ends (see A.1, blue square below). You begin with the diagram row closest to the chain stitch ring at the bottom, work the chain stitch(es) in A.1, then work the symbol(s) in A.2 (in the first round it is only 1 symbol) and repeat the symbol(s) in A.2 the number of times stated in the pattern.
At the end of the round you join the round with the slip stitch in A.1. When the first round is completed, continue with the next round: second closest to the chain stitch ring (see green arrow below).

Square diagrams / color diagrams:
Some crochet diagrams are displayed in a square diagram, where 1 square = 1 stitch. What type of stitch is worked will typically be explained in the pattern instructions, while the purpose of the diagram is to display what colors the stitches are worked in (see red circle below = symbol definition).
You work as explained above, depending on whether you work BACK AND FORTH, IN THE ROUND or a CIRCULAR DIAGRAM.


With over 40 years in knitting and crochet design, DROPS Design offers one of the most extensive collections of free patterns on the internet - translated to 17 languages. As of today we count 304 catalogs and 11422 patterns - 11417 of which are translated into English (US/in).
We work hard to bring you the best knitting and crochet have to offer, inspiration and advice as well as great quality yarns at incredible prices! Would you like to use our patterns for other than personal use? You can read what you are allowed to do in the Copyright text at the bottom of all our patterns. Happy crafting!
Telpatroon Dropshot 175-24. Moet ik bij dit patroon altijd van rechts naar links lezen of moet ik heen en weer lezen? Bij voorbaat dank!
28.02.2022 - 11:57: