
Popular categories
Looking for a yarn?


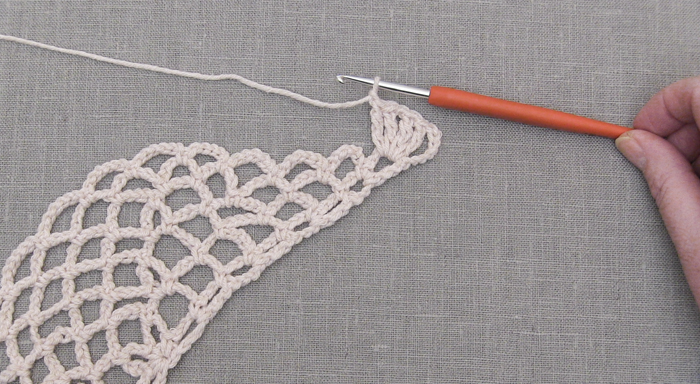
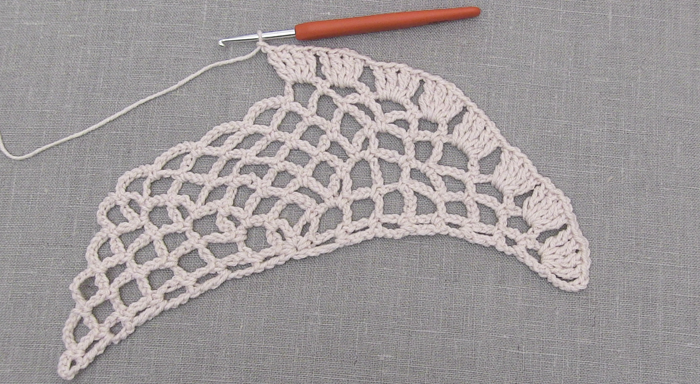
Clue #3 - Time to be done with this section!
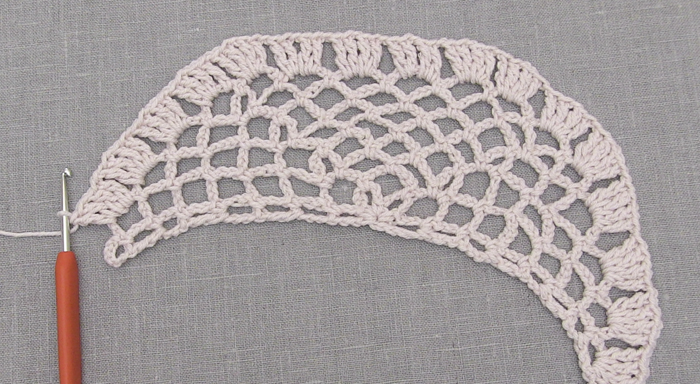
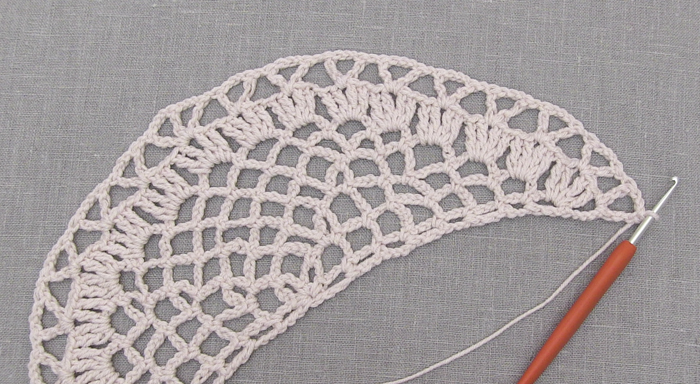
With clue #3 we finish the first color section of our shawl.
As usual, you will find videos to assist you at the end of the clue. But if you still have questions, you can always leave them using the form at the bottom of the page!
Brief version
On clue #3 we will be working from row 9 to 14.
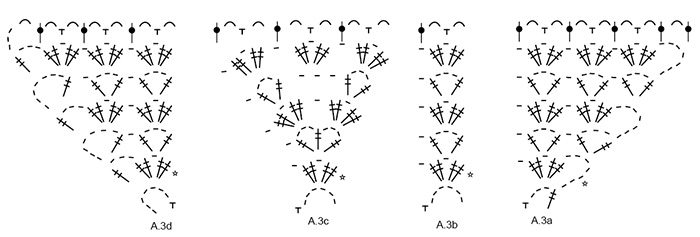
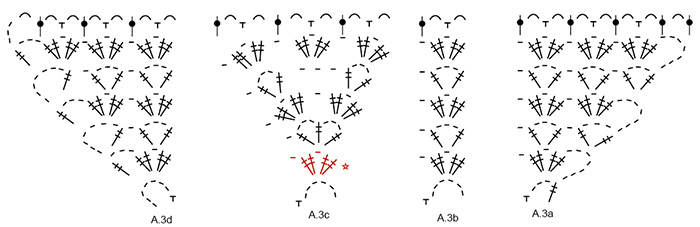
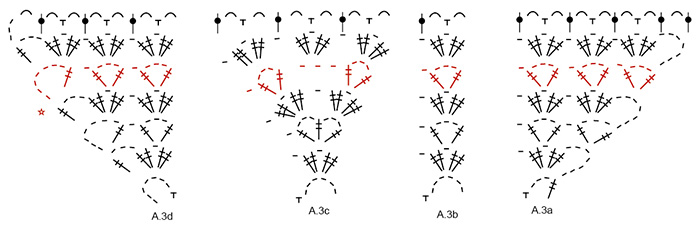
Work according to diagram A.3 as follows: Work A.3a around the first chain stitch space, A.3b around the next 7 chain stitch spaces, A.3c around next chain stitch space (= the space in the middle of the shawl), A.3b around the next 7 chain stitch spaces, A.3d around the last chain stitch space.
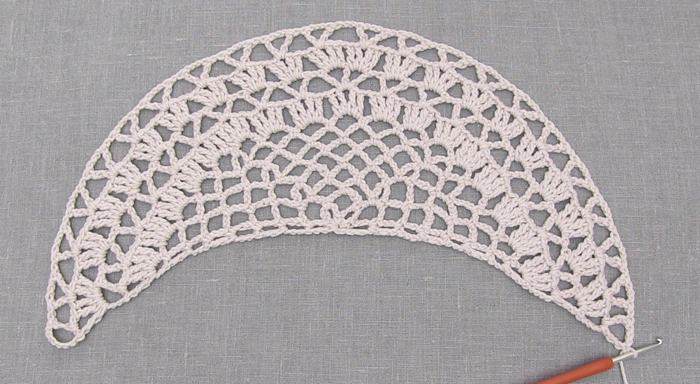
When the 3 diagrams have been worked in height there are 48 chain stitch spaces on row.
The piece after clue #3 is finished measures approx. 7” between the first chain stitch space and the midmost chain stitch space on row 14.
Diagram for Clue #3
 |
= | 1 chain stitch |
 |
= | 1 single crochet around chain stitch space |
 |
= | 1 treble crochet around chain stitch/chain stitch space |
 |
= | 1 double crochet around chain stitch/chain stitch space |
 |
= | 3 chain stitches |
 |
= | start here |
Need help to get started?
ROW 1:
Work A.3a around the 1st chain stitch space as follows: 7 chain stitches, 2 treble crochets around the first chain stitch space, 1 chain stitch, 2 treble crochets around the same chain stitch space, 1 chain stitch.

Work A.3b: 2 treble crochets, 1 chain stitch, 2 treble crochets around the same chain stitch space, 1 chain stitch, work like this around the next 7 chain stitch spaces.

Work A.3c in the midmost chain stitch space: 2 treble crochets, 1 chain stitch, 2 treble crochets around the same chain stitch space, 1 chain stitch.

Work according to A.3b again: 2 treble crochets, 1 chain stitch, 2 treble crochet around the same chain stitch space, 1 chain stitch space, work like this around the next 7 chain stitch spaces.
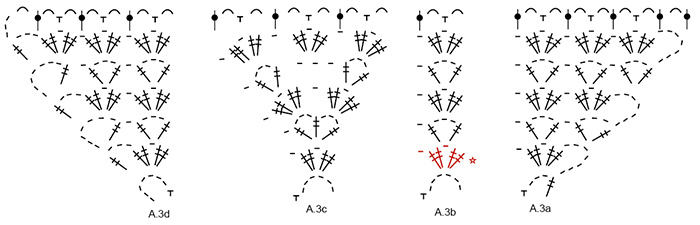
Work A.3d around the last chain stitch space: 2 treble crochets, 1 chain stitch, 2 treble crochets around the same chain stitch space, 3 chain stitches and 1 treble crochet around the same chain stitch space, turn work.


ROW 2:
Continue working according to diagrams A.3d, A.3b and A.3c (=the middle), A.3b and A.3a.

ROW 3:
Continue working according to diagrams A.3a, A.3b and A.3c (=the middle), A.3b and A.3d.


ROW 4:
Continue working according to diagrams A.3d, A.3b and A.3c (=the middle), A.3b and A.3a.
ROW 5:
Continue working according to diagrams A.3a, A.3b and A.3c (=the middle), A.3b and A.3d.


ROW 6:
Continue working according to diagrams A.3d, A.3b and A.3c (=the middle), A.3b and A.3a.


Finished!
You have now completed the first week’s third and last clue. Don’t forget to send pictures of your progress to our Gallery!
When the 3 diagrams have been worked in height there are 48 chain stitch spaces on row.
The piece after clue #3 is finished measures approx. 7” between the first chain stitch space and the midmost chain stitch space on row 14.
Tutorial Video


With over 40 years in knitting and crochet design, DROPS Design offers one of the most extensive collections of free patterns on the internet - translated to 17 languages. As of today we count 324 catalogs and 12290 patterns - 12280 of which are translated into English (US/in).
We work hard to bring you the best knitting and crochet have to offer, inspiration and advice as well as great quality yarns at incredible prices! Would you like to use our patterns for other than personal use? You can read what you are allowed to do in the Copyright text at the bottom of all our patterns. Happy crafting!
Synes ikke at instruksvideoen er særlig god. Det havde været en større hjælp, hvis hun havde vist starten af hver række, i stedet for bare at vise tegningen😞
30.05.2018 - 14:56