
Popular categories
Looking for a yarn?


Clue #4 - Time to add some color...
In this clue we crochet 20 new rows with lots of exciting techniques, and we will be working our stripes with 3 beautiful colors.
As usual, you will find videos to assist you at the end of the clue. But if you still have questions, you can always leave them using the form at the bottom of the page!

First a little information
PATTERN:
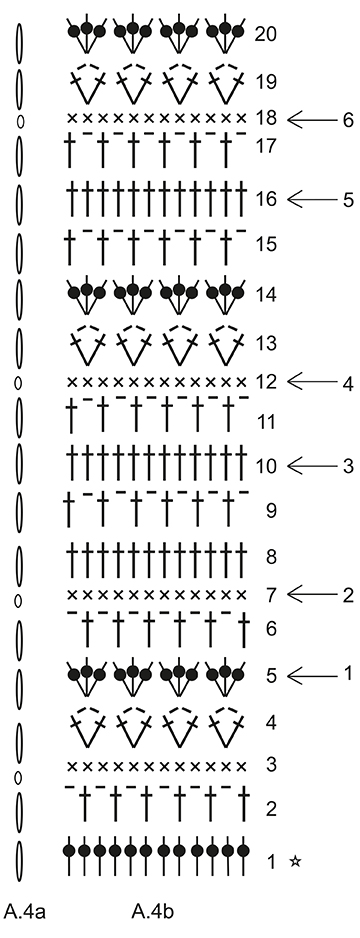
In clue #4 we are working with diagram A.4a and A.4b. A.4a shows how row begins. NOTE: The beginning of rows is drawn above each other in the same diagram even though they are worked alternately the right and left side of the shawl and not above each other.
STRIPES:
Cut thread after each row, unless the next row has the same colour. Fasten the threads in the side when you have finished.
ROWS 1-3: powder (colour a)
ROW 4: mustard (colour b)
ROWS 5-7: beige (colour e)
ROWS 8-9: powder (colour a)
ROWS 10-12: beige (colour e)
ROW 13: mustard (colour b)
ROWS 14-15: powder (colour a)
ROWS 16-18: beige (colour e)
ROW 19: mustard (colour b)
ROW 20: powder (colour a)
COLOR CHANGE:
When switching colors, work as follows: Work last stitch on row with the first color, but wait with last yarn over and pull through, switch to next color and work the last yarn over and pull through on the last stitch with this color, then work next row.
CROCHET INFO:
Information between two * are repeated every time it says *-* in the pattern.
If you are experienced, follow the brief description and diagrams A.4a+b which you will find under. If you need more help to get started continue to read the clue below.
Brief version
Continue working STRIPES – see explanation above, and pattern A.4b (A.4a shows how every row begins and are worked in addition to the stitches in A.4b). Read COLOR CHANGE! NOTE: To get a better overview of which row to work in the pattern and stripes, put a mark in the piece here and the next row is counted as row 1. Meaning first row in A.4b = Row 1 in stripes.
Diagram for Clue #4
 |
= | 1 chain stitch |
 |
= | 1 double crochet around chain stitch/chain stitch space |
 |
= | From right side: 1 double crochet into back loop of stitch. From wrong side: 1 double crochet into front loop of stitch |
 |
= | From right side: 1 single crochet into back of stitch. From wrong side: 1 single crochet into front of stitch |
 |
= | Increase (with the same stitch shown in the chart) on each side of the marking threads on row with arrow. |
 |
= | Work 3 chain stitches on beginning of row |
 |
= | Work 1 chain stitch on beginning of row |
 |
= | start here |
Need help to get started?
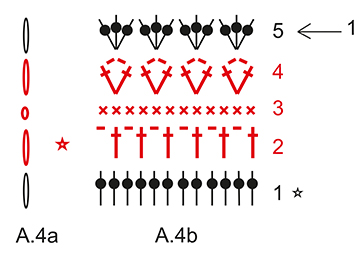
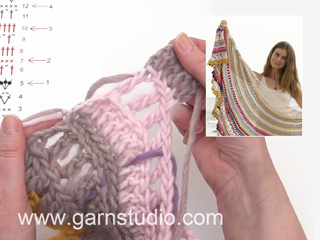
Here’s a more detailed description of how to start with Clue #4. We have marked where we are working in the diagram with red.
ROW 1 (= right side): Work 3 chain stitches (A.4a), then work A.4b as follows: * 2 double crochets around first/next chain stitch space, 3 double crochets around next chain stitch space *, work from *-* entire row = 120 double crochets


Without working, add 12 marking threads in piece as follows: add 1 marking thread after the first 5 stitches, then add the next 11 marking threads with 10 stitches between each marking thread, there are now 5 double crochets left on row after the last marking thread. The marking thread follows along while working the piece and will almost have the same stitch numbers on each side.

Turn work and work row 2, 3 and 4 according to diagram, A.4a and A.4b, - read COLOR CHANGE.

Turn work, work Row 5 (ARROW 1) and increase as follows: Increase 1 double crochet on each side of the marking thread by working 1 double crochet extra around the chain stitch space (=24 stitches increased) = 144 double crochets on row.

Turn work and work rows 6-10. Continue following stripes – see above and increase on row 7 (ARROW 2, increase as follows: increase 1 single crochet on each side of the marking threads by working 2 single crochets in the same stitch = 24 stitches increased) = 168 single crochets on row and on row 10 (ARROW 3, increase as follows: increase 1 double crochet on each side of the marking threads by working 2 double crochets in 1 stitch = 24 stitches increased) = 192 double crochets on row.


Turn work, and work rows 11-15. Continue following stripes – see above and increase on row 12 (ARROW 4 and increase as follows: increase 1 single crochet on each side of the marking thread by working 2 single crochets in 1 stitch = 24 stitches increased) = 216 single crochets on row.

Turn work and work rows 16-20. Continue following stripes – see above and increase on row 16 (ARROW 5 and increase as follows: Increase 1 double crochet on each side of the marking threads by working 2 double crochets in 1 stitch = 24 stitches increased) = 240 double crochets on row and on row 18 (ARROW 6 and increase as follows: Increase 1 single crochet by working 2 single crochets in 1 stitch on each side of the marking thread = 24 stitches increased) = 264 single crochets on row.

Finished!
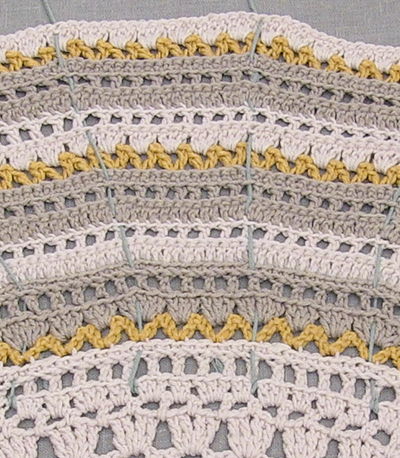
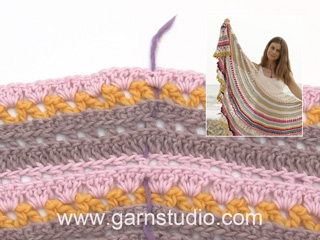
Clue 4 is now finished and the piece measures approx. 15 1/2" between the chain stitch ring and the middle of the last row worked when all 20 rows have been worked. The picture below shows how piece looks. Now you can look forward to the next clue! Just make sure you don't forget to send pictures of your progress to our Gallery!
Ran out of color E too early? You can use color G instead in row 18.
Tutorial Video


With over 40 years in knitting and crochet design, DROPS Design offers one of the most extensive collections of free patterns on the internet - translated to 17 languages. As of today we count 314 catalogs and 11822 patterns - 11812 of which are translated into English (US/in).
We work hard to bring you the best knitting and crochet have to offer, inspiration and advice as well as great quality yarns at incredible prices! Would you like to use our patterns for other than personal use? You can read what you are allowed to do in the Copyright text at the bottom of all our patterns. Happy crafting!
Er der et lige maskeantal ved enden af hver række og dette uden at tælle vendemaske/r med? Jeg har placeret maskemarkører med 10 masker imellem og arbejdet mig op. Nu er jeg så kommet til række 5 og kan overhovedet ikke komme videre. Jeg har 40 V stg i rækken fra række 4 - er dette korrekt? Nu vil jeg starte på række 5 og kan ikke, ligegyldigt hvordan jeg regner mig frem til det, nå til 144 masker på rækken med udt i nogenlunde lige orden?
14.06.2018 - 07:42