
Popular categories
Looking for a yarn?


Comments / Questions (5)
![]() Christine wrote:
Christine wrote:
Bonjour concernant les diminutions du dos. Vous indiquez qu'il faut tricoter ensemble la 5° et 6° maille mais pour le dos, ne faut il pas diminuer de 2 mailles sur chaque coté dans le même rang ? Par exemple : 5° et 6° ensemble + 79° et 80° ? (pour taille M). Merci pour vos précisions
22.11.2022 - 11:22DROPS Design answered:
Bonjour Christine, l'astuce DIMINUTIONS-1 (à intervalles réguliers): explique comment diminuer à intervalles réguliers après les côtes, dans l'exemple cité, on va diminuer 13 mailles sur la base des 79 mailles sur l'aiguille, en fonction de votre nombre de mailles, il faudra ajuster (cf cette leçon). Bon tricot!
22.11.2022 - 15:53
![]() Marjan wrote:
Marjan wrote:
Klopt het dat de mouwen korter zijn naarmate de maat groter is. Ik zie bij maat S een lengte van 51 cm en bij maat XXXL een lengte van 46 cm. Ik zou het andersom verwachten.
05.02.2022 - 10:17DROPS Design answered:
Dag Marjan,
Ja, dat klopt, want de grotere maten hebben bredere schouders, waardoor de mouwen korter worden.
11.02.2022 - 15:11
![]() Helen Bunter wrote:
Helen Bunter wrote:
I can't find a size chart anywhere on your site and one person's small is another person's XL. Can you give me a link or information that will tell me the chest measurement or UK or European dress size equivalent for your S - XXL sizing. Thanks
25.10.2021 - 14:42DROPS Design answered:
Hi Helen, The size chart is at the bottom of the pattern. Happy knitting!
26.10.2021 - 07:04
![]() Ellie Marsh wrote:
Ellie Marsh wrote:
Hi, i am working this pattern and i am using chunky velvet D type yarn. but for some reason i need more then what the pattern requires. it took 1 and a half 200g balls to do the front right peice. i have the right stitch count when i did the swatch. what am i doing wrong? thanks
02.08.2021 - 02:54DROPS Design answered:
Dear Mrs Marsh, are you using DROPS Melody? If not, did you calculate the new amount of yarn required? Read more here. Happy knitting!
02.08.2021 - 07:47
![]() Doreen W wrote:
Doreen W wrote:
Hallo liebes Team.\r\nleider stimmt irgendwas bei der Anleitung nicht. Ich habe auf Größe M gestrickt, mit dem Garn Melody. Ich stricke auch eher fest, aber die fertige Jacke ist eher Größe L bis XL. Stimmen die Maße bzw. Angaben? Ebenso ist die fertige Jacke nicht so dicht wie auf dem Bild (weswegen ich mich für die Jacke entschieden hatte). Muss man eventuell 2-fädrig Stricken? Kann man das jetzt unauffällig enger nähen oder bleibt mir nur das Auftrennen? Danke für die Hilfe!
22.03.2021 - 07:19DROPS Design answered:
Liebe Doreen, stimmt Ihre Maschenprobe? Mit 13 M A.1 = 10 cm sollten die 70 Maschen beim Rückenteil ca 53 cm messen. Die Jacke wird nur mit 1 Faden DROPS Melody getrickt, aber Maschenprobe ist doch wichtig - hier leseen Sie mehr. Viel Spaß beim stricken!
22.03.2021 - 09:47
|
||||||||||
Rosehip Jam#rosehipjamcardigan |
||||||||||
 |
 |
|||||||||
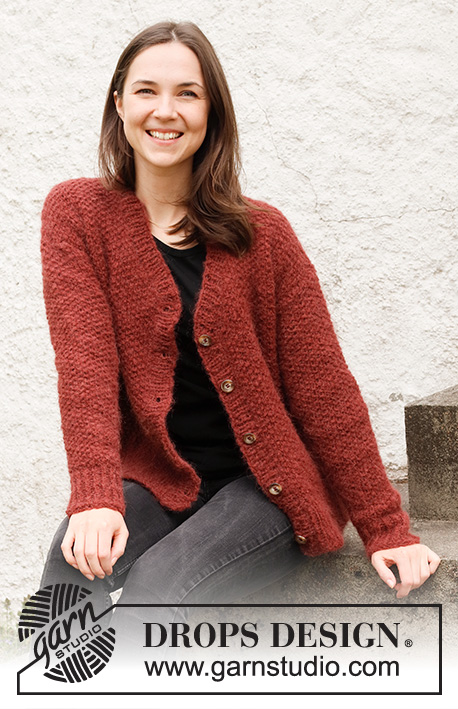
Knitted jacket in DROPS Melody. Piece is knitted in moss stitch with V-neck and edges in rib. Size: S - XXXL
DROPS 217-30 |
||||||||||
|
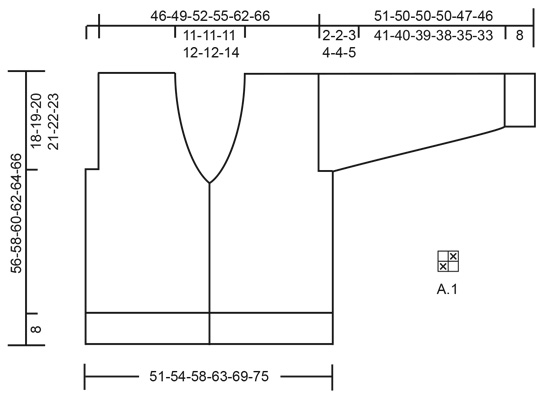
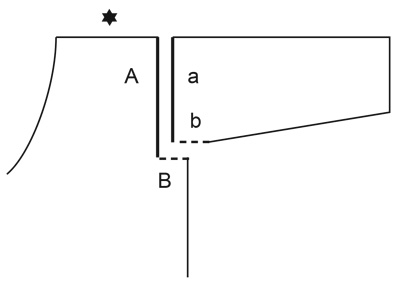
------------------------------------------------------- EXPLANATION FOR THE PATTERN: ------------------------------------------------------- GARTER STITCH (back and forth): Knit all rows. 1 ridge vertically = knit 2 rows. DECREASE TIP-1 (evenly): To calculate how to decrease evenly, use the total number of stitches on row (e.g. 79 stitches), minus edge stitches (e.g. 2 stitches) and divide the remaining 77 stitches by number of decreases to be done (e.g. 13) = 5.9. In this example purl approx. every 5th and 6th stitch together, and do not decrease of edge stitches. DECREASE TIP-2 (applies to V-neck): All decreases are done from the right side! DECREASE AS FOLLOWS ON RIGHT FRONT PIECE: Work 1 edge stitch in garter stitch, knit the next 2 stitches twisted together or purl twisted together, so that they fit A.1 (= 1 stitch decreased). DECREASE AS FOLLOWS ON LEFT FRONT PIECE: Work until 2 stitches remain before edge stitch, knit or purl the next 2 stitches together, so that they with A.1, finish with 1 edge stitch in garter stitch (= 1 stitch decreased). INCREASE TIP-1 (applies to sleeves): Increase 1 stitch inside 1 edge stitch in garter stitch by making 1 yarn over. On next row work yarn over twisted to avoid holes Then work the new stitches in A.1. INCREASE TIP-2 (applies to bands): To avoid the band from bending at the bottom of V-neck (where decreases begin), increase on every row from right side as explained below: Increase 1 stitch after 1 knit stitch by making 1 yarn over. On next row (wrong side) knit yarn over twisted to avoid hole. Then work the increased stitches purl from right side and knit from wrong side. PATTERN: See diagram A.1 (= moss stitch). Diagrams show all rows in pattern seen from the right side. ------------------------------------------------------- START THE PIECE HERE: ------------------------------------------------------- JACKET - SHORT OVERVIEW OF THE PIECE: Piece is worked bottom up in parts. Work back and forth on circular needle. Sew piece together as explained in pattern. Then pick up stitches for bands and neck edge. BACK PIECE: Cast on 79-85-91-99-109-117 stitches on circular needle size 6 mm with Melody. Purl 1 row (= wrong side). Then work rib back and forth as follows from right side: Work 1 edge stitch in GARTER STITCH – read explanation above, * knit 1, purl 1*, work from *-* until 2 stitches remain, knit 1 and finish with 1 edge stitch in garter stitch. Continue rib back and forth like this until piece measures 8 cm, and work next row from wrong side. Purl 1 row from wrong side with 1 edge stitch in garter stitch in each side - AT THE SAME TIME decrease 13-15-15-17-19-19 stitches evenly – read DECREASE TIP-1 = 66-70-76-82-90-98 stitches. Switch to circular needle size 7 mm. Work next row as follows from right side: Work 1 edge stitch in garter stitch, work A.1 until 1 stitch remains on needle, finish with 1 edge stitch in garter stitch. Continue pattern back and forth like this. REMEMBER THE KNITTING TENSION! When piece measures 38-39-40-41-42-43 cm, cast off for armholes as follows: Cast off the first 3-3-4-5-5-6 stitches, work as before the rest of row. Turn piece, cast off the first 3-3-4-5-5-6 stitches, work as before the rest of row = 60-64-68-72-80-86 stitches. Continue A.1 back and forth over all stitches. When piece measures 54-56-58-60-62-64 cm, cast off the middle 12-12-12-14-14-16 stitches for neck and finish each shoulder separately. Continue A.1 as before. AT THE SAME TIME cast off 1 stitch for neck on next row from neck = 23-25-27-28-32-34 stitches remain on shoulder. Then work as before until piece measures 56-58-60-62-64-66 cm. Cast off. Work the other shoulder the same way. RIGHT FRONT PIECE (when garment is worn): Cast on 41-43-47-51-55-59 stitches on circular needle size 6 mm with Melody. Purl 1 row (= wrong side). Then work rib back and forth as follows from right side: Work 1 edge stitch in garter stitch, * knit 1, purl 1*, work from *-* until 2 stitches remain, knit 1 and finish with 1 edge stitch in garter stitch. Continue rib back and forth like this until piece measures 8 cm, and work next row from wrong side. Purl 1 row from wrong side with 1 edge stitch in garter stitch in each side - AT THE SAME TIME decrease 7-7-7-9-9-9 stitches evenly – read DECREASE TIP-1 = 34-36-40-42-46-50 stitches. Switch to circular needle size 7 mm. Work next row as follows from the right side (i.e. from mid front): Work 1 edge stitch in garter stitch, work A.1 until 1 stitch remains on needle, finish with 1 edge stitch in garter stitch towards the side. Continue pattern back and forth like this. When piece measures 36-37-38-39-40-41 cm, begin decrease for V-neck – read DECREASE TIP-2. Decrease like this every other row (i.e. every row from right side) 3-3-4-4-4-4 times in total, and then every 4th row (i.e. every other row from right side) 5-5-5-5-5-6 times in total. AT THE SAME TIME when piece measures 38-39-40-41-42-43 cm, and next row is worked from wrong side, cast off for armholes as follows: Cast off the first 3-3-4-5-5-6 stitches, work as before the rest of row. After all decreases for V-neck and armholes 23-25-27-28-32-34 stitches remain on needle. Continue A.1 as before over all stitches until piece measures 56-58-60-62-64-66 cm. Cast off. LEFT FRONT PIECE (when garment is worn): Cast on 41-43-47-51-55-59 stitches on circular needle size 6 mm with Melody. Purl 1 row (= wrong side). Then work rib back and forth as follows from right side: Work 1 edge stitch in garter stitch, * knit 1, purl 1*, work from *-* until 2 stitches remain, knit 1 and finish with 1 edge stitch in garter stitch. Continue rib back and forth like this until piece measures 8 cm, and work next row from wrong side. Purl 1 row from wrong side with 1 edge stitch in garter stitch in each side - AT THE SAME TIME decrease 7-7-7-9-9-9 stitches evenly – read DECREASE TIP-1 = 34-36-40-42-46-50 stitches. Switch to circular needle size 7 mm. Work next row as follows from the right side (i.e. from the side): Work 1 edge stitch in garter stitch, work A.1 until 1 stitch remains on needle, finish with 1 edge stitch in garter stitch towards mid front. Continue pattern back and forth like this. When piece measures 36-37-38-39-40-41 cm, begin decrease for V-neck – read DECREASE TIP-2. Decrease like this every other row (i.e. every row from right side) 3-3-4-4-4-4 times in total, and then every 4th row (i.e. every other row from right side) 5-5-5-5-5-6 times in total. AT THE SAME TIME when piece measures 38-39-40-41-42-43 cm, and next row is worked from right side, cast off for armholes as follows: Cast off the first 3-3-4-5-5-6 stitches, then work as before and decrease for V-neck towards mid front as before. After all decreases for V-neck and armholes 23-25-27-28-32-34 stitches remain on needle. Continue A.1 as before over all stitches until piece measures 56-58-60-62-64-66 cm. Cast off. SLEEVES: Cast on 37-39-39-41-43-43 stitches on circular needle size 6 mm with Melody. Purl 1 row (= wrong side): Then work rib back and forth as follows from right side: Work 1 edge stitch in garter stitch, * knit 1, purl 1*, work from *-* until 2 stitches remain, knit 1 and finish with 1 edge stitch in garter stitch. Continue rib back and forth like this until piece measures 8 cm, and work next row from wrong side. Purl 1 row from wrong side with 1 edge stitch in garter stitch in each side - AT THE SAME TIME decrease 7 stitches evenly in all sizes – read DECREASE TIP-1 = 30-32-32-34-36-36 stitches. Switch to circular needle size 7 mm. Work next row as follows from right side: 1 edge stitch in garter stitch, work A.1 until 1 stitch remains on needle, finish with 1 edge stitch in garter stitch. Continue pattern back and forth like this. AT THE SAME TIME when piece measures 10-10-9-10-10-10 cm, increase 1 stitch in each side – read INCREASE TIP-1. Increase like this every 5-4½-4-3½-3-2½ cm 8-9-10-10-11-12 times in total in each side = 46-50-52-54-58-60 stitches. Continue to work until sleeve measures 49-48-47-46-43-41 cm. Insert 1 marker in each side on sleeve – markers mark where bottom of armhole begins. Continue to work until sleeve measures 51-50-50-50-47-46 cm in total. Cast off. Work the other sleeve the same way. ASSEMBLY: Sew shoulder seams edge to edge to avoid a chunky seam. Sew sleeve cap to armhole on front and back piece - see chart. Sew bottom of armhole - markers inserted on sleeves should fit the sides of body. Sew seam on underside of sleeves and side seams in one - begin at the bottom of sleeve and sew up to armhole, then sew down to cast-on edge on front and back piece (sew in outer loop of edge stitch to get at flat seam). Sew in the other sleeve the same way and sew under arm and side seam in one the same way. BACK NECK EDGE: Begin from right side and pick up approx. 21-21-21-23-23-27 stitches along neck line at the back of neck, on circular needle size 6 mm with Melody (number of stitches should be divisible by 2 + 1). Work rib back and forth as follows from right side: Work 1 edge stitch in garter stitch, * knit 1, purl 1*, work from *-* until 2 stitches remain, knit 1 and finish with 1 edge stitch in garter stitch.: Continue rib back and forth like this until neck edge measures 4 cm. Loosely cast off stitches with knit over knit and purl over purl. LEFT BAND: Read all of the following section on band before working! Begin from right side at the shoulder, and pick up approx. 32-32-34-36-38-40 stitches inside 1 edge stitch along V-neck, then pick up approx. 56-58-60-60-62-64 stitches from bottom of V-neck and down along mid front inside 1 edge stitch = approx. 88-90-94-96-100-104 stitches from shoulder and down to cast-on edge (number of stitches should be divisible by 2). Work rib back and forth as follows from wrong side: Work 1 edge stitch in garter stitch, * purl 1, knit 1 *, work from *-* until 1 stitch remain and finish with 1 edge stitch in garter stitch. Continue rib back and forth like this. AT THE SAME TIME on every row from right side increase 1 stitch at each of the 3 knit stitches in rib that is closest to bottom of V-neck - read INCREASE TIP-2. Increase like this every row from right side until band measures 4 cm. Loosely cast off stitches with knit over knit and purl over purl. RIGHT BAND: Read all of the following section on band before working! Begin from right side on bottom edge of front piece, and pick up approx. 56-58-60-60-62-64 stitches inside 1 edge stitch along mid front up to bottom of V-neck, then pick up approx. 32-32-34-36-38-40 stitches along V-neck up to shoulder inside 1 edge stitch = approx. 88-90-94-96-100-104 stitches from shoulder and down to cast-on edge (number of stitches should be divisible by 2). Work rib back and forth as follows from wrong side: Work 1 edge stitch in garter stitch, * knit 1, purl 1 *, work from *-* until 1 stitch remain and finish with 1 edge stitch in garter stitch. Continue rib back and forth like this. AT THE SAME TIME on every row from right side increase 1 stitch at each of the 3 knit stitches in rib that is closest to bottom of V-neck the same way as on left band. Continue increase the same way as on left band. AT THE SAME TIME when band measures approx. 2 cm, cast off for 5-5-5-6-6-6 buttonholes evenly. Place top buttonhole approx. 1 cm below bottom of V-neck, and bottom buttonhole approx. 4 cm from bottom edge. 1 BUTTONHOLE = work 2 stitches together, and make 1 yarn over. On next row knit or purl yarn over to fit with rib (there should be holes). Loosely cast off with knit over knit and purl over purl when band measures approx. 4 cm. ASSEMBLY: Sew short end of bands to short end of neck edge (at the shoulders) - sew inside 1 edge stitch in garter stitch with seam in towards wrong side. Sew the buttons on to the left band. |
||||||||||
Diagram explanations |
||||||||||
|
||||||||||
|
||||||||||
|
||||||||||
Have you finished this pattern?Tag your pictures with #dropspattern #rosehipjamcardigan or submit them to the #dropsfan gallery. Do you need help with this pattern?You'll find 25 tutorial videos, a Comments/Questions area and more by visiting the pattern on garnstudio.com. © 1982-2025 DROPS Design A/S. We reserve all rights. This document, including all its sub-sections, has copyrights. Read more about what you can do with our patterns at the bottom of each pattern on our site. |
||||||||||


With over 40 years in knitting and crochet design, DROPS Design offers one of the most extensive collections of free patterns on the internet - translated to 17 languages. As of today we count 314 catalogues and 11822 patterns translated into English (UK/cm).
We work hard to bring you the best knitting and crochet have to offer, inspiration and advice as well as great quality yarns at incredible prices! Would you like to use our patterns for other than personal use? You can read what you are allowed to do in the Copyright text at the bottom of all our patterns. Happy crafting!
Post a comment to pattern DROPS 217-30
We would love to hear what you have to say about this pattern!
If you want to leave a question, please make sure you select the correct category in the form below, to speed up the answering process. Required fields are marked *.