DROPS Karisma
DROPS Karisma
100% Wool
from 2.30 £ /50g
Get the yarn to make this pattern from 23.00£.

The yarn cost is calculated from the pattern’s smallest size and the yarn’s cheapest product type. Looking for an even better price? You might find it on the DROPS Deals!

DROPS SS24

Outdoor Christmas

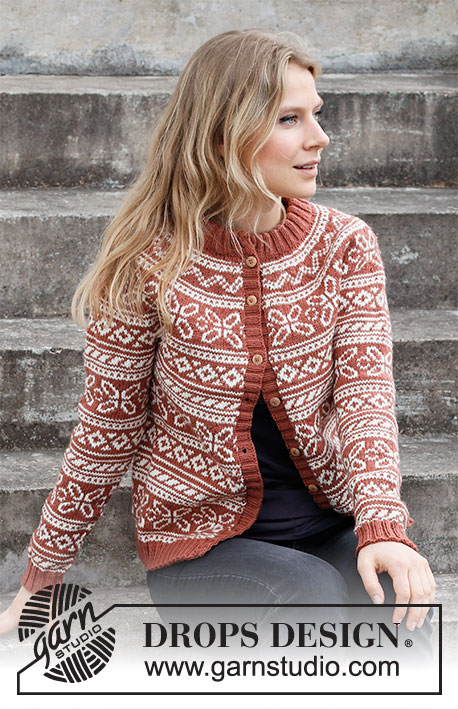
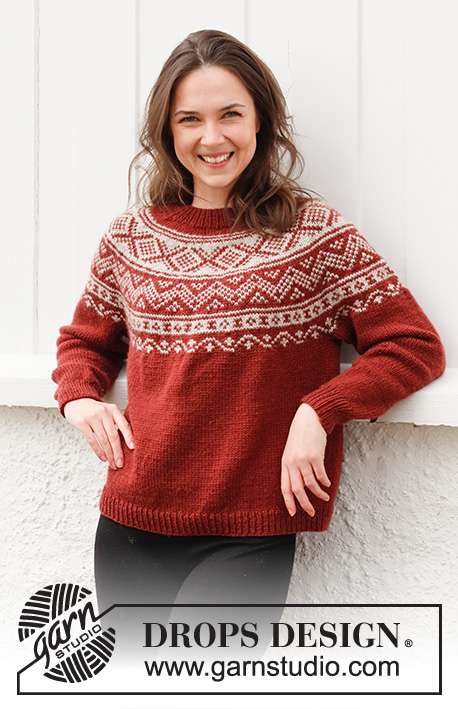
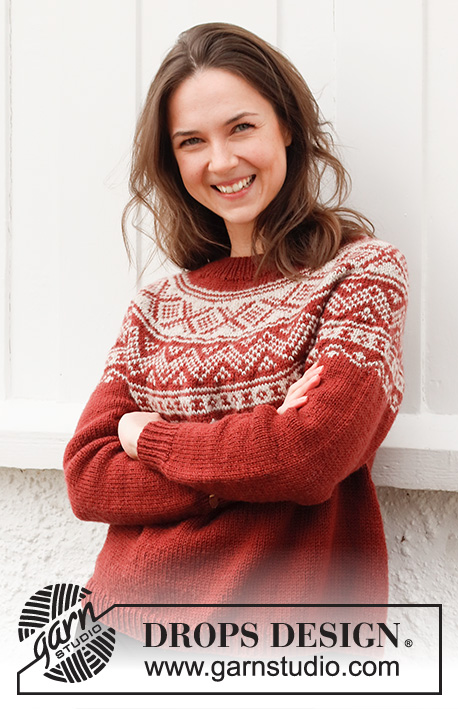
Knitted jumper in DROPS Karisma. The piece is worked top down with round yoke and Nordic pattern on the yoke. Sizes S - XXXL.

DROPS 217-11
DROPS Design: Pattern no u-900
Yarn group B
-------------------------------------------------------

SIZES:
S - M - L - XL - XXL - XXXL

MATERIALS:
DROPS KARISMA from Garnstudio (belongs to yarn group B)
400-450-500-550-600-650 g colour 82, maroon
100-100-100-100-100-100 g colour 77, light oak

KNITTING TENSION:
20 stitches in width and 26 rows in height with stocking stitch and Nordic pattern = 10 x 10 cm.

NEEDLES:
DROPS DOUBLE POINTED NEEDLES SIZE 4.5 MM.
DROPS CIRCULAR NEEDLE SIZE 4.5 MM: Length 40 cm and 60 cm or 80 cm for stocking stitch.
DROPS DOUBLE POINTED NEEDLES SIZE 3.5 MM.
DROPS CIRCULAR NEEDLE SIZE 3.5 MM: Length 40 cm and 80 cm for rib.
Needle size is only a guide. If you get too many stitches on 10 cm, change to a larger needle size. If you get too few stitches on 10 cm, change to a smaller needle size.

-------------------------------------------------------

Alternative Yarn – See how to change yarns here
Yarn Groups A to F – Use the same pattern and change the yarn here
Yarn usage using an alternative yarn – Use our yarn converter here

-------------------------------------------------------

DROPS Karisma
DROPS Karisma
100% Wool
from 2.30 £ /50g
Get the yarn to make this pattern from 23.00£.

The yarn cost is calculated from the pattern’s smallest size and the yarn’s cheapest product type. Looking for an even better price? You might find it on the DROPS Deals!

Pattern instructions

NOTE: This pattern is written in British English. All measurements in charts are in cm. For conversion from cm to inches - click here. There are different terms for crocheting in British and American English. If this pattern includes crochet, click for "crochet terms" here. For this pattern in American English, please click here.
-------------------------------------------------------

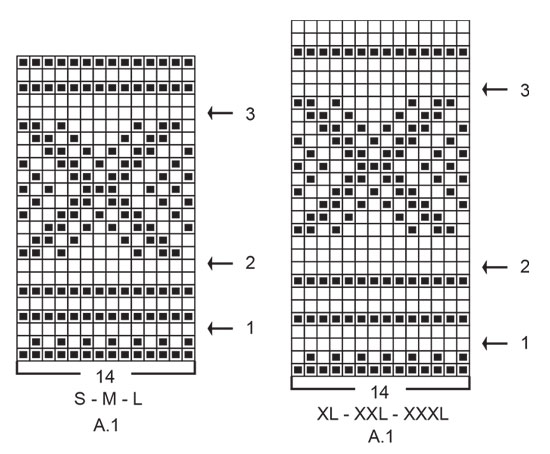
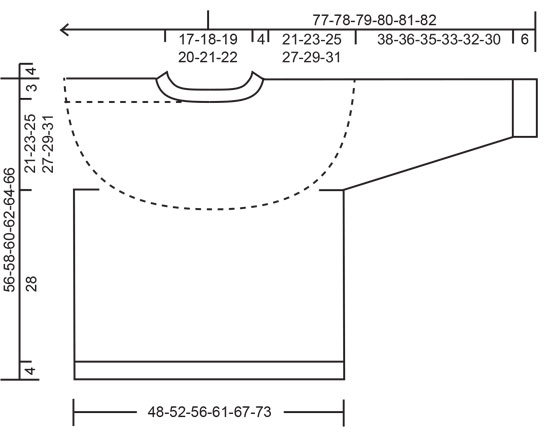
EXPLANATIONS FOR THE PATTERN:

-------------------------------------------------------

INCREASE TIP (evenly spaced):
To work out how to increase evenly, count the total number of stitches on the needle (e.g. 92 stitches) and divide by the number of increases to be made (e.g. 30) = 3.1. 
In this example, increase by making 1 yarn over after each 3rd stitch. On the next round knit the yarn overs twisted to avoid holes.

PATTERN:
See diagrams A.1 and A.2. Choose diagram for your size. The whole pattern is worked in stocking stitch.

KNITTING TIP:
To avoid the knitting tension becoming tighter when working pattern, it is important that the strands at the back are not tight. Use a size larger needle when working pattern if this is a problem.
If the knitting tension is too tight in height, the garment will be short and the armholes too small – you can correct this by regularly working an extra round in the one-coloured sections.
If your work is loose, the garment will be long and the armholes too big – you can correct this by regularly working one less round in the one-coloured sections.

ELEVATION (back of neck):
So the jumper is slightly higher at the back of the neck when working a round yoke, you can work an elevation as described here. Skip this section if you do not want an elevation.
Insert 1 marker at the beginning of the round (mid-back). Start from the right side with maroon and knit 15-15-16-16-17-17 stitches, turn, tighten strand and purl 30-30-32-32-34-34 stitches back. Turn, tighten strand and knit 45-45-48-48-51-51 stitches, turn, tighten strand and purl 60-60-64-64-68-68 stitches back. Turn, tighten strand and knit 75-75-80-80-85-85 stitches, turn, tighten strand and purl 90-90-96-96-102-102 stitches back. Turn tighten the strand and knit to mid-back. Then work YOKE as described in the text.

DECREASE TIP (for mid under sleeve): 
Work until there are 3 stitches left before the marker thread, knit 2 together, knit 2 (marker thread sits between these 2 stitches), slip 1 stitch as if to knit, knit 1 and pass the slipped stitch over the knitted stitch (= 2 stitches decreased).

CASTING-OFF TIP:
To avoid the cast-off edge being tight you can cast off with a larger size needle. If the edge is still tight, make 1 yarn over after approx. each 4th stitch at the same time as casting off; the yarn overs are cast off as normal stitches.

-------------------------------------------------------

START THE PIECE HERE:

-------------------------------------------------------

JUMPER – SHORT OVERVIEW OF THE PIECE:
The neck and yoke are worked in the round with circular needle, top down from mid back. The yoke is divided for body and sleeves and the body continued in the round with circular needle. The sleeves are worked in the round with short circular needle/double pointed needles, top down.

NECK:
Cast on 92-96-100-104-108-112 stitches with short circular needle size 3.5 mm and maroon. Knit 1 round, then work rib in the round (= knit 1, purl 1) for 4 cm.
Knit 1 round where you increase 30-32-34-34-36-38 stitches evenly spaced – read INCREASE TIP = 122-128-134-138-144-150 stitches.
Change to circular needle size 4.5 mm and knit 1 round (yarn overs knitted twisted).
Insert 1 marker in the middle of the round (= mid-front), the yoke is measured from this marker!!
You can now work an ELEVATION at the back of the neck – read description above. If you do not want an elevation, go straight to YOKE.

YOKE:
Work 0-4-4-6-6-6 rounds with stocking stitch and maroon. Then work pattern AT THE SAME TIME as you increase stitches as described below.
Read KNITTING TIP and work A.1 (when A.1 has been completed in height, work A.2 in the same way).
On each round marked with an arrow in A.1 and A.2, increase as follows:
Arrow-1: Increase 24-28-32-36-40-44 stitches evenly spaced = 146-156-166-174-184-194 stitches.
Arrow-2: Increase 22-26-30-36-40-44 stitches evenly spaced = 168-182-196-210-224-238 stitches (there is now room for 12-13-14-15-16-17 repeats of A.1 with 14 stitches).
Arrow-3: Increase 24-30-28-34-38-44 stitches evenly spaced = 192-212-224-244-262-282 stitches.
Arrow-4: Increase 24-28-28-32-38-42 stitches evenly spaced = 216-240-252-276-300-324 stitches (there is now room for 18-20-21-23-25-27 repeats of A.2 with 12 stitches).
Arrow-5: Increase 48-48-52-52-52-60 stitches evenly spaced = 264-288-304-328-352-384 stitches (there is now room for 33-36-38-41-44-48 repeats of A.2 with 8 stitches).
Arrow-6: Increase 24-24-32-44-44-48 stitches evenly spaced = 288-312-336-372-396-432 stitches (there is now room for 24-26-28-31-33-36 repeats of A.2 with 12 stitches).
Arrow-7: Increase 8-8-8-8-8-4 stitches evenly spaced = 296-320-344-380-404-436 stitches.
Finish working A.2.
When A.2 has been completed the piece measures approx. 21-22-22-27-27-27 cm from the marker on the neck. Continue with stocking stitch and maroon (in S and XL only continue if the piece measures less than the above measurement when A.2 is finished).
When the piece measures 21-23-25-27-29-31 cm from the marker on the neck, divide the yoke for the body and sleeves on the next round as follows; Work 45-49-52-57-62-68 stitches in stocking stitch (= ½ back piece), place the next 58-62-68-76-78-82 stitches on 1 thread for the sleeve and cast on 6-6-8-8-10-10 new stitches on the needle (= in side under sleeve), work 90-98-104-114-124-136 stitches in stocking stitch (= front piece), place the next 58-62-68-76-78-82 stitches on 1 thread for the sleeve and cast on 6-6-8-8-10-10 new stitches on the needle (= in side under sleeve) and work the remaining 45-49-52-57-62-68 stitches in stocking stitch (= ½ back piece). Body and sleeves are finished separately. THE PIECE IS NOW MEASURED FROM HERE!

BODY:
= 192-208-224-244-268-292 stitches. Work stocking stitch in the round with maroon until the piece measures 28 cm from the division. There is approx. 4 cm left to finished length; try the jumper on and work to desired length.
Knit 1 round where you increase 20-20-22-24-26-30 stitches evenly spaced = 212-228-246-268-294-322 stitches (this is done to avoid the rib being tight).
Change to circular needle size 3.5 mm and work rib (= knit 1, purl 1) for 4 cm. Cast off with knit over knit and purl over purl – read CASTING-OFF TIP! The jumper measures approx. 56-58-60-62-64-66 cm from the shoulder down.

SLEEVE:
Place the 58-62-68-76-78-82 stitches from the thread on the one side of the piece on double pointed needles/short circular needle size 4.5 mm and knit up 1 stitch in each of the 6-6-8-8-10-10 stitches cast on under the sleeve = 64-68-76-84-88-92 stitches. Insert a marker thread in the middle of the 6-6-8-8-10-10 stitches under the sleeve. Allow the thread to follow your work onwards; it will be used when decreasing under the sleeve. Start at the marker thread and work stocking stitch in the round with maroon.
When the sleeve measures 3-3-3-2-2-2 cm from the division, decrease 2 stitches under the sleeve – read DECREASE TIP. Decrease like this every 4-3½-2½-2-1½-1½ cm a total of 9-10-13-16-17-18 times = 46-48-50-52-54-56 stitches.
Work until the sleeve measures 38-36-35-33-32-30 cm from the division. There is approx. 6 cm left to finished length; try the jumper on and work to desired length. NOTE: Shorter measurements in larger sizes due to wider neck and longer yoke.
Change to double pointed needles size 3.5 mm and work rib (= knit 1, purl 1) for 6 cm. Cast off with knit over knit and purl over purl – remember CASTING-OFF TIP. The sleeve measures approx. 44-42-41-39-38-36 cm from the division. Work the other sleeve in the same way.

Diagram

symbols = maroon
symbols = light oak
symbols = increase-round
diagram
diagram
diagram

Each of our patterns has specific tutorial videos to help you.

Do you have a question? See a list of frequently asked questions (FAQ)

Knitting tension is what determines the final measurements of your work, and is usually measured per 10 x 10 cm. It is provided like so: number of stitches in width x number of rows in height - eg: 19 stitches x 26 rows = 10 x 10 cm.

The knitting tension is very individual; some people knit/crochet loosely while others work tightly. You adjust the knitting tension with the needle size, which is why the suggested needle size is only meant as a guide! You need to adjust this (up or down) to ensure that YOUR knitting tension matches the knitting tension provided in the pattern. If you work with a different knitting tension than provided you will have a different yarn consumption, and your work will have different measurements than what the pattern suggests.

The knitting tension also determines which yarns can replace each other. As long as you achieve the same knitting tension you can replace one yarn with another.

See DROPS lesson: How to measure your tension/gauge

See DROPS video: How to make a gauge tension swatch

The required amount of yarn is provided in grams, eg: 450 g. To calculate how many balls you’ll need you first need to know how many grams are in 1 ball (25g, 50g or 100g). This information is available if you click on the individual yarn quality on our pages. Divide the amount required with the amount of each ball. For example, if each ball is 50g (the most common amount), the calculation will be as follows: 450 / 50 = 9 balls.

The important thing when changing from one yarn to another is that the knitting/crochet tension remains the same. This is so that the measurements of the finished piece will be the same as on the sketch provided. It is easier to achieve the same knitting tension using yarns from the same yarn group. It is also possible to work with multiple strands of a thinner yarn to achieve the knitting tension of a thicker one. Please try our yarn converter. We recommend you to always work a test swatch.

Please NOTE: when changing yarn the garment might have a different look and feel to the garment in the photo, due to individual properties and qualities of each yarn.

See DROPS lesson: Can I use a different yarn than the one mentioned in the pattern?

All our yarns are categorised into yarn groups (from A to F) according to thickness and knitting tension – group A contains the thinnest yarns and group F the thickest. This makes it easier for you to find alternative yarns to our patterns, should you wish to switch yarn. All yarns within the same group have a similar knitting tension and can easily replace each other. However, different yarn qualities have different structures and properties which will give the finished work a unique look and feel.

Click here for an overview of the yarns in each yarn group

At the top of all our patterns you’ll find a link to our yarn calculator, which is a helpful tool should you wish to use a different yarn than suggested. By filling in the yarn quality you wish to replace, the amount (in your size) and number of strands, the calculator will present good alternative yarns with the same knitting tension. Additionally it will tell you how much you’ll require in the new qualities and whether you’ll need to work with multiple strands. Most skeins are 50g (some are 25g or 100g).

If the pattern is worked with multiple colours, every colour will have to be calculated separately. Similarly, if the pattern is worked with several strands of different yarns (for example 1 strand Alpaca and 1 strand Kid-Silk) you will have to find alternatives for each, individually.

Click here to see our yarn calculator

Since different yarns have different qualities and textures we have chosen to keep the original yarn in our patterns. However, you can easily find options among our available qualities by using our yarn calculator, or simply pick a yarn from the same yarn group.

It is possible that some retailers still have discontinued yarns in stock, or that someone has a few skeins at home that they would like to find patterns for.

The yarn calculator will provide both alternative yarn as well as required amount in the new quality.

If you think it's hard to decide what size to make, it can be a good idea to measure a garment you own already and like the size of. Then you can pick the size by comparing those measures with the ones available in the pattern's size chart.

You'll find the size chart at the bottom of the pattern.

See DROPS lesson: How to read size chart

The needle size provided in the pattern serves only as a guide, the important thing is to follow the knitting tension. And since knitting tension is very individual, you will have to adjust the needle size to ensure that YOUR tension is the same as in the pattern – maybe you’ll have to adjust 1, or even 2 needle sizes, up or down to achieve the correct tension. For this, we recommend that you work test swatches.

Should you work with a different knitting tension than the one provided, the measurements of the finished garment might deviate from the measurement sketch.

See DROPS lesson: How to measure your tension/gauge

See DROPS video: How to make a tension/gauge swatch

Working a garment top-down provides more flexibility and room for personal adjustment. For example it is easier to try the garment on while working, as well as making adjustments to length of yoke and shoulder caps.

The instructions are carefully explaining every step, in the correct order. Diagrams are adjusted to the knitting direction and are worked as usual.

The diagram depicts all rows/rounds, and every stitch seen from the right side. It is read from bottom to top, from right to left. 1 square = 1 stitch.

When working back and forth, every other row is worked from the right side and every other row is worked from the wrong side. When working from the wrong side, the diagram will have to be worked reversed: from left to right, knit stitches are purled, purl stitches are knit etc.

When working in the round every round is worked from the right side and the diagram are worked from right to left on all rounds.

See DROPS lesson: How to read knitting diagrams

The diagram depicts all rows/rounds, and every stitch seen from the right side. It is worked from bottom to top, from right to left.

When working back and forth every other row is worked from the right side: from right to left and every other row is worked from the wrong side: from left to right.

When working in the round, every row in the diagram are worked from the right side, from right to left.

When working a circular diagram you start in the middle and work your way outwards, counter clockwise, row by row.

The rows usually start with a given number of chain stitches (equivalent to the height of the following stitch), this will either be depicted in the diagram or explained in the pattern.

See DROPS lesson: How to read crochet diagrams

Instructions for working several diagrams after each other on the same row/round, will often be written like so: “work A.1, A.2, A.3 a total of 0-0-2-3-4 times". This means you work A.1 once, then A.2 is worked once, and A.3 is repeated (in width) the number of times provided for your size – in this case like so: S = 0 times, M = 0 times, L=2 times, XL= 3 times and XXL = 4 times.

The diagrams are worked as usual: begin with the first row in A.1, then work the first row in A.2 etc.

See DROPS lesson: How to read knitting diagrams

See DROPS lesson: How to read crochet diagrams

The total width of the garment (from wrist-to-wrist) will be larger in the larger sizes, despite the actual sleeves being shorter. The larger sizes have longer sleeve caps and wider shoulders, so there will be a good fit in all sizes.

The measurement sketch/schematic drawing provides information regarding the full length of the garment. If it’s a jumper or a jacket the length is measured from the highest point on the shoulder closest to the neckline, and straight down to the bottom of the garment. It is NOT measured from the tip of shoulder. Similarly, the length of yoke is measured from the highest point on the shoulder and down to where yoke is split into body and sleeves.

On a jacket measures are never taken along bands, unless specifically stated. Always measure inside band stitches when measuring the length.

See DROPS lesson: How to read a schematic drawing

Diagrams are often repeated on the round or in height. 1 repeat is the diagram the way it appears in the pattern. If it says to work 5 repeats of A.1 in the round, then you work A.1 a total of 5 times after/next to each other in the round. If it says to work 2 repeats of A.1 vertically/in height you work the entire diagram once, then begin again at the start and work the entire diagram one more time.

Chain stitches are slightly narrower than other stitches and to avoid working the cast-on edge too tight, we simply chain more stitches to begin with. The stitch count will be adjusted on the following row to fit the pattern and measurement sketch.

The rib edge is more elastic and will contract slightly compared to, for example, stocking stitch. By increasing before the rib edge, you avoid a visible difference in width between the rib edge and the rest of the body.

It’s very easy to cast off too tightly, and by making yarn overs while casting off (and simultaneously casting these off) you avoid a too tight cast off edge.

See DROPS video: How to bind off with yarn overs (yo)

To achieve an even increase (or decrease) you can increase on, for example: every 3rd and 4th row alternately, like so: work 2 rows and increase on the 3rd row, work 3 rows and increase on the 4th. Repeat this until the increase is complete.

See DROPS lesson: Increase or decrease 1 st on every 3rd and 4th row alternately

Should you prefer to work in the round instead of back and forth, you may of course adjust the pattern. You’ll need to add steeks mid-front (usually 5 stitches), and follow the instructions. When you would normally turn and work from the wrong side, simply work across the steek and continue in the round. At the end you’ll cut the piece open, pick up stitches to work bands, and cover the cut edges.

See DROPS video: How to knit steeks and cut open

Should you prefer to work back and forth instead of in the round, you may of course adjust the pattern so you work the pieces separately and then assemble them at the end. Divide the stitches for the body in 2, add 1 edge stitch in each side (for sewing) and work the front and back pieces separately.

See DROPS lesson: Can I adapt a pattern for circular needles into straight needles?

Pattern repeats can vary slightly in the different sizes, in order to get the correct proportions. If you’re not working the exact same size as the garment in the photo, yours might deviate slightly. This has been carefully developed and adjusted so that the complete impression of the garment is the same in all sizes.

Make sure to follow instructions and diagrams for your size!

If you have found a pattern you like which is available in women’s size it’s not very difficult to convert it to men’s size. The biggest difference will be the length of sleeves and body. Start working on the women size that you think would fit across the chest. The additional length will be worked right before you cast off for the armhole/sleeve cap. If the pattern is worked top-down you can add the length right after the armhole or before the first decrease on sleeve.

Regarding additional yarn amount, this will depend on how much length you add, but it is better with a skein too many than too few.

All yarns will have excess fibres (from production) that might come off as lint or shedding. Brushed yarns (ie hairier yarns) have more of these loose, excess fibres, causing more shedding.

Shedding also depends on what is worn under or over the garment, and whether this pulls at the yarn fibres. It’s therefore not possible to guarantee that there will be no shedding

Below are some tips on how to get the best result when working with hairier yarns:

1. When the garment is finished (before you wash it) shake it vigorously so the looser hairs come off. NOTE: do NOT use a lint roller, brush or any method that pulls at the yarn.

2. Place the garment in a plastic bag and put it in your freezer - the temperature will cause the fibres to become less attached to each other, and excess fibres will come off easier.

3. Leave in the freezer for a few hours before taking it out and shaking it again.

4. Wash the garment according to the instructions on the yarn label.

Pilling is a natural process that happens to even the most exclusive of fibers. It's a natural sign of wear and tear that is hard to avoid, and that is most visible in high friction areas of your garment like a sweater's arms and cuffs.

You can make your garment look as new by removing the pilling, using a fabric comb or a pill/lint remover.

Still can't find the answer you need? Then scroll down and leave your question so one of our experts can try to help you. This will be done normally within 5 to 10 working days.
In the meantime, you can read the questions and answers that others have left to this pattern or join the DROPS Workshop on Facebook to get help from fellow knitters/crocheters!

You might also like...

Outdoor Christmas

SoftStop, Sweden

Outdoor Christmas

Kasia, Poland

Outdoor Christmas

mint_knit_

Outdoor Christmas

Suzanne, United States

Outdoor Christmas

Annette, United Kingdom

Outdoor Christmas

Ildikó, Germany

Outdoor Christmas

Julia, Sweden

Post a comment to pattern DROPS 217-11

We would love to hear what you have to say about this pattern!

If you want to leave a question, please make sure you select the correct category in the form below, to speed up the answering process. Required fields are marked *.

Comments / Questions (19)

country flag Chantal Welsch wrote:

A partir de la taille XL, 100g de coloris clair ne suffisent plus. Il convient d'ajouter une pelote.

17.08.2021 - 16:09

country flag Meta wrote:

Önskar ersätta Lettlopi med liknande garn men mindre stickig till en vuxen dotter med eksem och torr hy.

30.03.2021 - 18:42

DROPS Design answered:

Hej Meta, er det til dette mønster? I så fald kan du bruge DROPS Karisma, eller DROPS Lima eller DROPS Merino Extra Fine :)

06.04.2021 - 15:51

country flag Marie wrote:

Hei:) hva er størrelse målene på oppskriften? Er ganske midt i mellom størrelser😬👍

16.03.2021 - 19:38

DROPS Design answered:

Hei Marie, Du finner en målskisse i bunnen av oppskriften. God fornøyelse!

17.03.2021 - 08:09

country flag Nynke Braem wrote:

Beste, Ik snap niet zo goed hoeveel bolletjes wol ik nodig heb om deze trui te breien in maat S? Alvast bedankt, Mvg, Nynke

13.03.2021 - 17:54

DROPS Design answered:

Dag Nynke,

Het eerste getal van de reeks getallen is steeds maat S, dus je hebt 400 gram wijnrood en 100 gram licht eiken nodig. Een bol weegt 50 gram.

20.03.2021 - 19:59

country flag Hurtevent Monique wrote:

Pour la modèle Drops 217-11 outdoor chrismas, je ne comprends pas la répartition des augmentations de l'empiècement: *la répartition des augmentations n'apparait pas sur les diagrammes * en taille A, pour le motif A. 1 je ne trouve pas le nombre de motifs (croix) entre les flèches 2 et 3. *'J'ai renoncé à étudié le diagramme A.2 et se Merci de m'éclairer.

09.03.2021 - 13:47

DROPS Design answered:

Bonjour Mme Hurtevent, les augmentations vont se faire dans les diagrammes A.1 et A.2 aux rangs avec une flèche dans les diagrammes, le nombre correspondant d'augmentations figurent dans les explications, après chaque flèche, vous trouverez ainsi pour votre taille le nombre de mailles à augmenter et le nombre total de mailles ainsi que le nombre de motifs à répéter après les augmentations. Autrement dit, après la flèche-2, vous pouvez tricoter 12-13-14-15-16-17 motifs de A.1 de 14 mailles. En espérant que ceci puisse vous aider. Bon tricot!

09.03.2021 - 14:28

country flag Andrea Lengemann wrote:

Ich möchte den als Jacke stricken, mit Steek, was mache ich mit dem Muster?? Habt Ihr einen Tipp?

08.03.2021 - 16:45

DROPS Design answered:

Liebe Frau Lengemann, am besten können Sie sich von einer Jacke, die mit Steek entworfen war- dieses Video kann Ihnen sicher weiterhelfen. Ihr DROPS Händler wird Ihnen gerne auch telefonisch oder per E-Mail weiterhelfen. Viel Spaß beim stricken!

09.03.2021 - 08:06

country flag Leonie wrote:

Vielen Dank für die tolle Anleitung, habe mich genau danach gerichtet, alles hat prima funktioniert!

22.01.2021 - 21:34

country flag Lyne Lapointe wrote:

When is the pattern going to be available? I would love to knit this one.

06.10.2020 - 21:36

country flag Barbara wrote:

Wunderschön, den stricke ich sofort nach

18.06.2020 - 10:05