
Popular categories
Looking for a yarn?


Comments / Questions (9)
![]() Sandy wrote:
Sandy wrote:
QUESTION on branching out cardiSIZE M: I still have 121 st when I do the yoke :yo, slip1, kn 2 tog. So why is the total supposed to be less?
25.06.2025 - 21:04DROPS Design answered:
Dear Sandy, note that the yarn overs are not counted as stitches as they belong to the slipped stitch. Hope this helps. Happy knitting!
26.06.2025 - 16:33
![]() Elly wrote:
Elly wrote:
Goedemorgen, fijn dat ik al zo snel antwoord heb gekregen op mijn vraag van gidteren over het vest patroon 216.14. Ik begrijp dat het de - steek volgens het telpatroon op de verkeerde kant rechts gebreid moet worden. Op het filmpje is te zien ( paars met aubergine kleuren, rond de 2 minuten speeltijd) dat alle steken op de verkeerde kant averecht gebreid worden. Is dit misschien niet het goede filmpje bij het patroon? Vriendelijke groet elly
27.10.2022 - 10:38
![]() Johanna wrote:
Johanna wrote:
Leider ist diese Naleitung unnötig kompliziert geraten. Selbst für erfahrene Strickerinnen ist es sehr schwierig, bei all den Diagrammen den Überblick zu behalten UND noch zusätzlich Blende und Knopflöcher korrekt zu stricken. Ich bin sicher, dass man das auch anders hätte beschreiben können. So macht es jedenfalls keinen Spaß. Für Anfängerinnen absolut ungeeignet. Schade! Bin von garnstudio besseres gewohnt.
26.03.2022 - 17:02
![]() Fernanda Valerio wrote:
Fernanda Valerio wrote:
Is this really colour beige? It doesn’t seem to match the colour palette of big merino
17.02.2022 - 20:46DROPS Design answered:
Dear Mrs Valerio, yes colour is the right one, but maybe light was different as pictures where taken. Should you need any help choosing the colour, please contact your DROPS store, they will help you, even per mail or telephone. Happy knitting!
18.02.2022 - 08:00
![]() Mayvor Fransson wrote:
Mayvor Fransson wrote:
Skall sticka en väst Drops Big Merino. Vad hittar jag mönster?
06.04.2021 - 07:29DROPS Design answered:
Hej Mayvor, Här hittar du Västar Du ser stickfastheten under varje bild, de med 17 m kan du använda till DROPS Big Merino :)
06.04.2021 - 12:12
![]() Katrien Willaert wrote:
Katrien Willaert wrote:
Kan het Branching Out Jacket, 216-14 ook op rechte naalden worden gebreid? Ik heb ook problemen om het telpatroon te starten.
24.11.2020 - 12:04DROPS Design answered:
Dag Katrien,
De ronde pas moet in één keer gebreid worden. Op dat moment heb je heel veel steken op de naald, vandaar dat hij met een rondbreinaald gebreid wordt. Het telpatroon begint onderaan en je leest het van rechts naar links en van onder naar boven. Bij veel gestelde vragen kun je ook antwoorden vinden op hoe je telpatronen leest.
24.11.2020 - 13:20
![]() Sussi Petersen wrote:
Sussi Petersen wrote:
Når jeg skal tage ud i diagrammet ved at strikke flere gange i samme maske skal jeg ende op med 5 masker. Skal omslag tælles med i dette tilfælde? På videoen er det vist som om jeg skal tælle omslaget med. =3r og 2 omslag Mvh Sussi
24.09.2020 - 12:40DROPS Design answered:
Hej Sussi, ja du tager ud ifølge diagramteksten og omslagene skal tælles med her :)
24.09.2020 - 16:00
![]() Sussi Petersen wrote:
Sussi Petersen wrote:
I afsnittet Bærestykke Første afsnit, 11. linje citat start "...som før = 79-87- 95-..." citat slut. Hvorfor står der disse maskeantal? I str. M starter jeg bærestykket med 121 m, der står intet i Første afsnits 1. til 11. linje om, at der nu skulle være færre m. Jeg mener at jeg bør have 121 m efter første afsnit. Er det korrekt og i så fald hvad skal jeg med de 87 m. Mvh. Sussi
23.09.2020 - 15:51DROPS Design answered:
Hej Sussi. I de "79-87-95-87-95-103 masker" är inte omslagen inräknade. Fortsätt bara enligt oppskriften så blir det riktigt. Mvh DROPS Design
24.09.2020 - 11:28
![]() Alessia wrote:
Alessia wrote:
Buongiorno, credo che la spiegazione del diagramma non sia corretta. Riuscite a verificare ed in caso correggere? Grazie!
16.09.2020 - 13:51DROPS Design answered:
Buongiorno Alessia. Abbiamo segnalato l'errore al settore design. La ringraziamo per la segnalazione. Buon lavoro!
16.09.2020 - 14:14
|
|||||||||||||
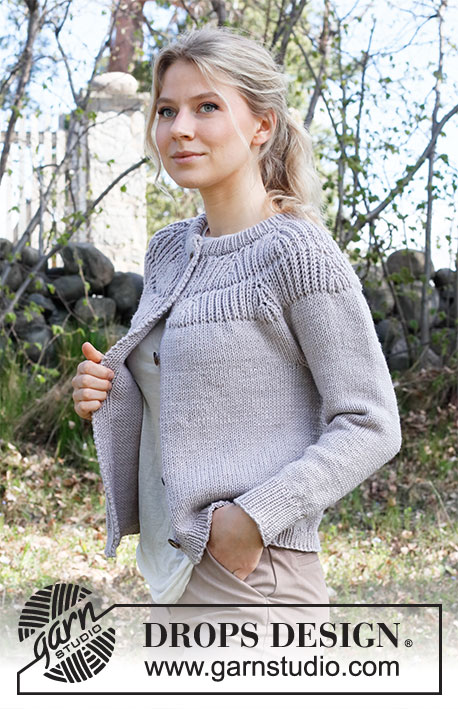
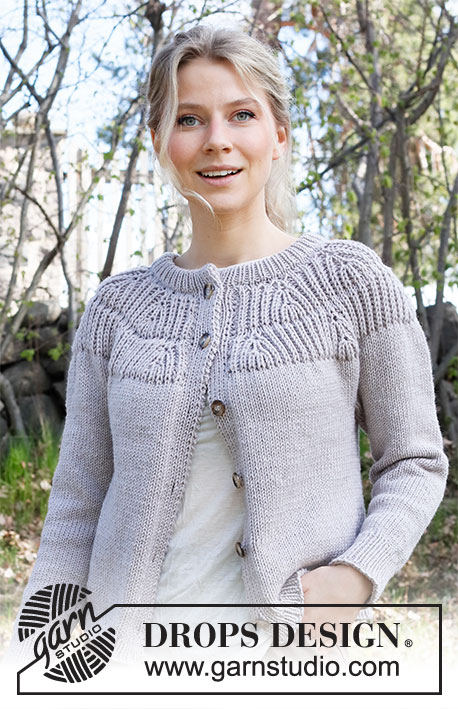
Branching Out Jacket#branchingoutjacket |
|||||||||||||
 |
 |
||||||||||||
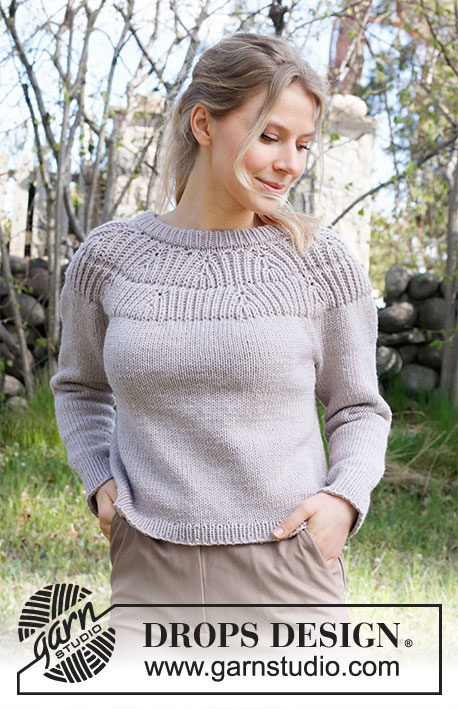
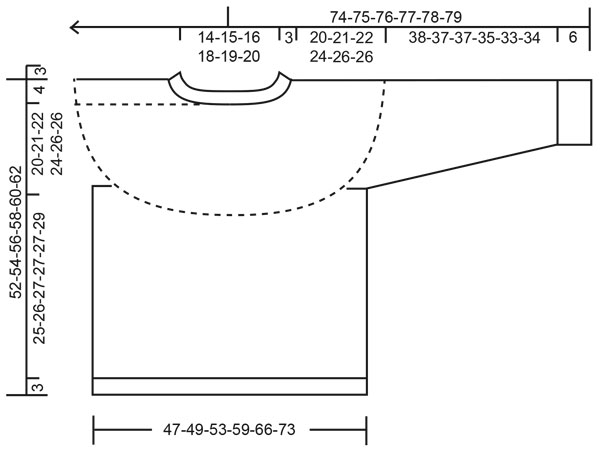
Knitted jacket in DROPS Big Merino. The piece is worked top down with English rib and double neck. Sizes S - XXXL.
DROPS 216-14 |
|||||||||||||
|
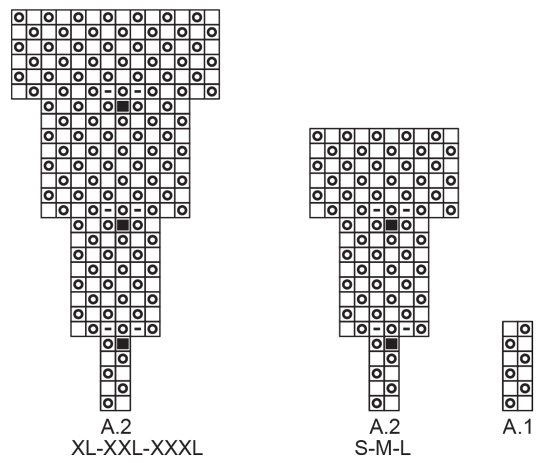
------------------------------------------------------- EXPLANATIONS FOR THE PATTERN: ------------------------------------------------------- RIDGE/GARTER STITCH (worked back and forth): Knit all rows. 1 ridge in height = Knit 2 rows. PATTERN: See diagrams A.1 and A.2. Choose diagram for your size (applies to A.2). The diagrams show all rows in the pattern from the right side. INCREASE TIP-1 (evenly spaced): To work out how to increase evenly, count the total number of stitches on the needle (e.g. 99 stitches) minus bands (e.g. 18 stitches) and divide the remaining stitches by the number of increases to be made (e.g. 10) = 8.1. In this example, increase by making 1 yarn over after approx. each 8th stitch. Do not increase on bands. On the next row work the yarn overs twisted to avoid holes. INCREASE TIP-2 (for sizes S-M-L-XL): All increases are worked from the right side! Work until there are 2 stitches left before the marker, 1 yarn over, knit 4 (the marker sits in the middle of these stitches), 1 yarn over. Increase like this at all markers (= 8 stitches increased). On the next row purl the yarn overs twisted to avoid holes. Then work the new stitches in stocking stitch. KNITTING TIP: Tighten the strand slightly when working the bands, so they are not so loose. DECREASE TIP (for sleeves): Decrease 1 stitch on either side of the marker thread as follows: Work until there are 3 stitches left before the marker thread, knit 2 together, knit 2 (marker thread sits between these 2 stitches), slip 1 stitch as if to knit, knit 1 and pass the slipped stitch over the knitted stitch. BUTTONHOLES: Work buttonholes on the right band (when the garment is worn). Work from the right side when there are 5 stitches left on the row as follows: Make 1 yarn over, knit 2 together and work the last 3 stitches as before. On the next row (wrong side), knit the yarn over to leave a hole. The first buttonhole is worked when the rib on the neck measures approx. 1 cm. Then work the other 5-5-5-6-6-6 buttonholes with approx. 8½-9-9½-8-8½-9 cm between each one. CASTING-OFF TIP: To avoid the cast-off edge being tight you can cast off with a larger size needle. If the edge is still tight, make 1 yarn over after approx. each 4th stitch at the same time as casting off; the yarn overs are cast off as normal stitches. ------------------------------------------------------- START THE PIECE HERE: ------------------------------------------------------- JACKET – SHORT OVERVIEW OF THE PIECE: The neck and yoke are worked back and forth with circular needle from mid front and top down. The yoke is divided for body and sleeves and the body continued back and forth. The sleeves are worked in the round with double pointed needles, top down. The neck is folded double and sewn down to finish. NECK: Cast on 99-103-107-111-115-121 stitches (including 9 band stitches on each side towards mid front) with circular needle size 4 mm and Big Merino. Purl 1 row (= wrong side). The next row is worked as follows from the right side: 1 stitch in GARTER STITCH – read description above, * knit 1, purl 1 *, work from *-* until there are 2 stitches left, knit 1 and finish with 1 edge stitch in garter stitch. Continue this rib for 6 cm – adjust so the next row is from the right side. The 9 band stitches on each side of the piece are continued in rib and garter stitch to finished length. The other stitches are worked in stocking stitch. On row 1 after the neck increase 10-18-26-10-18-24 stitches evenly spaced – read INCREASE TIP-1 = 109-121-133-121-133-145 stitches. Change to circular needle size 5.5 mm and insert 1 marker after the band at the beginning of the row; the yoke is measured from this marker! YOKE: Work 2 rows stocking stitch and rib over the bands as before. Work BUTTONHOLES on the right band – read description above. The next row is worked as follows from the wrong side: Work the 9 band stitches as before – read KNITTING TIP, * 1 yarn over, slip 1 stitch as if to purl, knit 2 together *, work from *-* until there are 10 stitches left, 1 yarn over, slip 1 stitch as if to purl and work the 9 band stitches as before = 79-87-95-87-95-103 stitches. Now work pattern as follows (row 1 = right side): Work the 9 band stitches as before, * A.1 over the next 6 stitches, A.2 over the next 2 stitches *, work from *-* until there are 14 stitches left (=7-8-9-8-9-10 times), A.1 over the next 5 stitches (i.e. 2 times in width, then the first stitch in A.1) and finish with 9 band stitches as before. Continue back and forth like this. When A.1 has been worked 1 time in height, repeat the last 2 rows. REMEMBER THE KNITTING TENSION! When A.2 has been worked 1 time in height there are 135-151-167-183-203-223 stitches on the needle. The piece measures approx. 7-7-7-9-9-9 cm from the marker after the neck. If the piece measures less than this, repeat the last 2 rows in the diagrams to the correct length. On the next row from the wrong side work as follows: Work the 9 band stitches as before, purl the stitches on the yoke at the same time as you purl together the yarn overs with their respective stitches and work the 9 band stitches as before. Work 1 row of stocking stitch with the 9 band stitches on each side as before. The next row from the wrong side is worked as follows: Work the 9 band stitches as before, * 1 yarn over, slip 1 stitch as if to purl, knit 1 *, work from *-* until there are 10 stitches left, 1 yarn over, slip 1 stitch as if to purl and work the 9 band stitches as before. Now work pattern as follows (row 1 = right side): Work 9 band stitches as before, * A.1 over the next 2 stitches, A.2 over the next 2 stitches, A.1 over the next 12-12-12-16-16-16 stitches *, work from *-* until there are 14 stitches left (= 7-8-9-8-9-10 times), A.1 over the next 2 stitches, A.2 over the next 2 stitches, work the first stitch in A.1 and finish with 9 band stitches as before. Continue back and forth like this. When A.1 has been worked 1 time in height, repeat the last 2 rows. When A.2 has been completed in height there are 199-223-247-291-323-355 stitches on the needle. The piece measures 14-14-14-18-18-18 cm. If the piece measures less than this, repeat the last 2 rows in the diagrams to the correct length. On the next row from the wrong side work as follows: Work the 9 band stitches as before, purl the stitches on the yoke at the same time as you purl together the yarn overs with their respective stitches, work the 9 band stitches as before. Continue with stocking stitch and 9 band stitches on each side as before. On the next row from the right side increase 13 stitches evenly spaced (do not increase on the bands) = 212-236-260-304-336-368 stitches. In sizes XXL-XXXL the increases are finished. The other sizes continue as follows: SIZES S-M-L-XL: Insert 4 markers on the next row as follows: Work the 9 band stitches as before, 29-32-36-42 stitches in stocking stitch, insert 1 marker, 38-44-48-58 stitches in stocking stitch, insert 1 marker, 59-65-73-85 stitches in stocking stitch, insert 1 marker, 38-44-48-58 stitches in stocking stitch, insert 1 marker, 30-33-37-43 stitches in stocking stitch and finish with 9 band stitches as before. On the next row from the right side, increase 1 stitch on each side of all the markers – read INCREASE TIP-2! Increase like this on every row from the right side a total of 4-3-2-1 times = 244-260-276-312 stitches. ALL SIZES: = 244-260-276-312-336-368 stitches. Continue with stocking stitch and the 9 band stitches on each side as before. When the piece measures 19-21-22-24-26-26 cm from the marker on the neck, divide the yoke for the body and sleeves as follows: Work 9 band stitches as before, 33-35-38-43-48-54 stitches in stocking stitch (= front piece), place the 46-50-52-60-62-66 stitches on a thread for the sleeve, cast on 8 new stitches on the needle (= in side under sleeve), work 67-71-77-87-98-110 stitches in stocking stitch (= back piece), place the 46-50-52-60-62-66 stitches on a thread for the sleeve, cast on 8 new stitches on the needle (= in side under sleeve), work 34-36-39-44-48-54 stitches in stocking stitch and finish with 9 band stitches as before (= front piece). BODY: = 168-176-188-208-228-252 stitches. Continue with stocking stitch and the 9 band stitches on each side as before until the piece measures 26-26-27-27-27-29 cm from the division. On the next row from the right side increase 27 stitches evenly spaced = 195-203-215-235-255-279 stitches. Change to circular needle size 4 mm and work rib, starting from the wrong side as follows: 1 stitch in garter stitch, * purl 1, knit 1 *, work from *-* until there are 2 stitches left, purl 1 and finish with 1 edge stitch in garter stitch. Continue this rib for 3 cm. Cast off with knit over knit and purl over purl – read CASTING-OFF TIP! The jacket measures approx. 52-54-56-58-60-62 cm from the shoulder down. SLEEVE: Place the 46-50-52-60-62-66 stitches from the thread on the one side of the piece on double pointed needles 5.5 mm and knit up 1 stitch in each of the 8 stitches cast on under the sleeve = 54-58-60-68-70-74 stitches. Insert a marker thread in the middle of the 8 stitches under the sleeve. Work stocking stitch in the round When the sleeve measures 3 cm from the division, decrease 1 stitch on each side of the marker thread – read DECREASE TIP. Decrease like this every 3-3-3-2-2-1½ cm a total of 9-10-10-13-13-15 times = 36-38-40-42-44-44 stitches. When the sleeve measures 39-37-37-35-33-34 cm, increase 6 stitches evenly spaced = 42-44-46-48-50-50 stitches. Change to double pointed needles size 4 mm and work rib (knit 1, purl 1) for 6 cm. The sleeve measures 45-43-43-41-39-40 cm from the division. Cast off with knit over knit and purl over purl – remember CASTING-OFF TIP. Work the other sleeve in the same way. ASSEMBLY: Fold the neck to the inside and sew down. To avoid the neck being tight and rolling down, it is important that the seam is elastic. Sew the ends of the neck together with small stitches. Sew the buttons onto the left band. |
|||||||||||||
Diagram explanations |
|||||||||||||
|
|||||||||||||
|
|||||||||||||
|
|||||||||||||
Have you finished this pattern?Tag your pictures with #dropspattern #branchingoutjacket or submit them to the #dropsfan gallery. Do you need help with this pattern?You'll find 32 tutorial videos, a Comments/Questions area and more by visiting the pattern on garnstudio.com. © 1982-2025 DROPS Design A/S. We reserve all rights. This document, including all its sub-sections, has copyrights. Read more about what you can do with our patterns at the bottom of each pattern on our site. |
|||||||||||||


With over 40 years in knitting and crochet design, DROPS Design offers one of the most extensive collections of free patterns on the internet - translated to 17 languages. As of today we count 314 catalogues and 11822 patterns translated into English (UK/cm).
We work hard to bring you the best knitting and crochet have to offer, inspiration and advice as well as great quality yarns at incredible prices! Would you like to use our patterns for other than personal use? You can read what you are allowed to do in the Copyright text at the bottom of all our patterns. Happy crafting!
Post a comment to pattern DROPS 216-14
We would love to hear what you have to say about this pattern!
If you want to leave a question, please make sure you select the correct category in the form below, to speed up the answering process. Required fields are marked *.