
Popular categories
Looking for a yarn?


|
||||||||||||||||||||||
Pearl Pointe |
||||||||||||||||||||||
 |
 |
|||||||||||||||||||||
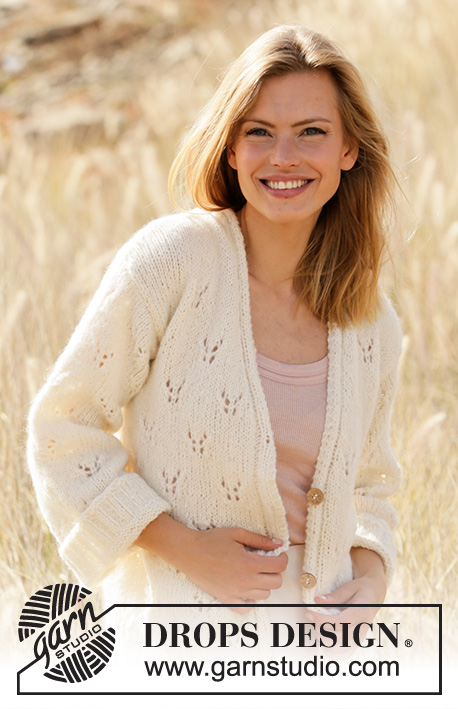
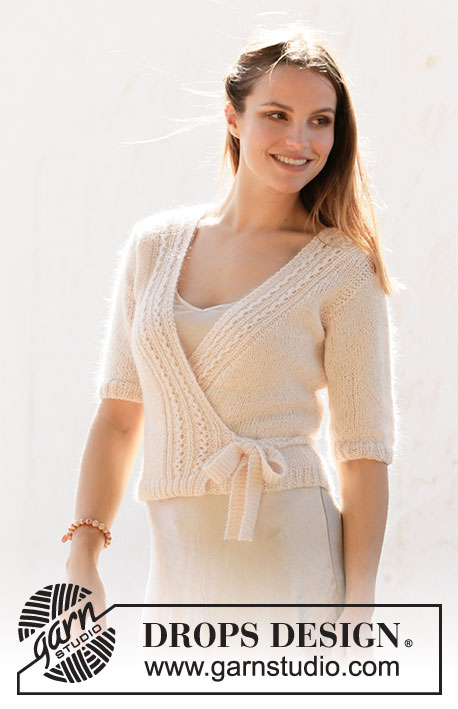
Knitted wrap-around jacket in DROPS BabyAlpaca Silk and DROPS Kid-Silk. The piece is worked top down with lace pattern. Sizes S - XXXL.
DROPS 212-9 |
||||||||||||||||||||||
|
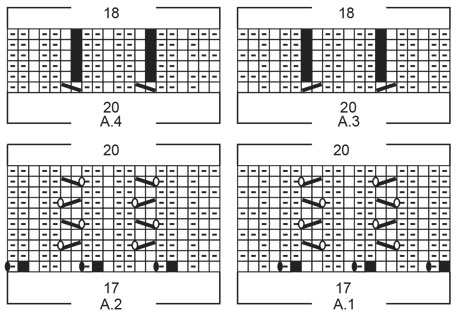
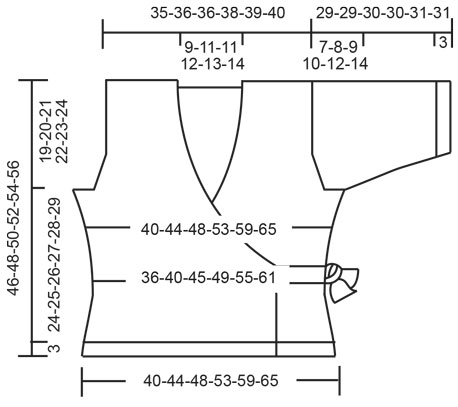
------------------------------------------------------- EXPLANATIONS FOR THE PATTERN: ------------------------------------------------------- RIDGE/GARTER STITCH (worked back and forth): Knit all rows. 1 ridge in height = Knit 2 rows. PATTERN: See diagrams A.1 to A.4. The diagrams show all rows in the pattern seen from the right side. INCREASE TIP-1 (for armholes): All increases are worked from the right side! Increase on the inside of the 3 edge stitches in garter stitch. Increase 1 stitch by making 1 yarn over. On the next row (wrong side) purl the yarn over twisted to avoid a hole. Then work the increased stitch in stocking stitch. INCREASE TIP-2 (for front neck): Increase for the neck inside the 20 stitches in A.1/A.2. Increase 1 stitch by making 1 yarn over. On the next row (wrong side) purl the yarn over twisted to avoid a hole. Then work the increased stitch in stocking stitch. INCREASE TIP-3 (for sides of body): Increase 1 stitch inside the 1 edge stitch in garter stitch by making 1 yarn over. On the next row (wrong side) purl the yarn over twisted to avoid a hole. DECREASE TIP-1 (for sides of body): All decreases are worked from the right side! Decrease on the inside of the 1 edge stitch in garter stitch. Decrease as follows after the 1 edge stitch in garter stitch: Slip 1 stitch as if to knit, knit 1, pass the slipped stitch over the knitted stitch (= 1 stitch decreased). Decrease as follows before the 1 edge stitch in garter stitch: Work until there are 2 stitches left before the edge stitch and knit 2 together (= 1 stitch decreased). DECREASE TIP-2 (for mid under sleeve): Work until there are 3 stitches left before the marker thread, knit 2 together, knit 2 (marker thread sits between these 2 stitches), slip 1 stitch as if to knit, knit 1 and pass the slipped stitch over the knitted stitch (= 2 stitches decreased). CASTING-OFF TIP: To avoid the cast-off edge being tight you can cast off with a larger size needle. If the edge is still tight, make 1 yarn over after approx. each 4th stitch at the same time as casting off and the yarn overs are cast off as normal stitches. ------------------------------------------------------- START THE PIECE HERE: ------------------------------------------------------- WRAP-AROUND JACKET – SHORT OVERVIEW OF THE PIECE: The front and back pieces are worked back and forth with circular needle, top down. Stitches are knitted up for the ties. The sleeve caps are worked back and forth with circular needle, top down. Then the rest of the sleeve is worked in the round with circular needle/double pointed needles, top down. BACK RIGHT SHOULDER (when garment is worn): Cast on 22-22-22-22-22-22 stitches with circular needle size 4 mm and 1 strand BabyAlpaca Silk + 1 strand Kid-Silk (= 2 strands). Work 1 RIDGE – read description above. Change to circular needle size 5 mm and continue with garter stitch until the piece measures approx. 2 cm; on the last row from the wrong side cast on 16-18-18-20-22-24 new stitches on the needle = 38-40-40-42-44-46 stitches. Lay the piece to one side and work the back left shoulder. BACK LEFT SHOULDER (when garment is worn): Cast on 22-22-22-22-22-22 stitches with circular needle size 4 mm and 1 strand BabyAlpaca Silk + 1 strand Kid-Silk (= 2 strands). Work 1 ridge. Change to circular needle size 5 mm and continue with garter stitch until the piece measures approx. 2 cm; adjust so the last row is worked from the wrong side. Now place the parts together and work the back piece as described below. BACK PIECE: Place the right and left shoulders on the same circular needle size 5 mm with the 16-18-18-20-22-24 cast-on-stitches in the middle = 60-62-62-64-66-68 stitches. Start from the right side and work 3 ridges over all stitches. Then work stocking stitch with 3 edge stitches in garter stitch towards the armholes. When the piece measures 17-14-8-12-10-7 cm increase 1 stitch on each side towards the armholes – read INCREASE TIP-1. Increase like this every 4th-4th-4th-2nd-2nd-2nd row a total of 2-4-8-11-15-19 times on each side. Continue working until the piece measures 19-20-21-22-23-24 cm. Now cast on 3 new stitches for the armholes at the end of the next 2 rows = 70-76-84-92-102-112 stitches. The piece is now measured from here! Work 4 rows of stocking stitch with 6 edge stitches in garter stitch on each side. Then work stocking stitch with 1 edge stitch in garter stitch on each side. When the piece measures 4 cm from the armhole decrease 1 stitch on each side – read DECREASE TIP-1 (= 2 stitches decrease). Repeat the decrease when the piece measures 8-8-9-9-10-10 and 12-13-14-15-16-17 cm = 64-70-78-86-96-106 stitches. When the piece measures 15-16-17-18-19-20 cm increase 1 stitch inside the 1 edge stitch in garter stitch on each side – read INCREASE TIP-3. Repeat the increase when the piece measures 19-20-21-22-23-24 cm and 23-24-25-26-27-28 cm = 70-76-84-92-102-112 stitches. Continue working until the piece measures 24-25-26-27-28-29 cm from the armholes and increase at the same time 8-8-9-10-12-14 stitches evenly spaced on the last row from the wrong side = 78-84-93-102-114-126 stitches. Change to circular needle size 4 mm and work the next row from the right side as follows: 1 edge stitch in garter stitch, * knit 1, purl 2 *, work from *-* until there are 2 stitches left on the row, knit 1, 1 edge stitch in garter stitch. Continue this rib for 3 cm. Cast off with knit over knit and purl over purl – read CASTING-OFF TIP. The back piece measures approx. 46-48-50-52-54-56 cm from the shoulder. RIGHT FRONT PIECE (when the piece is worn): Cast on 22-22-22-22-22-22 stitches with circular needle size 4 mm and 1 strand BabyAlpaca Silk + 1 strand Kid-Silk (= 2 strands). Work 1 ridge. Change to circular needle size 5 mm and work the next row from the right side as follows: 3 edge stitches in garter stitch towards the armhole, 2-2-2-2-2-2 stitches in stocking stitch, A.1 (= 17 stitches on the first row) = 25-25-25-25-25-25 stitches when the first row in A.1 has been worked. Continue this pattern back and forth, repeat A.1 in height from 3rd row. When the piece measures 4 cm increase for the neck-line on the inside of A.1 towards mid front – read INCREASE TIP-2. Increase like this every 4th row (i.e. every 2nd row from the right side) a total of 8-8-9-11-12-13 times, every 2nd row (i.e. every row from the right side) a total of 14-16-15-14-14-14 times and finally every 4th row 2-2-2-2-2-2 times. At the same time, when the piece measures 17-14-8-12-10-7 cm, increase 1 stitch in the side for the armhole – continue to increase in the same way as on the back piece. Continue working until the piece measures 19-20-21-22-23-24 cm and cast on 3 new stitches at the end of the next row from the wrong side. Continue as before with A.1 towards mid front, increases for neck-line and stocking stitch but, over the outermost 6 stitches towards the side, work 2 ridges (i.e. on the next 4 rows). Then continue with stocking stitch and 1 edge stitch in garter stitch towards the side and A.1 towards mid front (increases continued as before). When the piece measures 4 cm from the armhole, decrease 1 stitch in the side – remember DECREASE TIP-1. Repeat the decrease when the piece measures 8-8-9-9-10-10 and 12-13-14-15-16-17 cm. When the piece measures 15-16-17-18-19-20 cm, increase 1 stitch inside the 1 edge stitch in garter stitch on the side – remember INCREASE TIP-3. Repeat the increase when the piece measures 19-20-21-22-23-24 cm and 23-24-25-26-27-28 cm. When all the increases on the inside of A.1 are finished continue the pattern as before until the increases in the side are finished. When all the increases are finished there are 54-58-62-66-71-76 stitches on the needle. Continue working until the piece measures 24-25-26-27-28-29 cm from the armhole and increase 6-8-7-6-7-8 stitches evenly spaced = 60-66-69-72-78-84 stitches. Change to circular needle size 4 mm and work rib as follows: 1 edge stitch in garter stitch, * purl 2, knit 1 *, work from *-* until there are 20 stitches left on the row, work A.3 over the last 20 stitches (2 stitches are decreased in the diagram = 18 stitches) = 58-64-67-70-76-82 stitches. Continue the rib for 3 cm. Cast off with knit over knit and purl over purl – remember CASTING-OFF TIP. The front piece measures approx. 46-48-50-52-54-56 cm from the shoulder. LEFT FRONT PIECE (when garment is worn): Cast on 22-22-22-22-22-22 stitches with circular needle size 4 mm and 1 strand BabyAlpaca Silk + 1 strand Kid-Silk (= 2 strands). Work 1 ridge. Change to circular needle size 5 mm and work the next row from the right side as follows: Work A.2 (= 17 stitches on the first row), work 2-2-2-2-2-2 stitches in stocking stitch and finish with 3 edge stitches in garter stitch towards the armhole = 25-25-25-25-25-25 stitches when the first row in A.2 has been completed. Continue this pattern back and forth, repeat A.2 in height from 3rd row. When the piece measures 4 cm increase for the neck-line on the inside of A.2 towards mid front – remember INCREASE TIP-2. Increase like this every 4th row (i.e. every 2nd row from the right side) a total of 8-8-9-11-12-13 times, every 2nd row (i.e. every row from the right side) a total of 14-16-15-14-14-14 times and finally every 4th row 2-2-2-2-2-2 times. At the same time, when the piece measures 17-14-8-12-10-7 cm, increase 1 stitch in the side for the armhole – Continue to increase in the same way as on the back and right front piece. Continue working until the piece measures 19-20-21-22-23-24 cm and cast on 3 new stitches at the end of the next row from the right side. Continue as before with A.2 towards mid front, increases to neck-line and stocking stitch but, over the outermost 6 stitches towards the side, work 2 ridges (i.e. on the next 4 rows). Then continue with stocking stitch, 1 edge stitch in garter stitch towards the side and A.2 towards mid front (increases continue as before). When the piece measures 4 cm from the armhole decrease 1 stitch in the side – remember DECREASE TIP-1. Repeat the decrease when the piece measures 8-8-9-9-10-10 and 12-13-14-15-16-17 cm. When the piece measures 15-16-17-18-19-20 cm, increase 1 stitch inside the 1 edge stitch in garter stitch on the side – remember INCREASE TIP-3. Repeat the increase when the piece measures 19-20-21-22-23-24 cm and 23-24-25-26-27-28 cm. When all the increases inside A.2 are finished continue the pattern as before until the increases in the side are finished. When all increases are finished there are 54-58-62-66-71-76 stitches on the needle. Continue working until the piece measures 24-25-26-27-28-29 cm from the armhole and increase 6-8-7-6-7-8 stitches evenly on the row = 60-66-69-72-78-84 stitches. Change to circular needle size 4 mm and work rib as follows: A.4 over the first 20 stitches (2 stitches are decreased in the diagram = 18 stitches), * knit 1, purl 2 *, work from *-* until there are 2 stitches left on the row, knit 1, 1 edge stitch in garter stitch = 58-64-67-70-76-82 stitches. Continue the rib for 3 cm. Cast off with knit over knit and purl over purl – remember CASTING-OFF TIP. The front piece measures approx. 46-48-50-52-54-56 cm from the shoulder. SLEEVE: Cast on 22-24-26-28-24-26 stitches with circular needle size 5 mm and 1 strand BabyAlpaca Silk + 1 strand Kid-Silk. Work stocking stitch back and forth for the sleeve cap and, at the same time, cast on new stitches at the end of every row as follows: Cast on 3 stitches 1 time on each side, 2 stitches 3-3-3-3-4-4 times on each side, 1 stitch 0-1-2-3-3-5 times on each side, 2 stitches 3-3-3-3-4-4 times on each side and finally 3 stitches 1 time on each side = 58-62-66-70-74-80 stitches. Join the piece together and continue in the round with double pointed needles/short circular needle. Insert 1 marker thread at the join = mid under sleeve. The thread will be used when decreasing under the sleeve. Work stocking stitch in the round. When the piece measures 4 cm from where it was joined, decrease 2 stitches mid under sleeve – read DECREASE TIP-2. Decrease like this every 4-3-2-1½-1-1 cm a total of 3-4-5-6-7-9 times = 52-54-56-58-60-62 stitches. Continue working until the piece measures 19-18-18-17-16-14 cm from the join. Knit 1 round where you increase 2-0-1-2-0-1 stitches evenly on the round = 54-54-57-60-60-63 stitches. Change to double pointed needles size 4 mm and work rib in the round (= knit 1 / purl 2) for 3 cm. Loosely cast off with knit over knit and purl over purl. The sleeve measures approx. 29-29-30-30-31-31 cm from the cast-on edge down. Work one more sleeve in the same way. ASSEMBLY: Sew the shoulder seams inside the cast-on edge. Sew the side seams inside the 1 edge stitch but leave openings in both sides to thread the ties through – the openings should be 8 cm from the bottom edge and 2½–3 cm in width. Lay the sleeves under the garter stitch edge along the armholes and sew neatly from the right side (there should not be a loose edge after sewing; sew in the outermost garter stitch from the right side so the edge lies neatly outside the sleeve). TIES: Knit up using needle size 4 mm and 1 strand of each quality: Approx. 6-7 stitches along the ribbed edge in front; 8 cm from the bottom cast-off edge up to the first of the 6-7 stitches. On the right front piece work garter stitch back and forth until the tie measures approx. 40 cm. Cast off. On the left front piece work garter stitch back and forth until the tie measures approx. 84-94 cm. Cast off. |
||||||||||||||||||||||
Diagram explanations |
||||||||||||||||||||||
|
||||||||||||||||||||||
|
||||||||||||||||||||||
|
||||||||||||||||||||||
|
Have you made this or any other of our designs? Tag your pictures in social media with #dropsdesign so we can see them! Do you need help with this pattern?You'll find tutorial videos, a Comments/Questions area and more by visiting the pattern on garnstudio.com. © 1982-2024 DROPS Design A/S. We reserve all rights. This document, including all its sub-sections, has copyrights. Read more about what you can do with our patterns at the bottom of each pattern on our site. |
||||||||||||||||||||||


With over 40 years in knitting and crochet design, DROPS Design offers one of the most extensive collections of free patterns on the internet - translated to 17 languages. As of today we count 304 catalogues and 11422 patterns - 11422 of which are translated into English (UK/cm).
We work hard to bring you the best knitting and crochet have to offer, inspiration and advice as well as great quality yarns at incredible prices! Would you like to use our patterns for other than personal use? You can read what you are allowed to do in the Copyright text at the bottom of all our patterns. Happy crafting!
Comments / Questions (90)
Hei. Skal strikke denne og leser oppskriften og lurer på dette er riktig mål på bakstykket rett etter at skuldrene er satt dammen? Skal strikke str L. Når arbeidet måler 17-14-8-12-10-7 cm, økes det 1 maske i hver side til ermehull – les ØKETIPS-1. Er det riktig med 8 cm i str L når M og XL er flere cm lenger?
28.03.2021 - 20:38DROPS Design answered:
Hei Inger-Lise, Du skal øke flere ganger i de større størrelsene, og det er derfor målet er kortere i L før du øker første gangen. God fornøyelse!
29.03.2021 - 07:52Hej, jag har kommit till höger framstycke och diagram A1. Efter 4 cm ska man öka maskor på den sida som är mot mitten (jag tolkar mot halsen) men jag tycker inte det stämmer mot bilderna. Där ser det ut som att ökningen ska vara mot ärmens istället. Kan ni förklara? Jag undrar också hur ökningen ska gå till, lägger man till en extra maska innan den sista maskan? Ser fram emot svar
21.03.2021 - 21:23DROPS Design answered:
Hej Eva, du skal strikke A.1 yderst mod midt foran på hele forstykket og alle udtagninger skal være i det glatstrikkede lige før A.1 starter. I starten ser der ud til at det er mod siden, men når du altid tager ud lige før A.1 fra retsiden så vil du snart se at A.1 flytter sig mod den anden side som på billedet. God fornøjelse!
23.03.2021 - 14:25Hello, How do I adjust this pattern if I want to knit it with one strand of Group A only?
04.03.2021 - 18:17DROPS Design answered:
Hi Alexia, unfortunately we are not able to adjust our patterns to any individual requests. Should you need any individual assistance, please contact the store where you bought the yarn, even per mail or telephone. Happy knitting!
04.03.2021 - 19:10Can I use Brushed Alpaca Silk for this pattern? It is in group C, just checking before starting. Thanks.
04.03.2021 - 15:52DROPS Design answered:
Dear Mrs Buckingham, yes that's right, you can use here 1 strand Brushed Alpaca Silk instead of 1 strand BabyAlpaca Silk + 1 strand Kid-Silk worked together, just keep in mind texture will be different since yarns have different characteristics. Read more about alternatives here. Happy knitting!
04.03.2021 - 16:11Ik zou graag dit overslagvest willen breien op pen 6 en 7, hoe moet ik het patroon omrekenen en kan dit?
03.03.2021 - 08:41DROPS Design answered:
Dag Hanneke,
Helaas is het voor ons niet mogelijk om patronen aan te passen naar persoonlijke wensen, maar je kunt op basis van de stekenverhouding die je in je proeflapje hebt, wel vergelijken met het de stekenverhouding in het patroon en op basis daarvan het aantal steken omrekenen.
07.03.2021 - 10:12Hi, for the right front piece, when it tells me to increase "on the inside of A.1 towards the mid-front", does this mean I should make an increase after the 10th stitch and then isolate those stitches from the pattern and continue working them in stocking stitch? or incorporate those stitches into the pattern and displace the edge stitches from the 20? Thank you.
23.02.2021 - 20:10DROPS Design answered:
Hi Yonnie, The increased stitches are in the stocking stitch section and are worked in stocking stitch afterwards. So they do not affect the pattern or the band. Happy knitting!
24.02.2021 - 07:25The pattern for the back piece says to "start from the right side and work 3 ridges over all stitches" but the end of the yarns is on the left shoulder, and in the middle (after I casted 16 stitches). I now have two balls of yarn. Do I work from the middle-> right shoulder -> back over the right should-> middle-> left shoulder? or do I work left shoulder-> middle-> right shoulder and the reverse? and do I ties off one of the balls of yarn? Thank you.
10.02.2021 - 16:33DROPS Design answered:
Dear Yonnie, you finished the right shoulder with stitches picked up, and the left shoulder on the WS, the yarn at the beginning of the next RS row. The stitches should be put together the following way: left shoulder, new stitches cast on on the right shoulder, and the stitches for the right shoulder. Cut the yarn that is at the middle of teh piece (at the newly picked up stitches) and contiue knitting with the yarn you have at the edge of the left shoulder. Since the piece is knitted top down, you should start the next RS row on the left shoulder's edge. Happy Knitting!
10.02.2021 - 17:58Dommage pratiquement tous vos modèles sont avec aiguilles circulaire et aiguille double pointe,je ne comprends rien aux explications,comment faire pour réaliser le modèle avec des aiguilles normales,merci pour votre réponse
10.01.2021 - 09:14DROPS Design answered:
Bonjour Mme Cornet, cette leçon explique comment adapter un modèle sur aiguilles droites et devrait pouvoir vous aider. Bon tricot!
11.01.2021 - 09:08Hei. Jeg strikker denne i str small. Jeg får ikke maskeantallet på forstykkene til å stemme. Etter 1.omg i A1/A2 har jeg 25m. Så skal jeg mot halsen øke 8+15+2m. Til ermehull øker jeg 2+3m. 3 fellinger og 3 økninger i siden går opp i opp. Det får jeg til å bli 55m, ikke 54 som oppskriften sier. Hvor ligger feilen? Et annet spm: økningen før vrbord en på forstykkene må vel kun fordeles over glattstrikkpartiet, ikke over mønsterpartiet?
01.11.2020 - 07:32DROPS Design answered:
Hei Hanne. Ja, her var det en feil i str. S. Det er nå lagt til en rettelse i oppskriften, se rød link. Takk for at du gjorde oss oppmerksom på dette. mvh DROPS design
10.11.2020 - 15:04När det gäller bakstycket så står det att de 18 m som lades upp till hals ska vara i mitten = 62 m. Jag hänger inte riktigt med på hur jag ska göra detta. Det är 40 m på ena stickan (med de 18 omslagen) och 22 m på andra stickan, för att dessa 18 ska hamna i mitten av 62 m - Betyder det att omslagen ska sättas upp direkt efter varandra efter de 22 m? (Och inte varannat omslag). I så fall hamnar de 18 m på slutet av den stickan och kan då vara i mitten. Stämmer det?
20.08.2020 - 09:41