
Popular categories
Looking for a yarn?


|
||||||||||||||||||||||
Pearl Pointe |
||||||||||||||||||||||
 |
 |
|||||||||||||||||||||
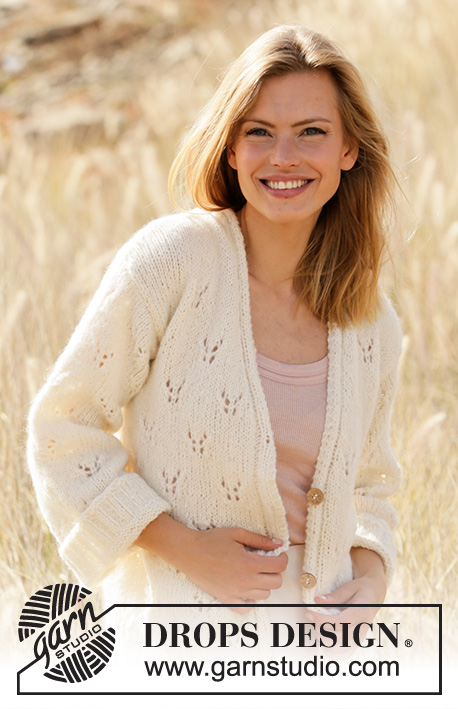
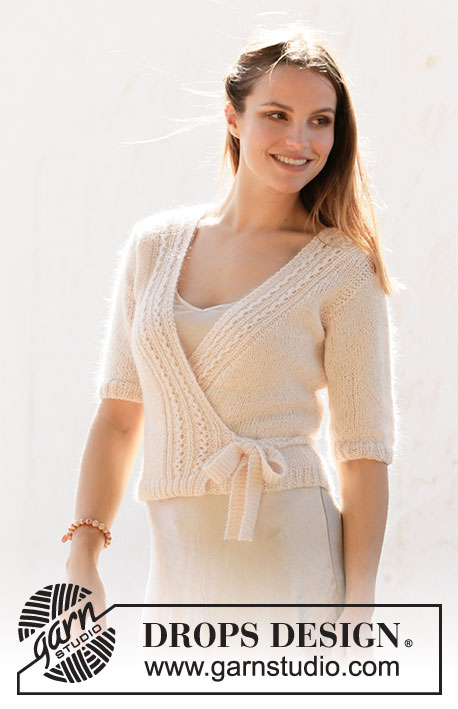
Knitted wrap-around jacket in DROPS BabyAlpaca Silk and DROPS Kid-Silk. The piece is worked top down with lace pattern. Sizes S - XXXL.
DROPS 212-9 |
||||||||||||||||||||||
|
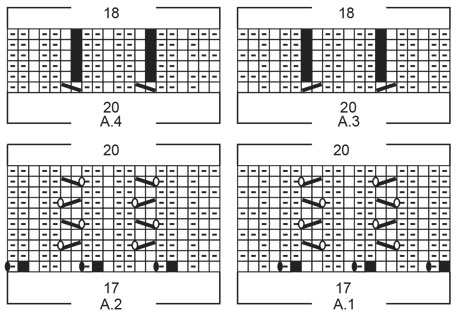
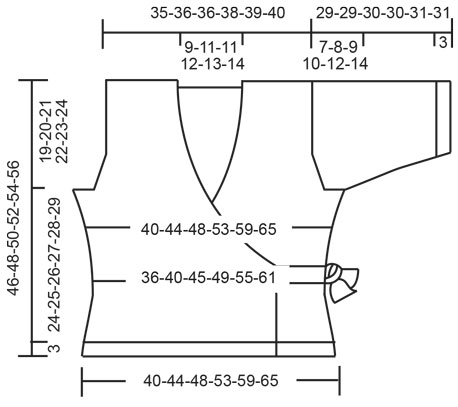
------------------------------------------------------- EXPLANATIONS FOR THE PATTERN: ------------------------------------------------------- RIDGE/GARTER STITCH (worked back and forth): Knit all rows. 1 ridge in height = Knit 2 rows. PATTERN: See diagrams A.1 to A.4. The diagrams show all rows in the pattern seen from the right side. INCREASE TIP-1 (for armholes): All increases are worked from the right side! Increase on the inside of the 3 edge stitches in garter stitch. Increase 1 stitch by making 1 yarn over. On the next row (wrong side) purl the yarn over twisted to avoid a hole. Then work the increased stitch in stocking stitch. INCREASE TIP-2 (for front neck): Increase for the neck inside the 20 stitches in A.1/A.2. Increase 1 stitch by making 1 yarn over. On the next row (wrong side) purl the yarn over twisted to avoid a hole. Then work the increased stitch in stocking stitch. INCREASE TIP-3 (for sides of body): Increase 1 stitch inside the 1 edge stitch in garter stitch by making 1 yarn over. On the next row (wrong side) purl the yarn over twisted to avoid a hole. DECREASE TIP-1 (for sides of body): All decreases are worked from the right side! Decrease on the inside of the 1 edge stitch in garter stitch. Decrease as follows after the 1 edge stitch in garter stitch: Slip 1 stitch as if to knit, knit 1, pass the slipped stitch over the knitted stitch (= 1 stitch decreased). Decrease as follows before the 1 edge stitch in garter stitch: Work until there are 2 stitches left before the edge stitch and knit 2 together (= 1 stitch decreased). DECREASE TIP-2 (for mid under sleeve): Work until there are 3 stitches left before the marker thread, knit 2 together, knit 2 (marker thread sits between these 2 stitches), slip 1 stitch as if to knit, knit 1 and pass the slipped stitch over the knitted stitch (= 2 stitches decreased). CASTING-OFF TIP: To avoid the cast-off edge being tight you can cast off with a larger size needle. If the edge is still tight, make 1 yarn over after approx. each 4th stitch at the same time as casting off and the yarn overs are cast off as normal stitches. ------------------------------------------------------- START THE PIECE HERE: ------------------------------------------------------- WRAP-AROUND JACKET – SHORT OVERVIEW OF THE PIECE: The front and back pieces are worked back and forth with circular needle, top down. Stitches are knitted up for the ties. The sleeve caps are worked back and forth with circular needle, top down. Then the rest of the sleeve is worked in the round with circular needle/double pointed needles, top down. BACK RIGHT SHOULDER (when garment is worn): Cast on 22-22-22-22-22-22 stitches with circular needle size 4 mm and 1 strand BabyAlpaca Silk + 1 strand Kid-Silk (= 2 strands). Work 1 RIDGE – read description above. Change to circular needle size 5 mm and continue with garter stitch until the piece measures approx. 2 cm; on the last row from the wrong side cast on 16-18-18-20-22-24 new stitches on the needle = 38-40-40-42-44-46 stitches. Lay the piece to one side and work the back left shoulder. BACK LEFT SHOULDER (when garment is worn): Cast on 22-22-22-22-22-22 stitches with circular needle size 4 mm and 1 strand BabyAlpaca Silk + 1 strand Kid-Silk (= 2 strands). Work 1 ridge. Change to circular needle size 5 mm and continue with garter stitch until the piece measures approx. 2 cm; adjust so the last row is worked from the wrong side. Now place the parts together and work the back piece as described below. BACK PIECE: Place the right and left shoulders on the same circular needle size 5 mm with the 16-18-18-20-22-24 cast-on-stitches in the middle = 60-62-62-64-66-68 stitches. Start from the right side and work 3 ridges over all stitches. Then work stocking stitch with 3 edge stitches in garter stitch towards the armholes. When the piece measures 17-14-8-12-10-7 cm increase 1 stitch on each side towards the armholes – read INCREASE TIP-1. Increase like this every 4th-4th-4th-2nd-2nd-2nd row a total of 2-4-8-11-15-19 times on each side. Continue working until the piece measures 19-20-21-22-23-24 cm. Now cast on 3 new stitches for the armholes at the end of the next 2 rows = 70-76-84-92-102-112 stitches. The piece is now measured from here! Work 4 rows of stocking stitch with 6 edge stitches in garter stitch on each side. Then work stocking stitch with 1 edge stitch in garter stitch on each side. When the piece measures 4 cm from the armhole decrease 1 stitch on each side – read DECREASE TIP-1 (= 2 stitches decrease). Repeat the decrease when the piece measures 8-8-9-9-10-10 and 12-13-14-15-16-17 cm = 64-70-78-86-96-106 stitches. When the piece measures 15-16-17-18-19-20 cm increase 1 stitch inside the 1 edge stitch in garter stitch on each side – read INCREASE TIP-3. Repeat the increase when the piece measures 19-20-21-22-23-24 cm and 23-24-25-26-27-28 cm = 70-76-84-92-102-112 stitches. Continue working until the piece measures 24-25-26-27-28-29 cm from the armholes and increase at the same time 8-8-9-10-12-14 stitches evenly spaced on the last row from the wrong side = 78-84-93-102-114-126 stitches. Change to circular needle size 4 mm and work the next row from the right side as follows: 1 edge stitch in garter stitch, * knit 1, purl 2 *, work from *-* until there are 2 stitches left on the row, knit 1, 1 edge stitch in garter stitch. Continue this rib for 3 cm. Cast off with knit over knit and purl over purl – read CASTING-OFF TIP. The back piece measures approx. 46-48-50-52-54-56 cm from the shoulder. RIGHT FRONT PIECE (when the piece is worn): Cast on 22-22-22-22-22-22 stitches with circular needle size 4 mm and 1 strand BabyAlpaca Silk + 1 strand Kid-Silk (= 2 strands). Work 1 ridge. Change to circular needle size 5 mm and work the next row from the right side as follows: 3 edge stitches in garter stitch towards the armhole, 2-2-2-2-2-2 stitches in stocking stitch, A.1 (= 17 stitches on the first row) = 25-25-25-25-25-25 stitches when the first row in A.1 has been worked. Continue this pattern back and forth, repeat A.1 in height from 3rd row. When the piece measures 4 cm increase for the neck-line on the inside of A.1 towards mid front – read INCREASE TIP-2. Increase like this every 4th row (i.e. every 2nd row from the right side) a total of 8-8-9-11-12-13 times, every 2nd row (i.e. every row from the right side) a total of 14-16-15-14-14-14 times and finally every 4th row 2-2-2-2-2-2 times. At the same time, when the piece measures 17-14-8-12-10-7 cm, increase 1 stitch in the side for the armhole – continue to increase in the same way as on the back piece. Continue working until the piece measures 19-20-21-22-23-24 cm and cast on 3 new stitches at the end of the next row from the wrong side. Continue as before with A.1 towards mid front, increases for neck-line and stocking stitch but, over the outermost 6 stitches towards the side, work 2 ridges (i.e. on the next 4 rows). Then continue with stocking stitch and 1 edge stitch in garter stitch towards the side and A.1 towards mid front (increases continued as before). When the piece measures 4 cm from the armhole, decrease 1 stitch in the side – remember DECREASE TIP-1. Repeat the decrease when the piece measures 8-8-9-9-10-10 and 12-13-14-15-16-17 cm. When the piece measures 15-16-17-18-19-20 cm, increase 1 stitch inside the 1 edge stitch in garter stitch on the side – remember INCREASE TIP-3. Repeat the increase when the piece measures 19-20-21-22-23-24 cm and 23-24-25-26-27-28 cm. When all the increases on the inside of A.1 are finished continue the pattern as before until the increases in the side are finished. When all the increases are finished there are 54-58-62-66-71-76 stitches on the needle. Continue working until the piece measures 24-25-26-27-28-29 cm from the armhole and increase 6-8-7-6-7-8 stitches evenly spaced = 60-66-69-72-78-84 stitches. Change to circular needle size 4 mm and work rib as follows: 1 edge stitch in garter stitch, * purl 2, knit 1 *, work from *-* until there are 20 stitches left on the row, work A.3 over the last 20 stitches (2 stitches are decreased in the diagram = 18 stitches) = 58-64-67-70-76-82 stitches. Continue the rib for 3 cm. Cast off with knit over knit and purl over purl – remember CASTING-OFF TIP. The front piece measures approx. 46-48-50-52-54-56 cm from the shoulder. LEFT FRONT PIECE (when garment is worn): Cast on 22-22-22-22-22-22 stitches with circular needle size 4 mm and 1 strand BabyAlpaca Silk + 1 strand Kid-Silk (= 2 strands). Work 1 ridge. Change to circular needle size 5 mm and work the next row from the right side as follows: Work A.2 (= 17 stitches on the first row), work 2-2-2-2-2-2 stitches in stocking stitch and finish with 3 edge stitches in garter stitch towards the armhole = 25-25-25-25-25-25 stitches when the first row in A.2 has been completed. Continue this pattern back and forth, repeat A.2 in height from 3rd row. When the piece measures 4 cm increase for the neck-line on the inside of A.2 towards mid front – remember INCREASE TIP-2. Increase like this every 4th row (i.e. every 2nd row from the right side) a total of 8-8-9-11-12-13 times, every 2nd row (i.e. every row from the right side) a total of 14-16-15-14-14-14 times and finally every 4th row 2-2-2-2-2-2 times. At the same time, when the piece measures 17-14-8-12-10-7 cm, increase 1 stitch in the side for the armhole – Continue to increase in the same way as on the back and right front piece. Continue working until the piece measures 19-20-21-22-23-24 cm and cast on 3 new stitches at the end of the next row from the right side. Continue as before with A.2 towards mid front, increases to neck-line and stocking stitch but, over the outermost 6 stitches towards the side, work 2 ridges (i.e. on the next 4 rows). Then continue with stocking stitch, 1 edge stitch in garter stitch towards the side and A.2 towards mid front (increases continue as before). When the piece measures 4 cm from the armhole decrease 1 stitch in the side – remember DECREASE TIP-1. Repeat the decrease when the piece measures 8-8-9-9-10-10 and 12-13-14-15-16-17 cm. When the piece measures 15-16-17-18-19-20 cm, increase 1 stitch inside the 1 edge stitch in garter stitch on the side – remember INCREASE TIP-3. Repeat the increase when the piece measures 19-20-21-22-23-24 cm and 23-24-25-26-27-28 cm. When all the increases inside A.2 are finished continue the pattern as before until the increases in the side are finished. When all increases are finished there are 54-58-62-66-71-76 stitches on the needle. Continue working until the piece measures 24-25-26-27-28-29 cm from the armhole and increase 6-8-7-6-7-8 stitches evenly on the row = 60-66-69-72-78-84 stitches. Change to circular needle size 4 mm and work rib as follows: A.4 over the first 20 stitches (2 stitches are decreased in the diagram = 18 stitches), * knit 1, purl 2 *, work from *-* until there are 2 stitches left on the row, knit 1, 1 edge stitch in garter stitch = 58-64-67-70-76-82 stitches. Continue the rib for 3 cm. Cast off with knit over knit and purl over purl – remember CASTING-OFF TIP. The front piece measures approx. 46-48-50-52-54-56 cm from the shoulder. SLEEVE: Cast on 22-24-26-28-24-26 stitches with circular needle size 5 mm and 1 strand BabyAlpaca Silk + 1 strand Kid-Silk. Work stocking stitch back and forth for the sleeve cap and, at the same time, cast on new stitches at the end of every row as follows: Cast on 3 stitches 1 time on each side, 2 stitches 3-3-3-3-4-4 times on each side, 1 stitch 0-1-2-3-3-5 times on each side, 2 stitches 3-3-3-3-4-4 times on each side and finally 3 stitches 1 time on each side = 58-62-66-70-74-80 stitches. Join the piece together and continue in the round with double pointed needles/short circular needle. Insert 1 marker thread at the join = mid under sleeve. The thread will be used when decreasing under the sleeve. Work stocking stitch in the round. When the piece measures 4 cm from where it was joined, decrease 2 stitches mid under sleeve – read DECREASE TIP-2. Decrease like this every 4-3-2-1½-1-1 cm a total of 3-4-5-6-7-9 times = 52-54-56-58-60-62 stitches. Continue working until the piece measures 19-18-18-17-16-14 cm from the join. Knit 1 round where you increase 2-0-1-2-0-1 stitches evenly on the round = 54-54-57-60-60-63 stitches. Change to double pointed needles size 4 mm and work rib in the round (= knit 1 / purl 2) for 3 cm. Loosely cast off with knit over knit and purl over purl. The sleeve measures approx. 29-29-30-30-31-31 cm from the cast-on edge down. Work one more sleeve in the same way. ASSEMBLY: Sew the shoulder seams inside the cast-on edge. Sew the side seams inside the 1 edge stitch but leave openings in both sides to thread the ties through – the openings should be 8 cm from the bottom edge and 2½–3 cm in width. Lay the sleeves under the garter stitch edge along the armholes and sew neatly from the right side (there should not be a loose edge after sewing; sew in the outermost garter stitch from the right side so the edge lies neatly outside the sleeve). TIES: Knit up using needle size 4 mm and 1 strand of each quality: Approx. 6-7 stitches along the ribbed edge in front; 8 cm from the bottom cast-off edge up to the first of the 6-7 stitches. On the right front piece work garter stitch back and forth until the tie measures approx. 40 cm. Cast off. On the left front piece work garter stitch back and forth until the tie measures approx. 84-94 cm. Cast off. |
||||||||||||||||||||||
Diagram explanations |
||||||||||||||||||||||
|
||||||||||||||||||||||
|
||||||||||||||||||||||
|
||||||||||||||||||||||
|
Have you made this or any other of our designs? Tag your pictures in social media with #dropsdesign so we can see them! Do you need help with this pattern?You'll find tutorial videos, a Comments/Questions area and more by visiting the pattern on garnstudio.com. © 1982-2024 DROPS Design A/S. We reserve all rights. This document, including all its sub-sections, has copyrights. Read more about what you can do with our patterns at the bottom of each pattern on our site. |
||||||||||||||||||||||


With over 40 years in knitting and crochet design, DROPS Design offers one of the most extensive collections of free patterns on the internet - translated to 17 languages. As of today we count 304 catalogues and 11422 patterns - 11422 of which are translated into English (UK/cm).
We work hard to bring you the best knitting and crochet have to offer, inspiration and advice as well as great quality yarns at incredible prices! Would you like to use our patterns for other than personal use? You can read what you are allowed to do in the Copyright text at the bottom of all our patterns. Happy crafting!
Comments / Questions (90)
Je souhaite réaliser le modèle de cache -coeur DROPS 21-9 en taille S mais avec des manches longues. combien dois-je rajouter de pelotes ?
21.06.2020 - 16:06DROPS Design answered:
Bonjour Mme Fouilhoux, nous ne sommes malheureusement pas en mesure de pouvoir adapter chacun de nos modèles à chaque demande. Vous pouvez vous inspirer d'un modèle de tension identique avec des manches longues. Votre magasin DROPS saura vous apporter toute l'assistance nécessaire, même par mail ou téléphone. Bon tricot!
22.06.2020 - 08:36Wieso sollen beim Zusammennähen an beiden Seiten Schlitze für die Bindebänder offen gelassen werden? Es reicht doch eine Seite?
15.06.2020 - 07:43Please could you let me know if the whole jacket is kitted with 2 strands ( DROPS BABYALPACA SILK and DROPS KID-SILK
09.06.2020 - 14:57DROPS Design answered:
Dear Mrs Amin, that's right, the jacket is worked entirely with 1 strand each quality, this means 1 strand DROPS BabyAlpaca Silk + 1 strand DROPS Kid-Silk held together as there were just one. Happy knitting!
09.06.2020 - 19:02Hallo, ich stricke die Größe S und habe eine Frage zum Zunahmetipp 2 rechte Vorderseite: Was genau bedeutet in Richtung vorderer Rand? Muss sich das Strickstück, wenn die Vorderseite einen auf der Nadel anschaut, nach links oder rechts erweitern? Ich hätte nach rechts erwartet... Wenn ich aber in den Hinreihen nach den ersten 20M von A1 zunehme, erweitert es sich nach links. Oder mache ich etwas falsch? Vielen Dank!
01.05.2020 - 20:27DROPS Design answered:
Liebe Nissi, A.1 wird über die letzten Maschen bei den Hinreihen bein dem rechten Vorderteil gestrickt (von oben nach unten). Die Zunahmen werden dann vor A.1 gestrickt, dh die Reihe stricken bis die Maschen von A.1 bleiben, 1 Masche zunehmen, A.1 stricken. Hier ist es gemeint, daß A.1 für die Blende gestrickt wird. (Beim linken Vorderteil stricken Sie A.2 am Anfang den Hinreihen: bein den Zunahmen stricken Sie zuerst A.2 dann nehmen Sie 1 Masche zu, dann stricken Sie bis zur Ende der Reihe). Viel Spaß beim stricken!
04.05.2020 - 11:14Ik snap hier helemaal niets van, kunt u het uitleggen? Brei verder tot het werk 19-20-21-22-23-24 cm meet en zet 3 nieuwe steken op aan het einde van de volgende naald aan de verkeerde kant. Ga zo verder als hiervoor met A.1 richting midden voor, meerderingen voor de halslijn en tricotsteek maar, over de buitenste 6 steken richting de zijkant, breit..... tot de meerderingen in de zijkant klaar zijn. dit is de omschrijving van rechtsvoor.
27.04.2020 - 21:09DROPS Design answered:
Dag Netty,
Op een hoogte van 19-20-21-22-23-24 cm zet je steken aan de zijkant op voor het armsgat. Tegelijkertijd ga je gewoon verder met A.1 midden voor. Vlak nadat je de 3 steken voor het armsgat hebt opgezet brei je over de buitenste 6 steken, dus aan de kant van het armsgat, 2 ribbels. Die ribbels komen dus a.h.w. onder de oksels. Daarna brei je weer gewoon tricotsteek aan de zijkant, met 1 kantsteek in ribbelsteek.
28.04.2020 - 20:09Bonjour, Je tricote ce magnifique modèle en taille L. En revanche, je trouve étrange (dans la partie DOS) l'indication "Quand l'ouvrage mesure 17-14-8-12-10-7 cm, augmenter 1 maille de chaque côté...". N'y a t-il pas un problème d'indication pour la taille L? La longueur tricotée ne devrait-elle pas être entre 14 et 12 cm? J'ai continué à avancer un peu, mais je doute, et préfère faire une pause en attendant confirmation de ces 8 cm. Merci à vous!
19.04.2020 - 02:30DROPS Design answered:
Bonjour Lily, c'est tout à fait juste ainsi, vous commencez à augmenter à 8 cm en taille L et augmentez 8 fois tous les 4 cm. Il vous faut commencer plus tôt qu'en taille M (moins d'augmentations tous les 4 rangs) ou XL (plus d'augmentations mais tous les 2 rangs=) pour avoir la bonne hauteur. Bon tricot!
20.04.2020 - 10:16Jeg holder på å strikke denne jakken. Har nettopp begynt, og satt sammen høyre og venstre skulder bak på samme pinnen med opplagte masker til hals i midten. Synes dette ser veldig rart ut, har dere et bilde av hvordan jakken skal se ut bak? Jeg ser at det ligger et bilde der, men håret til modellen dekker over akkurat det området jeg lurer på! Tusen takk for svar :-)
06.04.2020 - 10:37DROPS Design answered:
Hej Ragnhild, vi har desværre ikke flere billeder, du har de 2 skulderstykker med de nye masker imellem, nu fortsætter du over alle masker frem og tilbage. God fornøjelse!
21.04.2020 - 12:24Wat wordt bedoeld met BINNENKANT van A1 meerderen aan de halslijn. (Zie rechtervoorpand.)\r\nIs dat hetzelfde als; richting halslijn?
01.03.2020 - 14:42DROPS Design answered:
Dag Wiesje,
Hiermee wordt bedoeld dat je aan de kant van het pand meerdert, dus niet bij de bies maar tussen A.1 en het gedeelte in tricotsteek.
04.03.2020 - 15:34På Montering ”Lämna hål till knytband i *varje sida*.”. ska det inte vara bara i den ena sidan ... på bilden ser det ut som att knytbandet från den innersta framstycket går igenom sidhålet och sedan runt på baksidan och knyts ihop med det andra knytbandet som är fastsytt i det yttersta framstycket...
26.02.2020 - 21:16DROPS Design answered:
Hej, jo fast det beror på om du vill ha bandet innanför tröjan på ryggen eller som på bilden :)
27.02.2020 - 08:58I am confused. Increases inside A1 -8 every 4th +15 every other +2 every 4th ...= 25 increases... I have 54 stitches... I have 3 increases too many inside A1 (I assumed the increasing repeats) 2 increases left in the side. If I take away 3 stitches that were too many I have 51 stitches + remaining 2 = 53... it should be 54 by now.... is it a mistake in the numbers? Perhaps it should be 8+15+3....?
23.02.2020 - 12:26DROPS Design answered:
Dear Mrs Joop, could you please tell us which size you are working on? It would be then easier to check. Thank you!
24.02.2020 - 09:04