DROPS Alpaca
DROPS Alpaca
100% Alpaca
from 3.65 € /50g
DROPS Kid-Silk
DROPS Kid-Silk
75% Mohair, 25% Silk
from 5.05 € /25g
DROPS SS24

Spinning Ribbons

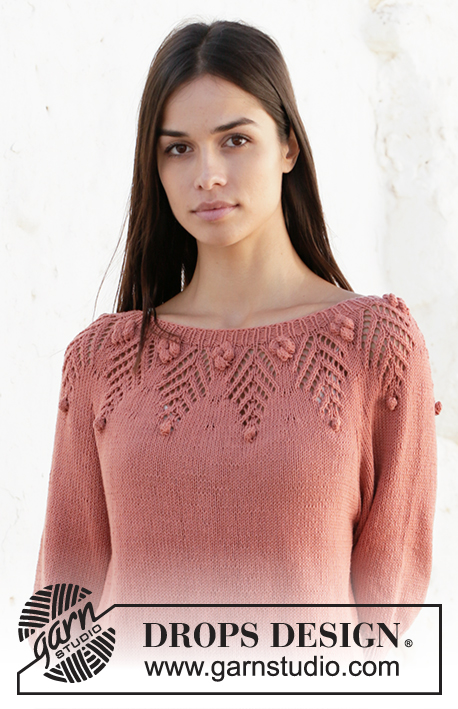
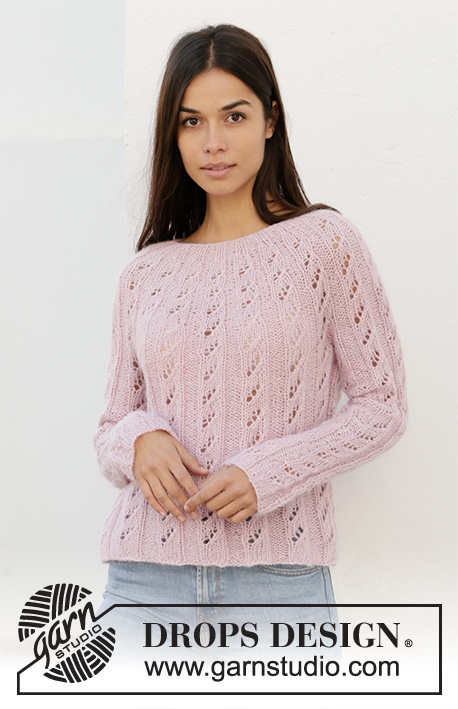
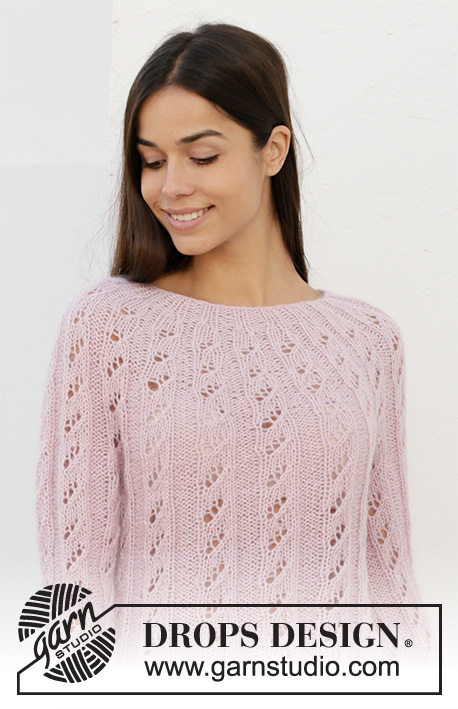
Knitted jumper with round yoke in DROPS Alpaca and DROPS Kid-Silk. Piece is knitted with rib and lace pattern. Size XS–XXL.

DROPS 212-22
DROPS design: Pattern z-885
Yarn group A + A or C
----------------------------------------------------------

SIZE:
XS - S/M - L/XL - XXL

MATERIALS:
DROPS ALPACA from Garnstudio (belongs to yarn group A)
200-200-250-300 g colour 3112, powder pink
And use:
DROPS KID-SILK from Garnstudio (belongs to yarn group A)
75-75-100-100 g colour 03, light pink

KNITTING TENSION:
16 stitches in width and 20 rows vertically in stocking stitch and 1 strand of each quality = 10 x 10 cm.

NEEDLES:
DROPS DOUBLE POINTED NEEDLES SIZE 5.5 mm
DROPS CIRCULAR NEEDLE SIZE 5.5 mm : Length 40 and 80 cm.
DROPS CIRCULAR NEEDLE SIZE 4 mm: Length 40 cm - for rib.
Needle size is only a suggestion! If you have too many stitches on 10 cm switch to a larger needle size. If you have too few stitches on 10 cm switch to a smaller needle size.

-------------------------------------------------------

Alternative Yarn – See how to change yarns here
Yarn Groups A to F – Use the same pattern and change the yarn here
Yarn usage using an alternative yarn – Use our yarn converter here

-------------------------------------------------------

DROPS Alpaca
DROPS Alpaca
100% Alpaca
from 3.65 € /50g
DROPS Kid-Silk
DROPS Kid-Silk
75% Mohair, 25% Silk
from 5.05 € /25g

Pattern instructions

----------------------------------------------------------

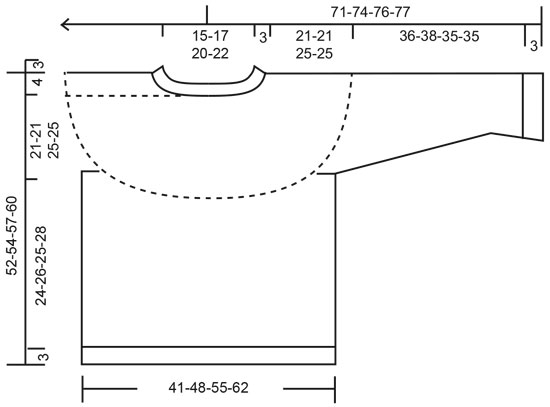
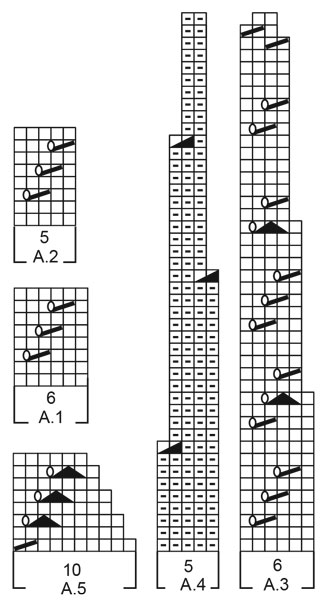
EXPLANATION FOR THE PATTERN:

----------------------------------------------------------

PATTERN: 
See diagrams A.1 to A.5.

INCREASE TIP-1 (applies to sleeve):
Increase 1 stitch by making 1 yarn over. On next round purl yarn over twisted to avoid holes. At first increase, increase after the first purl stitch in every purl section. On second increase, increase before the last purl stitch in every purl section. On third increase, increase after the first purl stitch in every purl section, etc.

INCREASE TIP-2:
Increase in every knit section as follows: Knit 1, make 1 yarn over, knit the remaining 4 stitches = 6 stitches.

DECREASE TIP:
Work until 3 stitches remain before marker thread, purl 3 together (= 2 stitches decreased), marker thread is here, purl 3 together (= 2 stitches decreased). Repeat at the other marker thread.

----------------------------------------------------------

START THE PIECE HERE:

----------------------------------------------------------

JUMPER - SHORT OVERVIEW OF THE PIECE:
Work body in the round on circular needle. Work sleeves in the round on double pointed needles/a short circular needle. Then slip sleeves on to same circular needle as body before working yoke in the round on circular needle.

BODY:
Cast on 132-154-176-198 stitches on circular needle size 5.5 mm with 1 strand Alpaca and 1 strand Kid-Silk (= 2 strands). Work rib (= purl 5/knit 6) in the round. When piece measures 3 cm, work pattern as follows: * Purl 5, A.1 over the next 6 stitches *, work from *-* in the round. REMEMBER THE KNITTING TENSION! Continue until piece measures 27-29-28-31 cm – adjust to finish after next to last round in A.1. Work next round (i.e. last round in A.1) as follows: Cast off the first 6 stitches (= purl 5, and knit 1), work the next 59-70-81-92 stitches (= front piece), cast off the next 7 stitches (= knit 1, purl 5, knit 1), work the next 59-70-81-92 stitches (= back piece), cast off last stitch (= knit 1). Cut the yarn. Put piece aside and work the sleeves.

SLEEVES:
Cast on 45-45-54-54 stitches on double pointed needles size 5.5 mm with 1 strand Alpaca and 1 strand Kid-Silk (= 2 strands). Work rib (purl 4/knit 5) in the round for 3 cm.
Now work A.2 over the 5 knit stitches and continue with purl over purl. AT THE SAME TIME decrease and increase as follows:
When piece measures 6 cm, decrease all 4 purl stitches to 3 purl stitches by purling the first 2 stitches in purl sections together = 40-40-48-48 stitches.
When piece measures 12 cm, decrease all 3 purl stitches to 2 purl stitches by purling the last 2 stitches in purl sections together = 35-35-42-42 stitches.
When piece measures 18-18-17-16 cm, increase all 2 purl stitches to 3 purl stitches - read INCREASE TIP-1 = 40-40-48-48 stitches.
When piece measures 24-24-23-22 cm, increase all 3 purl stitches to 4 purl stitches = 45-45-54-54 stitches.
When piece measures 29-29-28-27 cm, adjust so that one whole repetition of A.2 has been worked vertically, increase all 5 knit stitches to 6 knit stitches - read INCREASE TIP-2 = 50-50-60-60 stitches. Then work A.1 over every repetition of A.2.
When piece measures 35-35-33-33 cm, increase all 4 purl stitches to 5 purl stitches = 55-55-66-66 stitches.
Continue in the round with A.1 and 5 purl stitches in every purl stitch until sleeve measures 39-41-38-38 cm - adjust to finish after next to last round in A.1. Work next round (i.e. last round in A.1) as follows: Cast off the first 6 stitches (= 5 purl stitches, 1 knit stitch), work pattern as before until 1 stitch remain, cast off last stitch (= 1 knit stitch) = 48-48-59-59 stitches remain on needle. Cut the yarn. Put piece aside and knit another sleeve the same way.

YOKE:
Slip sleeves on to same circular needle as body where armholes were cast off in each side= 214-236-280-302 stitches. In every transition between body and sleeves there are now 10 knit stitches. Begin round after 10 knit stitches, i.e. after 5 knit stitches after transition between right sleeve and back piece.
Work pattern A.3 over A.1, A.4 over the 5 purl stitches and A.5 over the 10 knit stitches in transition between body and sleeves. When A.5 has been worked vertically (8 rounds on yoke have been worked), 4 stitches have been decrease in every repetition A.5 (= 16 stitches decreased) = 198-220-264-286 stitches.
Now work in the different sizes as follows:

Size XS and S/M:
Continue with A.3 and A.4 as before, over the 6 stitches in A.5 work A.3 (make sure to begin on same round in all repetitions on round). When diagrams have been worked vertically, there are 72-80 stitches on round. Switch to circular needle size 4 mm. Continue with rib = knit 2/purl 2 for 3 cm. Cast off stitches with knit over knit and purl over purl. Cut and fasten the yarn. Jumper measures approx. 52-54 cm from shoulder and down.

Size L/XL, XXL:
Repeat the first 8 rounds in A.3 and A.4 and over A.5 work A.3 (make sure to begin on same round in all repetitions on round). When the 8 rounds in diagrams have been worked 2-2 times in total vertically (i.e. 16 rounds have been worked in total on yoke), work the remaining rounds in diagrams. When diagrams have been worked vertically, there are 96-104 stitches on round. Now insert a marker thread in the middle of the 2 knit stitches mid on top of shoulder in each side. On next round work knit over knit and purl over purl, and on each side of marker thread on each shoulder decrease 2 stitches - read DECREASE TIP = 88-96 stitches. Switch to circular needle size 4 mm. Continue with rib = knit 2/purl 2 for 3 cm. Cast off stitches with knit over knit and purl over purl. Cut and fasten the yarn. Jumper measures approx. 57-60 cm from shoulder and down.

ASSEMBLY:
Sew the openings under the sleeves.

Diagram

symbols = knit
symbols = purl
symbols = between 2 stitches make 1 yarn over, on next round knit yarn over to make hole
symbols = knit 2 stitches together (= 1 stitch decreased)
symbols = slip 1 stitch knitwise, knit 1, pass slipped stitch over stitch worked (= 1 stitch decreased)
symbols = purl 2 together (= 1 stitch decreased)
symbols = knit 3 stitches together (= 2 stitches decreased)
diagram
diagram

Each of our patterns has specific tutorial videos to help you.

Do you have a question? See a list of frequently asked questions (FAQ)

Knitting tension is what determines the final measurements of your work, and is usually measured per 10 x 10 cm. It is provided like so: number of stitches in width x number of rows in height - eg: 19 stitches x 26 rows = 10 x 10 cm.

The knitting tension is very individual; some people knit/crochet loosely while others work tightly. You adjust the knitting tension with the needle size, which is why the suggested needle size is only meant as a guide! You need to adjust this (up or down) to ensure that YOUR knitting tension matches the knitting tension provided in the pattern. If you work with a different knitting tension than provided you will have a different yarn consumption, and your work will have different measurements than what the pattern suggests.

The knitting tension also determines which yarns can replace each other. As long as you achieve the same knitting tension you can replace one yarn with another.

See DROPS lesson: How to measure your tension/gauge

See DROPS video: How to make a gauge tension swatch

The required amount of yarn is provided in grams, eg: 450 g. To calculate how many balls you’ll need you first need to know how many grams are in 1 ball (25g, 50g or 100g). This information is available if you click on the individual yarn quality on our pages. Divide the amount required with the amount of each ball. For example, if each ball is 50g (the most common amount), the calculation will be as follows: 450 / 50 = 9 balls.

The important thing when changing from one yarn to another is that the knitting/crochet tension remains the same. This is so that the measurements of the finished piece will be the same as on the sketch provided. It is easier to achieve the same knitting tension using yarns from the same yarn group. It is also possible to work with multiple strands of a thinner yarn to achieve the knitting tension of a thicker one. Please try our yarn converter. We recommend you to always work a test swatch.

Please NOTE: when changing yarn the garment might have a different look and feel to the garment in the photo, due to individual properties and qualities of each yarn.

See DROPS lesson: Can I use a different yarn than the one mentioned in the pattern?

All our yarns are categorised into yarn groups (from A to F) according to thickness and knitting tension – group A contains the thinnest yarns and group F the thickest. This makes it easier for you to find alternative yarns to our patterns, should you wish to switch yarn. All yarns within the same group have a similar knitting tension and can easily replace each other. However, different yarn qualities have different structures and properties which will give the finished work a unique look and feel.

Click here for an overview of the yarns in each yarn group

At the top of all our patterns you’ll find a link to our yarn calculator, which is a helpful tool should you wish to use a different yarn than suggested. By filling in the yarn quality you wish to replace, the amount (in your size) and number of strands, the calculator will present good alternative yarns with the same knitting tension. Additionally it will tell you how much you’ll require in the new qualities and whether you’ll need to work with multiple strands. Most skeins are 50g (some are 25g or 100g).

If the pattern is worked with multiple colours, every colour will have to be calculated separately. Similarly, if the pattern is worked with several strands of different yarns (for example 1 strand Alpaca and 1 strand Kid-Silk) you will have to find alternatives for each, individually.

Click here to see our yarn calculator

Since different yarns have different qualities and textures we have chosen to keep the original yarn in our patterns. However, you can easily find options among our available qualities by using our yarn calculator, or simply pick a yarn from the same yarn group.

It is possible that some retailers still have discontinued yarns in stock, or that someone has a few skeins at home that they would like to find patterns for.

The yarn calculator will provide both alternative yarn as well as required amount in the new quality.

If you think it's hard to decide what size to make, it can be a good idea to measure a garment you own already and like the size of. Then you can pick the size by comparing those measures with the ones available in the pattern's size chart.

You'll find the size chart at the bottom of the pattern.

See DROPS lesson: How to read size chart

The needle size provided in the pattern serves only as a guide, the important thing is to follow the knitting tension. And since knitting tension is very individual, you will have to adjust the needle size to ensure that YOUR tension is the same as in the pattern – maybe you’ll have to adjust 1, or even 2 needle sizes, up or down to achieve the correct tension. For this, we recommend that you work test swatches.

Should you work with a different knitting tension than the one provided, the measurements of the finished garment might deviate from the measurement sketch.

See DROPS lesson: How to measure your tension/gauge

See DROPS video: How to make a tension/gauge swatch

Working a garment top-down provides more flexibility and room for personal adjustment. For example it is easier to try the garment on while working, as well as making adjustments to length of yoke and shoulder caps.

The instructions are carefully explaining every step, in the correct order. Diagrams are adjusted to the knitting direction and are worked as usual.

The diagram depicts all rows/rounds, and every stitch seen from the right side. It is read from bottom to top, from right to left. 1 square = 1 stitch.

When working back and forth, every other row is worked from the right side and every other row is worked from the wrong side. When working from the wrong side, the diagram will have to be worked reversed: from left to right, knit stitches are purled, purl stitches are knit etc.

When working in the round every round is worked from the right side and the diagram are worked from right to left on all rounds.

See DROPS lesson: How to read knitting diagrams

The diagram depicts all rows/rounds, and every stitch seen from the right side. It is worked from bottom to top, from right to left.

When working back and forth every other row is worked from the right side: from right to left and every other row is worked from the wrong side: from left to right.

When working in the round, every row in the diagram are worked from the right side, from right to left.

When working a circular diagram you start in the middle and work your way outwards, counter clockwise, row by row.

The rows usually start with a given number of chain stitches (equivalent to the height of the following stitch), this will either be depicted in the diagram or explained in the pattern.

See DROPS lesson: How to read crochet diagrams

Instructions for working several diagrams after each other on the same row/round, will often be written like so: “work A.1, A.2, A.3 a total of 0-0-2-3-4 times". This means you work A.1 once, then A.2 is worked once, and A.3 is repeated (in width) the number of times provided for your size – in this case like so: S = 0 times, M = 0 times, L=2 times, XL= 3 times and XXL = 4 times.

The diagrams are worked as usual: begin with the first row in A.1, then work the first row in A.2 etc.

See DROPS lesson: How to read knitting diagrams

See DROPS lesson: How to read crochet diagrams

The total width of the garment (from wrist-to-wrist) will be larger in the larger sizes, despite the actual sleeves being shorter. The larger sizes have longer sleeve caps and wider shoulders, so there will be a good fit in all sizes.

The measurement sketch/schematic drawing provides information regarding the full length of the garment. If it’s a jumper or a jacket the length is measured from the highest point on the shoulder closest to the neckline, and straight down to the bottom of the garment. It is NOT measured from the tip of shoulder. Similarly, the length of yoke is measured from the highest point on the shoulder and down to where yoke is split into body and sleeves.

On a jacket measures are never taken along bands, unless specifically stated. Always measure inside band stitches when measuring the length.

See DROPS lesson: How to read a schematic drawing

Diagrams are often repeated on the round or in height. 1 repeat is the diagram the way it appears in the pattern. If it says to work 5 repeats of A.1 in the round, then you work A.1 a total of 5 times after/next to each other in the round. If it says to work 2 repeats of A.1 vertically/in height you work the entire diagram once, then begin again at the start and work the entire diagram one more time.

Chain stitches are slightly narrower than other stitches and to avoid working the cast-on edge too tight, we simply chain more stitches to begin with. The stitch count will be adjusted on the following row to fit the pattern and measurement sketch.

The rib edge is more elastic and will contract slightly compared to, for example, stocking stitch. By increasing before the rib edge, you avoid a visible difference in width between the rib edge and the rest of the body.

It’s very easy to cast off too tightly, and by making yarn overs while casting off (and simultaneously casting these off) you avoid a too tight cast off edge.

See DROPS video: How to bind off with yarn overs (yo)

To achieve an even increase (or decrease) you can increase on, for example: every 3rd and 4th row alternately, like so: work 2 rows and increase on the 3rd row, work 3 rows and increase on the 4th. Repeat this until the increase is complete.

See DROPS lesson: Increase or decrease 1 st on every 3rd and 4th row alternately

Should you prefer to work in the round instead of back and forth, you may of course adjust the pattern. You’ll need to add steeks mid-front (usually 5 stitches), and follow the instructions. When you would normally turn and work from the wrong side, simply work across the steek and continue in the round. At the end you’ll cut the piece open, pick up stitches to work bands, and cover the cut edges.

See DROPS video: How to knit steeks and cut open

Should you prefer to work back and forth instead of in the round, you may of course adjust the pattern so you work the pieces separately and then assemble them at the end. Divide the stitches for the body in 2, add 1 edge stitch in each side (for sewing) and work the front and back pieces separately.

See DROPS lesson: Can I adapt a pattern for circular needles into straight needles?

Pattern repeats can vary slightly in the different sizes, in order to get the correct proportions. If you’re not working the exact same size as the garment in the photo, yours might deviate slightly. This has been carefully developed and adjusted so that the complete impression of the garment is the same in all sizes.

Make sure to follow instructions and diagrams for your size!

If you have found a pattern you like which is available in women’s size it’s not very difficult to convert it to men’s size. The biggest difference will be the length of sleeves and body. Start working on the women size that you think would fit across the chest. The additional length will be worked right before you cast off for the armhole/sleeve cap. If the pattern is worked top-down you can add the length right after the armhole or before the first decrease on sleeve.

Regarding additional yarn amount, this will depend on how much length you add, but it is better with a skein too many than too few.

All yarns will have excess fibres (from production) that might come off as lint or shedding. Brushed yarns (ie hairier yarns) have more of these loose, excess fibres, causing more shedding.

Shedding also depends on what is worn under or over the garment, and whether this pulls at the yarn fibres. It’s therefore not possible to guarantee that there will be no shedding

Below are some tips on how to get the best result when working with hairier yarns:

1. When the garment is finished (before you wash it) shake it vigorously so the looser hairs come off. NOTE: do NOT use a lint roller, brush or any method that pulls at the yarn.

2. Place the garment in a plastic bag and put it in your freezer - the temperature will cause the fibres to become less attached to each other, and excess fibres will come off easier.

3. Leave in the freezer for a few hours before taking it out and shaking it again.

4. Wash the garment according to the instructions on the yarn label.

Pilling is a natural process that happens to even the most exclusive of fibers. It's a natural sign of wear and tear that is hard to avoid, and that is most visible in high friction areas of your garment like a sweater's arms and cuffs.

You can make your garment look as new by removing the pilling, using a fabric comb or a pill/lint remover.

Still can't find the answer you need? Then scroll down and leave your question so one of our experts can try to help you. This will be done normally within 5 to 10 working days.
In the meantime, you can read the questions and answers that others have left to this pattern or join the DROPS Workshop on Facebook to get help from fellow knitters/crocheters!

You might also like...

Post a comment to pattern DROPS 212-22

We would love to hear what you have to say about this pattern!

If you want to leave a question, please make sure you select the correct category in the form below, to speed up the answering process. Required fields are marked *.

Comments / Questions (29)

country flag Nanny wrote:

Dag, bij het telpatroon merkte ik een foutje: Leeg vierkantje = recht Vierkantje met - erin = recht Dit laatste moet averecht zijn. Prachtige trui.

27.10.2022 - 16:42

country flag Grillaert Jenny wrote:

Bij de naalden die nodig zijn voor dit model, staat rondbreinaald nr 4 voor de boordsteek, maar toch staat bij de uitleg voor het patroon : opzetten met rondbreinaald 5,5. Graag had ik geweten met welke naald nu echt moet opgezet worden. Met dank

02.04.2022 - 02:49

DROPS Design answered:

Dag Jenny,

De dunnere naald wordt alleen gebruikt bij de boordsteek langs de halslijn. Voor de boord aan het begin van de mouwen en het lijf wordt de dikkere naald gebruikt om te voorkomen dat de boordsteek samentrekt. Als je toch wilt dat de boord een beetje samentrekt, kun je natuurlijk ook daar een dunnere naald gebruiken.

04.04.2022 - 11:44

country flag Kirsi Hemanus wrote:

Please, the pattern (drawing) has disappeared, can you add it or send to me via email.

08.10.2021 - 15:37

DROPS Design answered:

Dear Kirsi, that was caused by a technical problem, that is solved since. You should see the diagrams now. Happy Stitching!

08.10.2021 - 17:39

country flag Joan Lægg Willumsen wrote:

Hej - jeg vil så gerne igang med denne bluse, men jeg kan ikke se diagrambeskrivelserne når jeg henter opskriften på nettet. vh Joan

05.10.2021 - 15:13

DROPS Design answered:

Hej Joan. Diagrammen/diagrambeskrivningar finns längst ner på opskriften. prova att uppdatera sidan (ev. testa en annan webläsare) om du inte kan se dem. Mvh DROPS Design

06.10.2021 - 09:29

country flag Rene Giuld wrote:

I can't use double pointed needles for this pattern is there another way to do sleeves for this pattern thank you

07.08.2021 - 23:50

DROPS Design answered:

Dear Renee, you can knit the sleeves with shorter circulars or a long one using the magic circle method. Happy Stitching.

08.08.2021 - 23:02

country flag Debora wrote:

Buongiorno, vorrei lavorare questo modello con un filato che richiede ferri 2,5 - 3,5 (anche 4). Mi basta seguire le istruzioni per la taglia più grande o potete aiutarmi diversamente? Per me ci vuole almeno una taglia M. Grazie. Debora

12.05.2021 - 07:09

DROPS Design answered:

Buongiorno Debora, deve lavorare con un ferro che le permette di ottenere il campione indicato. Buon lavoro!

14.05.2021 - 18:00

country flag Joelle wrote:

Bonjour Avez-vous des modèles de pulls simples réalisés avec un seul fil alpaca ?

22.01.2021 - 20:21

DROPS Design answered:

Bonjour Joelle, vous trouverez les modèles de pulls tricotés avec 1 fil Alpaca et 24 m pour 10 cm ici; et tous ceux du groupe A (même que Alpaca) - vous pouvez également faire une autre recherche avec un nombre de mailles différent. Bon tricot!

25.01.2021 - 08:21

country flag Florence wrote:

Bonjour en faisant ce modèle j'ai cru remarquer une erreur au niveau de l’empiècement "Commencer le tour après 10 mailles endroit, c'est-à-dire après 5 mailles endroit après la transition entre la manche droite et le dos ..." Il me semble que c'est après 5MAILLES envers. J'avoue que j'ai bloqué un petit moment sur ce passage.

22.10.2020 - 22:38

DROPS Design answered:

Bonjour Florence, c'est juste en fait, vous commencez par les 5 mailles envers, après les 5 m end du dos et les 5 m end de la manche, donc si vous avez commencez par les 5 m env, c'est tout à fait juste, si vous avez commencez après les 5 m env, ça tombait fort probablement juste aussi. Bonne continuation!

23.10.2020 - 09:23

country flag Jette Olsen wrote:

Kan jeg sortere opskrifter så der kun vises dem der strikkes nedefra og op? Jeg synes det er svært at strikke oppefra og ned.

16.10.2020 - 10:25

DROPS Design answered:

Hej Jette. Ja du kan sortera på detta. Under teknik/søgeord kan du välja "nedefra og op", då får du detta resultat. Sedan kan du sortera vidare på tex dam osv. Mvh DROPS Design

16.10.2020 - 10:38

country flag Claudia wrote:

Hallo, Bin gerade an der Passe in Größe L/XL . Nach den 16 Runden steht in der Anleitung, die restlichen Runden der Diagramme stricken. Beinhaltet das Diagramm nun die 16 Runden oder beginne ich an Anfang der Diagramme? Das komplette Diagram weißt 44 Runden auf. Muss nun die 16 Runden abziehen als noch 28 Runden stricken oder die kompletten 44 Runden in der Größe? Vielen Dank im Voraus für Ihre Hilfe.

01.10.2020 - 10:17

DROPS Design answered:

Liebe Claudia, nachdem Sie die 8 Reihen von A.5 gestrickt haben, wiederholen Sie A.3 und A.4 über A.3 und A.4 von der 1. Reihe und gleichzeitig stricken Sie A3 über die restlichen Maschen von A.5 (die 8 ersten Reihen in A.3/A.4 werden 2 Mal in der Höhe über diese Maschen gestrickt und 1 Mal über A.5 gestrickt). Dann stricken Sie die Diagramme bis zur Ende. Viel Spaß beim stricken!

01.10.2020 - 10:35