
Populära kategorier
Letar du efter ett garn?


|
|||||||||||||||||||||||||
Fields of Blue |
|||||||||||||||||||||||||
 |
 |
||||||||||||||||||||||||
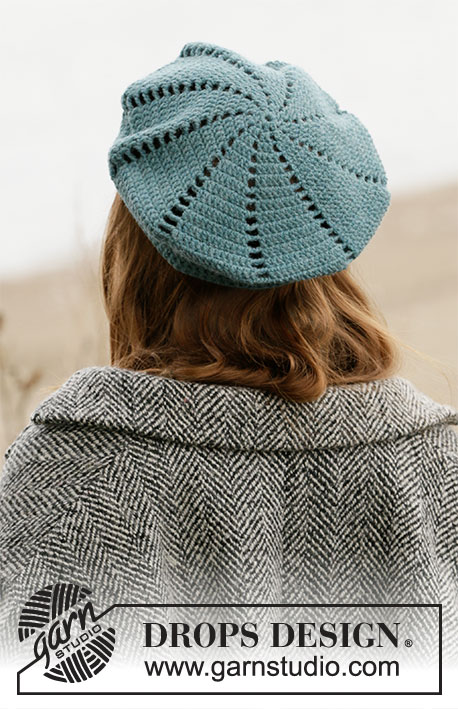
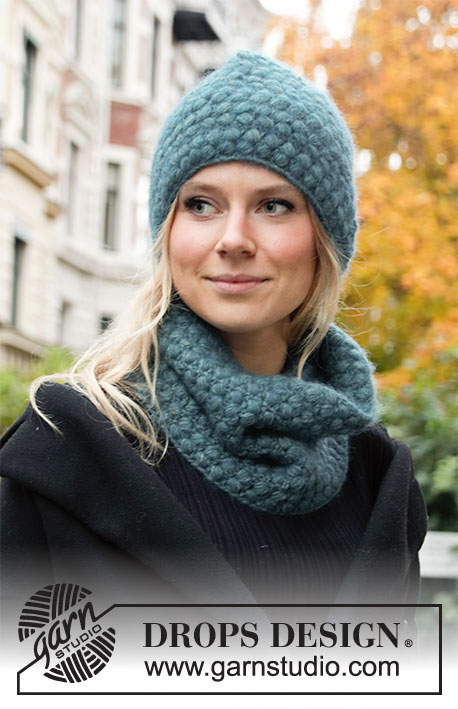
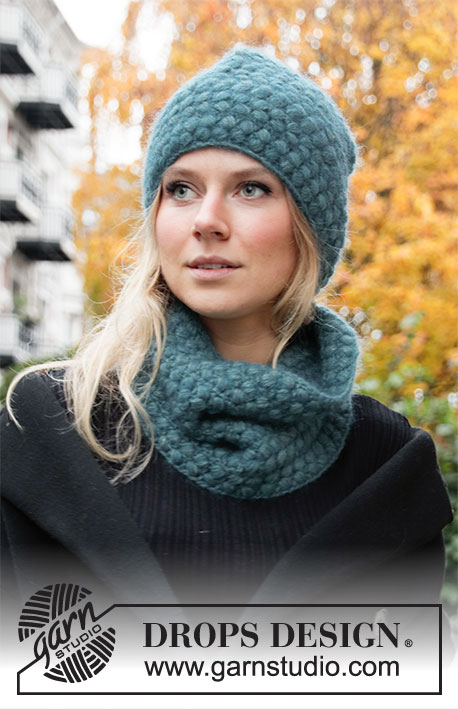
Virkad mössa och halsvärmare med puffmaskor. Hela settet virkas i DROPS Sky och DROPS Kid-Silk.
DROPS 204-16 |
|||||||||||||||||||||||||
|
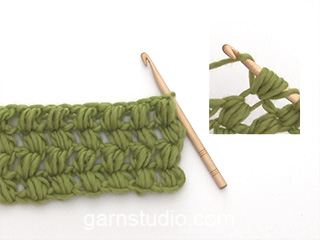
------------------------------------------------------- FÖRKLARING TILL BESKRIVNINGEN: ------------------------------------------------------- MÖNSTER (gäller både mössa och halsvärmare): Se diagram A.1 till A.4. LUFTMASKA: Om du virkar ytterst på virknålen kommer luftmaskan ofta att bli för stram. 1 luftmaska ska vara lika lång som 1 fastmaska/stolpe är bred. 1 PUFFMASKA: Virka så här i samma maska (det är viktigt att det virkas i maskan, inte om maskan): * gör 1 omslag om nålen, stick nålen genom maskan, gör 1 omslag om nålen och drag omslaget genom maskan, drag båda omslagen långa (för att undvika att puffmaskorna blir små och kompakta är det viktigt att omslagen dras så långt det går, dvs ca 2 cm) *, virka *-* totalt 5 gånger, gör 1 omslag om nålen och drag tråden genom alla öglorna på nålen. MINSKNINGSTIPS (jämn fördelning): För att beräkna hur det ska minskas jämnt, räknar man det totala maskantalet på varvet (t.ex 63 maskor) och delar maskorna med det antal minskningar som ska göras (t.ex 28) = 2,3. I detta exempel minskas det genom att virka ca varje och varannan fastmaska tillsammans så här: Stick nålen genom nästa maska, gör 1 omslag om nålen och drag omslaget genom maskan, stick nålen genom nästa maska, gör 1 omslag om nålen, drag omslaget genom maskan, gör 1 nytt omslag om nålen och drag omslaget genom alla 3 öglorna på nålen (= 1 maska minskad). ------------------------------------------------------- BÖRJA ARBETET HÄR: ------------------------------------------------------- MÖSSA - KORT ÖVERSIKT ÖVER ARBETET: Mössan virkas fram och tillbaka från mitt bak, nerifrån och upp, och sys ihop mitt bak till slut. MÖSSA: Virka 75-77-82 luftmaskor med nål 5,5 med 1 tråd Sky + 1 tråd Kid-Silk (= 2 trådar). Första varvet virkas så här: Virka 1 fastmaska i 3:e luftmaskan från nålen, virka 1 fastmaska i var och en av de 0-2-1 nästa luftmaskorna, * hoppa över 1 luftmaska, virka 1 fastmaska i var och en av de 5 nästa luftmaskorna *, virka *-* varvet ut = 62-64-68 fastmaskor på varvet. Nästa varv virkas så här: Virka A.1 över första maskan, virka A.2 tills det återstår 3 maskor på varvet, virka A.3 över 2 maskor, och avsluta med A.4 över sista maskan. Fortsätt mönstret fram och tillbaka så. KONTROLLERA VIRKFASTHETEN! När arbetet mäter ca 20-21-22 cm, minskas det 28-30-30 maskor jämnt fördelat på 3:e eller 6:e varvet i diagrammet (markerat med pil i diagrammet) – läs MINSKNINGSTIPS = 34-34-38 maskor. Virka 2 varv till med puffmaskor. På nästa varv (ett varv med fastmaskor), minskas det genom att virka alla fastmaskorna tillsammans 2 och 2 = 17-17-19 fastmaskor kvar. Sedan virkas det 2 varv fastmaskor där alla fastmaskorna virkas tillsammans 2 och 2 på båda varven = 5 fastmaskor kvar i alla storlekar. Klipp av tråden, men låt den vara så lång att den kan användas till att sy ihop arbetet med. Trä tråden upp och ner genom de 5 maskorna på toppen av mössan, strama tråden och fäst ordentligt. Mössan mäter ca 26-27-28 cm uppifrånoch ner. MONTERING: Sy ihop mössan mitt bak – sy kant i kant i de yttersta maskbågarna så att sömmen blir flat. ------------------------------------------------------- HALSVÄRMARE - KORT ÖVERSIKT ÖVER ARBETET: Arbetet virkas fram och tillbaka från mitt bak, nerifrån och upp, och sys ihop mitt bak till slut. HALSVÄRMARE: Virka 94-101-108 luftmaskor med nål 5,5 med 1 tråd Sky + 1 tråd Kid-Silk (= 2 trådar). Första varvet virkas så här: Virka 1 fastmaska i 3:e luftmaskan från nålen, 1 fastmaska i var och en av de 1-2-3 nästa luftmaskorna, * hoppa över 1 luftmaska, virka 1 fastmaska i var och en av de 5 nästa luftmaskorna *, virka *-* varvet ut = 78-84-90 fastmaskor på varvet. Nästa varv virkas så här: Virka A.1A över första maskan, virka A.2 tills det återstår 3 maskor på varvet, virka A.3 över 2 maskor, och avsluta med A.4 över sista maskan. KONTROLLERA VIRKFASTHETEN! Fortsätt mönstret fram och tillbaka så till arbetet mäter ca 24-27-30 cm (eller till önskad längd), men avsluta efter 3:e eller 6:e varvet i diagrammet. Klipp av tråden, men låt den vara så lång att den kan användas till att sy ihop arbetet med. MONTERING: Sy ihop halsvärmaren mitt bak – sy kant i kant i de yttersta maskbågarna så att sömmen blir flat. |
|||||||||||||||||||||||||
Diagram förklaring |
|||||||||||||||||||||||||
|
|||||||||||||||||||||||||

|
|||||||||||||||||||||||||
|
Har du stickat/virkat detta mönster, eller några av våra andra designs? Dela dina bilder i sociala medier och använd taggen #dropsdesign så vi också kan se dem! Behöver du hjälp med mönstret?Du hittar instruktionsvideoer, kommentarer/frågor och mer i mönstret på www.garnstudio.com © 1982-2024 DROPS Design A/S. Alla rättigheter är reserverade. Detta dokument med tillhörande underdokument har copyright. Läs mer om vad du kan göra med våra mönster längst ner på vår hemsida. |
|||||||||||||||||||||||||


Med över 40 år i stick- och virkbranschen erbjuder DROPS Design en av de mest omfattande samlingarna av gratis mönster på internet - översatt till 17 språk. Per idag har vi 304 kataloger och 11422 mönster på och alla är översatta till Svenska.
Vi arbetar hårt för att kunna erbjuda det bästa inom stickning och virkning, inspiration och goda råd, men också kvalitetsgarn till fantastiska priser! Vill du använda våra mönster till annat än personligt användande? Du kan läsa om vilka regler som gäller i texten Copyright längst ner på sidan på alla våra mönster. Lycka till!
Kommentarer / Frågor (33)
Hola, he comenzado a hacer el cuello. Si lo pongo en plano sobre la mesa me queda circular, no un rectángulo, como pensaba que tendría que quedar. Pienso que pasa esto porque en la primera vuelta dice que hay que saltarse una cadena. ¿Esto es correcto? O yo no lo he entendido bien? Gracias
19.05.2021 - 15:40DROPS Design answered:
Hola Olga, la forma obtenida no es por la cadeneta saltada, sino que por la tensión del tejido. Efectivamente, se tiene que saltar una cadeneta; siempre se montan más cadenetas que las necesarias para evitar que la labor se tense.
30.05.2021 - 20:53Thanks. However the instructions for the box (□) say 'skip 1 puff-stitch + 1 chain stitch, work 1 treble crochet in the next treble crochet' - this uses 3 stitches. The instructions for the cross (X) say 'skip 1 stitch, work 1 treble crochet in next stitch' - this uses 2 stitches. It worked in the second row of the pattern fine because the box (□)was used all the way along the row (not the cross X). Please could you get someone to explain this. Thanks.
14.04.2021 - 13:10The very top row of the pattern (before the last row of double crochet) doesn't seem to work for me. I am working it right to left, A1 over 1st stitch, A2 until the last 3 stitches, A3 over last 2 stitches and A1 over last stitch. Because A2 is a cross (X) and not a box (□) (like row No 2), there ends up being more puff stitches because the chain stitch isn't being missed (there is a puff stitch being made every 2 stitches instead of 3). Should this symbol not be a box to prevent this?
13.04.2021 - 21:08DROPS Design answered:
Dear Jean, the X is worked over 2 stitches (1 treble in the 2. one, and one puff into the first one, cossing the tr), and the square is also wprked over two stitches (puff stitch into the 2. stotch, and treble into the first one) so you should not end up (both symbols have crossed stitches, only teh direction is different), so you should not end up with extra stitches. Happy Crafting!
13.04.2021 - 21:58Hej ! I flere af Drops opskrifter møder jeg 3 tal med bindestreg imellem f. eks. i Drops 204-16: "hækl 1 fastmaske i hver af de 0-2-1 næste luftmasker, . . . " Hvad betyder 0-2-1 næste luftmaske ? Eller i strikkeopskriften Drops Clementin Hat "Strik 0-1-0 maske ret, strik derefter . . ." Hvad betyder det ? Med venlig hilsen Annette
25.02.2021 - 06:50DROPS Design answered:
Hej Annette, det er tallene i de 3 forskellige størrelser. Strikker du den mindste, følger du det første tal igennem hele opskriften osv. God fornøjelse!
25.02.2021 - 14:20Efter att ha virkat de två första varven (först fastmaskor... sedan första varvet på diagrammet) står: "Fortsätt mönstret fram och tillbaka så". Hur menas? Är det det nedersta varvet som ska upprepas till 20 cm och för att sedan gå uppåt i diagrammet? Eller ska jag följa hela diagrammet uppåt direkt? Med vänlig hälsning, Annica
31.01.2021 - 20:02DROPS Design answered:
Hei Annica. Den nederst raden i diagrammet hekler du kun 1 gang, slik det står beskrevet i oppskriften. I diagramteksten med sort stjerne står det: denne raden skal ikke hekles, den er allerede heklet og viser kun hvordan neste rad skal hekles i maskene . Så du skal kun repetere de 6 radene i diagrammet (starter med 3 luftmasker) i høyden. God Fornøyelse!
08.02.2021 - 10:18Bonjour, Pour faire mon échantillon, vous dites : "13 double-brides/mailles serrées de large avec 1 fil de chaque qualité = 10 cm." Je ne comprends pas bien : je fais des double-brides ou des mailles serrées ? Et dans la hauteur, comment je peux voir ce qu'il y a dans 10 cm ? Merci de me répondre car je reste bloquée sur mon échantillon !
17.11.2020 - 11:14DROPS Design answered:
Bonjour Mme Lasalle, vos mailles doivent être toutes de la même largeur, autrement dit 13 double-brides = 13 mailles serrées = 10 cm de large. La hauteur est indiquée pour A.2 = 3 rangs de A.2 = environ 3,25 cm. Bon crochet!
17.11.2020 - 13:56Thanks so much for your patience. That explains well how the row of 78 dbl crochet stitches are worked into. However, after you have done the first row of puff stitches, and then count the stitches, there are 116 stitches. This is because each X box contains 3 stitches (a treble, a chain and a puff) and this is being worked into 2 dc stitches. So at the end of the row you have 38 extra stitches (because there are 38 puff stitches). Can you possibly work out why I am going wrong here. Thanks
30.07.2020 - 09:40DROPS Design answered:
Dear Roro, work simply following the diagram and video previously linked, making sure you have 38 puff stitches on every row - if your tension is right, you should have then the right measurements. Happy crocheting!
30.07.2020 - 12:34Thanks for your response. However, there is an increase from the row of double crochets to the 1st row of puff stitches if you follow the pattern (see question below). In the pattern it looks like each 3rd double crochet is possibly missed, which would actually even out the number of stitches if that was the case - is this where I'm possibly going wrong? Thanks for your patience.
29.07.2020 - 18:01DROPS Design answered:
Dear Roro, on neck warmer you cast on 94-101-108 sts and work first row skipping chains evenly so that there are 78-84-90 sts at the end of this first row. Then work: A.1 over 1st st, repeat A.2 until 3 sts remain = repeat A.2 a total of 37-40-43 times in width (= over the next 74-80-86 sts), and finish with A.3 (= 2 sts) and A.4 over the last stitch = 1+74-80-86+2+1=78-84-90 sts and 38-41-44 puff stitches. Hope this help. Happy crocheting!
30.07.2020 - 08:54Thanks for all your help. The fundamental reason I don't understand this pattern is this: On the 1st row (after dbl crochet row ) the puff stitches which produce 3 stitches (1 treble + 1 chain + 1 puff) are worked into 2 dbl crochet stitches (1 missed - into which a puff stitch goes after the treble + 1 for the treble). This results in an increase of stitches. That would maybe make sense in the 1st row of the item, but not further up. Should the 'X' box say 'miss 2 stitches' instead? Thanks
29.07.2020 - 16:02DROPS Design answered:
Dear Roro, there shouldn't be any increase, you should work "straight", each treble will be worked in the treble from the previous row so that the number of sts will remain constant. This video shows how to crochet these 2 rows with same symbols. Happy crocheting!
29.07.2020 - 17:11Sorry there are so many questions. I'm kind of struggling a bit with this pattern. The 'CROCHET INFORMATION' section states that each row will finish with a slip stitch. Does this mean that the last stitch in the row in the diagram is not actually the last stitch because a slip stitch comes after it. So in effect there is 2 stitches worked in A4 (Right side) or A1 (Wrong side). For example the 1st row ends in A4 with '1 treble crochet in stitch' - is there a slip stitch after this? Thanks.
18.07.2020 - 00:59DROPS Design answered:
Dear Roro, you can follow diagram, ie work back and forth as explained under each piece, without joining at the end of every row, then sew the seam on mid back (hat and neck warmer). The first stitch of each row is drawn in the chart, ie at the beg of puff sts start with 3 chains and end with 1 treble and at the beg of dc row, start with 1 chain and end with 1 dc in 3rd ch from previous row. (A.1 might have to be edited, but our design team is now on summer vacation - thanks in advance for your patience and comprehension). Happy crocheting!
20.07.2020 - 09:11