Comments / Questions (45)
![]() Dodo wrote:
Dodo wrote:
Hvis man begynder med 4 p retstrik, er næste p fra vrangsiden. Så hvorfor ikke rette til 5 p retstrik?
25.05.2025 - 09:26
![]() Melanie wrote:
Melanie wrote:
Hallo, ich stricke Größe M, und laut Anleitung sollen die drei Knopflöcher in Höhe 18, 26 und 34 cm eingearbeitet werden. Wie soll das letzte der drei Knopflöcher beim Auffassen der Maschen für die Halsblende eingearbeitet werden, wenn ich bereits alle drei Knopflöcher gestrickt habe? Vielen Dank im Voraus für eure Klärung!
22.01.2025 - 18:45DROPS Design answered:
Liebe Melanie, das letzte bzw 3. Knopfloch bearbeiten Sie bei der 1. Reihe von der Halsblende - siehe HALSBLENDE, wenn Sie schon das letzte Knopfloch gestrickt haben, dann sollen Sie eventuell noch 1 stricken, die Länge anpassen, oder wenn Ihr letztes Knopfloch zu hoch ist, vielleicht kein letztes bei der Halsblende arbeiten. Viel Spaß beim Stricken!
23.01.2025 - 10:11
![]() Helena wrote:
Helena wrote:
Dobrý den, byl by možný překlad do čj? Děkuji
09.01.2025 - 12:59DROPS Design answered:
Dobrý den, Heleno, děkujeme za Váš podnět. Překlad návodu je možný a v nejbližších dnech jej zveřejníme na našich stránkách. Hezký den!
09.01.2025 - 18:09
![]() Vieyra wrote:
Vieyra wrote:
I would like to knit a size between Medium and Large, can you please tell me how many stitches I should cast on and how many stitches should I use in all the pattern pieces, increases and decreases! Thanks
25.12.2024 - 22:10DROPS Design answered:
Dear Vieyra, we don't make custom patterns. To calculate a pattern you can follow the instructions in the following lessons: https://www.garnstudio.com/lesson.php?id=25&cid=19. You will need to use your calculated gauge. Then, to calculate the pattern, increases and decreases you need to do a rule of three. Happy knitting!
29.12.2024 - 21:04
![]() Vieyra wrote:
Vieyra wrote:
Hi. Can you please explain row 5 : A 3 , I end up with only 2 last stitches to knit instead of 3 Thks in advance
05.12.2024 - 11:59DROPS Design answered:
Dear Vieyra, you should work: band stitches, k3 (= A.1), *1 YO, slip 1 stitch as if to knit, k2tog and pass slipped stitch over, 1 YO* (* to * are worked over last stitch of A.1 and 1st stitch of A.2 in the previous row). k5 (the rest of A.2) and work from * to * once again (over last stitch of a repeat of A.2 and 1st stitch of the next repeat of A.2 of the previous row). In the last repeat, after * to *, k5 (to end the A.2 repeat) and work * to * (over last stitch of A.2 and 1st of A.3 in the previous row) and k3 (= A.3), then band stitches. The number of stitches remains the same (you aren't actually decreasing or increasing stitches) so the row should fit. Happy knitting!
08.12.2024 - 12:43
![]() Vieura wrote:
Vieura wrote:
Hi, Is it possible to eliminate the bottom design and do all the cardigan in knit stitch? Would this alter the pattern and need modifications? Thks in advance
05.12.2024 - 11:55DROPS Design answered:
Dear Vieura, you can work the whole cardigan in garter stitch. Since you didn't change the number of stitches when working the lace pattern then it shouldn't affect the garment's width. However, you may want to add a lower edge to the garment, so that it will look neatly and not roll upwards. For example, working a few more ridges instead of just 2. Happy knitting!
08.12.2024 - 13:00
![]() Vieyra wrote:
Vieyra wrote:
Hi is it possible to knit Jolina ( is 144) ( 200-23) with double strand of Kid Silk?\r\nWould this modify the gauge?\r\nHow should I proceed?\r\nThank you
25.11.2024 - 23:37DROPS Design answered:
Hi Vieyra, If you use 2 strands instead of the recommended 1 strand, you will double the thickness of the garment. This means you will get approx. half the rows/stitches on your 10 x 10 cm swatch and will need to adjust the pattern/needle size accordingly. Good luck!
26.11.2024 - 06:49
![]() Eva wrote:
Eva wrote:
Prosim, bylo by mozne prelozit tento navod do cj? Predem dekuji.
04.07.2024 - 09:20DROPS Design answered:
Dobrý den, Evo, ano, rádi jej přidáme - sledujte prosím dál naše stránky, během 1-2 dnů bude český návod k dispozici :-) Hezký den! Hana
04.07.2024 - 12:51
![]() Annie JAVOY wrote:
Annie JAVOY wrote:
Bonjour.pourriez vous me donner les instructions si je veux tricoter les manches en tubulaire avec les aiguilles circulaires pour qu il n y ai pas de coutures . Merci d avance
13.05.2024 - 16:06DROPS Design answered:
Bonjour Mme Javoy, pour un gilet sans coutures, vous pouvez consulter nos modèles de gilets ou vestes avec emmanchures raglan, empiècement arrondi, manches marteau ou même épaules européennes - retrouvez-les tous ici et choisissez le type d'empiècement et le type de construction, autrement dit, à tricoter de bas en haut ou de haut en bas, n'hésitez pas à ajouter des filtres si besoin. Bon tricot!
14.05.2024 - 07:27
![]() Annie JAVOY wrote:
Annie JAVOY wrote:
Bo jour j aimerai me tricoter ce beau gilet jolina . J ai acheté 6 pelotes kid s'il et un kit d aiguilles circulaires drops romance Je ne comprends pas pour les explications du modèle si la taille 3,5 corresponds à une taille us ou en taille mm Cordialement
08.05.2024 - 16:34DROPS Design answered:
Bonjour Mme Javoy, pour trouver votre taille, mesurez un vêtement similaire que vous avez et dont vous aimez la forme et comparez ces mesures à celles du schéma (indiquées en cm), retrouvez plus d'infos ici. Bon tricot!
10.05.2024 - 07:42
Jolina#jolinacardigan |
||||||||||||||||||||||
 |
 |
|||||||||||||||||||||
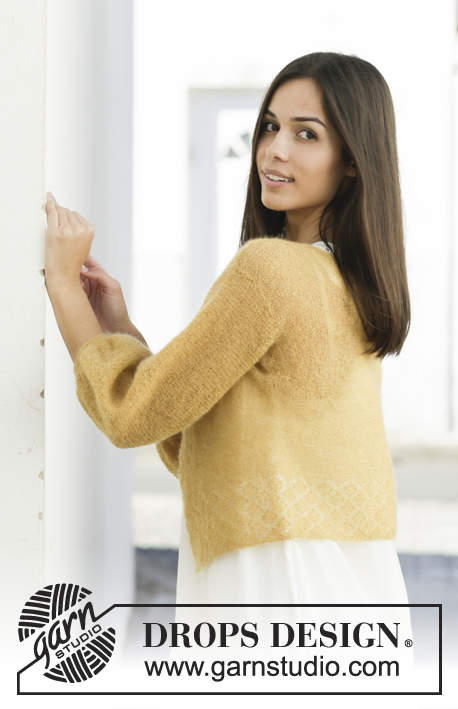
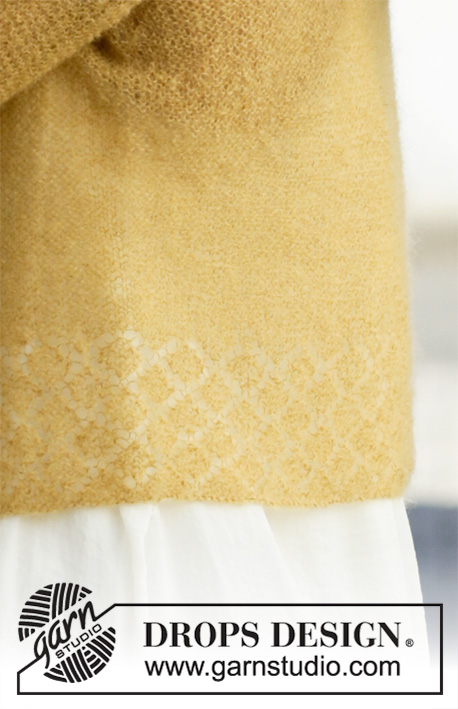
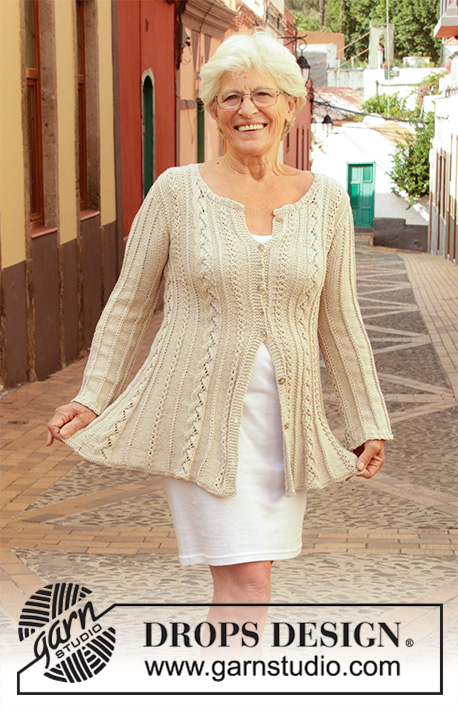
Knitted jacket in DROPS Kid-Silk. The piece is worked in garter stitch with lace pattern and ¾-length balloon sleeves. Sizes S - XXXL.
DROPS 200-23 |
||||||||||||||||||||||
|
------------------------------------------------------- EXPLANATIONS FOR THE PATTERN: ------------------------------------------------------- RIDGE/GARTER STITCH (worked back and forth): Knit all rows. 1 ridge in height = Knit 2 rows. PATTERN: See diagrams A.1 to A.3. The diagrams show all the rows in the pattern seen from the right side. INCREASE TIP: Increase 1 stitch on each side of the marker thread as follows: Work until there is 1 stitch left before the marker thread, make 1 yarn over, knit 2 (marker thread sits in between these 2 stitches), 1 yarn over (= 2 stitches increased at each marker thread and 4 stitches increased on row). On the next row knit the yarn overs twisted to avoid holes. DECREASE TIP (for sides of sleeves): All decreases are made from the right side! Decrease after the 1 edge stitch in garter stitch as follows: Knit 2 twisted together. Decrease before the 1 edge stitch in garter stitch as follows: Work until there are 2 stitches left before the edge stitch and knit 2 together. BUTTONHOLES: Work buttonholes from the right side on the right band (when the garment is worn). 1 BUTTONHOLE = Purl third and fourth stitch from the edge together and make 1 yarn over. On the next row (wrong side) purl the yarn over to leave a hole. Work buttonholes when the piece measures: S: 18, 25 and 32 cm M: 18, 26 and 34 cm L: 19, 27 and 35 cm XL: 19, 25, 31 and 37 cm XXL: 20, 26, 32 and 38 cm XXXL: 22, 28, 34 and 40 cm NOTE: The last of these 3-3-3-4-4-4 buttonholes is worked on the first row when knitting up stitches for the neck. ------------------------------------------------------- START THE PIECE HERE: ------------------------------------------------------- JACKET - SHORT OVERVIEW OF THE PIECE: The piece is worked back and forth with circular needle from mid front, bottom up as far as the armholes. Then cast off for armholes and the front and back pieces are continued separately back and forth on needle. The sleeves are worked back and forth with circular needle, bottom up. The garment is sewn together to finish. BODY: Cast on 179-195-219-243-267-299 stitches (including 5 band stitches on each side towards mid front) with circular needle size 3.5 mm and 2 strands Kid-Silk (this is done to avoid the cast-on edge being tight). Remove 1 strand and continue with just 1 strand Kid-Silk as follows: Work 2 RIDGES – read description above, but the outermost 5 stitches on each side are purled on all rows to finished length (= bands – when the bands are purled on each row they will be distinct from the rest of the garment). After the 2 ridges, work the next row from the right side as follows: 5 purled band stitches, work A.1 (= 4 stitches), work A.2 until there are 10 stitches left on row (= 20-22-25-28-31-35 repeats of 8 stitches), work A.3 (= 5 stitches) and finish with 5 purled band stitches. Continue this pattern until you have worked 3 repeats in height. REMEMBER THE KNITTING TENSION! The piece now measures approx. 9 cm from the cast-on edge. Insert 1 marker thread 47-51-57-63-69-77 stitches in from each side (= 85-93-105-117-129-145 stitches between marker threads on back piece). Allow the threads to follow your work onwards; they will be used when increasing in the sides. Work garter stitch back and forth over all stitches; the bands are purled on each row as before. When the piece measures 10 cm, increase 1 stitch on each side of both marker threads – read INCREASE TIP (= 4 stitches increased). Increase like this every 4-4-5-5-5-6 cm a total of 4 times on each side = 195-211-235-259-283-315 stitches. Remember BUTTONHOLES on right band – read description above! Continue working until the piece measures 26-27-28-29-30-31 cm. Now cast off for the armholes; i.e. the next row is worked as follows from the wrong side: Work 48-52-56-61-67-74 stitches as before (= left front piece), cast off 6-6-10-12-12-14 stitches for armhole (i.e. cast off 3-3-5-6-6-7 stitches on each side of the marker thread), knit 87-95-103-113-125-139 stitches (= back piece), cast off 6-6-10-12-12-14 stitches for armhole (e. cast off 3-3-5-6-6-7 stitches on each side of the marker thread) and work the remaining 48-52-56-61-67-74 stitches as before (= right front piece). Front and back pieces are continued separately. RIGHT FRONT PIECE (when garment is worn): = 48-52-56-61-67-74 stitches. Continue back and forth with garter stitch and 5 purled band stitches towards mid front. AT THE SAME TIME cast off for the armhole at the beginning of each row from the side as follows: Cast off 2 stitches 0-1-1-2-2-3 times and then 1 stitch 1-2-5-6-10-14 times = 47-48-49-51-53-54 stitches left on front piece. Continue working until the piece measures 32-34-35-37-38-40 cm. Now place the outermost 8-8-9-9-10-10 stitches towards mid front on 1 thread for neck, but to avoid having to cut the strand you are working with, work the stitches before putting them on the thread. Then cast off for the neck at the beginning of the each row from the neck as follows: Cast off 3 stitches 1 time, 2 stitches 4 times and 1 stitch 4 times = 24-25-25-27-28-29 stitches left on shoulder. Continue working until the piece measures 44-46-48-50-52-54 cm. Loosely cast off with knit from the right side and 2 strands Kid-Silk (this is done to avoid the cast-off edge being tight). LEFT FRONT PIECE (when garment is worn): = 48-52-56-61-67-74 stitches. Continue back and forth with garter stitch and 5 purled band stitches towards mid front. AT THE SAME TIME cast off for the armhole at the beginning of each row from the side as follows: Cast off 2 stitches 0-1-1-2-2-3 times and then 1 stitch 1-2-5-6-10-14 times = 47-48-49-51-53-54 stitches left on front piece. Continue working until the piece measures 32-34-35-37-38-40 cm. Now place the outermost 8-8-9-9-10-10 stitches towards mid front on 1 thread for neck, but to avoid having to cut the strand you are working with, work the stitches before putting them on the thread. Then cast off for the neck at the beginning of the each row from the neck as follows: Cast off 3 stitches 1 time, 2 stitches 4 times and 1 stitch 4 times = 24-25-25-27-28-29 stitches left on shoulder. Continue working until the piece measures 44-46-48-50-52-54 cm. Loosely cast off with knit from the right side and 2 strands Kid-Silk. BACK PIECE: = 87-95-103-113-125-139 stitches. Continue back and forth with garter stitch over all stitches. AT THE SAME TIME cast off for the armholes at the beginning of each row on each side as follows: Cast off 2 stitches 0-1-1-2-2-3 times and then 1 stitch 1-2-5-6-10-14 times = 85-87-89-93-97-99 stitches. Continue working until the piece measures 42-44-46-48-50-52 cm. Now cast off the middle 33-33-35-35-37-37 stitches for neck and each shoulder is finished separately. Continue back and forth with garter stitch and cast off 2 stitches on the next row from the neck = 24-25-25-27-28-29 stitches left. Continue working until the piece measures 44-46-48-50-52-54 cm. Loosely cast off with knit from the right side and 2 strands Kid-Silk. Work the other shoulder in the same way. SLEEVE: Cast on 56-58-60-62-64-66 stitches (including 1 edge stitch on each side) with circular needle size 3 mm and 2 strands Kid-Silk. Remove the one strand and continue with just 1 strand Kid-Silk as follows: Work 5 ridges back and forth over all stitches. On the next row increase 1 stitch in each stitch by knitting in both the front and back loops in all stitches on the row = 112-116-120-124-128-132 stitches. Change to circular needle size 3.5 mm and work garter stitch back and forth over all stitches. When the piece measures 5 cm, decrease 1 stitch on each side – read DECREASE TIP (= 2 stitches decreased). Decrease like this every 1½ cm a total of 18-17-16-15-14-14 times on each side = 76-82-88-94-100-104 stitches. Continue working until the piece measures 33-33-31-31-30-28 cm. Now cast off stitches on each side for sleeve cap at the beginning of each row on each side as follows: Cast off 3 stitches 1 time on each side, 2 stitches 3-3-5-6-6-6 times on each side and 1 stitch 3-4-6-7-9-16 times on each side. Then cast off 2 stitches on each side until the piece measures approx. 37-38-38-39-39-40 cm. Cast off 3 stitches 1 time on each side and then cast off the remaining stitches with knit from the right side and 2 strands Kid-Silk. The sleeve measures approx. 38-39-39-40-40-41 cm from the top down. Work the other sleeve in the same way. ASSEMBLY: Sew shoulder seams inside the cast-off edge. Sew sleeve seams inside the 1 edge stitch on each side. Sew in sleeves - sew in outermost loop of outermost stitch along the armhole. Sew buttons onto left band. NECK: Knit up from the right side approx. 114 to 130 stitches around the neck (including the stitches on the threads at front) with circular needle size 3 mm and 1 strand Kid-Silk remember to work the last buttonhole on the right band AT THE SAME TIME. Knit 1 row from the wrong side, knit 1 row from the right side, knit 1 row from the wrong side, knit 1 row from the right side and knit 1 row from the wrong side. Loosely cast off with knit from the right side and 2 strands Kid-Silk. |
||||||||||||||||||||||
Diagram explanations |
||||||||||||||||||||||
|
||||||||||||||||||||||

|
||||||||||||||||||||||

|
||||||||||||||||||||||
Have you finished this pattern?Tag your pictures with #dropspattern #jolinacardigan or submit them to the #dropsfan gallery. Do you need help with this pattern?You'll find 27 tutorial videos, a Comments/Questions area and more by visiting the pattern on garnstudio.com. © 1982-2025 DROPS Design A/S. We reserve all rights. This document, including all its sub-sections, has copyrights. Read more about what you can do with our patterns at the bottom of each pattern on our site. |
||||||||||||||||||||||








Post a comment to pattern DROPS 200-23
We would love to hear what you have to say about this pattern!
If you want to leave a question, please make sure you select the correct category in the form below, to speed up the answering process. Required fields are marked *.