
Popular categories
Looking for a yarn?


Comments / Questions (18)
![]() Birgitta Kronvall wrote:
Birgitta Kronvall wrote:
Hur gör jag på det 5-e varvet?PÅ den mittersta mönsterdelen? där går ju maskorna utanför mönstret. Börjar med1 omslag lyft 1m, sticka 2tills,drag den lyfta över de hopstickade maskerna,1omslag.Jag får inte det att stämma med mönstret. ,
15.05.2025 - 19:08DROPS Design answered:
Hej Birgitta, jo, da du strikker rundt, så starter du A.1 med 3m, 1 omslag, lyft 1 m(sista i A.1), 2 tills, drag den lyfta, 1 omslag, 5 m, 1oms, lyft 1 osv.... :)
21.05.2025 - 07:40
![]() Isabel wrote:
Isabel wrote:
Bonjour, je suis arrivée au niveau du rabattage pour les manches. Doit on le faire à chaque rang ou tout les 2 rangs svp sout uniquement sur l'endroit ?( 1*4m/ 1*2m et 2*2m pour la taille M). Merci beaucoup pour votre aide
14.03.2025 - 07:44DROPS Design answered:
Bonjour Isabel, pour que l'arrondi de la manche soit symétrique, on doit rabattre le même nombre de mailles de chaque côté, autrement dit aussi bien en début de rang sur l'endroit qu'en début de rang sur l'envers. Ainsi, si vus devez rabattre 1 x 3 m de chaque côté, rabattez les 3 premières mailles au début des 2 rangs suivants; puis pour 3 x 2 m de chaque côté, rabattez 2 mailles au début des 6 rangs suivants (soit 3 fois sur l'endroit et 3 fois sur l'envers), et ainsi de suite. Bon tricot!
14.03.2025 - 08:01
![]() Petra wrote:
Petra wrote:
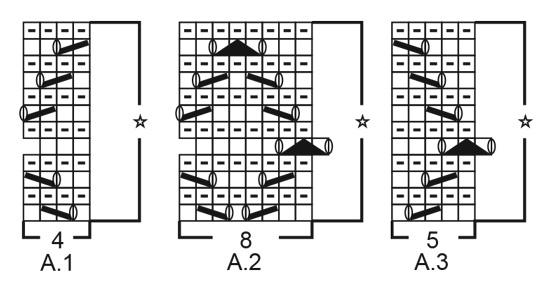
Ist es möglich, dass bei den Diagrammen A1 und A3 vertauscht sind? So umschließen A1 und A3 das Muster A2. Andersherum würde das Muszer A2 fortgesetzt werden.
13.04.2022 - 20:59DROPS Design answered:
Liebe Petra, nein, die Diagramme wurden nicht vertauscht. A.1 und A.3 sind nicht in der Reihenfolge dargestellt, wie sie dann auch gestrickt werden. Das Muster wird folgerichtig fortgesetzt, wenn Sie A.1 und A.3 wie in der Anleitung beschrieben stricken (also A.1 1 x, A.2 wiederholen, A.3 1 x). Viel Spaß beim Stricken!
14.04.2022 - 13:04
![]() Vera B wrote:
Vera B wrote:
Hello, I would like to know if this pattern can be knitted in the round and if so, how should I go about doing so ? Would it be too complicated ?
15.03.2022 - 00:46DROPS Design answered:
Dear Vera B, you can work the body of the jumper in the round but you will have then to divide piece in 2 different parts to finish front and back piece separately. You can work sleeves in the round to the sleeve cap that should be worked in rows. When working in the round instead, remove the edge stitches (seam allowance), and adjust the first cast off (remembering there are 2 sts less). Happy knitting!
15.03.2022 - 09:57
![]() Minna wrote:
Minna wrote:
Der står til bagstykke at efter udtagninger er der 103m der efter tages ind på hver side Luk 3-4-6-6-7-7 masker af 1 gang i hver side, hvordan kan det bliver til 87m_
01.01.2022 - 16:26DROPS Design answered:
Hej Minna. Det står: Luk 4 masker af 1 gang i hver side, 2 masker 1 gange i hver side og derefter 1 maske 2 gange i hver side = 87 masker (storlek M). 103-(4x2)-(2x2)-(1x2)-(1x2)= 87 m. Mvh DROPS Design
03.01.2022 - 13:42
![]() Katarina Andresen Pehrsson wrote:
Katarina Andresen Pehrsson wrote:
Om man delar på nystanet i 2 trådar, är det då meningen att använda den avklippta tråden till fortsatt stickning av tröjan
29.08.2020 - 12:05DROPS Design answered:
Hej Katarina, du skal ikke dele tråden, du skal lägge upp med 2 tråde (dobbelt tråd/2 nystan) så kanten bliver lidt kraftigere. Du strikker resten af trøjen med 1 tråd (1 nystan). God fornøjelse!
01.09.2020 - 15:48
![]() Ola wrote:
Ola wrote:
Dzień dobry, czy dałoby się zrobić ten sweterek na okrągło, z góry na dół?
05.05.2020 - 10:33DROPS Design answered:
Witaj Olu. Będzie trudno, za dużo modyfikacji. Gdyby karczek był robiony na okrągło to byłoby to możliwe. Jest cudowny, rób zgodnie ze wzorem i koniecznie zamieść na naszej facebookowej grupie DROPS Workshop. Pozdrawiamy!
05.05.2020 - 11:16
![]() Anna wrote:
Anna wrote:
Hello. As cannot decide between the size S or M, would you advise to make the front panel in size M and the back panel in size S?
22.04.2020 - 17:15DROPS Design answered:
Dear Anna, when in doubt, always go for the bigger size. You could make each panel of a different size, however you'd need to make some adjustments. Happy knitting!
22.04.2020 - 20:13
![]() Karoline wrote:
Karoline wrote:
Hei, Jeg strikker genseren nå, str. M. Har kommet til ermene og strikket 8 cm på dem. Ermene virker altfor store og når jeg tar dem rundt armen ser det ut som om jeg bare trenger halvparten- en tredjedel av lengden. Rundt ermet (helt nede) er ca 35 cm. Er det feil i oppskriften? Eller har dere tips til hvordan ermet kan stikkes for å ikke bli altfor stort?
20.04.2020 - 21:31DROPS Design answered:
Hej Karoline, Denne bluse har ballongermer, det er derfor de er så store :) du kan finde en anden genser i DROPS Kid-Silk som har de ermer du synes bedst om :)
22.04.2020 - 11:25
![]() Inger Valberg wrote:
Inger Valberg wrote:
Hei, jeg vil forlenge bolen og armene med 5 cm. Hvor mange ekstra nøster trenger jeg i strl XL eller L?
28.11.2019 - 18:29DROPS Design answered:
Hei Inger! Å regne ut garnmengden ved forlengelse er et regnestykke jeg desverre ikke er helt sikker på, men jeg vil tro at du trenger minst 1 nøste ekstra. både for L og XL. Lykke til!
29.11.2019 - 11:27
|
||||||||||||||||||||||
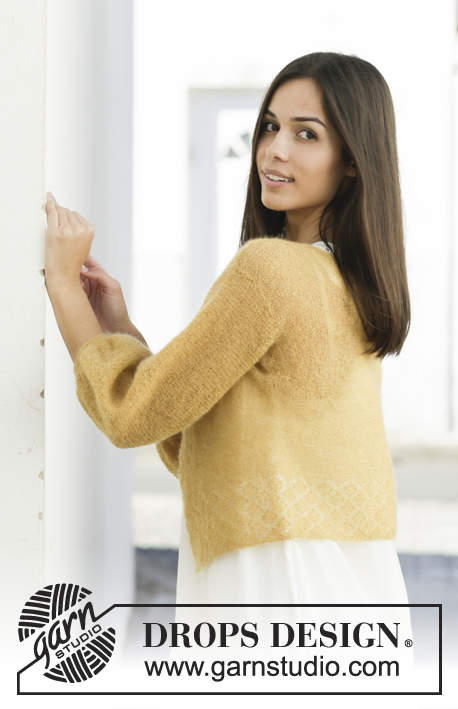
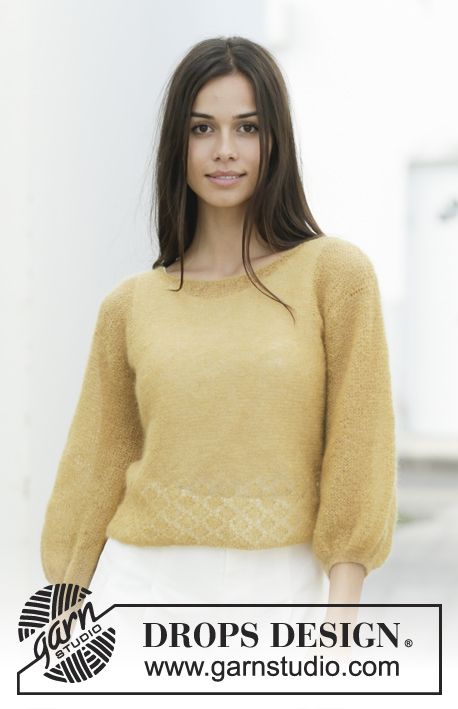
Jolina Top#jolinatopsweater |
||||||||||||||||||||||
 |
 |
|||||||||||||||||||||
Knitted jumper in DROPS Kid-Silk. The piece is worked with garter stitch, lace pattern and ¾-length balloon sleeves. Sizes S - XXXL.
DROPS 200-22 |
||||||||||||||||||||||
|
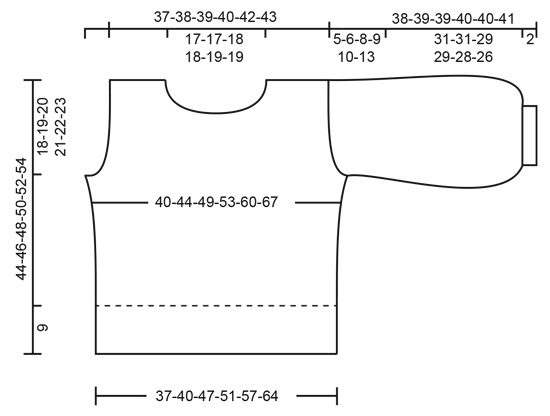
------------------------------------------------------- EXPLANATIONS FOR THE PATTERN: ------------------------------------------------------- RIDGE/GARTER STITCH (worked back and forth): Knit all rows. 1 ridge in height = Knit 2 rows. PATTERN: See diagrams A.1 to A.3. The diagrams show all rows in pattern seen from the right side. INCREASE TIP: Increase 1 stitch on the inside of 2 edge stitches in garter stitch by making 1 yarn over. On the next row knit yarn over twisted to avoid a hole. DECREASE TIP (for sides of sleeves): All decreases are made from the right side! Decrease after the 1 edge stitch in garter stitch as follows: Knit 2 twisted together. Decrease before the 1 edge stitch in garter stitch as follows: Work until there are 2 stitches left before the edge stitch and knit 2 together. ------------------------------------------------------- START THE PIECE HERE: ------------------------------------------------------- JUMPER - SHORT OVERVIEW OF THE PIECE: The piece is worked back and forth with circular needle in sections, bottom up. The garment is sewn together and then the neck is worked. BACK PIECE: Cast on 87-95-109-119-133-149 stitches (including 1 edge stitch on each side) with circular needle size 3.5 mm and 2 strands Kid Silk (this is done to avoid the cast-on edge being tight). Remove the one strand and continue working with just 1 strand Kid Silk as follows: Work 2 RIDGES back and forth over all stitches – read description above. Then work the next row as follows from the right side: Work 3-3-2-3-2-2 stitches in garter stitch, A.1 (= 4 stitches), A.2 until there are 8-8-7-8-7-7 stitches left on row (= 9-10-12-13-15-17 repeats of 8 stitches), work A.3 (= 5 stitches) and finish with 3-3-2-3-2-2 stitches in garter stitch. Continue this pattern until you have worked a total of 3 repeats in height. REMEMBER THE KNITTING TENSION! The piece now measures approx. 9 cm from the cast-on edge. Continue with garter stitch back and forth over all stitches. When the piece measures 10 cm from the cast-on edge increase 1 stitch on each side – read INCREASE TIP (= 2 stitches increased). Increase like this every 4-4-6-6-8-8 cm a total of 4-4-3-3-3-3 times on each side = 95-103-115-125-139-155 stitches. When the piece measures 26-27-28-29-30-31 cm, cast off stitches on each side for armholes at the beginning of each row as follows: Cast off 3-4-6-6-7-7 stitches 1 time on each side, 2 stitches 0-1-1-2-2-3 times on each side and then 1 stitch 2-2-5-6-10-15 times on each side = 85-87-89-93-97-99 stitches left on needle. Continue working until the piece measures 42-44-46-48-50-52 cm. Now cast off the middle 35-35-37-37-39-39 stitches for neck and each shoulder is finished separately. Continue back and forth with garter stitch and cast off 2 stitches on next row from the neck = 23-24-24-26-27-28 stitches left on shoulder. Continue working until the piece measures 44-46-48-50-52-54 cm. Loosely cast off with knit from the right side and 2 strands Kid-Silk. Work the other shoulder in the same way. FRONT PIECE: Cast on 87-95-109-119-133-149 stitches (including 1 edge stitch on each side) with circular needle size 3.5 mm and 2 strands Kid Silk. Remove the one strand and continue working with just 1 strand Kid Silk as follows: Work 2 ridges back and forth over all stitches Then work the next row as follows from the right side: Work 3-3-2-3-2-2 stitches in garter stitch, A.1 (= 4 stitches), A.2 until there are 8-8-7-8-7-7 stitches left on row (= 9-10-12-13-15-17 repeats of 8 stitches), work A.3 (= 5 stitches) and finish with 3-3-2-3-2-2 stitches in garter stitch. Continue this pattern until you have worked a total of 3 repeats in height. The piece now measures approx. 9 cm from the cast-on edge. Continue with garter stitch back and forth over all stitches. When the piece measures 10 cm from the cast-on edge increase 1 stitch on each side – read INCREASE TIP (= 2 stitches increased). Increase like this every 4-4-6-6-8-8 cm a total of 4-4-3-3-3-3 times on each side = 95-103-115-125-139-155 stitches. When the piece measures 26-27-28-29-30-31 cm cast off stitches on each side for armholes at the beginning of each row as follows: Cast off 3-4-6-6-7-7 stitches 1 time on each side, 2 stitches 0-1-1-2-2-3 times on each side and then 1 stitch 2-2-5-6-10-15 times on each side = 85-87-89-93-97-99 stitches left on needle. Continue working until the piece measures 36-38-40-42-44-46 cm. Now place the middle 15-15-17-17-19-19 stitches on 1 thread for neck and each shoulder is finished separately. Continue back and forth with garter stitch and cast off at the beginning of each row from the neck as follows: Cast off 3 stitches 1 time, 2 stitches 3 times and 1 stitch 3 times = 23-24-24-26-27-28 stitches left on shoulder. Continue working until the piece measures 44-46-48-50-52-54 cm. Loosely cast off with knit from the right side and 2 strands Kid-Silk. Work the other shoulder in the same way. SLEEVE: Cast on 56-58-60-62-64-66 stitches (including 1 edge stitch on each side) with circular needle size 3 mm and 2 strands Kid-Silk. Remove the one strand and continue with just 1 strand Kid-Silk as follows: Work 5 ridges back and forth over all stitches. On the next row increase 1 stitch in each stitch by knitting in both the front and back loops in all stitches on the row = 112-116-120-124-128-132 stitches. Change to circular needle size 3.5 mm and work garter stitch back and forth over all stitches. When the piece measures 5 cm, decrease 1 stitch on each side – read DECREASE TIP (= 2 stitches decreased). Decrease like this every 1½ cm a total of 18-17-16-15-14-14 times on each side = 76-82-88-94-100-104 stitches. Continue working until the piece measures 33-33-31-31-30-28 cm. Now cast off stitches on each side for sleeve cap at the beginning of each row as follows: Cast off 3 stitches 1 time on each side, 2 stitches 3-3-5-6-6-6 times on each side and 1 stitch 3-4-6-7-9-16 times on each side. Then cast off 2 stitches on each side until the piece measures approx. 37-38-38-39-39-40 cm. Cast off 3 stitches 1 time on each side and then cast off the remaining stitches with knit from the right side and 2 strands Kid-Silk. The sleeve measures approx. 38-39-39-40-40-41 cm from the top down. Work the other sleeve in the same way. ASSEMBLY: Sew shoulder seams inside the cast-off edge. Sew side seams inside the 1 edge stitch on each side. Sew sleeve seams inside the 1 edge stitch on each side. Sew in sleeves - sew in outermost loop of outermost stitch along the armholes. NECK: Knit up from the right side approx. 104 to 116 stitches around the neck (including stitches from the thread in front) with short circular needle size 3 mm and 1 strand Kid-Silk. Purl 1 round, knit 1 round, purl 1 round, knit 1 round and purl 1 round. Then loosely cast off with knit and 2 strands Kid-Silk. |
||||||||||||||||||||||
Diagram explanations |
||||||||||||||||||||||
|
||||||||||||||||||||||
|
||||||||||||||||||||||
|
||||||||||||||||||||||
Have you finished this pattern?Tag your pictures with #dropspattern #jolinatopsweater or submit them to the #dropsfan gallery. Do you need help with this pattern?You'll find 27 tutorial videos, a Comments/Questions area and more by visiting the pattern on garnstudio.com. © 1982-2025 DROPS Design A/S. We reserve all rights. This document, including all its sub-sections, has copyrights. Read more about what you can do with our patterns at the bottom of each pattern on our site. |
||||||||||||||||||||||


With over 40 years in knitting and crochet design, DROPS Design offers one of the most extensive collections of free patterns on the internet - translated to 17 languages. As of today we count 314 catalogues and 11822 patterns translated into English (UK/cm).
We work hard to bring you the best knitting and crochet have to offer, inspiration and advice as well as great quality yarns at incredible prices! Would you like to use our patterns for other than personal use? You can read what you are allowed to do in the Copyright text at the bottom of all our patterns. Happy crafting!
Post a comment to pattern DROPS 200-22
We would love to hear what you have to say about this pattern!
If you want to leave a question, please make sure you select the correct category in the form below, to speed up the answering process. Required fields are marked *.