DROPS Baby Merino
DROPS Baby Merino
100% Wool
from 3.50 £ /50g
Get the yarn to make this pattern from 28.00£.

The yarn cost is calculated from the pattern’s smallest size and the yarn’s cheapest product type. Looking for an even better price? You might find it on the DROPS Deals!

DROPS SS24

Dalvik

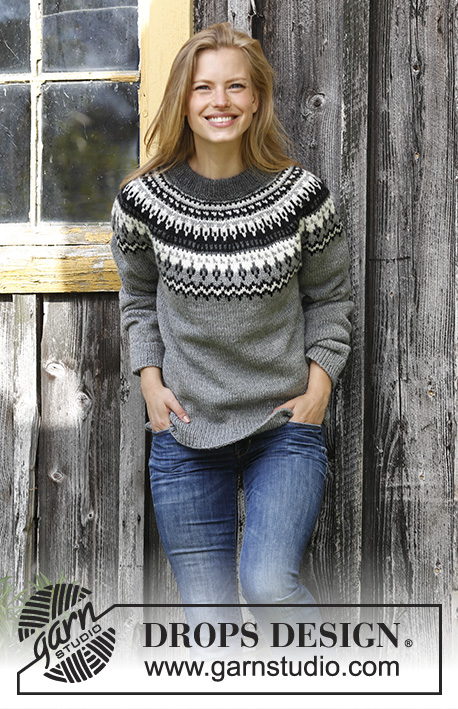
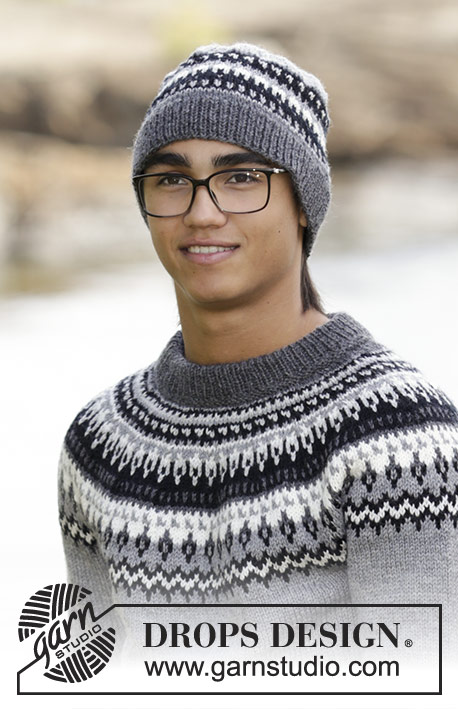
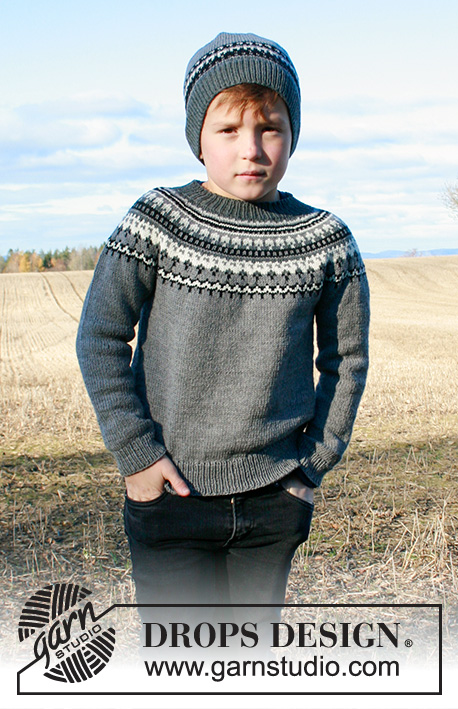
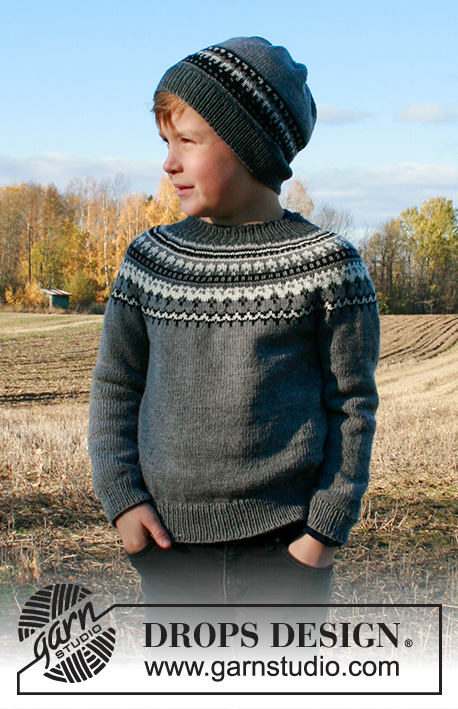
Knitted jumper for children in DROPS BabyMerino. The piece is worked top down with round yoke and Nordic pattern. Sizes 2-12 years. Knitted hat for children in DROPS BabyMerino with Nordic pattern.

DROPS Children 34-18
DROPS Design: Pattern no bm-017-bn
Yarn group A
-------------------------------------------------------

WHOLE SET:

SIZES:
2 - 3/4 - 5/6 - 7/8 - 9/10 - 11/12 years
Sizes equivalent to height of child in cm:
92 - 98/104 - 110/116 - 122/128 - 134/140 - 146/152

MATERIALS:
DROPS BABYMERINO from Garnstudio (belongs to yarn group A)
200-200-200-250-250-300 g colour 19, grey
50-50-50-50-50-50 g colour 02, off white
50-50-50-50-50-50 g colour 20, dark grey
50-50-50-50-50-50 g colour 21, black
50-50-50-50-50-50 g colour 22, light grey

JUMPER:

SIZES:
2 - 3/4 - 5/6 - 7/8 - 9/10 - 11/12 years
Sizes equivalent to height of child in cm:
92 - 98/104 - 110/116 - 122/128 - 134/140 - 146/152

MATERIALS:
DROPS BABYMERINO from Garnstudio (belongs to yarn group A)
150-200-200-200-250-300 g colour 19, grey
50-50-50-50-50-50 g colour 02, off white
50-50-50-50-50-50 g colour 20, dark grey
50-50-50-50-50-50 g colour 21, black
50-50-50-50-50-50 g colour 22, light grey

KNITTING TENSION:
24 stitches in width and 32 rows in height with stocking stitch and Nordic pattern = 10 x 10 cm.

NEEDLES:
DROPS DOUBLE POINTED NEEDLES SIZE 3 MM.
DROPS CIRCULAR NEEDLE SIZE 3 MM: length 40 cm and 60 cm for stocking stitch and Nordic pattern.
DROPS DOUBLE POINTED NEEDLES SIZE 2.5 MM.
DROPS CIRCULAR NEEDLE SIZE 2.5 MM: length 40 cm and 60 cm for rib.
Needle size is only a guide. If you get too many stitches on 10 cm, change to a larger needle size. If you get too few stitches on 10 cm, change to a smaller needle size.

HAT:

SIZES:
2/4 - 5/8 - 9/12 years
Fits head size: approx. 48/52 – 52/54 – 54/56 cm

MATERIALS:
DROPS BABYMERINO from Garnstudio (belongs to yarn group A)
50-50-50-50-50-50 g colour 19, grey
50-50-50-50-50-50 g colour 02, off white
50-50-50-50-50-50 g colour 20, dark grey
50-50-50-50-50-50 g colour 21, black
50-50-50-50-50-50 g colour 22, light grey

KNITTING TENSION:
24 stitches in width and 32 rows in height with stocking stitch and Nordic pattern = 10 x 10 cm.

NEEDLES:
DROPS DOUBLE POINTED NEEDLES SIZE 3 MM.
DROPS CIRCULAR NEEDLE SIZE 3 MM: length 40 cm for stocking stitch and Nordic pattern.
DROPS CIRCULAR NEEDLE SIZE 2.5 MM: length 40 cm for rib.
Needle size is only a guide. If you get too many stitches on 10 cm, change to a larger needle size. If you get too few stitches on 10 cm, change to a smaller needle size.

-------------------------------------------------------

-------------------------------------------------------

Alternative Yarn – See how to change yarns here
Yarn Groups A to F – Use the same pattern and change the yarn here
Yarn usage using an alternative yarn – Use our yarn converter here

-------------------------------------------------------

DROPS Baby Merino
DROPS Baby Merino
100% Wool
from 3.50 £ /50g
Get the yarn to make this pattern from 28.00£.

The yarn cost is calculated from the pattern’s smallest size and the yarn’s cheapest product type. Looking for an even better price? You might find it on the DROPS Deals!

Pattern instructions

NOTE: This pattern is written in British English. All measurements in charts are in cm. For conversion from cm to inches - click here. There are different terms for crocheting in British and American English. If this pattern includes crochet, click for "crochet terms" here. For this pattern in American English, please click here.
-------------------------------------------------------

EXPLANATIONS FOR THE PATTERN:

-------------------------------------------------------

INCREASE/DECREASE TIP (evenly spaced):
To work out how to increase/decrease evenly, count the total number of stitches on needle (e.g. 88 stitches) and divide by the number of increases/decreases to be made (e.g. 27) = 3.2. In this example, increase by making 1 yarn over after approx. each 3rd stitch. On the next row knit the yarn overs twisted to avoid holes.
When decreasing, knit together approx. each 2nd and 3rd stitch.

ELEVATION (back of neck):
To make the jumper slightly higher at the back of the neck when working the yoke, work an elevation as described here. Skip this section if you do not want an elevation.
Start from the right side, mid back and work with dark grey as follows: Knit 15-15-16-16-17-17 stitches, turn, tighten strand and purl 30-30-32-32-34-34 stitches back. Turn, tighten strand and knit 45-45-48-48-51-51 stitches, turn, tighten strand and purl 60-60-64-64-68-68 stitches back. Turn, tighten strand and knit 75-75-80-80-85-85 stitches, turn, tighten strand and purl 90-90-96-96-102-102 stitches, turn and knit to mid back. Then work YOKE as described in the text.

PATTERN:
Jumper: See diagrams A.1 and A.2. Choose diagram for your size (A.2 applies only to sizes 2 years – this repeat is worked on the yoke in the other sizes).
Hat: See diagram A.3.
The whole pattern is worked in stocking stitch.

DECREASE TIP (for mid under sleeves):
Decrease 1 stitch on each side of the marker thread as follows: Work until there are 3 stitches left before the marker thread, slip 1 stitch as if to knit, knit 1 and pass the slipped stitch over the knitted stitch, knit 2 (marker thread sits between these 2 stitches), knit 2 together (= 2 stitches decreased).

CASTING-OFF TIP:
To avoid the cast-off edge being tight you can cast off with a larger needle size; or you can make 1 yarn over after approx. each 8th stitch at the same time as casting off (yarn overs cast off as normal stitches).

-------------------------------------------------------

START THE PIECE HERE:

-------------------------------------------------------

JUMPER - SHORT OVERVIEW OF THE PIECE:
Neck and yoke are worked in the round with circular needle, top down. The yoke is divided for body and sleeves and the body is continued in the round with circular needle. Sleeves are worked in the round with double pointed needles, top down.

NECK:
Cast on 88-90-92-94-96-98 stitches with short circular needle size 2.5 mm and dark grey. Knit 1 round and then work rib in the round (= knit 1 / purl 1) for 3 cm. Knit 1 round where you increase 27-30-33-31-34-37 stitches evenly spaced – read INCREASE/DECREASE TIP = 115-120-125-125-130-135 stitches. Knit 1 round. Insert 1 marker at the beginning of the round = mid back. Now you can work an ELEVATION in the back of the neck – read description above. If you do not want an elevation, go straight to yoke.

YOKE:
Change to circular needle size 3 mm and work A.1 in the round (= 23-24-25-25-26-27 repeats of 5 stitches). Continue this pattern and increase as shown in the diagram. REMEMBER THE KNITTING TENSION!
On the round before the one marked with an arrow in A.1, there are 230-240-250-250-260-270 stitches on the needle.
On the round marked with an arrow in A.1, increase 10-20-22-30-36-38 stitches evenly spaced = 240-260-272-280-296-308 stitches.
When A.1 has been completed the piece measures approx. 14-16-16-16-16-16 cm from the cast-on edge mid front.
Continue in the round with stocking stitch and grey until the piece measures 14-16-16-17-18-19 cm from the cast-on edge mid front.
Now, on the next round, divide the yoke for body and sleeves as follows: Work 35-38-40-42-44-46 stitches in stocking stitch with grey (= ½ back piece), place the next 50-54-56-56-60-62 stitches on 1 thread for sleeve, cast on 6-6-6-8-8-8 new stitches on the needle (= in side under sleeve), work 70-76-80-84-88-92 stitches in stocking stitch with grey (= front piece), place the next 50-54-56-56-60-62 stitches on 1 thread for sleeve, cast on 6-6-6-8-8-8 new stitches on the needle (= in side under sleeve) and work the remaining 35-38-40-42-44-46 stitches in stocking stitch with grey (= ½ back piece). Cut the strand. Body and sleeves are continued separately. THE PIECE IS NOW MEASURED FROM HERE!

BODY:
= 152-164-172-184-192-200 stitches. Insert 1 marker in the middle of the 6-6-6-8-8-8 stitches under the one sleeve. Start the round at this marker and work A.2 in the round (applies only to sizes 2 years– this repeat was worked on the yoke in the other sizes).
When A.2 has been completed continue with stocking stitch and grey (all sizes).
Work with grey until the piece measures 15-17-21-24-27-30 cm from the division (or to desired length; there is approx. 5 cm left to finished length).
Change to circular needle size 2.5 mm and work rib in the round (= knit 1/ purl 1) for 5 cm. Loosely cast off with knit over knit and purl over purl – read CASTING-OFF TIP! The jumper measures approx. 36-40-44-48-52-56 cm from the shoulder down.

SLEEVE:
Place the 50-54-56-56-60-62 stitches from the thread on the one side of the piece on double pointed needles size 3 mm and knit up 1 stitch in each of the 6-6-6-8-8-8 stitches cast on under sleeve = 56-60-62-64-68-70 stitches. Insert 1 marker thread in the middle of the 6-6-6-8-8-8 stitches under the sleeve; allow it to follow your work onwards - it will be used when decreasing mid under sleeve.
Start the round at the marker thread and work A.2 in the round (applies only to sizes 2 years – this repeat was worked on the yoke in the other sizes).
When A.2 has been completed continue with stocking stitch and grey (all sizes).
AT THE SAME TIME when the piece measures 2 cm from the division, decrease 2 stitches mid under sleeve – read DECREASE TIP. Decrease like this every 3-3-3½-4-4-4½ cm a total of 6-7-7-7-8-8 times = 44-46-48-50-52-54 stitches.
Continue with grey until the piece measures 18-21-26-29-33-37 cm from the division (or to desired length; there is approx. 5 cm left to finished length).
Change to double pointed needles size 2.5 mm and work rib in the round (knit 1/ purl 1) for 5 cm. Loosely cast off with knit over knit and purl over purl – read CASTING-OFF TIP! The sleeve measures approx. 23-26-31-34-38-42 cm from the division. Work the other sleeve in the same way.

-------------------------------------------------------

HAT - SHORT OVERVIEW OF THE PIECE:
The piece is worked in the round with short circular needle, bottom up. Change to double pointed needles when necessary.

HAT:
Cast on 138-144-150 stitches with short circular needle size 2.5 mm and dark grey. Work rib in the round (= knit 1/ purl 1) for 4 cm. Knit 1 round where you decrease 26-28-30 stitches evenly spaced – read INCREASE/DECREASE TIP = 112-116-120 stitches.
Change to short circular needle size 3 mm and work A.3 in the round (= 28-29-30 repeats of 4 stitches). REMEMBER THE KNITTING TENSION!
On the round marked with an arrow in A.3 decrease 1-2-0 stitches evenly spaced = 111-114-120 stitches. Continue the pattern (there is now room for 37-38-40 repeats of 3 stitches). When A.3 has been completed the piece measures approx. 11 cm from the cast-on edge.
Continue with stocking stitch and grey. When the piece measures 13-15-17 cm from the cast-on edge, knit 1 round where you decrease 1-4-0 stitches evenly spaced = 110-110-120 stitches. Now insert 10 markers in the piece with 11-11-12 stitches between each one. On the next round decrease 1 stitch after each marker by knitting 2 stitches together (= 10 stitches decreased). Decrease like this every 2nd round a total of 9 times in all sizes (change to double pointed needles when necessary) = 20-20-30 stitches left. On the next round knit all stitches together 2 and 2 = 10-10-15 stitches left. Work 1 more round where all stitches are knitted together 2 and 2 = 5-5-8 stitches left.
Cut the strand, pull it through the remaining stitches, tighten and fasten well. The hat measures approx. 19-21-23 cm from the top down.

This pattern has been corrected.

Updated online: 25.09.2019
Correction: Elevation.... Turn, tighten strand and knit 75-75-80-80-85-85 stitches, turn, tighten strand and purl 90-90-96-96-102-102 stitches, turn and knit to mid back. Then work YOKE as described in the text.

Diagram

symbols = dark grey
symbols = light grey
symbols = grey
symbols = black
symbols = off white
symbols = between 2 stitches make 1 yarn over with background colour in pattern; on the next round knit the yarn over twisted to avoid a hole
symbols = increase/decrease round
diagram
diagram

Each of our patterns has specific tutorial videos to help you.

Do you have a question? See a list of frequently asked questions (FAQ)

Knitting tension is what determines the final measurements of your work, and is usually measured per 10 x 10 cm. It is provided like so: number of stitches in width x number of rows in height - eg: 19 stitches x 26 rows = 10 x 10 cm.

The knitting tension is very individual; some people knit/crochet loosely while others work tightly. You adjust the knitting tension with the needle size, which is why the suggested needle size is only meant as a guide! You need to adjust this (up or down) to ensure that YOUR knitting tension matches the knitting tension provided in the pattern. If you work with a different knitting tension than provided you will have a different yarn consumption, and your work will have different measurements than what the pattern suggests.

The knitting tension also determines which yarns can replace each other. As long as you achieve the same knitting tension you can replace one yarn with another.

See DROPS lesson: How to measure your tension/gauge

See DROPS video: How to make a gauge tension swatch

The required amount of yarn is provided in grams, eg: 450 g. To calculate how many balls you’ll need you first need to know how many grams are in 1 ball (25g, 50g or 100g). This information is available if you click on the individual yarn quality on our pages. Divide the amount required with the amount of each ball. For example, if each ball is 50g (the most common amount), the calculation will be as follows: 450 / 50 = 9 balls.

The important thing when changing from one yarn to another is that the knitting/crochet tension remains the same. This is so that the measurements of the finished piece will be the same as on the sketch provided. It is easier to achieve the same knitting tension using yarns from the same yarn group. It is also possible to work with multiple strands of a thinner yarn to achieve the knitting tension of a thicker one. Please try our yarn converter. We recommend you to always work a test swatch.

Please NOTE: when changing yarn the garment might have a different look and feel to the garment in the photo, due to individual properties and qualities of each yarn.

See DROPS lesson: Can I use a different yarn than the one mentioned in the pattern?

All our yarns are categorised into yarn groups (from A to F) according to thickness and knitting tension – group A contains the thinnest yarns and group F the thickest. This makes it easier for you to find alternative yarns to our patterns, should you wish to switch yarn. All yarns within the same group have a similar knitting tension and can easily replace each other. However, different yarn qualities have different structures and properties which will give the finished work a unique look and feel.

Click here for an overview of the yarns in each yarn group

At the top of all our patterns you’ll find a link to our yarn calculator, which is a helpful tool should you wish to use a different yarn than suggested. By filling in the yarn quality you wish to replace, the amount (in your size) and number of strands, the calculator will present good alternative yarns with the same knitting tension. Additionally it will tell you how much you’ll require in the new qualities and whether you’ll need to work with multiple strands. Most skeins are 50g (some are 25g or 100g).

If the pattern is worked with multiple colours, every colour will have to be calculated separately. Similarly, if the pattern is worked with several strands of different yarns (for example 1 strand Alpaca and 1 strand Kid-Silk) you will have to find alternatives for each, individually.

Click here to see our yarn calculator

Since different yarns have different qualities and textures we have chosen to keep the original yarn in our patterns. However, you can easily find options among our available qualities by using our yarn calculator, or simply pick a yarn from the same yarn group.

It is possible that some retailers still have discontinued yarns in stock, or that someone has a few skeins at home that they would like to find patterns for.

The yarn calculator will provide both alternative yarn as well as required amount in the new quality.

If you think it's hard to decide what size to make, it can be a good idea to measure a garment you own already and like the size of. Then you can pick the size by comparing those measures with the ones available in the pattern's size chart.

You'll find the size chart at the bottom of the pattern.

See DROPS lesson: How to read size chart

The needle size provided in the pattern serves only as a guide, the important thing is to follow the knitting tension. And since knitting tension is very individual, you will have to adjust the needle size to ensure that YOUR tension is the same as in the pattern – maybe you’ll have to adjust 1, or even 2 needle sizes, up or down to achieve the correct tension. For this, we recommend that you work test swatches.

Should you work with a different knitting tension than the one provided, the measurements of the finished garment might deviate from the measurement sketch.

See DROPS lesson: How to measure your tension/gauge

See DROPS video: How to make a tension/gauge swatch

Working a garment top-down provides more flexibility and room for personal adjustment. For example it is easier to try the garment on while working, as well as making adjustments to length of yoke and shoulder caps.

The instructions are carefully explaining every step, in the correct order. Diagrams are adjusted to the knitting direction and are worked as usual.

The diagram depicts all rows/rounds, and every stitch seen from the right side. It is read from bottom to top, from right to left. 1 square = 1 stitch.

When working back and forth, every other row is worked from the right side and every other row is worked from the wrong side. When working from the wrong side, the diagram will have to be worked reversed: from left to right, knit stitches are purled, purl stitches are knit etc.

When working in the round every round is worked from the right side and the diagram are worked from right to left on all rounds.

See DROPS lesson: How to read knitting diagrams

The diagram depicts all rows/rounds, and every stitch seen from the right side. It is worked from bottom to top, from right to left.

When working back and forth every other row is worked from the right side: from right to left and every other row is worked from the wrong side: from left to right.

When working in the round, every row in the diagram are worked from the right side, from right to left.

When working a circular diagram you start in the middle and work your way outwards, counter clockwise, row by row.

The rows usually start with a given number of chain stitches (equivalent to the height of the following stitch), this will either be depicted in the diagram or explained in the pattern.

See DROPS lesson: How to read crochet diagrams

Instructions for working several diagrams after each other on the same row/round, will often be written like so: “work A.1, A.2, A.3 a total of 0-0-2-3-4 times". This means you work A.1 once, then A.2 is worked once, and A.3 is repeated (in width) the number of times provided for your size – in this case like so: S = 0 times, M = 0 times, L=2 times, XL= 3 times and XXL = 4 times.

The diagrams are worked as usual: begin with the first row in A.1, then work the first row in A.2 etc.

See DROPS lesson: How to read knitting diagrams

See DROPS lesson: How to read crochet diagrams

The total width of the garment (from wrist-to-wrist) will be larger in the larger sizes, despite the actual sleeves being shorter. The larger sizes have longer sleeve caps and wider shoulders, so there will be a good fit in all sizes.

The measurement sketch/schematic drawing provides information regarding the full length of the garment. If it’s a jumper or a jacket the length is measured from the highest point on the shoulder closest to the neckline, and straight down to the bottom of the garment. It is NOT measured from the tip of shoulder. Similarly, the length of yoke is measured from the highest point on the shoulder and down to where yoke is split into body and sleeves.

On a jacket measures are never taken along bands, unless specifically stated. Always measure inside band stitches when measuring the length.

See DROPS lesson: How to read a schematic drawing

Diagrams are often repeated on the round or in height. 1 repeat is the diagram the way it appears in the pattern. If it says to work 5 repeats of A.1 in the round, then you work A.1 a total of 5 times after/next to each other in the round. If it says to work 2 repeats of A.1 vertically/in height you work the entire diagram once, then begin again at the start and work the entire diagram one more time.

Chain stitches are slightly narrower than other stitches and to avoid working the cast-on edge too tight, we simply chain more stitches to begin with. The stitch count will be adjusted on the following row to fit the pattern and measurement sketch.

The rib edge is more elastic and will contract slightly compared to, for example, stocking stitch. By increasing before the rib edge, you avoid a visible difference in width between the rib edge and the rest of the body.

It’s very easy to cast off too tightly, and by making yarn overs while casting off (and simultaneously casting these off) you avoid a too tight cast off edge.

See DROPS video: How to bind off with yarn overs (yo)

To achieve an even increase (or decrease) you can increase on, for example: every 3rd and 4th row alternately, like so: work 2 rows and increase on the 3rd row, work 3 rows and increase on the 4th. Repeat this until the increase is complete.

See DROPS lesson: Increase or decrease 1 st on every 3rd and 4th row alternately

Should you prefer to work in the round instead of back and forth, you may of course adjust the pattern. You’ll need to add steeks mid-front (usually 5 stitches), and follow the instructions. When you would normally turn and work from the wrong side, simply work across the steek and continue in the round. At the end you’ll cut the piece open, pick up stitches to work bands, and cover the cut edges.

See DROPS video: How to knit steeks and cut open

Should you prefer to work back and forth instead of in the round, you may of course adjust the pattern so you work the pieces separately and then assemble them at the end. Divide the stitches for the body in 2, add 1 edge stitch in each side (for sewing) and work the front and back pieces separately.

See DROPS lesson: Can I adapt a pattern for circular needles into straight needles?

Pattern repeats can vary slightly in the different sizes, in order to get the correct proportions. If you’re not working the exact same size as the garment in the photo, yours might deviate slightly. This has been carefully developed and adjusted so that the complete impression of the garment is the same in all sizes.

Make sure to follow instructions and diagrams for your size!

If you have found a pattern you like which is available in women’s size it’s not very difficult to convert it to men’s size. The biggest difference will be the length of sleeves and body. Start working on the women size that you think would fit across the chest. The additional length will be worked right before you cast off for the armhole/sleeve cap. If the pattern is worked top-down you can add the length right after the armhole or before the first decrease on sleeve.

Regarding additional yarn amount, this will depend on how much length you add, but it is better with a skein too many than too few.

All yarns will have excess fibres (from production) that might come off as lint or shedding. Brushed yarns (ie hairier yarns) have more of these loose, excess fibres, causing more shedding.

Shedding also depends on what is worn under or over the garment, and whether this pulls at the yarn fibres. It’s therefore not possible to guarantee that there will be no shedding

Below are some tips on how to get the best result when working with hairier yarns:

1. When the garment is finished (before you wash it) shake it vigorously so the looser hairs come off. NOTE: do NOT use a lint roller, brush or any method that pulls at the yarn.

2. Place the garment in a plastic bag and put it in your freezer - the temperature will cause the fibres to become less attached to each other, and excess fibres will come off easier.

3. Leave in the freezer for a few hours before taking it out and shaking it again.

4. Wash the garment according to the instructions on the yarn label.

Pilling is a natural process that happens to even the most exclusive of fibers. It's a natural sign of wear and tear that is hard to avoid, and that is most visible in high friction areas of your garment like a sweater's arms and cuffs.

You can make your garment look as new by removing the pilling, using a fabric comb or a pill/lint remover.

Still can't find the answer you need? Then scroll down and leave your question so one of our experts can try to help you. This will be done normally within 5 to 10 working days.
In the meantime, you can read the questions and answers that others have left to this pattern or join the DROPS Workshop on Facebook to get help from fellow knitters/crocheters!

You might also like...

Dalvik

Bettina Sundman, Finland

Dalvik

Martina, Czech Republic

Post a comment to pattern DROPS Children 34-18

We would love to hear what you have to say about this pattern!

If you want to leave a question, please make sure you select the correct category in the form below, to speed up the answering process. Required fields are marked *.

Comments / Questions (34)

country flag Nadia wrote:

Bonjour, Je fais la taille 2 ans, pour séparer les manches et dos/devant c’est 14 cm du début ou après les cotes ? Merci beaucoup

27.03.2020 - 08:29

DROPS Design answered:

Bonjour Nadia! Cela doit etre depuis le rang de montage le long du devant , avec les cotes. Bon tricot!

27.03.2020 - 09:33

country flag Cim Bergqvist wrote:

Dalvik mönster storlek 2 år. Förstår inte diagrammet A2. Vad är det som skiljer det från A1? Jag har repat upp när jag upptäckte jag hade stickat A1 hela vägen upp. Vad gör jag nu? Vänligen Cim

18.02.2020 - 22:44

DROPS Design answered:

Hej I den minsta storleken stickar du A.2 efter att du delat oket till fram & bakstycke och ärmar (i de större storlekarna stickar du den delen på oket eftersom den då tillhör A.1) detta pga att oket är kortare i den minsta storleken. Om du läser i början av stycket FRAM- OCH BAKSTYCKE så ser du att du där stickar A.2. Lycka till!

19.02.2020 - 07:36

country flag Johanna wrote:

Hei,\r\nKysisin mitä käytännössä tarkoittaa \"luo apulangan silmukoiden tilalle 6-6-6-8-8-8 silmukkaa (= sivussa hihan alla)\". Onko tähän olemassa ohjevideota?

14.02.2020 - 09:12

country flag Ingrid Markovsky wrote:

Hallo liebes Team, ich möchte den Pullover ohne Muster in Dunkelblau stricken. Nur bei der Passe denke ich an 1 Knäuel Hellblau für Streifen.Wieviel Material brauche ich dann in Dunkelblau für Größe 11/12?Danke und ein schönes Weihnachtsfest!Ingrid

18.12.2019 - 07:52

DROPS Design answered:

Liebe Frau Markovsky, leider können wir jeder Anleitung nach jedem individuellen Frage anpassen und einzelne Modelle auf individuellen Wunsch hin umrechnen. Wenn sie Hilfe damit brauchen, wenden Sie sich bitte an dem Laden wo Sie die Wolle gekauft haben, dort hilft man Ihnen gerne weiter. Viel Spaß beim stricken!

18.12.2019 - 07:54

country flag Kristina wrote:

Er lidt i tvivl om dette under ærmer: Sæt de 50-54-56-56-60-62 masker fra tråden i den ene side af arbejdet tilbage på strømpepinde 3, og strik 1 ny maske i hver af de 6-6-6-8-8-8 masker som blev slået op under ærmet = 56-60-62-64-68-70 masker. De 6 masker der er blevet slået op strikkes jo med på for og bagstykke. Skal jeg strikke nye masker op i dem, der allerede er strikkede?

10.12.2019 - 10:02

DROPS Design answered:

Hei Kristina! Det skal plukkes opp masker fra kanten der 6-6-6-8-8-8 masker ble lagt opp under ermet, det er mulig å se hvordan det gjøres her . Lykke til!

10.12.2019 - 10:15

country flag Britt wrote:

Hei. Jeg ser at det opereres med to ganger lys grå i diagrammet. Er det meningen at det skal være to ulike grpnyanser, eller er det en feil? Mvh Britt

23.10.2019 - 16:16

DROPS Design answered:

Hej. Tack för info, det var ett fel som nu är rättat! Mvh DROPS Design

24.10.2019 - 06:42

country flag BIBI wrote:

Merci DROPS pour la réponse rapide! Je m'en doutais mais préférais que la correction soit effective pour tous.

25.09.2019 - 12:18

country flag BIBI wrote:

Le 20 juillet, Ben vous a demandé si la rehausse était correcte et il vous a donné une solution; vous n'y avez pas répondu à ma connaissance. J'en suis au même point de reflexion et j'abonde dans son sens! merci de signifier l'erreur et attend pour continuer. Car le modèle est superbe..

24.09.2019 - 19:08

DROPS Design answered:

Bonjour Bibi, nos stylistes vont vérifier la réhausse pour qu'il y ait le même nombre de rangs de chaque côté du milieu dos. Edit 11:27: la correction a été faite, vous la retrouverez dans les explications et en rouge sous "corrections". Bon tricot!

25.09.2019 - 07:56

country flag Ben wrote:

Hi DROPS, Thanks for this great pattern. Just a comment regarding the elevation - I think the instructions result in an asymmetrical elevation. After the 75 knit stitches there needs to be 90 purl stiches, then turn and knit 45 stitches - which will return the working yarn to the mid back. Is this correct?

20.08.2019 - 00:21

country flag Birgit wrote:

Hvor er diagrammet til denne genseren? Jeg strikker den og plutselig er diagrammet borte???

22.07.2019 - 10:57

DROPS Design answered:

Hei Birgit, Diagrammene er på bunnen av oppskriften. God fornøyelse!

23.07.2019 - 07:38