
Popular categories
Looking for a yarn?


Comments / Questions (72)
![]() Danya wrote:
Danya wrote:
What does" work one treble crochet in each of the next 3-0 chain stich" mean please?
30.06.2025 - 10:46DROPS Design answered:
Dear Danya, as for the number of chains and stitches, the first number applies to the first size and the 2nd number to the 2nd size, so for the smaller blanket, you will work 1 treble crochet in each of the next 3 chains, but you won't work this in the 2nd size. Happy crocheting!
30.06.2025 - 15:10
![]() Nada wrote:
Nada wrote:
Hi! Thanks a lot for the pattern and all the explanations! I got a bit confused about the stitch count. When you say work 105-172 chain stitches, do you mean i can choose to stitch 105 chains or 172? If that's it, then when you say we have to work doubt crochet in the next 3-0 chain stitchs, then if i did 172, i skip this part ?
28.04.2025 - 04:43DROPS Design answered:
Hi Nada, Yes, you choose how many chain stitches depending on how large a blanket you want to make: 105 chain stitches will give a width of approx. 40 cm and 172 chain stitches a width of 66 cm. But you always skip the first 3 chain stitches on the row (they are there to turn with) and begin each row from both the right and wrong side in the fourth stitch. Happy crocheting!
28.04.2025 - 07:16
![]() Anne Marie Larsen wrote:
Anne Marie Larsen wrote:
Kan jeg købe hækleopskrift til dette tæppe SOM JEG Hr købt garn til, jeg har ikke selv mulighed for at printe ud og kan i sende den
31.03.2025 - 13:14
![]() Thea Horn wrote:
Thea Horn wrote:
Ik ben begonnen met dit patroon met de drops safraan vindt het veel dunner lijken dan op de foto! Kan dit? Heb aleendunnere haaknaald genomen! Grt thea horn
28.02.2025 - 13:00
![]() Carola wrote:
Carola wrote:
Hej! Jag får inte denna filt att bli jämn i kanterna, vad gör jag för fel? Jag börjar varje nytt varv med 3 luftmaskor, men nu efter 4 varv ser jag tendenserna att den liknar lite av en banan. Känns som att det är färre maskor på rad 4 än det första varvet. Tack på förhand.
02.02.2025 - 20:11DROPS Design answered:
Hei Carola. Husk at de 3 luftmaskene skal erstatte 1. stav, de kommer ikke i tillegg. Også lurt å telle antall etter hver rad. Usikker på om du hekler riktig etter diagrammet? Ta en titt på hjelpevideoen: Hur man virkar ett enkelt hålmönster enligt diagram. Du finner videoen ved å klikke på VIDEOR til høyre eller under bildet. mvh DROPS Design
10.02.2025 - 13:53
![]() LR wrote:
LR wrote:
Wie wir der Seitenrand verarbeitet? Gibt es da Möglichkeit für einen schönen Abschluss?🤔
29.12.2024 - 22:31DROPS Design answered:
Liebe LR, die Seiten werden mit Stäbchen (3 Luftmaschen am Anfang der Reihen) gehäkelt - in diesem Video zeigen wir, wie man schöne Seiten erhält. Viel Spaß beim Häkeln!
02.01.2025 - 14:31
![]() Lea wrote:
Lea wrote:
Tolle Anleitung!😍 Darf ich fragen, wie viele Knäuel Wolle der „Drops Safran“ oder der „Drops Baby Merino“ für die angegebene Grösse verwendet werden?
25.11.2024 - 09:33DROPS Design answered:
Liebe Lea, die gesamte Garnmenge für die jeweiligen 2 Größe finden Sie für jedes Garn unter Tab "Anleitung" oben der Seite - so z.B. 200 g für die kleinere Decke DROPS Safran / 50 g das Knäuel = 4 Knäuel Safran. Viel Spaß beim Häkeln!
25.11.2024 - 10:11
![]() Patrycja wrote:
Patrycja wrote:
Witam, ile oczek łańcuszka początkowego zrobić aby kocyk był większy (ok. 80 cm szerokości)?
23.11.2024 - 09:24DROPS Design answered:
Witaj Patrycjo, musisz zrobić ok. 210 oczek łańcuszka na początku, aby szerokość kocyka wyniosła 80 cm. Pozdrawiamy!
25.11.2024 - 15:48
![]() Lorraine Johnstone wrote:
Lorraine Johnstone wrote:
I've been directed to your site and am learning to crochet. I am wondering what a cotton yarn alternative would be to DROPS Safron or DROPS BabyMerino as it will be Summer here when a friend's baby is born. I am going to attempt the "Sleepyhead" crocheted blanket.
23.08.2024 - 09:24DROPS Design answered:
Dar Mrs Johnstone, DROPS Safran is a cotton yarn so should match, see alternatives thanks our yarn converter. Find DROPS stores shipping worldwide here. Happy Crocheting!
23.08.2024 - 15:46
![]() Cecilie wrote:
Cecilie wrote:
Hei. Hvis jeg vil ha teppet større, hvor mange masker må jeg da øke? Takk på forhånd :) PS: nydelig teppe å hekle :)
22.06.2024 - 17:54DROPS Design answered:
Hej Cecilie, diagrammet går op i 3, og du hækler diagrammet ca 7 gange for hver 10 cm :)
25.06.2024 - 13:55
|
||||||||||||||||
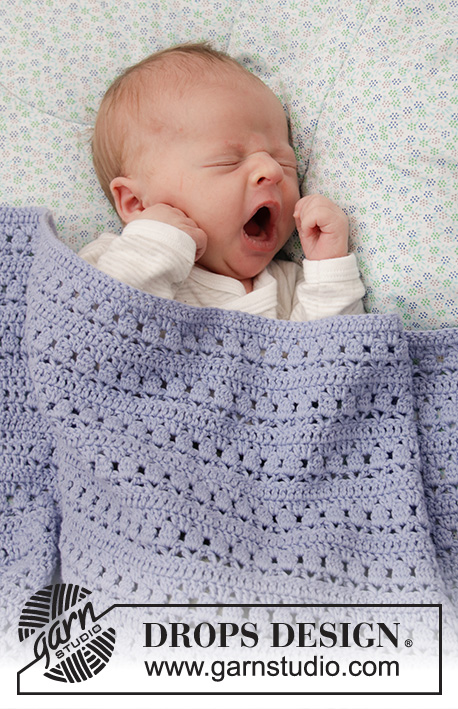
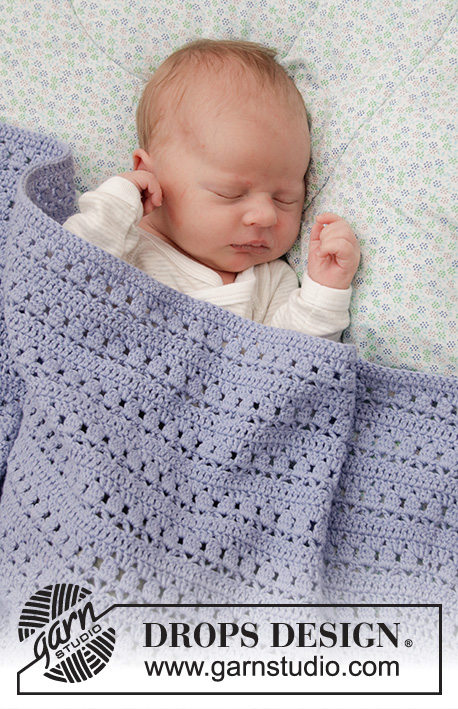
Sleepyhead#sleepyheadblanket |
||||||||||||||||
 |
 |
|||||||||||||||
Crocheted blanket for baby in DROPS Safran or DROPS BabyMerino. Piece is crocheted with lace pattern. Theme: Baby blanket
DROPS Baby 33-1 |
||||||||||||||||
|
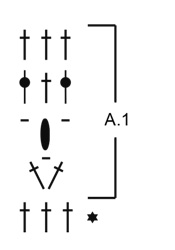
EXPLANATION FOR THE PATTERN: ---------------------------------------------------------- PATTERN: See diagram A.1. CROCHET INFO: Begin every row with 3 chain stitches (= 1 treble crochet). ---------------------------------------------------------- START THE PIECE HERE: ---------------------------------------------------------- BLANKET - SHORT OVERVIEW OF THE PIECE: Worked back and forth, bottom up. BLANKET: Work 105-172 chain stitches (including 3 chain stitches to turn with) on hook size 3.5 mm with Safran or BabyMerino. Work first row as follows: Work 1 treble crochet in 4th chain stitch from hook, work 1 treble crochet in each of the next 3-0 chain stitches, * skip 1 chain stitch, work 1 treble crochet in each of the next 6 chain stitches *, work from *-* the entire row = 89-146 treble crochets on row. Turn piece. Then work as follows – read CROCHET TIP: 3 chain stitches (= 1 treble crochet), work A.1 until 1 treble crochet remains on row (= 29-48 repetitions of 3 stitches), finish with 1 treble crochet in last treble crochet. Continue this pattern like this until blanket measures approx. 50-80 cm or desired length. REMEMBER THE CROCHET TENSION! Finish after 1 row with treble crochets. Fasten off. |
||||||||||||||||
Diagram explanations |
||||||||||||||||
|
||||||||||||||||
|
||||||||||||||||
Have you finished this pattern?Tag your pictures with #dropspattern #sleepyheadblanket or submit them to the #dropsfan gallery. Do you need help with this pattern?You'll find 7 tutorial videos, a Comments/Questions area and more by visiting the pattern on garnstudio.com. © 1982-2025 DROPS Design A/S. We reserve all rights. This document, including all its sub-sections, has copyrights. Read more about what you can do with our patterns at the bottom of each pattern on our site. |
||||||||||||||||


With over 40 years in knitting and crochet design, DROPS Design offers one of the most extensive collections of free patterns on the internet - translated to 17 languages. As of today we count 314 catalogues and 11821 patterns translated into English (UK/cm).
We work hard to bring you the best knitting and crochet have to offer, inspiration and advice as well as great quality yarns at incredible prices! Would you like to use our patterns for other than personal use? You can read what you are allowed to do in the Copyright text at the bottom of all our patterns. Happy crafting!
Post a comment to pattern DROPS Baby 33-1
We would love to hear what you have to say about this pattern!
If you want to leave a question, please make sure you select the correct category in the form below, to speed up the answering process. Required fields are marked *.