DROPS Safran
DROPS Safran
100% Cotton
from 1.30 £ /50g
Get the yarn to make this pattern from 5.20£.

The yarn cost is calculated from the pattern’s smallest size and the yarn’s cheapest product type. Looking for an even better price? You might find it on the DROPS Deals!

DROPS SS24

Sleepyhead

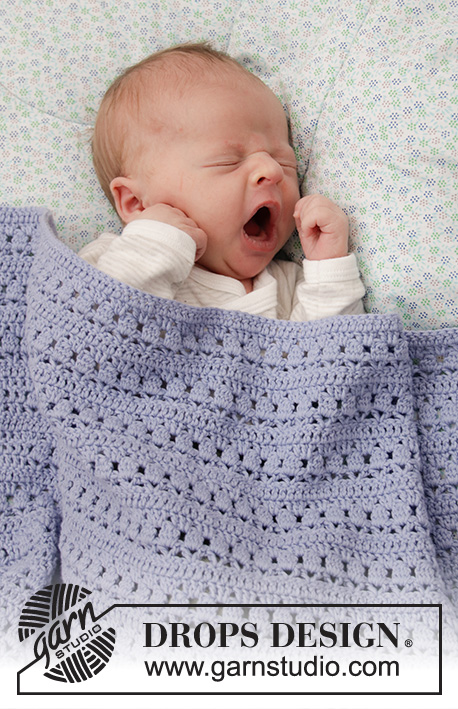
Crocheted blanket for baby in DROPS Safran or DROPS BabyMerino. Piece is crocheted with lace pattern. Theme: Baby blanket

DROPS Baby 33-1
DROPS design: Pattern bm-112-by
Yarn group A
----------------------------------------------------------

Measurements: Width: approx. 40-66 cm Length: approx. 50-80 cm
Materials:
DROPS SAFRAN from Garnstudio (belongs to yarn group A)
200-300 g colour 05, light blue purple
Or use:
DROPS BABYMERINO from Garnstudio (belongs to yarn group A)
150-250 g colour 25, lavender

----------------------------------------------------------
ACCESSORIES FOR THE PIECE:

CROCHET TENSION:
22 treble crochets in width and 12 rows vertically = 10 x 10 cm.

CROCHET HOOK:
DROPS CROCHET HOOK SIZE 3.5 mm
Hook size is only a suggestion! If you have too many stitches on 10 cm switch to larger hook. If you have too few stitches on 10 cm switch to smaller hook.

----------------------------------------------------------

-------------------------------------------------------

Alternative Yarn – See how to change yarns here
Yarn Groups A to F – Use the same pattern and change the yarn here
Yarn usage using an alternative yarn – Use our yarn converter here

-------------------------------------------------------

More like this:
Baby Baby Blanketslace
DROPS Safran
DROPS Safran
100% Cotton
from 1.30 £ /50g
Get the yarn to make this pattern from 5.20£.

The yarn cost is calculated from the pattern’s smallest size and the yarn’s cheapest product type. Looking for an even better price? You might find it on the DROPS Deals!

Pattern instructions

NOTE: This pattern is written in British English. All measurements in charts are in cm. For conversion from cm to inches - click here. There are different terms for crocheting in British and American English. If this pattern includes crochet, click for "crochet terms" here. For this pattern in American English, please click here.
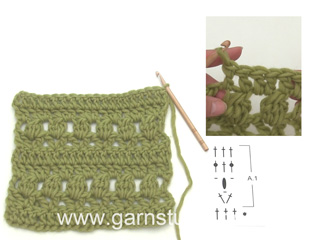
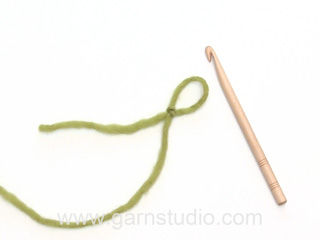
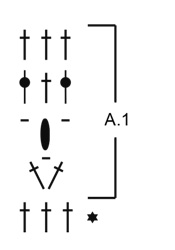
EXPLANATION FOR THE PATTERN:

----------------------------------------------------------

PATTERN: 
See diagram A.1.

CROCHET INFO:
Begin every row with 3 chain stitches (= 1 treble crochet).

----------------------------------------------------------

START THE PIECE HERE:

----------------------------------------------------------

BLANKET - SHORT OVERVIEW OF THE PIECE:
Worked back and forth, bottom up.

BLANKET:
Work 105-172 chain stitches (including 3 chain stitches to turn with) on hook size 3.5 mm with Safran or BabyMerino. Work first row as follows: Work 1 treble crochet in 4th chain stitch from hook, work 1 treble crochet in each of the next 3-0 chain stitches, * skip 1 chain stitch, work 1 treble crochet in each of the next 6 chain stitches *, work from *-* the entire row = 89-146 treble crochets on row. Turn piece.
Then work as follows – read CROCHET TIP: 3 chain stitches (= 1 treble crochet), work A.1 until 1 treble crochet remains on row (= 29-48 repetitions of 3 stitches), finish with 1 treble crochet in last treble crochet. Continue this pattern like this until blanket measures approx. 50-80 cm or desired length. REMEMBER THE CROCHET TENSION! Finish after 1 row with treble crochets. Fasten off.

Diagram

symbols = chain stitch
symbols = treble crochet in stitch
symbols = treble crochet around chain stitch
symbols = work 4 treble crochets together as follows: Work 3 treble crochets around same chain stitch but wait with last yarn over and pull through on each of these 3 treble crochets, work 1 treble crochet more around same chain stitch and pull last yarn over through all 5 loops on hook
symbols = row has already been worked, begin on next row
diagram
Do you have a question? See a list of frequently asked questions (FAQ)

Knitting tension is what determines the final measurements of your work, and is usually measured per 10 x 10 cm. It is provided like so: number of stitches in width x number of rows in height - eg: 19 stitches x 26 rows = 10 x 10 cm.

The knitting tension is very individual; some people knit/crochet loosely while others work tightly. You adjust the knitting tension with the needle size, which is why the suggested needle size is only meant as a guide! You need to adjust this (up or down) to ensure that YOUR knitting tension matches the knitting tension provided in the pattern. If you work with a different knitting tension than provided you will have a different yarn consumption, and your work will have different measurements than what the pattern suggests.

The knitting tension also determines which yarns can replace each other. As long as you achieve the same knitting tension you can replace one yarn with another.

See DROPS lesson: How to measure your tension/gauge

See DROPS video: How to make a gauge tension swatch

The required amount of yarn is provided in grams, eg: 450 g. To calculate how many balls you’ll need you first need to know how many grams are in 1 ball (25g, 50g or 100g). This information is available if you click on the individual yarn quality on our pages. Divide the amount required with the amount of each ball. For example, if each ball is 50g (the most common amount), the calculation will be as follows: 450 / 50 = 9 balls.

The important thing when changing from one yarn to another is that the knitting/crochet tension remains the same. This is so that the measurements of the finished piece will be the same as on the sketch provided. It is easier to achieve the same knitting tension using yarns from the same yarn group. It is also possible to work with multiple strands of a thinner yarn to achieve the knitting tension of a thicker one. Please try our yarn converter. We recommend you to always work a test swatch.

Please NOTE: when changing yarn the garment might have a different look and feel to the garment in the photo, due to individual properties and qualities of each yarn.

See DROPS lesson: Can I use a different yarn than the one mentioned in the pattern?

All our yarns are categorised into yarn groups (from A to F) according to thickness and knitting tension – group A contains the thinnest yarns and group F the thickest. This makes it easier for you to find alternative yarns to our patterns, should you wish to switch yarn. All yarns within the same group have a similar knitting tension and can easily replace each other. However, different yarn qualities have different structures and properties which will give the finished work a unique look and feel.

Click here for an overview of the yarns in each yarn group

At the top of all our patterns you’ll find a link to our yarn calculator, which is a helpful tool should you wish to use a different yarn than suggested. By filling in the yarn quality you wish to replace, the amount (in your size) and number of strands, the calculator will present good alternative yarns with the same knitting tension. Additionally it will tell you how much you’ll require in the new qualities and whether you’ll need to work with multiple strands. Most skeins are 50g (some are 25g or 100g).

If the pattern is worked with multiple colours, every colour will have to be calculated separately. Similarly, if the pattern is worked with several strands of different yarns (for example 1 strand Alpaca and 1 strand Kid-Silk) you will have to find alternatives for each, individually.

Click here to see our yarn calculator

Since different yarns have different qualities and textures we have chosen to keep the original yarn in our patterns. However, you can easily find options among our available qualities by using our yarn calculator, or simply pick a yarn from the same yarn group.

It is possible that some retailers still have discontinued yarns in stock, or that someone has a few skeins at home that they would like to find patterns for.

The yarn calculator will provide both alternative yarn as well as required amount in the new quality.

If you think it's hard to decide what size to make, it can be a good idea to measure a garment you own already and like the size of. Then you can pick the size by comparing those measures with the ones available in the pattern's size chart.

You'll find the size chart at the bottom of the pattern.

See DROPS lesson: How to read size chart

The needle size provided in the pattern serves only as a guide, the important thing is to follow the knitting tension. And since knitting tension is very individual, you will have to adjust the needle size to ensure that YOUR tension is the same as in the pattern – maybe you’ll have to adjust 1, or even 2 needle sizes, up or down to achieve the correct tension. For this, we recommend that you work test swatches.

Should you work with a different knitting tension than the one provided, the measurements of the finished garment might deviate from the measurement sketch.

See DROPS lesson: How to measure your tension/gauge

See DROPS video: How to make a tension/gauge swatch

Working a garment top-down provides more flexibility and room for personal adjustment. For example it is easier to try the garment on while working, as well as making adjustments to length of yoke and shoulder caps.

The instructions are carefully explaining every step, in the correct order. Diagrams are adjusted to the knitting direction and are worked as usual.

The diagram depicts all rows/rounds, and every stitch seen from the right side. It is read from bottom to top, from right to left. 1 square = 1 stitch.

When working back and forth, every other row is worked from the right side and every other row is worked from the wrong side. When working from the wrong side, the diagram will have to be worked reversed: from left to right, knit stitches are purled, purl stitches are knit etc.

When working in the round every round is worked from the right side and the diagram are worked from right to left on all rounds.

See DROPS lesson: How to read knitting diagrams

The diagram depicts all rows/rounds, and every stitch seen from the right side. It is worked from bottom to top, from right to left.

When working back and forth every other row is worked from the right side: from right to left and every other row is worked from the wrong side: from left to right.

When working in the round, every row in the diagram are worked from the right side, from right to left.

When working a circular diagram you start in the middle and work your way outwards, counter clockwise, row by row.

The rows usually start with a given number of chain stitches (equivalent to the height of the following stitch), this will either be depicted in the diagram or explained in the pattern.

See DROPS lesson: How to read crochet diagrams

Instructions for working several diagrams after each other on the same row/round, will often be written like so: “work A.1, A.2, A.3 a total of 0-0-2-3-4 times". This means you work A.1 once, then A.2 is worked once, and A.3 is repeated (in width) the number of times provided for your size – in this case like so: S = 0 times, M = 0 times, L=2 times, XL= 3 times and XXL = 4 times.

The diagrams are worked as usual: begin with the first row in A.1, then work the first row in A.2 etc.

See DROPS lesson: How to read knitting diagrams

See DROPS lesson: How to read crochet diagrams

The total width of the garment (from wrist-to-wrist) will be larger in the larger sizes, despite the actual sleeves being shorter. The larger sizes have longer sleeve caps and wider shoulders, so there will be a good fit in all sizes.

The measurement sketch/schematic drawing provides information regarding the full length of the garment. If it’s a jumper or a jacket the length is measured from the highest point on the shoulder closest to the neckline, and straight down to the bottom of the garment. It is NOT measured from the tip of shoulder. Similarly, the length of yoke is measured from the highest point on the shoulder and down to where yoke is split into body and sleeves.

On a jacket measures are never taken along bands, unless specifically stated. Always measure inside band stitches when measuring the length.

See DROPS lesson: How to read a schematic drawing

Diagrams are often repeated on the round or in height. 1 repeat is the diagram the way it appears in the pattern. If it says to work 5 repeats of A.1 in the round, then you work A.1 a total of 5 times after/next to each other in the round. If it says to work 2 repeats of A.1 vertically/in height you work the entire diagram once, then begin again at the start and work the entire diagram one more time.

Chain stitches are slightly narrower than other stitches and to avoid working the cast-on edge too tight, we simply chain more stitches to begin with. The stitch count will be adjusted on the following row to fit the pattern and measurement sketch.

The rib edge is more elastic and will contract slightly compared to, for example, stocking stitch. By increasing before the rib edge, you avoid a visible difference in width between the rib edge and the rest of the body.

It’s very easy to cast off too tightly, and by making yarn overs while casting off (and simultaneously casting these off) you avoid a too tight cast off edge.

See DROPS video: How to bind off with yarn overs (yo)

To achieve an even increase (or decrease) you can increase on, for example: every 3rd and 4th row alternately, like so: work 2 rows and increase on the 3rd row, work 3 rows and increase on the 4th. Repeat this until the increase is complete.

See DROPS lesson: Increase or decrease 1 st on every 3rd and 4th row alternately

Should you prefer to work in the round instead of back and forth, you may of course adjust the pattern. You’ll need to add steeks mid-front (usually 5 stitches), and follow the instructions. When you would normally turn and work from the wrong side, simply work across the steek and continue in the round. At the end you’ll cut the piece open, pick up stitches to work bands, and cover the cut edges.

See DROPS video: How to knit steeks and cut open

Should you prefer to work back and forth instead of in the round, you may of course adjust the pattern so you work the pieces separately and then assemble them at the end. Divide the stitches for the body in 2, add 1 edge stitch in each side (for sewing) and work the front and back pieces separately.

See DROPS lesson: Can I adapt a pattern for circular needles into straight needles?

Pattern repeats can vary slightly in the different sizes, in order to get the correct proportions. If you’re not working the exact same size as the garment in the photo, yours might deviate slightly. This has been carefully developed and adjusted so that the complete impression of the garment is the same in all sizes.

Make sure to follow instructions and diagrams for your size!

If you have found a pattern you like which is available in women’s size it’s not very difficult to convert it to men’s size. The biggest difference will be the length of sleeves and body. Start working on the women size that you think would fit across the chest. The additional length will be worked right before you cast off for the armhole/sleeve cap. If the pattern is worked top-down you can add the length right after the armhole or before the first decrease on sleeve.

Regarding additional yarn amount, this will depend on how much length you add, but it is better with a skein too many than too few.

All yarns will have excess fibres (from production) that might come off as lint or shedding. Brushed yarns (ie hairier yarns) have more of these loose, excess fibres, causing more shedding.

Shedding also depends on what is worn under or over the garment, and whether this pulls at the yarn fibres. It’s therefore not possible to guarantee that there will be no shedding

Below are some tips on how to get the best result when working with hairier yarns:

1. When the garment is finished (before you wash it) shake it vigorously so the looser hairs come off. NOTE: do NOT use a lint roller, brush or any method that pulls at the yarn.

2. Place the garment in a plastic bag and put it in your freezer - the temperature will cause the fibres to become less attached to each other, and excess fibres will come off easier.

3. Leave in the freezer for a few hours before taking it out and shaking it again.

4. Wash the garment according to the instructions on the yarn label.

Pilling is a natural process that happens to even the most exclusive of fibers. It's a natural sign of wear and tear that is hard to avoid, and that is most visible in high friction areas of your garment like a sweater's arms and cuffs.

You can make your garment look as new by removing the pilling, using a fabric comb or a pill/lint remover.

Still can't find the answer you need? Then scroll down and leave your question so one of our experts can try to help you. This will be done normally within 5 to 10 working days.
In the meantime, you can read the questions and answers that others have left to this pattern or join the DROPS Workshop on Facebook to get help from fellow knitters/crocheters!

You might also like...

Post a comment to pattern DROPS Baby 33-1

We would love to hear what you have to say about this pattern!

If you want to leave a question, please make sure you select the correct category in the form below, to speed up the answering process. Required fields are marked *.

Comments / Questions (61)

country flag Caroline wrote:

Hallo Ik wil heel graag de deken breder maak, met hoeveel moet ik meerderen dan? met 3? eerste keer een deken haken

06.05.2021 - 23:40

country flag Eike Hjorth Hansen wrote:

Hej! Er diagram A1 det eneste diagram? Når jeg ser på opskriften er ser det ud som om at billedfilerne til resten af mønsteret er i stykker. Har både prøvet på ipad, iphone og pc.

06.04.2021 - 19:29

DROPS Design answered:

Hej Eike, ja der er kun ét diagram og du finder en video nederst i opskriften. Vi skal få fjernet de 2 symboler som snyder dig :)

07.04.2021 - 10:05

country flag Sadjia Bouya wrote:

Merci pour tous les modèles sur drops, très bien expliqué qui rend le travail facile...

12.03.2021 - 22:47

country flag Elisabeth Hiltl wrote:

Leider versteh ich es immer noch nicht. Ich hab schon mal eine Decke von euch gehäkelt, da war alles gut. Es geht eigentlich nur um die erste Reihe. Wieviel Stäbchen sind das ingsamt? 146 oder? Wann muss ich eine Luftmaschen auslassen? das ich die 146 habe. Ich will die größere machen Vielleicht muss ich ein anderes Muster aussuchen aber das gefällt mir sehr gut für meine Enkelin MfG

18.02.2021 - 16:03

DROPS Design answered:

Liebe Frau Hiltl, für die grössere Decke häkeln Sie 172 Lm, dann: 1 Stb in die 4. Lm ab der Nadel, *1 Lm überspringen, je 1 Stb in die 6 nächsten Lm*, von *bis* 24 Mal insgesamt wiederholen = 146 Stb sind es am Ende dieser Reihe. Veilleicht kann das Ihnen helfen zu verstehen, warum es hier mehr Luftmaschen als Stäbchen gehäkelt werden. Viel Spaß beim häkeln!

18.02.2021 - 16:17

country flag Elisabeth Hiltl wrote:

Hallo Wie man hakelt das weiß ich ja, aber ich verstehe die Aussage nicht: Ein Stäbchen in die vierte Luftmache ab der Nadeln (das versteh ich) aber dann: Je 1 Stäbchen in die 3-0 nächsten Luftmaschen. Was heisst das 3-0? MfG Elisabeth Hiltl

18.02.2021 - 10:04

DROPS Design answered:

Liebe Frau Hiltl, die Decke kommt in 2 Größen/Maßen, für die kleinere häkeln Sie je 1 Stäbchen in die 3 nächsten Luftmaschen, aber für die grössere häkeln Sie jetzt nur von *bis* = dann haben Sie 89 oder 146 Stäbchen am Ende der 1. Reihe. Viel Spaß beim häkeln!

18.02.2021 - 10:10

country flag Elisabeth Hiltl wrote:

Hallo, gibt es die häkelanleitung nicht in einer gezeichneten Anleitung? Da würde ich sie besser verstehen. MfG

17.02.2021 - 17:20

DROPS Design answered:

Liebe Frau Hiltl, die Anleitung ist schriftlich aber gleichzeitig soll man wie im Diagram A.1 häkeln - hier lesen Sie mehr über Diagramme. Viel Spaß beim häkeln!

18.02.2021 - 08:53

country flag Alicia wrote:

Por qué dice al principio montar 105-172 puntos de cadeneta? Cuántas cadenetas hay que montar para una manta de bebé?

30.09.2020 - 19:02

DROPS Design answered:

Hola Alicia. Esta modelo se puede hacer en dos tamaños. Para el tamaño pequeño hay que montar 105 puntos de cadeneta, para el tamaño grande son 172 puntos de cadeneta.

30.09.2020 - 20:56

country flag Ida Ivarsson wrote:

Jag tänkte göra den stora filten. (Då förstår jag de som att jag ska göra 6 stolpar hoppa över en LM sen göra 6 stolpar igen.) Ska jag göra en LM mellan varje 6 stolpar? För att få den rak.

10.07.2020 - 10:47

DROPS Design answered:

Hei Ida. Nei, du hopper bare over luftmasken. Dette gjøres på 1. rad slik at ikke kanten skal stramme. Så på 1. rad vil maskenatallet minke. God Fornøyelse!

13.07.2020 - 09:33

country flag Alicia wrote:

Hola Quería saber cuánta lana necesitaría para hacer una manta de 1m x 1m. Gracias

26.05.2020 - 18:48

DROPS Design answered:

Hola Alicia. Si te refieres a este modelo, necesitas aprox. 450-500 gr, siempre que mantengas la tensión del tejido indicada.

17.08.2020 - 19:29

country flag Alicia wrote:

Hola! Me gustaría saber cuántos ovillos necesitaría aproximadamente para hacer una manta de 1 metro x 1 metro. Gracias

24.05.2020 - 14:09

DROPS Design answered:

Hola Alicia! Alrededor 600 g (12 ovillos). Buon trabajo!

20.11.2020 - 13:49