DROPS Safran
DROPS Safran
100% Cotton
from 1.30 £ /50g
Get the yarn to make this pattern from 5.20£.

The yarn cost is calculated from the pattern’s smallest size and the yarn’s cheapest product type. Looking for an even better price? You might find it on the DROPS Deals!

DROPS SS24

Sleepyhead

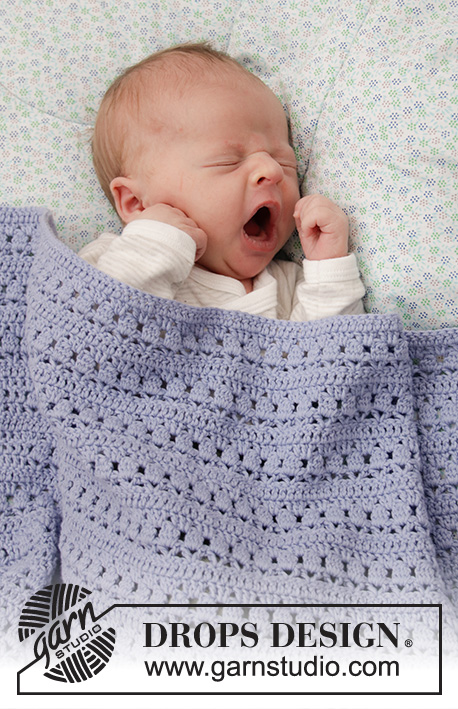
Crocheted blanket for baby in DROPS Safran or DROPS BabyMerino. Piece is crocheted with lace pattern. Theme: Baby blanket

DROPS Baby 33-1
DROPS design: Pattern bm-112-by
Yarn group A
----------------------------------------------------------

Measurements: Width: approx. 40-66 cm Length: approx. 50-80 cm
Materials:
DROPS SAFRAN from Garnstudio (belongs to yarn group A)
200-300 g colour 05, light blue purple
Or use:
DROPS BABYMERINO from Garnstudio (belongs to yarn group A)
150-250 g colour 25, lavender

----------------------------------------------------------
ACCESSORIES FOR THE PIECE:

CROCHET TENSION:
22 treble crochets in width and 12 rows vertically = 10 x 10 cm.

CROCHET HOOK:
DROPS CROCHET HOOK SIZE 3.5 mm
Hook size is only a suggestion! If you have too many stitches on 10 cm switch to larger hook. If you have too few stitches on 10 cm switch to smaller hook.

----------------------------------------------------------

-------------------------------------------------------

Alternative Yarn – See how to change yarns here
Yarn Groups A to F – Use the same pattern and change the yarn here
Yarn usage using an alternative yarn – Use our yarn converter here

-------------------------------------------------------

More like this:
Baby Baby Blanketslace
DROPS Safran
DROPS Safran
100% Cotton
from 1.30 £ /50g
Get the yarn to make this pattern from 5.20£.

The yarn cost is calculated from the pattern’s smallest size and the yarn’s cheapest product type. Looking for an even better price? You might find it on the DROPS Deals!

Pattern instructions

NOTE: This pattern is written in British English. All measurements in charts are in cm. For conversion from cm to inches - click here. There are different terms for crocheting in British and American English. If this pattern includes crochet, click for "crochet terms" here. For this pattern in American English, please click here.
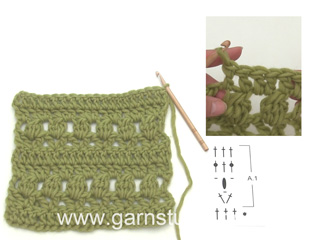
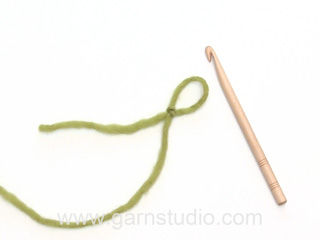
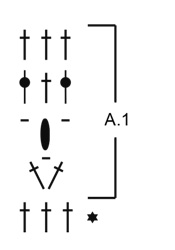
EXPLANATION FOR THE PATTERN:

----------------------------------------------------------

PATTERN: 
See diagram A.1.

CROCHET INFO:
Begin every row with 3 chain stitches (= 1 treble crochet).

----------------------------------------------------------

START THE PIECE HERE:

----------------------------------------------------------

BLANKET - SHORT OVERVIEW OF THE PIECE:
Worked back and forth, bottom up.

BLANKET:
Work 105-172 chain stitches (including 3 chain stitches to turn with) on hook size 3.5 mm with Safran or BabyMerino. Work first row as follows: Work 1 treble crochet in 4th chain stitch from hook, work 1 treble crochet in each of the next 3-0 chain stitches, * skip 1 chain stitch, work 1 treble crochet in each of the next 6 chain stitches *, work from *-* the entire row = 89-146 treble crochets on row. Turn piece.
Then work as follows – read CROCHET TIP: 3 chain stitches (= 1 treble crochet), work A.1 until 1 treble crochet remains on row (= 29-48 repetitions of 3 stitches), finish with 1 treble crochet in last treble crochet. Continue this pattern like this until blanket measures approx. 50-80 cm or desired length. REMEMBER THE CROCHET TENSION! Finish after 1 row with treble crochets. Fasten off.

Diagram

symbols = chain stitch
symbols = treble crochet in stitch
symbols = treble crochet around chain stitch
symbols = work 4 treble crochets together as follows: Work 3 treble crochets around same chain stitch but wait with last yarn over and pull through on each of these 3 treble crochets, work 1 treble crochet more around same chain stitch and pull last yarn over through all 5 loops on hook
symbols = row has already been worked, begin on next row
diagram
Do you have a question? See a list of frequently asked questions (FAQ)

Knitting tension is what determines the final measurements of your work, and is usually measured per 10 x 10 cm. It is provided like so: number of stitches in width x number of rows in height - eg: 19 stitches x 26 rows = 10 x 10 cm.

The knitting tension is very individual; some people knit/crochet loosely while others work tightly. You adjust the knitting tension with the needle size, which is why the suggested needle size is only meant as a guide! You need to adjust this (up or down) to ensure that YOUR knitting tension matches the knitting tension provided in the pattern. If you work with a different knitting tension than provided you will have a different yarn consumption, and your work will have different measurements than what the pattern suggests.

The knitting tension also determines which yarns can replace each other. As long as you achieve the same knitting tension you can replace one yarn with another.

See DROPS lesson: How to measure your tension/gauge

See DROPS video: How to make a gauge tension swatch

The required amount of yarn is provided in grams, eg: 450 g. To calculate how many balls you’ll need you first need to know how many grams are in 1 ball (25g, 50g or 100g). This information is available if you click on the individual yarn quality on our pages. Divide the amount required with the amount of each ball. For example, if each ball is 50g (the most common amount), the calculation will be as follows: 450 / 50 = 9 balls.

The important thing when changing from one yarn to another is that the knitting/crochet tension remains the same. This is so that the measurements of the finished piece will be the same as on the sketch provided. It is easier to achieve the same knitting tension using yarns from the same yarn group. It is also possible to work with multiple strands of a thinner yarn to achieve the knitting tension of a thicker one. Please try our yarn converter. We recommend you to always work a test swatch.

Please NOTE: when changing yarn the garment might have a different look and feel to the garment in the photo, due to individual properties and qualities of each yarn.

See DROPS lesson: Can I use a different yarn than the one mentioned in the pattern?

All our yarns are categorised into yarn groups (from A to F) according to thickness and knitting tension – group A contains the thinnest yarns and group F the thickest. This makes it easier for you to find alternative yarns to our patterns, should you wish to switch yarn. All yarns within the same group have a similar knitting tension and can easily replace each other. However, different yarn qualities have different structures and properties which will give the finished work a unique look and feel.

Click here for an overview of the yarns in each yarn group

At the top of all our patterns you’ll find a link to our yarn calculator, which is a helpful tool should you wish to use a different yarn than suggested. By filling in the yarn quality you wish to replace, the amount (in your size) and number of strands, the calculator will present good alternative yarns with the same knitting tension. Additionally it will tell you how much you’ll require in the new qualities and whether you’ll need to work with multiple strands. Most skeins are 50g (some are 25g or 100g).

If the pattern is worked with multiple colours, every colour will have to be calculated separately. Similarly, if the pattern is worked with several strands of different yarns (for example 1 strand Alpaca and 1 strand Kid-Silk) you will have to find alternatives for each, individually.

Click here to see our yarn calculator

Since different yarns have different qualities and textures we have chosen to keep the original yarn in our patterns. However, you can easily find options among our available qualities by using our yarn calculator, or simply pick a yarn from the same yarn group.

It is possible that some retailers still have discontinued yarns in stock, or that someone has a few skeins at home that they would like to find patterns for.

The yarn calculator will provide both alternative yarn as well as required amount in the new quality.

If you think it's hard to decide what size to make, it can be a good idea to measure a garment you own already and like the size of. Then you can pick the size by comparing those measures with the ones available in the pattern's size chart.

You'll find the size chart at the bottom of the pattern.

See DROPS lesson: How to read size chart

The needle size provided in the pattern serves only as a guide, the important thing is to follow the knitting tension. And since knitting tension is very individual, you will have to adjust the needle size to ensure that YOUR tension is the same as in the pattern – maybe you’ll have to adjust 1, or even 2 needle sizes, up or down to achieve the correct tension. For this, we recommend that you work test swatches.

Should you work with a different knitting tension than the one provided, the measurements of the finished garment might deviate from the measurement sketch.

See DROPS lesson: How to measure your tension/gauge

See DROPS video: How to make a tension/gauge swatch

Working a garment top-down provides more flexibility and room for personal adjustment. For example it is easier to try the garment on while working, as well as making adjustments to length of yoke and shoulder caps.

The instructions are carefully explaining every step, in the correct order. Diagrams are adjusted to the knitting direction and are worked as usual.

The diagram depicts all rows/rounds, and every stitch seen from the right side. It is read from bottom to top, from right to left. 1 square = 1 stitch.

When working back and forth, every other row is worked from the right side and every other row is worked from the wrong side. When working from the wrong side, the diagram will have to be worked reversed: from left to right, knit stitches are purled, purl stitches are knit etc.

When working in the round every round is worked from the right side and the diagram are worked from right to left on all rounds.

See DROPS lesson: How to read knitting diagrams

The diagram depicts all rows/rounds, and every stitch seen from the right side. It is worked from bottom to top, from right to left.

When working back and forth every other row is worked from the right side: from right to left and every other row is worked from the wrong side: from left to right.

When working in the round, every row in the diagram are worked from the right side, from right to left.

When working a circular diagram you start in the middle and work your way outwards, counter clockwise, row by row.

The rows usually start with a given number of chain stitches (equivalent to the height of the following stitch), this will either be depicted in the diagram or explained in the pattern.

See DROPS lesson: How to read crochet diagrams

Instructions for working several diagrams after each other on the same row/round, will often be written like so: “work A.1, A.2, A.3 a total of 0-0-2-3-4 times". This means you work A.1 once, then A.2 is worked once, and A.3 is repeated (in width) the number of times provided for your size – in this case like so: S = 0 times, M = 0 times, L=2 times, XL= 3 times and XXL = 4 times.

The diagrams are worked as usual: begin with the first row in A.1, then work the first row in A.2 etc.

See DROPS lesson: How to read knitting diagrams

See DROPS lesson: How to read crochet diagrams

The total width of the garment (from wrist-to-wrist) will be larger in the larger sizes, despite the actual sleeves being shorter. The larger sizes have longer sleeve caps and wider shoulders, so there will be a good fit in all sizes.

The measurement sketch/schematic drawing provides information regarding the full length of the garment. If it’s a jumper or a jacket the length is measured from the highest point on the shoulder closest to the neckline, and straight down to the bottom of the garment. It is NOT measured from the tip of shoulder. Similarly, the length of yoke is measured from the highest point on the shoulder and down to where yoke is split into body and sleeves.

On a jacket measures are never taken along bands, unless specifically stated. Always measure inside band stitches when measuring the length.

See DROPS lesson: How to read a schematic drawing

Diagrams are often repeated on the round or in height. 1 repeat is the diagram the way it appears in the pattern. If it says to work 5 repeats of A.1 in the round, then you work A.1 a total of 5 times after/next to each other in the round. If it says to work 2 repeats of A.1 vertically/in height you work the entire diagram once, then begin again at the start and work the entire diagram one more time.

Chain stitches are slightly narrower than other stitches and to avoid working the cast-on edge too tight, we simply chain more stitches to begin with. The stitch count will be adjusted on the following row to fit the pattern and measurement sketch.

The rib edge is more elastic and will contract slightly compared to, for example, stocking stitch. By increasing before the rib edge, you avoid a visible difference in width between the rib edge and the rest of the body.

It’s very easy to cast off too tightly, and by making yarn overs while casting off (and simultaneously casting these off) you avoid a too tight cast off edge.

See DROPS video: How to bind off with yarn overs (yo)

To achieve an even increase (or decrease) you can increase on, for example: every 3rd and 4th row alternately, like so: work 2 rows and increase on the 3rd row, work 3 rows and increase on the 4th. Repeat this until the increase is complete.

See DROPS lesson: Increase or decrease 1 st on every 3rd and 4th row alternately

Should you prefer to work in the round instead of back and forth, you may of course adjust the pattern. You’ll need to add steeks mid-front (usually 5 stitches), and follow the instructions. When you would normally turn and work from the wrong side, simply work across the steek and continue in the round. At the end you’ll cut the piece open, pick up stitches to work bands, and cover the cut edges.

See DROPS video: How to knit steeks and cut open

Should you prefer to work back and forth instead of in the round, you may of course adjust the pattern so you work the pieces separately and then assemble them at the end. Divide the stitches for the body in 2, add 1 edge stitch in each side (for sewing) and work the front and back pieces separately.

See DROPS lesson: Can I adapt a pattern for circular needles into straight needles?

Pattern repeats can vary slightly in the different sizes, in order to get the correct proportions. If you’re not working the exact same size as the garment in the photo, yours might deviate slightly. This has been carefully developed and adjusted so that the complete impression of the garment is the same in all sizes.

Make sure to follow instructions and diagrams for your size!

If you have found a pattern you like which is available in women’s size it’s not very difficult to convert it to men’s size. The biggest difference will be the length of sleeves and body. Start working on the women size that you think would fit across the chest. The additional length will be worked right before you cast off for the armhole/sleeve cap. If the pattern is worked top-down you can add the length right after the armhole or before the first decrease on sleeve.

Regarding additional yarn amount, this will depend on how much length you add, but it is better with a skein too many than too few.

All yarns will have excess fibres (from production) that might come off as lint or shedding. Brushed yarns (ie hairier yarns) have more of these loose, excess fibres, causing more shedding.

Shedding also depends on what is worn under or over the garment, and whether this pulls at the yarn fibres. It’s therefore not possible to guarantee that there will be no shedding

Below are some tips on how to get the best result when working with hairier yarns:

1. When the garment is finished (before you wash it) shake it vigorously so the looser hairs come off. NOTE: do NOT use a lint roller, brush or any method that pulls at the yarn.

2. Place the garment in a plastic bag and put it in your freezer - the temperature will cause the fibres to become less attached to each other, and excess fibres will come off easier.

3. Leave in the freezer for a few hours before taking it out and shaking it again.

4. Wash the garment according to the instructions on the yarn label.

Pilling is a natural process that happens to even the most exclusive of fibers. It's a natural sign of wear and tear that is hard to avoid, and that is most visible in high friction areas of your garment like a sweater's arms and cuffs.

You can make your garment look as new by removing the pilling, using a fabric comb or a pill/lint remover.

Still can't find the answer you need? Then scroll down and leave your question so one of our experts can try to help you. This will be done normally within 5 to 10 working days.
In the meantime, you can read the questions and answers that others have left to this pattern or join the DROPS Workshop on Facebook to get help from fellow knitters/crocheters!

You might also like...

Post a comment to pattern DROPS Baby 33-1

We would love to hear what you have to say about this pattern!

If you want to leave a question, please make sure you select the correct category in the form below, to speed up the answering process. Required fields are marked *.

Comments / Questions (61)

country flag Heather Mercer wrote:

I would like to increase the size of this blanket and make it suitable for a 6-10 year old. Can you advise how many stitches to start with and a good finished length. Also the amount of wool required. Thanks

26.08.2023 - 16:53

DROPS Design answered:

Dear Heather, you need to calculate the pattern yourself. The number of stitches to work the pattern should be divisible by 3. Width of the blanket with the recommended gauge is 105 chain stitches = 40 cm. You need to calculate for your desired width. For example, for 80 cm you need to cast on 210 chain stitches. In this case (80 x 120cm) you would need double the amount of yarn indicated here. You can see here more tips on calculating a pattern: https://www.garnstudio.com/lesson.php?id=25&cid=19. Happy crochetting!

28.08.2023 - 00:40

country flag Gitte wrote:

I diagram, rk. 3 læst nedefra og op, står der at man skal lave 1 stgm om lm og 1 stgm i masken (som er dannet ved de 4 stgm der er hæklet sammen). Men på billedet ses tydeligt at der er lavet 2 stgm om lm, og derefter 1 stgm i m. Så der må være fejl i diagrammet, hvis man vil ha det til at se ud som på billedet.? Vh Gitte

30.07.2023 - 20:26

DROPS Design answered:

Hej Gitte, jo når du gentager diagrammet, så vil du få 2 lm efter hinanden imellem hver af de 4 som er hæklet sammen, og i de 2 lm du får imellem hver, hækler du 2 stangm og så 1 i m (de 4 som er hæklet sammen) :)

07.08.2023 - 11:23

country flag Simona wrote:

Dear, when you say " Work 172 chain stitches (including 3 chain stitches to turn with)", does it mean that the 3 chain stitches are already included in the count of 172 or do I have do add 3 extra - 172+3? I worked 172 chain in total and my first row ends with 6 DC, so I have 6x 24DC=144DC + 1DC at the beginning of the row - do I have to count the very first 3 chain stitches as a DC in order to have 146DC - so it would be 2DC-*SPACE-6DC*? Thank you!

10.03.2023 - 16:27

DROPS Design answered:

Dear Simona, the 3 chains to turn with are included in the 172 chain stitches to start with. Work the first row as follows: 1 dc in the 4th ch from hook (2 dc / 4 ch), then *skip 1 ch, 1 dc in each of the next 6 ch*, work from *-* a total of 24 times ( 6 dc x 24 = 144 dc / 7 chains x 24=168 ) = there are now 2+144 = 146 dc worked over 4+168=172 chains; and that way, the first row will not be that tight (as the foundation rows are often much too tight). Happy crocheting!

10.03.2023 - 16:48

country flag Iza wrote:

Witam, w 1 rzędzie pisze żeby ominąć niektóre oczka łańcuszka- to znaczy że trzeba w tych omijanych przerobić oczko zamykające oz czy jakoś inaczej to ominąć? Bo jak przerabiam oz w nich to robotyka trochę mi "faluje". Pozdrawiam!

25.02.2023 - 16:32

DROPS Design answered:

Witaj Izo, trzeba omijać oczka, o których piszesz. te małe falki później staną się niewidoczne. Miłej pracy!

27.02.2023 - 09:10

country flag Donna wrote:

Is there a pdf to download. Some don’t understand the diagrams and easier in pdf format. Please consider.

01.10.2022 - 01:15

DROPS Design answered:

Dear Donna, you can download the pattern with the diagrams as a pdf by clicking on print and afterwards, when selecting a printer, choose to "Save as PDF". Happy crocheting!

02.10.2022 - 23:32

country flag Jutta Eidenschink wrote:

Ich verstehe die Anleitung leider nicht. Gibt es zu diese Anleitung ein Diagramm von Anfang bis Ende. Viel Dank für die Hilfe

24.06.2022 - 15:56

DROPS Design answered:

Liebe Frau Eidenschink, so was haben wir nicht, aber diese Lektion erklärt, wie man ein Diagram liest und sollte Ihnen damit helfen. Viel Spaß beim häkeln!

27.06.2022 - 07:59

country flag Laura Burt wrote:

Please send the pdf pattern for the sleepyhead baby blanket.Thanks.

24.05.2022 - 05:29

DROPS Design answered:

Dear Mrs Burt, our patterns can only be printed, but using a virtual printer you will be able to download them as a .pdf. Happy crocheting!

24.05.2022 - 08:15

country flag Marie wrote:

Hej Jag kan tyvärr inte se två symboler i diagrammet. Stolpe i maska Stolpe om maska Skulle vara jättetacksam om jag fick det förklarat för mig Tack Marie

26.03.2022 - 21:53

DROPS Design answered:

Hei Marie. Kan du se de 5 diagramsymbolene med en forklarende tekst bak? Og diagram A.1? Diagramikonet til stav i maske er en lang loddrett strek med en kort vannrett strek over, mens diagramikonet til stav om maske er en lang loddrett strek med en sort prikk på. Du kan også se videoen på hvordan dette diagrammet hekles, klikk på video bildene under diagrammet. mvh DROPS Design

28.03.2022 - 13:16

country flag Pirjo wrote:

Bonjour, Je voudrais réaliser ce modèle avec 2 fils. Et dans ce cas j'aimerais savoir les dimensions de l'ouvrage approximativement. Faudra-t-il s'attendre à un ouvrage deux fois plus grand que le modèle...? Merci à l'avance pour votre réponse

11.09.2021 - 16:43

DROPS Design answered:

Bonjour Mme Pirjo, nous ne sommes malheureusement pas en mesure de pouvoir adapter chacun de nos modèles à chaque demande; l'idéal serait de réaliser un échantillon avec la/les laines choisies et de recalculer ainsi la taille finale/voulue. Votre magasin saura vous aider si besoin, même par mail ou téléphone. Bon tricot!

13.09.2021 - 08:32

country flag Erica wrote:

Goedendag A) Waarvoor dienen de “losse” steken, na elke 6 stokjes in de eerste toer? B) bestaat het patroon uit 3 steken? C) Om zelf te verbreden, met welke factor van hoeveelheid steken moet ik dit doen? Mvg bvd

13.07.2021 - 22:54

DROPS Design answered:

Dag Erica,

Antwoord A: dit is om te voorkomen dat de ketting van lossen voor het opzetten te strak wordt. B. Het patroon bestaat uit een meervoud van 3 stokjes + 2. Omdat je na het maken van de lossenlus steeds 6 stokjes haakt en 1 steek overslaat, zou je een meervoud van 7 lossen erbij kunnen haken.

20.07.2021 - 17:35