
Looking for a yarn?


Comments / Questions (7)
![]() Gaby wrote:
Gaby wrote:
Sehr schlechte Beschreibung. Ein paar mehr Bebilderungen würden schon helfen.
03.03.2024 - 21:23
![]() Carole wrote:
Carole wrote:
Je ne comprends pas du tout les écrits pour l'assemblage. Tout ce que je peux dire c'est que maintenant j'ai 51 mailles sur 1 aiguille. Je suis rendue à faire l'assemblage. Pouvez-vous m'expliquer avec plus d'informations svp? Merci beaucoup pour votre aide
24.12.2022 - 03:10DROPS Design answered:
Bonjour Carole, glissez la moitié de vos mailles sur une autre aiguille (ou bien glissez la moitié de vos mailles sur l'autre extrémité de l'aiguille circulaire en faisant bien en sorte que votre fil de début des rangs se trouve toujours en début de rang, et pas au milieu du chausson) et assemblez les mailles ensemble en grafting, comme dans cette vidéo. Vous devez commencer par le côté talon et terminer par le côté pointe (la moitié de votre rang). Bon tricot!
02.01.2023 - 08:51
![]() Carole wrote:
Carole wrote:
Rebonjour, Désolée de vous déranger encore une fois mais je ne vois pas comment je peux faire ça. Y a-t-il une place où je pourrais vous envoyer une photo d'où je suis rendue? Peut-être que je n'ai pas fait le début comme il faut. Je suis vraiment mal prise et pourtant je tricote depuis un certain temps. J'espère que vous pourrez m’aider Merci
22.11.2022 - 21:50DROPS Design answered:
Bonjour Carole, cette vidéo montre comment tricoter la partie "pied" d'autres chaussons mais on fera de la même façon ici, sauf que les mailles ne sont pas montées mais relevées dans les rangs (côtes mousse) de la bordure picot. En espérant que ceci puisse vous aider. Bon tricot!
23.11.2022 - 09:12
![]() Carole wrote:
Carole wrote:
Merci infiniment pour les explications. Votre réponse, c'est très apprécié.
22.11.2022 - 11:48
![]() Carole wrote:
Carole wrote:
Bonjour, Je ne comprends pas les explications après avoir fini le dessus mesure 7cm. Pouvez-vous peut-être me l'expliquer autrement? Merci beaucoup pour votre aide
21.11.2022 - 20:40DROPS Design answered:
Bonjour Carole, lorsque le dessus du pied mesure 7 cm, tricotez 1 rang sur l'envers en rabattant 1 m de chaque côté = il reste 9 m, coupez le fil et mettez en attente. Vous allez maintenant tricoter toutes les mailles: reprenez les 14 m en attente, relevez 12 m le long du côté droit de la partie centrale, tricotez les 9 m, relevez 12 m le long du côté gauche de la partie centrale et reprenez les 14 m en attente = 61 m; tricotez maintenant au point mousse pendant 4 cm, mais après 2 cm, vous allez diminuer au milieu + de chaque côté. Bon tricot!
22.11.2022 - 10:02
![]() Carmela Squatrito Accetta wrote:
Carmela Squatrito Accetta wrote:
Ho lavorato questo modello con il bordo picot, ho riscontrato questa difficoltà:la parte della gamba risulta, larga rispetto al piede, forse per il bordo conviene lavorarla con i ferri più piccoli? Grazie, per le vostre spiegazioni molto chiare, e per i video .
29.01.2021 - 13:17DROPS Design answered:
Buonasera Carmela, come può vedere anche dalla foto questo modello non è aderente: controlli di non aver modificato la sua tensione. Buon lavoro!
29.01.2021 - 19:38
![]() Debbie wrote:
Debbie wrote:
What is your eskimo group E yarn comparable to in US weight yarns is it a bulky? Super bulky, chunky??
11.04.2018 - 18:05DROPS Design answered:
Dear Debbie, the DROPS Eskimo yarn can be considered "super-bulky" in teh US yarn-weight system. There is 50 meters in a 50 gramm skein, and we suggest using about 8 mm thick needles. Don not forget however, that eveyone knits slightly difefrently, therefore it is very important to always knit a swatch, wash it and check your gauge, and change needle sizes if necessary. Happy Crafting!
12.04.2018 - 02:14
|
|
Raspberry Frills#raspberryfrillsslippers |
|
|
|
|
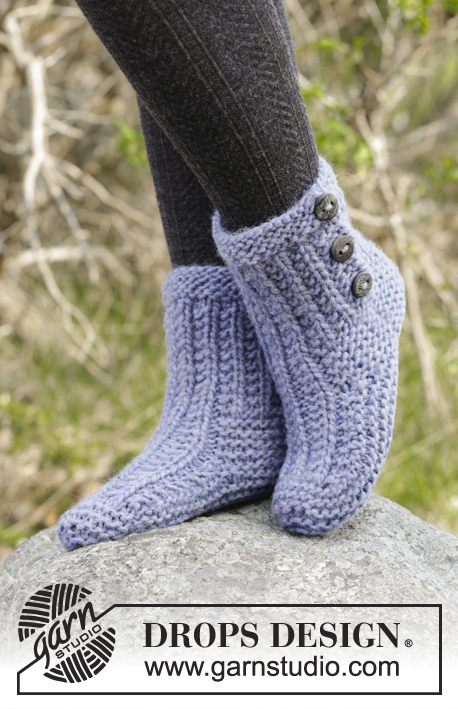
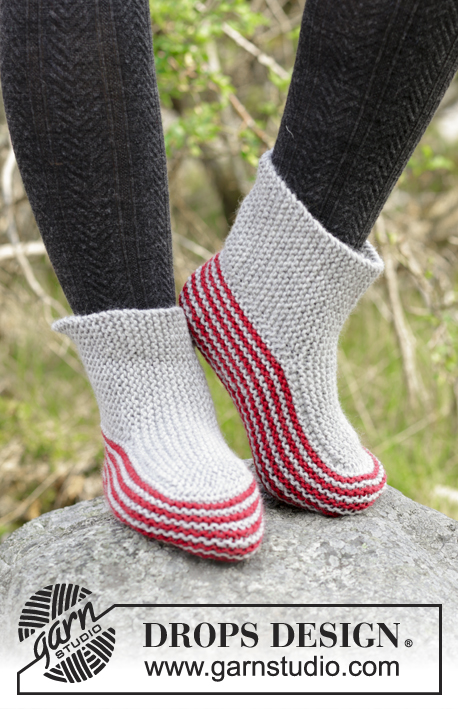
Knitted slippers with garter stitch and picot edge. The piece is worked in DROPS Snow.
DROPS 182-44 |
|
|
INFORMATION FOR THE PATTERN: RIDGE/GARTER STITCH (worked back and forth): 1 ridge = Knit 2 rows. PICOT EDGE (back and forth on needle): ROW 1 (= right side): Knit all stitches. ROW 2 (= wrong side): Knit all stitches. ROW 3 (= right side): Knit until there are 4 stitches left, these are worked as follows: Knit 2 together, 1 yarn over, in each of the last 2 stitches work 2 stitches = 2 new stitches on needle. ROW 4 (= wrong side): Slip 1 stitch, knit 1, pass slipped stitch over, knit 1 and pass the back stitch on the right needle over the front, 2 stitches now decreased - then knit to end of row. Repeat rows 1 - 4. ---------------------------------------------------------- SLIPPER: The piece is worked back and forth on circular needle. FOLDED EDGE: Cast on 26-28-30 stitches with circular needle size 6 mm / US 10 and Snow. Work GARTER STITCH – see description above, AT THE SAME TIME as you work PICOT EDGE – see description above, over the last 4 stitches. REMEMBER THE GAUGE! When you have worked a total of 37-39-41 ridges (i.e. 74-78-82 rows, the piece measures approx. 28-30-32 cm / 11"-11¾"-12½") bind off. FOOT: Knit up 1 stitch in each ridge along the long side without the picot edge = 37-39-41 stitches. Work 2 ridges, then knit 1 row from the right side. The next row is worked as follows - from the wrong side. Work the first 14-14-15 stitches and place on a thread, increase 1 stitch, work the next 9-11-11 stitches, increase 1 stitch, work the last 14-14-15 stitches and place these 14-14-15 stitches on a thread. Cut the strand. Continue working garter stitch over the middle 11-13-13 stitches. When top piece measures 7-8½-10 cm / 2¾"-3¼"-4" bind off the 1 edge stitch in each side = 9-11-11 stitches, place stitches on a thread. Cut the strand. Work the next row as follows (= from the right side): Work stitches from the threads AT THE SAME TIME as you knit up 12-14-16 stitches on each side of the top piece inside the 1 edge stitch = 61-67-73 stitches. THE PIECE IS NOW MEASURED FROM HERE! Insert 1 marker thread mid front of toe. Continue with garter stitch back and forth to finished length. When piece measures 2 cm / ¾", knit 2 together on each side of the marker thread. Repeat the decrease every 2nd row – AT THE SAME TIME when piece measures 4-4-5 cm / 1½"-1½"-2" knit 2 stitches together inside the 1 edge stitch in each side of the piece, repeat the decrease in the sides every 2nd row (= a total of 4 stitches decreased every 2nd row). When piece measures 5-5-6 cm / 2"-2"-2½" place stitches on a thread. Work another slipper in the same way. ASSEMBLY: Divide the stitches between 2 needles (= mid under foot), lay double and sew together lengthwise with grafting stitches. Sew the slipper mid back and up the leg – sew in the outermost loop of outermost stitch, so that the seam will not show when folding down the top part towards the right side. |
|
Have you finished this pattern?Tag your pictures with #dropspattern #raspberryfrillsslippers or submit them to the #dropsfan gallery. Do you need help with this pattern?You'll find 18 tutorial videos, a Comments/Questions area and more by visiting the pattern on garnstudio.com. © 1982-2025 DROPS Design A/S. We reserve all rights. This document, including all its sub-sections, has copyrights. Read more about what you can do with our patterns at the bottom of each pattern on our site. |


With over 40 years in knitting and crochet design, DROPS Design offers one of the most extensive collections of free patterns on the internet - translated to 17 languages. As of today we count 314 catalogs and 11822 patterns - 11812 of which are translated into English (US/in).
We work hard to bring you the best knitting and crochet have to offer, inspiration and advice as well as great quality yarns at incredible prices! Would you like to use our patterns for other than personal use? You can read what you are allowed to do in the Copyright text at the bottom of all our patterns. Happy crafting!
Post a comment to pattern DROPS 182-44
We would love to hear what you have to say about this pattern!
If you want to leave a question, please make sure you select the correct category in the form below, to speed up the answering process. Required fields are marked *.