
Popular categories
Looking for a yarn?


|
||||||||||||||||
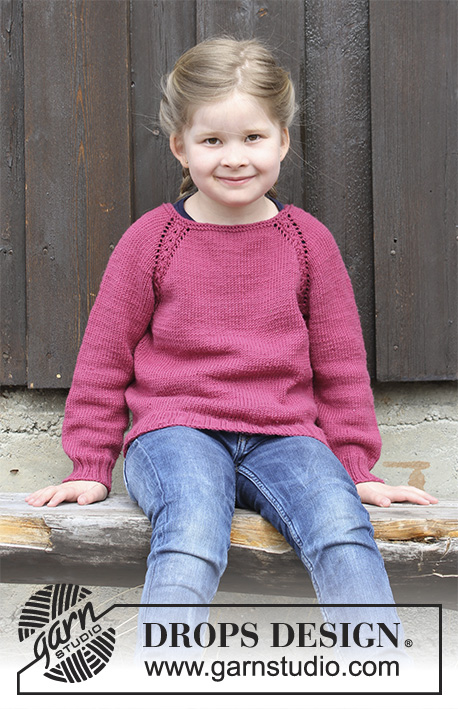
Cherry Cuddler |
||||||||||||||||
 |
 |
|||||||||||||||
Jumper with raglan and cables, worked top down for kids. Size 2 - 12 years Piece is knitted in DROPS Merino Extra Fine.
DROPS Children 30-14 |
||||||||||||||||
|
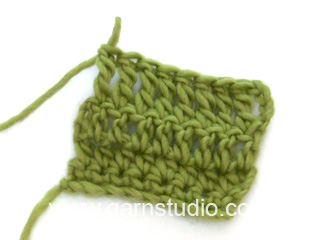
INFORMATION FOR PATTERN: GARTER STITCH (worked in the round): 1 ridge = 2 rounds. Knit 1 round and purl 1 round. PATTERN: See diagram A.1. RAGLAN: Increase for raglan on each side of A.1 in every transition between sleeves and body. INCREASE 1 STITCH BEFORE A.1 every other round: Work until A.1: Make 1 yarn over, work A.1. Knit yarn over on next round to make a hole. Work the increased stitches in stocking stitch. Repeat these 2 rounds. INCREASE 1 STITCH AFTER A.1 every other round: Work A.1, make 1 yarn over. Knit yarn over on next round to make a hole. Work the increased stitches in stocking stitch. Repeat these 2 rounds. INCREASE 1 STITCH BEFORE A.1 every 4th round: ROUND 1: Work until A.1. Make 1 yarn over, work A.1. ROUND 2: Knit yarn over to make a hole. ROUND 3: Work until 2 stitches remain before A.1: Knit 2 together, make 1 yarn over, work A.1. ROUND 4: Knit yarn over to make a hole. Repeat these 4 rounds. INCREASE 1 STITCH AFTER A.1 every 4th round: ROUND 1: Work A.1, make 1 yarn over. ROUND 2: Knit yarn over to make a hole. ROUND 3: Work A.1, make 1 yarn over, slip 1 stitch knitwise, knit 1 and pass slipped stitch over stitch worked ROUND 4: Knit yarn over to make a hole. Repeat these 4 rounds. DECREASE TIP (applies to sleeves): Decrease 1 stitch on each side of marker thread as follows: Work until 2 stitches remain before marker thread, knit 2 together (marker thread), slip 1 stitch knitwise, knit 1, pass slipped stitch over stitch worked (= 2 stitches decreased). ---------------------------------------------------------- JUMPER: Worked in the round on circular needle from mid back. Work top down. Work sleeves in the round on double pointed needles/a short circular needle, top down. YOKE: Cast on 72-76-80-80-84-84 stitches on a short circular needle size 4 mm with Merino Extra Fine. Work 2 ridges in GARTER STITCH - see explanation above. Then work as follows from mid back: Work 9-10-11-11-12-12 stitches in stocking stitch (= half back piece), A.1 (= 5 stitches), 8 stitches in stocking stitch (= sleeve), A.1, 18-20-22-22-24-24 stitches in stocking stitch (= front piece), A.1, 8 stitches in stocking stitch (= sleeve), A.1, 9-10-11-11-12-12 stitches in stocking stitch (= half back piece). REMEMBER THE KNITTING TENSION! Continue this pattern, AT THE SAME TIME begin increases for RAGLAN – see explanation above. NOTE! Increase differently on body and sleeves. INCREASE AS FOLLOWS ON FRONT/BACK PIECE: Increase 2 stitches on back piece and 2 stitches on front piece (= 1 stitch before/after A.1): Increase every other round 20-21-22-24-24-26 times in total. INCREASE AS FOLLOWS ON SLEEVES: Increase 2 stitches on each sleeve (= 1 stitch after/before A.1): Increase every other round 10-11-12-12-12-12 times, then increase every 4th round 5-5-5-6-6-7 times (15-16-17-18-18-19 times in total). After all increases are done there are 212-224-236-248-252-264 stitches on round. Work pattern as before until piece measures 15-16-16-18-18-19 cm from mid back. Work next round as follows: Work the first 31-33-35-37-38-40 stitches (= half back piece), slip the next 44-46-48-50-50-52 stitches on a stitch holder for sleeve, cast on 6-6-6-6-8-8 new stitches (= in the side under sleeve), work the next 62-66-70-74-76-80 stitches (= front piece), slip the next 44-46-48-50-50-52 stitches on a stitch holder for sleeve, cast on 6-6-6-6-8-8 new stitches (= in the side under sleeve), work the last 31-33-35-37-38-40 stitches (= half back piece). Finish body and sleeves separately. NOW MEASURE THE PIECE FROM HERE! BODY: = 136-144-152-160-168-176 stitches. Continue working in stocking stitch in the round over all stitches. When piece measures 14-17-21-23-27-30 cm from division, knit 1 round while increasing 28-28-32-32-36-36 stitches evenly = 164-172-184-192-204-212 stitches. Switch to circular needle size 3.5 mm. Work rib = knit 2/purl 2 for 4 cm. Cast off stitches with knit over knit and purl over purl. Jumper measures approx. 36-40-44-48-52-56 cm from shoulder and down. SLEEVE: Slip the stitches from stitch holder in one side of piece on double pointed needles/a short circular needle size 4 mm and pick in addition up 1 stitch in each of the 6-6-6-6-8-8 new stitches cast on under sleeve = 50-52-54-56-58-60 stitches. Insert 1 marker thread mid under sleeve. Work in stocking stitch in the round. When piece measures 3 cm, decrease 1 stitch on each side of marker thread - read DECREASE TIP. Decrease like this every 2-3-3-3½-3½-4 cm 7-7-8-8-9-9 times in total = 36-38-38-40-40-42 stitches. Continue in stocking stitch until sleeve measures 19-24-28-31-36-40 cm. Knit 1 round while increasing 8-6-6-8-8-10 stitches evenly = 44-44-44-48-48-52 stitches. Switch to circular needle size 3.5 mm. Work rib = knit 2/purl 2 for 4 cm. Cast off stitches with knit over knit and purl over purl. Sleeve measures approx. 23-28-32-35-40-44 cm from division. Work the other sleeve the same way. |
||||||||||||||||
Diagram explanations |
||||||||||||||||
|
||||||||||||||||

|
||||||||||||||||
|
Have you made this or any other of our designs? Tag your pictures in social media with #dropsdesign so we can see them! Do you need help with this pattern?You'll find tutorial videos, a Comments/Questions area and more by visiting the pattern on garnstudio.com. © 1982-2024 DROPS Design A/S. We reserve all rights. This document, including all its sub-sections, has copyrights. Read more about what you can do with our patterns at the bottom of each pattern on our site. |
||||||||||||||||


With over 40 years in knitting and crochet design, DROPS Design offers one of the most extensive collections of free patterns on the internet - translated to 17 languages. As of today we count 304 catalogues and 11422 patterns - 11422 of which are translated into English (UK/cm).
We work hard to bring you the best knitting and crochet have to offer, inspiration and advice as well as great quality yarns at incredible prices! Would you like to use our patterns for other than personal use? You can read what you are allowed to do in the Copyright text at the bottom of all our patterns. Happy crafting!
Comments / Questions (43)
Je viens de comprendre mon erreur. Je tricote en aller retour car je fais un gilet. J'ai resolu mon problème. Vous pouvez supprimer ma question. Merci
07.03.2020 - 15:52Bonjour. Pour le diagramme A1, les rangs retour sont représentés? Parce qu'en faisant les 3 mailles centrales en point toujours endroit, j'obtiens du point mousse. Pareil pour les 2 mailles qui debutent et terminent le motif. En les faisant toujours envers j'obtiens aussi du point mousse. Et il ne semble pas que ça correspond au modèle. Du coup je fais les mailles comme elles se presentent et mo. Motif A1 se fait sur 8 rangs ? Ou je tricote comme ca se presente sur 4 rangs ?
07.03.2020 - 15:25DROPS Design answered:
Bonjour Valérie, le diagramme A.1, comme le pull, se tricote entièrement en rond, on va donc lire tous les rangs de A.1 sur l'endroit de droite à gauche. Pour tricoter du jersey en rond, on tricote tous les tours à l'endroit (pour du point mousse en rond, il faudra alterner 1 tour end, 1 tour env). A.1 se tricote donc sur l'endroit comme indiqué dans la légende: 1 m env, 2 ou 3 m end en fonction du tour, 1 m env. Bon tricot!
09.03.2020 - 10:02Hallo, Ich bin nun mit der Raglan-Zunahme fertig. Jetzt steht in der Anleitung "im Muster wie zuvor weiterarbeiten". Stricke ich nun immer glatt rechts bis zum Muster A1 und ginterher wieder glatt rechts? Oder werden noch durch Zu- und Abnahme Löcher hinzugefügt?
19.09.2019 - 22:44DROPS Design answered:
Liebe Kathrin, wenn alle Raglan-Zunahmen fertig sind, stricken Sie mit glatt rechts und A.1 (= wie zuvor) aber jetzt nehmen Sie keine Maschen mehr zu. Viel Spaß beim stricken!
20.09.2019 - 08:39Bonjour, Comment distinguer le A1 qui appartient à la manche ou au dos ? Si je comprends bien il y a deux fois le A1 au dos et deux fois le A1 au devant ? Merci beaucoup
17.09.2019 - 23:10DROPS Design answered:
Bonjour Mme Beaudoin, on tricote effectivement 4 fois A.1 tout le tour,: entre le dos/la 1ère manche, puis entre la 1ère manche et le devant; entre le devant et la 2ème manche et enfin entre la 2ème manche et le dos. Les augmentations du raglan se feront donc après A.1 au début de la manche/dos/devant et avant A.1 à la fin de la manche/dos/devant. Bon tricot!
18.09.2019 - 08:06No entiendo en el esquema del raglan el cuadrado negro que dice "ningún punto, saltar este cuadrado". Muchas gracias
29.08.2019 - 11:20DROPS Design answered:
Hola Alicia. La fila 2 se trabaja de la siguiente manera: 1 revés, 1 derecho, 1 lazada, 1 derecho, 1 revés (el punto (el cuadrado negro) se ha disminuido en la fila anterior). La fila 3 = 1 revés, 3 derechos, 1 revés.
31.08.2019 - 19:45Hola,mi pregunta es si se podría tejer con agujas rectas este modelo?Gracias,saludos
11.04.2019 - 23:47DROPS Design answered:
Hola Amalia. Este modelo está trabajado en redondo de arriba abajo, sin costuras. Para realizarlo necesitarás agujas circulares y agujas de doble punta. Con agujas rectas no se puedan realizar este tipo de labores.
13.04.2019 - 20:12Hej, börjar med detta mönster efter långt uppehåll och är relativt nybörjare. Fastnar direkt på vad ”ingen maska,hoppa över rutan” betyder i A.1 tredje varvet. Försöker hitta en instruktionsvideo för detta men hittar inget. Tacksam för lite hjälp.
08.02.2019 - 22:09DROPS Design answered:
Hei Sofia. Det betyr rett og slette at du bare kan se bort fra denne ruten/ignorere den. Forrige omgang felt du 1 maske, og du leger 1 kast (øker 1 maske) etter den sorte ruten, slik at maskeantallet forblir det samme. Du strikker altså omgang 2 og 6 i diagrammet slik: 1 maske vrang, 1 rett, 1 kast, 1 rett, 1 vrang. God fornøyelse
11.02.2019 - 15:20Como empiezo a tejer despues de los 2 surcos en PUNTO MUSGO, NO TENGO CLARO ESTA PARTE?
05.02.2019 - 20:58DROPS Design answered:
Hola Tania. Después de 2 pliegues en PUNTO MUSGO, comenzamos con el patrón, es decir, comenzamos a trabajar el delantero, la espalda y las mangas en punto jersey y las partes de ráglan según el diagrama A.1.
11.02.2019 - 20:12Hi, ich habe ein Fragen zu dem Diagram: Es wurde schon mal gefragt, ob das Diagramm von rechts nach links gelesen wird, aber dann verstehe ich den Rest leider nicht. Was passiert mit der schwarzen Masche in Zeile 3 und 7. wird sie nur rechts abgehoben. Und wenn ich wie beschieben in Zeile 4 bzw. 8 dann wieder die erste Masche abhebe wäre das doch die gleiche Masche wieder. Oder lese ich das Diagramm doch vin links nach rechts?
10.01.2019 - 00:13DROPS Design answered:
Liebe Christine, A.1 wird über 5 bzw 4 Maschen gestrickt: bei der 1. Reihe nehmen Sie 1 Masche ab, bei der 2. Reihe stricken Sie 1 Umschlag zwischen den beiden re. Maschen = es sind wieder 5 M. Dieses Video zeigt, wie man dieses Zopf strickt. Viel Spaß beim stricken!
10.01.2019 - 09:56Liebes Team, ich verstehe die Zunahme nach dem Bündchen nicht. Woran erkenne ich den Unterschied in der Beschreibung der Zunahme Vorder- und Rückenteil zwischen Zunahme Ärmel. Für mich ist alles gleich beschrieben. Hinzu kommt, daß von Zunahme in der 2. und 4. Runde die Rede ist, in der Beschreibung oben in der 1. und 3. Runde. Wenn ich beim Ärmel dann nicht so wie beim Vorder- und Rückenteil durch Umschlag zunehme, wie entsteht dann das Loch. Ich brauche Hilfe . Dankeschön
09.01.2019 - 21:44DROPS Design answered:
Liebe Sylvia, wenn Sie in jede 4. Runde zunehmen, nehmen Sie bei der 1. Runde 1 M zu (= Umschlag vor/nach A.1), und bei der 3. Runde stricken Sie 1 Abnahme + 1 Umschlag = keine Zunahme, die Maschenanzahl bleibt gleich und das Loch entsteht durch den Umschlag. Viel Spaß beim stricken!
10.01.2019 - 09:40