DROPS Baby Merino
DROPS Baby Merino
100% Wool
from 3.50 £ /50g
Get the yarn to make this pattern from 45.50£.

The yarn cost is calculated from the pattern’s smallest size and the yarn’s cheapest product type. Looking for an even better price? You might find it on the DROPS Deals!

DROPS SS24

Fairy Glass

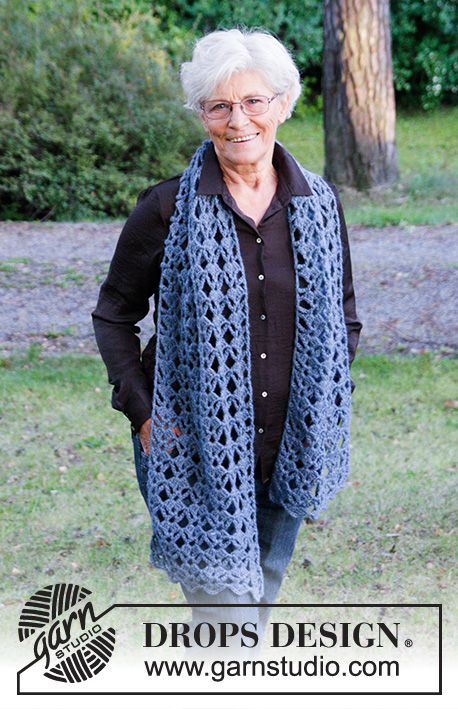
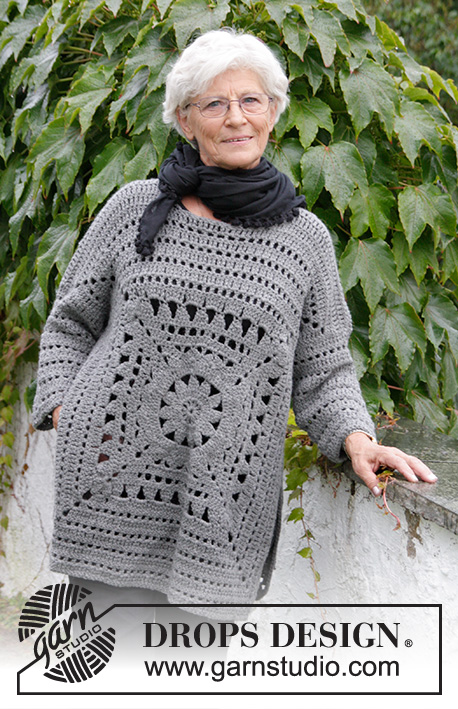
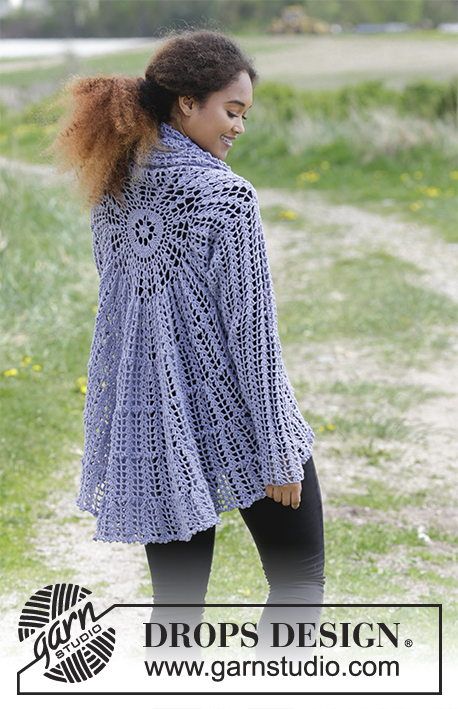
Crochet jacket worked in a circle with fan pattern. Size: S - XXXL Piece is crocheted in DROPS BabyMerino.

DROPS 181-26
DROPS design: Pattern no bm-040
Yarn group A
----------------------------------------------------------
Size: S/M – L/XL – XXL/XXXL
Materials:
DROPS BABY MERINO from Garnstudio (belongs to yarn group A)
650-750-800 g colour 37, lavender

Piece can also be crocheted with yarn from:
“Alternative yarn (yarn group A)” - see link below.

DROPS HOOK SIZE 3.5 mm - or size needed to get 22 double treble crochets x 8 rows = 10 cm in width and 10 cm vertically. 1 repetition A.1 should measure approx. 4.5 cm in width.
----------------------------------------------------------

-------------------------------------------------------

Alternative Yarn – See how to change yarns here
Yarn Groups A to F – Use the same pattern and change the yarn here
Yarn usage using an alternative yarn – Use our yarn converter here

-------------------------------------------------------

DROPS Baby Merino
DROPS Baby Merino
100% Wool
from 3.50 £ /50g
Get the yarn to make this pattern from 45.50£.

The yarn cost is calculated from the pattern’s smallest size and the yarn’s cheapest product type. Looking for an even better price? You might find it on the DROPS Deals!

Pattern instructions

NOTE: This pattern is written in British English. All measurements in charts are in cm. For conversion from cm to inches - click here. There are different terms for crocheting in British and American English. If this pattern includes crochet, click for "crochet terms" here. For this pattern in American English, please click here.
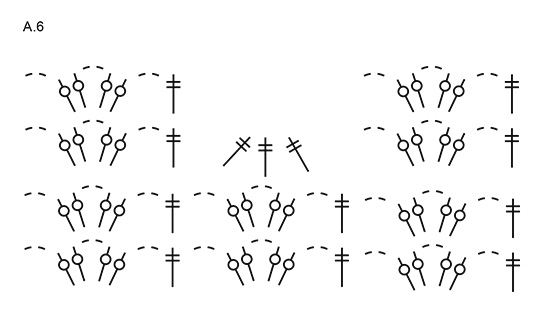
INFORMATION FOR PATTERN:

MAGIC CIRCLE:
To avoid hole in the middle beg with this technique: 
Hold yarn end in the left hand and make a loop around left index finger (from left to right). Hold the loop with left thumb and index finger. Insert hook through loop, get the yarn from ball, pull yarn through loop, make 1 yarn over and pull yarn over through stitch on hook = 1 double crochet, work 4 chain stitches (= 1 double treble crochet), then work 15 double treble crochets around loop, finish with 1 slip stitch in 3rd chain stitch = 16 double treble crochets. Pull yarn end tighten loop together so that the hole in the middle disappears. Then work as explained in pattern.

PATTERN:
See diagrams A.1 to A.6.

FAN:
1 fan = 2 double treble crochets, 2 chain stitches and 2 double treble crochets worked into a chain space.

CROCHET TOGETHER:
See diagram A.6. Decrease 1 repetition as follows:
Work 1 double treble crochet in first chain space but wait with last pull through. Work next double treble crochet in next chain space but wait with last yarn over and pull through. Work next double treble crochet in last chain space and pull last yarn over through all 4 loops on hook. On next round skip the double treble crochets worked together.
----------------------------------------------------------

JACKET WORKED IN A CIRCLE:
Worked in the round from mid back on the back. Work the sleeves at the end.

Work a MAGIC CIRCLE - see explanation above, on hook size 3.5 mm with Baby Merino. Then work according to A.1 - NOTE: First round in A.1 is explained below magic circle. Work 4 repetitions of A.1b in the round on every round. A.1a shows how round begins and ends. REMEMBER THE CROCHET TENSION! When A.1 has been worked, there are 28 groups of double treble crochets / 56 double treble crochets on round.

Work from 2nd round in A.2 as follows: Work A.2a (shows how round begins and ends), continue with A.2b in the round (= 14 repetitions). Work A.2 1 time vertically = 84 treble crochets/chain spaces.

Work from 2nd round in A.3 as follows: Work A.3a (shows how round begins and ends), continue with A.3b in the round (= 42 fans/double treble crochets). Work from A.2: 3rd round 1 time and 4th round 4-5-6 times (= 6-7-8 rounds in total with fans and double treble crochets).

ARMHOLES:
Work next round as 4th round in A.2 (fans and double treble crochets), at the same time work as follows: Work the first 5 repetitions as before (1 repetition = 1 double treble crochet, 1 chain space, 1 fan, 1 chain space ), work 1 double treble crochet in next double treble crochet, work 40-44-48 new chain stitches, skip next fan and the next 5-6-7 repetitions, (skip 6-7-8 fans and 5-6-7 double treble crochets in total = armhole), work as before in the next 20-18-16 repetitions, work 1 double treble crochet in next double treble crochet, work 40-44-48 new chain stitches, skip next fan and the next 5-6-7 repetitions, (skip 6-7-8 fans and 5-6-7 double treble crochets in total = armhole), work as before in the last 5 repetitions.

Work next round as follows:
Work 5th round in A.2, around chain spaces for armhole work 6-7-8 repetitions of A.2 (= 36-42-48 treble crochets with 5 chain stitches between each) = 42 repetitions in total of A.2 (= 252 treble crochets in total with 5 chain stitches between each).

Work from 2nd round in A.4 as follows: Work A.4a, continue with A.4b, but 10 times evenly on round (= approx. every 4th repetition work A.5b instead of A.4b to increase) = 52 repetitions of A.4.

Work from 2nd round in A.2 as follows: Work A.2a, continue with A.2b in the round = 52 repetitions of A.2. On next round continue from 3rd round in A.2a and A.2b. When 4th round has been worked vertically, repeat this round 3-4-5 more times (= 6-7-8 rounds with fans/double treble crochets in total).

Work next round as follows:
Work 5th round in A.2 (= 312 treble crochets with 5 chain stitches between each).

Work from 2nd round in A.4 as follows: Work A.4a, continue with A.4b, but 10 times evenly on round (= approx. every 5th repetition work A.5b instead of A.4b to increase) = 62 repetitions of A.4.

Work from 2nd round in A.2 as follows: Work A.2a, continue with A.2b in the round = 62 repetitions of A.2. On next round continue from 3rd round in A.2a and A.2b. When 4th round has been worked vertically, repeat this round 3-4-5 more times (= 6-7-8 rounds with fans/double treble crochets in total).

Work next round as follows:
Work 5th round in A.2 (= 372 treble crochets with 5 chain stitches between each).

Work from 2nd round in A.4 as follows: Work A.4a, continue with A.4b, but 10 times evenly on round (= approx. every 6th repetition work A.5b instead of A.4b to increase) = 72 repetitions of A.4.

Work from 2nd round in A.2 as follows: Work A.2a, continue with A.2b in the round = 72 repetitions of A.2. On next round continue from 3rd round in A.2a and A.2b. When 4th round has been worked vertically, repeat this round 3-4-5 more times (= 6-7-8 rounds with fans/double treble crochets in total).

Work next round as follows:
Work 5th round in A.2 (= 432 treble crochets with 5 chain stitches between each).

Work from 2nd round in A.4 as follows: Work A.4a, continue with A.4 b, but 20 times evenly on round (= approx. every 3rd repetition work A.5b instead of A.4b to increase) = 92 repetitions of A.4.

Work from 2nd round in A.2 as follows: Work A.2a, continue with A.2b in the round = 92 repetitions of A.2. On next round continue from 3rd round in A.2a and A.2b. When 4th round has been worked vertically, repeat this round 3-4-5 more times (= 6-7-8 rounds with fans/double treble crochets in total).

Work next round as follows:
Work last round in A.2 (= 552 treble crochets with 5 chain stitches between each). Fasten off. Piece measures approx. 120-130-140 cm in diameter.

SLEEVES:
Work in the round from armhole and down. Begin mid under sleeve: In the side where fans were skipped. Work as last round in A.2 BUT with only 1 chain stitch between treble crochets, then work 36-42-48 treble crochets with 1 chain stitch between each from the other side of armhole = 72-84-96 treble crochets/chain stitches.

Work 2nd round in A.4 = 12-14-16 repetitions around armhole. Then work 2nd round in A.2. Continue with fans and double treble crochets as in 3rd and 4th round in A.2. When piece measures 3 cm from armhole, decrease 1 repetition under sleeve. See diagram A.6 and read CROCHET TOGETHER. Decrease alternately before and after mid under sleeve every 8 cm, 6 times in total = 6-7-8 repetitions remain on round. Fasten off when piece measures 54-54-54 cm. Work the other sleeve the same way, but start in the opposite side so that the round starts mid under sleeve.

Diagram

symbols = 1 chain stitch
symbols = 5 chain stitches
symbols = 1 treble crochet in stitch
symbols = 1 treble crochet around chain space
symbols = 1 double treble crochet around chain space
symbols = 1 double treble crochet in stitch
symbols = work 3 chain stitches. Finish round with 1 slip stitch in 3rd chain stitch at beginning of round
symbols = work 4 chain stitches. Finish round with 1 slip stitch in 4th chain stitch at beginning of round.
symbols = this round has already been worked
diagram
diagram
diagram
diagram
Do you have a question? See a list of frequently asked questions (FAQ)

Knitting tension is what determines the final measurements of your work, and is usually measured per 10 x 10 cm. It is provided like so: number of stitches in width x number of rows in height - eg: 19 stitches x 26 rows = 10 x 10 cm.

The knitting tension is very individual; some people knit/crochet loosely while others work tightly. You adjust the knitting tension with the needle size, which is why the suggested needle size is only meant as a guide! You need to adjust this (up or down) to ensure that YOUR knitting tension matches the knitting tension provided in the pattern. If you work with a different knitting tension than provided you will have a different yarn consumption, and your work will have different measurements than what the pattern suggests.

The knitting tension also determines which yarns can replace each other. As long as you achieve the same knitting tension you can replace one yarn with another.

See DROPS lesson: How to measure your tension/gauge

See DROPS video: How to make a gauge tension swatch

The required amount of yarn is provided in grams, eg: 450 g. To calculate how many balls you’ll need you first need to know how many grams are in 1 ball (25g, 50g or 100g). This information is available if you click on the individual yarn quality on our pages. Divide the amount required with the amount of each ball. For example, if each ball is 50g (the most common amount), the calculation will be as follows: 450 / 50 = 9 balls.

The important thing when changing from one yarn to another is that the knitting/crochet tension remains the same. This is so that the measurements of the finished piece will be the same as on the sketch provided. It is easier to achieve the same knitting tension using yarns from the same yarn group. It is also possible to work with multiple strands of a thinner yarn to achieve the knitting tension of a thicker one. Please try our yarn converter. We recommend you to always work a test swatch.

Please NOTE: when changing yarn the garment might have a different look and feel to the garment in the photo, due to individual properties and qualities of each yarn.

See DROPS lesson: Can I use a different yarn than the one mentioned in the pattern?

All our yarns are categorised into yarn groups (from A to F) according to thickness and knitting tension – group A contains the thinnest yarns and group F the thickest. This makes it easier for you to find alternative yarns to our patterns, should you wish to switch yarn. All yarns within the same group have a similar knitting tension and can easily replace each other. However, different yarn qualities have different structures and properties which will give the finished work a unique look and feel.

Click here for an overview of the yarns in each yarn group

At the top of all our patterns you’ll find a link to our yarn calculator, which is a helpful tool should you wish to use a different yarn than suggested. By filling in the yarn quality you wish to replace, the amount (in your size) and number of strands, the calculator will present good alternative yarns with the same knitting tension. Additionally it will tell you how much you’ll require in the new qualities and whether you’ll need to work with multiple strands. Most skeins are 50g (some are 25g or 100g).

If the pattern is worked with multiple colours, every colour will have to be calculated separately. Similarly, if the pattern is worked with several strands of different yarns (for example 1 strand Alpaca and 1 strand Kid-Silk) you will have to find alternatives for each, individually.

Click here to see our yarn calculator

Since different yarns have different qualities and textures we have chosen to keep the original yarn in our patterns. However, you can easily find options among our available qualities by using our yarn calculator, or simply pick a yarn from the same yarn group.

It is possible that some retailers still have discontinued yarns in stock, or that someone has a few skeins at home that they would like to find patterns for.

The yarn calculator will provide both alternative yarn as well as required amount in the new quality.

If you think it's hard to decide what size to make, it can be a good idea to measure a garment you own already and like the size of. Then you can pick the size by comparing those measures with the ones available in the pattern's size chart.

You'll find the size chart at the bottom of the pattern.

See DROPS lesson: How to read size chart

The needle size provided in the pattern serves only as a guide, the important thing is to follow the knitting tension. And since knitting tension is very individual, you will have to adjust the needle size to ensure that YOUR tension is the same as in the pattern – maybe you’ll have to adjust 1, or even 2 needle sizes, up or down to achieve the correct tension. For this, we recommend that you work test swatches.

Should you work with a different knitting tension than the one provided, the measurements of the finished garment might deviate from the measurement sketch.

See DROPS lesson: How to measure your tension/gauge

See DROPS video: How to make a tension/gauge swatch

Working a garment top-down provides more flexibility and room for personal adjustment. For example it is easier to try the garment on while working, as well as making adjustments to length of yoke and shoulder caps.

The instructions are carefully explaining every step, in the correct order. Diagrams are adjusted to the knitting direction and are worked as usual.

The diagram depicts all rows/rounds, and every stitch seen from the right side. It is read from bottom to top, from right to left. 1 square = 1 stitch.

When working back and forth, every other row is worked from the right side and every other row is worked from the wrong side. When working from the wrong side, the diagram will have to be worked reversed: from left to right, knit stitches are purled, purl stitches are knit etc.

When working in the round every round is worked from the right side and the diagram are worked from right to left on all rounds.

See DROPS lesson: How to read knitting diagrams

The diagram depicts all rows/rounds, and every stitch seen from the right side. It is worked from bottom to top, from right to left.

When working back and forth every other row is worked from the right side: from right to left and every other row is worked from the wrong side: from left to right.

When working in the round, every row in the diagram are worked from the right side, from right to left.

When working a circular diagram you start in the middle and work your way outwards, counter clockwise, row by row.

The rows usually start with a given number of chain stitches (equivalent to the height of the following stitch), this will either be depicted in the diagram or explained in the pattern.

See DROPS lesson: How to read crochet diagrams

Instructions for working several diagrams after each other on the same row/round, will often be written like so: “work A.1, A.2, A.3 a total of 0-0-2-3-4 times". This means you work A.1 once, then A.2 is worked once, and A.3 is repeated (in width) the number of times provided for your size – in this case like so: S = 0 times, M = 0 times, L=2 times, XL= 3 times and XXL = 4 times.

The diagrams are worked as usual: begin with the first row in A.1, then work the first row in A.2 etc.

See DROPS lesson: How to read knitting diagrams

See DROPS lesson: How to read crochet diagrams

The total width of the garment (from wrist-to-wrist) will be larger in the larger sizes, despite the actual sleeves being shorter. The larger sizes have longer sleeve caps and wider shoulders, so there will be a good fit in all sizes.

The measurement sketch/schematic drawing provides information regarding the full length of the garment. If it’s a jumper or a jacket the length is measured from the highest point on the shoulder closest to the neckline, and straight down to the bottom of the garment. It is NOT measured from the tip of shoulder. Similarly, the length of yoke is measured from the highest point on the shoulder and down to where yoke is split into body and sleeves.

On a jacket measures are never taken along bands, unless specifically stated. Always measure inside band stitches when measuring the length.

See DROPS lesson: How to read a schematic drawing

Diagrams are often repeated on the round or in height. 1 repeat is the diagram the way it appears in the pattern. If it says to work 5 repeats of A.1 in the round, then you work A.1 a total of 5 times after/next to each other in the round. If it says to work 2 repeats of A.1 vertically/in height you work the entire diagram once, then begin again at the start and work the entire diagram one more time.

Chain stitches are slightly narrower than other stitches and to avoid working the cast-on edge too tight, we simply chain more stitches to begin with. The stitch count will be adjusted on the following row to fit the pattern and measurement sketch.

The rib edge is more elastic and will contract slightly compared to, for example, stocking stitch. By increasing before the rib edge, you avoid a visible difference in width between the rib edge and the rest of the body.

It’s very easy to cast off too tightly, and by making yarn overs while casting off (and simultaneously casting these off) you avoid a too tight cast off edge.

See DROPS video: How to bind off with yarn overs (yo)

To achieve an even increase (or decrease) you can increase on, for example: every 3rd and 4th row alternately, like so: work 2 rows and increase on the 3rd row, work 3 rows and increase on the 4th. Repeat this until the increase is complete.

See DROPS lesson: Increase or decrease 1 st on every 3rd and 4th row alternately

Should you prefer to work in the round instead of back and forth, you may of course adjust the pattern. You’ll need to add steeks mid-front (usually 5 stitches), and follow the instructions. When you would normally turn and work from the wrong side, simply work across the steek and continue in the round. At the end you’ll cut the piece open, pick up stitches to work bands, and cover the cut edges.

See DROPS video: How to knit steeks and cut open

Should you prefer to work back and forth instead of in the round, you may of course adjust the pattern so you work the pieces separately and then assemble them at the end. Divide the stitches for the body in 2, add 1 edge stitch in each side (for sewing) and work the front and back pieces separately.

See DROPS lesson: Can I adapt a pattern for circular needles into straight needles?

Pattern repeats can vary slightly in the different sizes, in order to get the correct proportions. If you’re not working the exact same size as the garment in the photo, yours might deviate slightly. This has been carefully developed and adjusted so that the complete impression of the garment is the same in all sizes.

Make sure to follow instructions and diagrams for your size!

If you have found a pattern you like which is available in women’s size it’s not very difficult to convert it to men’s size. The biggest difference will be the length of sleeves and body. Start working on the women size that you think would fit across the chest. The additional length will be worked right before you cast off for the armhole/sleeve cap. If the pattern is worked top-down you can add the length right after the armhole or before the first decrease on sleeve.

Regarding additional yarn amount, this will depend on how much length you add, but it is better with a skein too many than too few.

All yarns will have excess fibres (from production) that might come off as lint or shedding. Brushed yarns (ie hairier yarns) have more of these loose, excess fibres, causing more shedding.

Shedding also depends on what is worn under or over the garment, and whether this pulls at the yarn fibres. It’s therefore not possible to guarantee that there will be no shedding

Below are some tips on how to get the best result when working with hairier yarns:

1. When the garment is finished (before you wash it) shake it vigorously so the looser hairs come off. NOTE: do NOT use a lint roller, brush or any method that pulls at the yarn.

2. Place the garment in a plastic bag and put it in your freezer - the temperature will cause the fibres to become less attached to each other, and excess fibres will come off easier.

3. Leave in the freezer for a few hours before taking it out and shaking it again.

4. Wash the garment according to the instructions on the yarn label.

Pilling is a natural process that happens to even the most exclusive of fibers. It's a natural sign of wear and tear that is hard to avoid, and that is most visible in high friction areas of your garment like a sweater's arms and cuffs.

You can make your garment look as new by removing the pilling, using a fabric comb or a pill/lint remover.

Still can't find the answer you need? Then scroll down and leave your question so one of our experts can try to help you. This will be done normally within 5 to 10 working days.
In the meantime, you can read the questions and answers that others have left to this pattern or join the DROPS Workshop on Facebook to get help from fellow knitters/crocheters!

You might also like...

Post a comment to pattern DROPS 181-26

We would love to hear what you have to say about this pattern!

If you want to leave a question, please make sure you select the correct category in the form below, to speed up the answering process. Required fields are marked *.

Comments / Questions (45)

country flag Teresa wrote:

I do not know how to crochet from a diagram. I really want to make this sweater. Can I get the pattern in a written form?

15.10.2020 - 05:33

DROPS Design answered:

Dear Teresa, we only have diagrams to this pattern, but you will get helped with this lesson explaining how to read crochet diagrams. Happy crocheting!

15.10.2020 - 09:14

country flag Anja wrote:

Hallo, ich bin gerade bei der Runde nach den Armausschnitten, die 5. Reihe von A2 ist erledigt (252 Stäbchen mit 5 Luftmaschen dazwischen). Ich komm jedoch in der Runde danach (A4b bzw. A5b) nicht auf die in der Beschreibung angegebenen 52 Rapporte. Bei den 252 Stäbchen/Luftmaschenbögen gehen sich nur 42 Rapporte aus (für 52 Rapporte würden 312 Stäbchen/Luftmaschenbögen benötigt). Ist die Beschreibung falsch oder die Grafik von A4/A5?

20.08.2020 - 20:58

DROPS Design answered:

Liebe Anja, Sie hatten 42 Mal A.2 in der Breite gehäkelt = 42 x 6 Stb in jedem A.2 = 252 Stb. Jetzt häkeln Sie A.4 (über 6 Stb = 1 Rapport von A.4) 32 Mal in der Runde aber gleichzeitig häkeln Sie A.5 (= über 6 Stb häkeln Sie 2 Rapporte von A.4) insgesamt 10 Mal bei der Runde. Dh ungefär so: (A.4 x 4, A.5) in der Runde häkeln. = jetzt haben Sie: 42 Rapporte von A.4 + 10 Rapporte (in A.5 zugenommen) = 52 Rapporte von A.4 in der Runde. Viel Spaß beim häkeln!

21.08.2020 - 08:12

country flag Adrian Canfield wrote:

I was just wondering if I could get some clarification on the sleeves. When it says, "...Decrease alternately before and after mid under sleeve every 8 cm / 3 1/8'', 6 times in total = 6-7-8 repetitions remain on round..." does that mean decrease once before the mid, do a round with no decreases, and then on the next round decrease after the mid? Or does it mean to decrease before and after the mid, then a round with no decreases.

05.08.2020 - 23:34

DROPS Design answered:

Hi Adrian, This means you decrease just once every 8 cm, so the first time before mid under sleeve, then work 8 cm and decrease again but this time after the mid under sleeve. A total of 6 decreases means you have then worked 48 cm. Hope this helps and happy crocheting!

06.08.2020 - 07:10

country flag Kirsten English wrote:

After the armholes, when I have 52 repetitions of A4&5, do I continue with 2nd round of A2 in every chain space, including fan? If so I will have way too many repetitions. I keep referring to the photos but I don't think they match this section of the pattern.

07.07.2020 - 14:14

DROPS Design answered:

Dear Mrs English, you work 1 repeat of A.2b over 1 repeat of A.4 from previous round, ie you had 52 repeats A.4 on previous round, you work now 52 repeats as before but following now A.2b (with A.2a at the beg of the round). Happy crocheting!

07.07.2020 - 15:32

country flag Kirsten English wrote:

Also having trouble after armholes. I have the 252 double crochets, but skipping 2 chain spaces looks gappy and doing 4b three times, then 5b gives me 43 repetitions. It just doesn't add up and it doesn't look like the photos. The photos look like you just skip one chain space. Can you clarify?

05.07.2020 - 23:34

DROPS Design answered:

Dear Mrs English, not sure to understand completely what you mean - after you have worked the 2 chain spaces for armholes (skipping stitches), you then work the 5th row in A.2 around (= as before), in both chain-spaces for armhole (where you skipped 5-6-7 repetitions), work now 6-7-8 repetitions = 252 sts in total (with 5 ch-sts between each) and the round continue as if there weren't any "holes" for the armholes. Hope this will help :) Happy crocheting!

06.07.2020 - 09:13

country flag Anett wrote:

Har problem som flera andra med varvet a4b och där man ska virka a5b fördelat 10 ggr. Hur jag än tänker och försöker får jag inte 52 rapporter virkade när jag är klar. Jag får 32 a4 och 10 a5 enligt beskrivningen ska jag ha 52 a4 vad jag kan läsa. Vad är det som inte stämmer

09.04.2020 - 01:16

DROPS Design answered:

Hej Anette, jo men i A.5 har du 2 rapporter, så hvis du har 32 rapporter i A.4 og 10x2 rapporter i A.5, så bliver det ialt 52 rapporter :)

29.04.2020 - 09:39

country flag Sylvia Ritson wrote:

I love this pattern (Fairy Glass) and others like it. I was wondering if it would be possible to make it in a slowly graduating yarn (such as the Wolltraum My Melodyy range). I see it working well for the body, but not sure about the sleeves. If that wouldn't work for this pattern, is there a similar one that I could do this with?

09.11.2019 - 14:52

DROPS Design answered:

Dear Sylvia, please understand that we cannot advise you on using yarns other than the DROPS range. Generally with self striping / graduating yarns the colors on the sleeves will have a different rythm than on the bogy. Happy Crafting!

10.11.2019 - 11:26

country flag Sarah wrote:

I love the pattern but I do not understand the pattern, i need it in American English, I pressed the key for it to be converted , but nothing happen, i would like to have this pattern, how do I get it in english.

18.09.2019 - 08:24

DROPS Design answered:

Dear Sarah, click on the scrolling down menu below photo and choose US-English to get the pattern with US-crochet terminology and measurements in inches. Happy crocheting!

18.09.2019 - 10:13

country flag Kristin Blevins wrote:

So in other words, the next round after completing the arm hole paragraph of the pattern, and the 5th row of A2 is completed... will I work the next round similar to previous rounds with the exception of doing a repetition of A5, every 10 repetition? The diagram for A4. Which the pattern says to work 10 repetitions before a repetition of A5 is confusing. Not sure if it is worked like previous A2. Rounds or if I'm skipping more chain spaces

19.07.2019 - 18:59

Kristin Blevins answered:

I have figured it out. The chart for A.4 is wrong and should be corrected. The chart says to skip two chain spaces between each fan and TC. In order to get the correct stitch count you only skip one chain space.

20.07.2019 - 02:34

country flag Kristin L Blevins wrote:

I am having issues after the arm hole. Where the switch back and forth between A4, and A5. Is it supposed to be skipping loops, it seems to be a decrease. The chart appears to read: TC, ch2, skip 2 chain sp, then work fan, chain 2, skip 2 chain space, this we do 4 times and then work A5. TC, ch2, skip home chain space, work fan, ch2, TC in next chain sp, ch2, skip 1 chain, work fan. Then switch back to the A4 round. Am I reading this correctly?

18.07.2019 - 18:31

DROPS Design answered:

Dear MRs Blevins, working A.5b evenly instead of A.4b will increase the number of stitches = in each A.4b you have 1 tr + 1 fan and in each A.4b you will have 1tr,1 fan, 1 tr, 1 fan worked over the same number of stitches. Happy crocheting!

19.07.2019 - 07:39