
Popular categories
Looking for a yarn?


Comments / Questions (60)
![]() Patti Urso wrote:
Patti Urso wrote:
I have completed this part of the instructions for 4x and finished.at mid back. “Increase 14-16-18-19 stitches in each side on 2nd, 5th and 8th round in A.1b, then increase 16-16-20-21 stitches on 9th-9th-11th-11th round = 236-256-280-300 stitches.” Do I proceed with starting at midback or do I start somewhere else in the round for this part of the instructions “Work 1 treble crochet in each of the first 27-30-32-35-39-43 stitches, work 4-4-6-6-6-8 chain stitches under sleeve”
26.09.2024 - 06:58DROPS Design answered:
Dear Mrs Urso, the rounds still start as before, just start working as explained under ALL SIZES. Happy crocheting!
26.09.2024 - 08:35
![]() Patti Urso wrote:
Patti Urso wrote:
I have completed this part of the instructions for 4x and finished.at mid back. “Increase 14-16-18-19 stitches in each side on 2nd, 5th and 8th round in A.1b, then increase 16-16-20-21 stitches on 9th-9th-11th-11th round = 236-256-280-300 stitches.” Do I proceed with starting at midback or do I start somewhere else in the round for this part of the instructions “Work 1 treble crochet in each of the first 27-30-32-35-39-43 stitches, work 4-4-6-6-6-8 chain stitches under sleeve”
24.09.2024 - 21:42
![]() Patti Urso wrote:
Patti Urso wrote:
In these instructions “ Increase 14-16-18-19 stitches in each side on 2nd, 5th and 8th round in A.1b, then increase 16-16-20-21 stitches on 9th-9th-11th-11th round = 236-256-280-300 stitches.” In the 11th round is the increase done evenly in the entire round or just on the sides?
19.09.2024 - 11:05DROPS Design answered:
Dear Mrs Urso, yes so that the number of stitches between markers remain the same just as before. Happy crocheting!
19.09.2024 - 16:06
![]() Lisa Taddei wrote:
Lisa Taddei wrote:
La descrizione non sembra corrispondere al modello in foto e ritengo molto approssimative le spiegazioni
16.06.2024 - 21:17
![]() Lisa Taddei wrote:
Lisa Taddei wrote:
La descrizione non sembra corrispondere al modello in foto e ritengo molto approssimative le spiegazioni
16.06.2024 - 21:12
![]() Paola wrote:
Paola wrote:
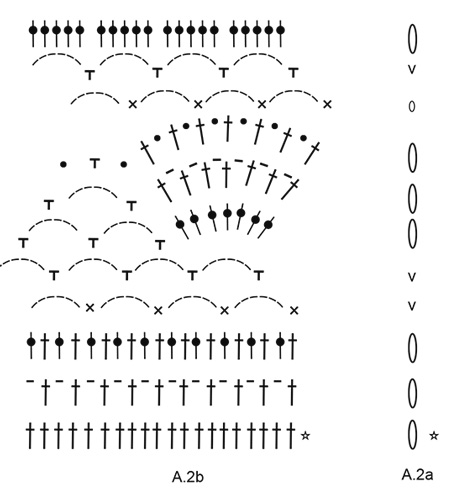
Buonasera, sto realizzando la taglia L. Dopo i giri di maglia tripla nello schema a2b si vedono dei punti alti e nel giro seguente punto alto alternato a catenella saltando una maglia di base. questi giri di maglie alte non sono menzionati nella spiegazione. Quante volte devo ripetere i giri di maglia alta?
16.06.2024 - 18:41DROPS Design answered:
Buonasera Paola, i diagrammi non sono riportati riga per riga nelle spiegazioni, viene indicato dove lavorarli: il diagramma A.2b viene lavorato sul corpo. Buon lavoro!
16.06.2024 - 21:28
![]() Lisa wrote:
Lisa wrote:
Non capisco cosa vuol dire -3-0-0-0-0-3
16.05.2024 - 22:08DROPS Design answered:
Buonasera Lisa, i numeri si riferiscono alle diverse taglie. Buon lavoro!
16.05.2024 - 22:58
![]() InfiernoC wrote:
InfiernoC wrote:
Hallo, ich musste das top deutlich schmaler häkeln und habe somit nur 100 Maschen. Wie viele Maschen muss ich überspringen, um das Muster A.2b zu häkeln, damit es symmetrisch bleibt?
27.10.2023 - 09:26
![]() Astrid Smit wrote:
Astrid Smit wrote:
Wat betekend “haak 1 dubbel stokje in elk van de volgende 3-0-0-0-0-3 lossen”
20.05.2023 - 21:18DROPS Design answered:
Dag Astrid,
Als je de kleinste of de grootste maat haakt, dan haak je 1 dubbel stokje in het volgende stokje van de vorige toer, dan 1 dubbel stokje in het stokje daarna, en tot slot 1 dubbel stokje en het stokje daarna. Bij alle andere maten staat er 0, dus hoef je niks te doen en ga je verder met wat er verderop staat in het patroon.
23.05.2023 - 09:53
![]() Christine wrote:
Christine wrote:
Bonjour Que veut dire V = le tour commence par 1 maille en l'air et se termine par 1 maille coulée dans la 1ère maille en l'air, crocheter ensuite des mailles coulées jusqu'au 1er arceau Surtout les mailles coulées jusqu'au 1er arceau cordialement Christine
23.03.2023 - 10:27DROPS Design answered:
Bonjour Christine, au 3ème rang de A.2a, crochetez 1 maille en l'air au début du tour, puis crochetez A.2b comme avant tout le tour, à la fin du tour, crochetez 1 maille coulée dans cette maille en l'air puis crochetez des mailles coulées dans la 1ère ms + les 2 premières mailles en l'air du début du tour précédent pour pouvoir crocheter la 1ère maille serrée du rang 4 autour du 1er arceau du 1er A.2b. Bon crochet!
23.03.2023 - 10:51
|
||||||||||||||||||||||||||||||||||||||||||||||
Astoria#astoriatop |
||||||||||||||||||||||||||||||||||||||||||||||
|
|
||||||||||||||||||||||||||||||||||||||||||||||
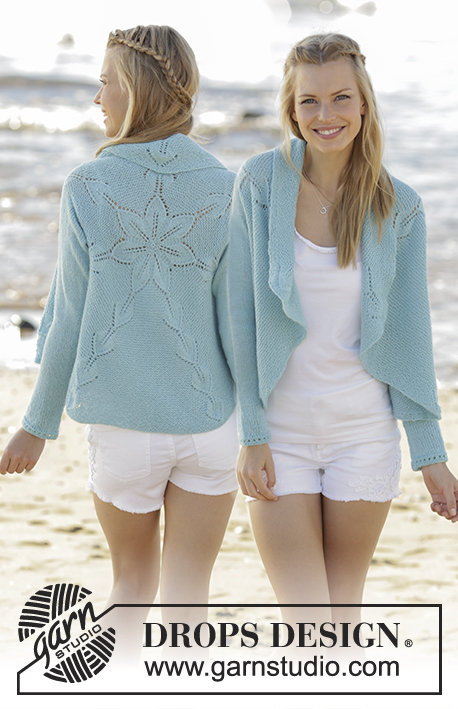
Crochet top with round yoke, lace pattern, worked top down in DROPS Paris. Size: S - XXXL.
DROPS 175-15 |
||||||||||||||||||||||||||||||||||||||||||||||
|
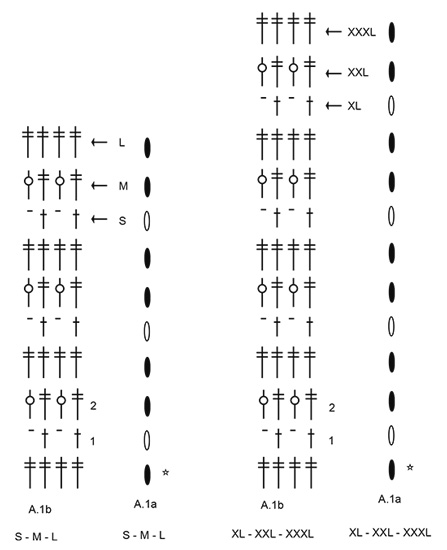
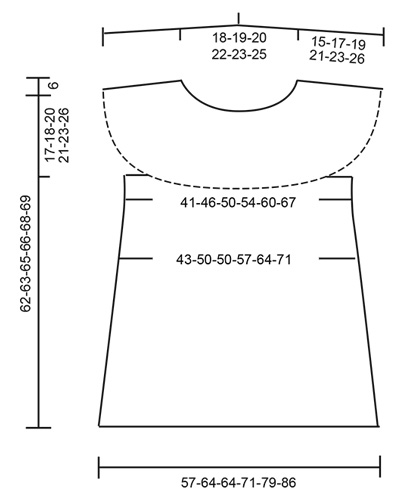
CROCHET INFO: At beginning of every round with treble crochets replace first treble crochet with 3 chain stitches. Finish round with 1 slip stitch in 3rd chain stitch. At beginning of every round with double treble crochets replace first double treble crochet with 4 chain stitches. Finish round with 1 slip stitch in 4th chain stitch. At beginning of every round with triple treble crochets replace first triple treble crochet with 5 chain stitches. Finish round with 1 slip stitch in 5th chain stitch. INCREASE TIP (evenly spaced): To calculate how to increase evenly, use the number of stitches increases are done over (e.g. 84 stitches) and divide this number by number of increases to be done (e.g. 24) = 3.5. I.e. in this example increase after alternately approx. every 3rd and 4th stitch. DECREASE TIP: Decrease 1 treble crochet by working 2 treble crochets together as follows: * Make 1 yarn over, insert hook in next treble crochet, get yarn, make 1 yarn over, pull yarn through the 2 first loops on hook *, repeat from *-* one more time, make 1 yarn over and pull yarn through all 3 loops on hook (= 1 treble crochet decreased). PATTERN: See diagrams A.1 and A.2 (A.1a and A.2a shows how rounds begin and end). Choose diagram for your size. ---------------------------------------------------------- TOP: Work in the round top down. YOKE: Begin with crochet hook 5 mm and Paris, work 100-103-109-115-121-124 chain stitches and form a ring with 1 slip stitch in first chain stitch. Insert a marker thread on the beginning of the round = mid back. Work 4 chain stitches (= 1 double treble crochet) - READ CROCHET INFO, work 1 double treble crochet in each of the next 3-0-0-0-0-3 chain stitches, * skip 1 chain stitch, work 1 double treble crochet in each of the next 5 chain stitches *, repeat from *-* 15-16-17-18-19-19 more times = 84-86-91-96-101-104 double treble crochets. Work 1 round with double trebles and increase 24-30-29-32-31-40 double trebles evenly - READ INCREASE TIP (evenly spaced) = 108-116-120-128-132-144 double trebles. REMEMBER THE CROCHET TENSION! Insert 4 marker threads in piece without working as follows: Insert 1st marker thread after 8-9-10-11-11-13 double trebles. Insert 2nd marker thread after another 38-40-40-42-44-46 double trebles, 3rd marker thread is after another 16-18-20-22-22-26 double trebles and 4th marker thread after another 38-40-40-42-44-46 double treble crochets. There are now 8-9-10-11-11-13 double treble crochets left until mid back. Work A.1b (choose diagram for your size). A.1a shows how round begins and ends), AT THE SAME TIME increase double treble crochets evenly over the 38-40-40-42-44-46 stitches in each side. Number of stitches between the 2 markers mid front and mid back is constant (= 16-18-20-22-22-26 stitches). Increase in the different sizes as follows: Size S and M: Increase 14-17 stitches in each side on 2nd and 5th round in A.1b, then increase 16-18 stitches on 6th-8th round = 196-220 stitches. NOTE! See round marked with arrow for when yoke is done in the different sizes. Size L, XL, XXL and XXXL: Increase 14-16-18-19 stitches in each side on 2nd, 5th and 8th round in A.1b, then increase 16-16-20-21 stitches on 9th-9th-11th-11th round = 236-256-280-300 stitches. NOTE! See round marked with arrow for when yoke is done in the different sizes. Work next round in all sizes as follows: NOTE: in sizes S and XL crochet around the chain stitches instead of in the chain stitches. Work 1 double treble crochet in each of the first 27-30-32-35-39-43 stitches, work 4-4-6-6-6-8 chain stitches under sleeve, skip 44-50-54-58-62-64 stitches for sleeve, work 1 double treble in each of the next 54-60-64-70-78-86 stitches, work 4-4-6-6-6-8 chain stitches under sleeve, skip 44-50-54-58-62-64 stitches for sleeve, work 1 double treble in each of the remaining 27-30-32-35-39-43 stitches on round. Piece measures approx. 17-18-20-21-23-25 cm measures from neck edge and down vertically. BODY: = 116-128-140-152-168-188 stitches. NOW MEASURE THE PIECE FROM HERE! Work 1 triple treble crochet in every stitch. When piece measures 5 cm, increase 4-12-0-8-12-12 triple treble crochets evenly = 120-140-140-160-180-200 triple treble crochets. Cut the yarn. To fit the pattern symmetrically mid front and mid back on top displace beginning of round as follows: Skip the first 15-5-5-15-5-15 triple treble crochets on round and fasten strand with 1 double crochet in next triple treble crochet. Begin on 2nd round in diagrams and work A.2a (shows how round begins and ends), work A.2b (= 6-7-7-8-9-10 repetitions). On last round in diagram increase trebles. To make the pattern symmetrical mid front and mid back increase the same number of trebles in each side. Increase 20 trebles in each side evenly between mid back and fan in pattern mid front on top. Increase 40 trebles in total evenly in all sizes = 160-180-180-200-220-240 trebles. Continue from 2nd round in A.2a and A.2b (= 8-9-9-10-11-12 repetitions on round). When diagrams have been worked vertically, work 2nd and 3rd round 1 more time. Piece measures approx. 62-63-65-66-68-69 cm from neck edge mid back and down. Fasten off. NECK EDGE: Begin mid back of neck and fasten strand with 1 double crochet. Work 1 double crochet in every chain stitch but work only in the chain stitches worked with treble crochets = 84-86-91-96-101-104 double crochets. Fasten off. SLEEVE EDGE: Begin mid under sleeve and work 4 chain stitches (= 1 double treble crochet). Work 1 double treble crochet in every stitch and work 3 double treble crochets around the outermost stitch in transition between yoke and body AT THE SAME TIME decrease 13-15-16-14-12-11 double treble crochets evenly on round – READ DECREASE TIP = 41-45-50-56-62-67 double treble crochets. Fasten off. |
||||||||||||||||||||||||||||||||||||||||||||||
Diagram explanations |
||||||||||||||||||||||||||||||||||||||||||||||
|
||||||||||||||||||||||||||||||||||||||||||||||
|
||||||||||||||||||||||||||||||||||||||||||||||
|
||||||||||||||||||||||||||||||||||||||||||||||
|
||||||||||||||||||||||||||||||||||||||||||||||
Have you finished this pattern?Tag your pictures with #dropspattern #astoriatop or submit them to the #dropsfan gallery. Do you need help with this pattern?You'll find 13 tutorial videos, a Comments/Questions area and more by visiting the pattern on garnstudio.com. © 1982-2025 DROPS Design A/S. We reserve all rights. This document, including all its sub-sections, has copyrights. Read more about what you can do with our patterns at the bottom of each pattern on our site. |
||||||||||||||||||||||||||||||||||||||||||||||


With over 40 years in knitting and crochet design, DROPS Design offers one of the most extensive collections of free patterns on the internet - translated to 17 languages. As of today we count 314 catalogues and 11822 patterns translated into English (UK/cm).
We work hard to bring you the best knitting and crochet have to offer, inspiration and advice as well as great quality yarns at incredible prices! Would you like to use our patterns for other than personal use? You can read what you are allowed to do in the Copyright text at the bottom of all our patterns. Happy crafting!
Post a comment to pattern DROPS 175-15
We would love to hear what you have to say about this pattern!
If you want to leave a question, please make sure you select the correct category in the form below, to speed up the answering process. Required fields are marked *.