DROPS Paris
DROPS Paris
100% Cotton
from 1.10 £ /50g
Get the yarn to make this pattern from 9.90£.

The yarn cost is calculated from the pattern’s smallest size and the yarn’s cheapest product type. Looking for an even better price? You might find it on the DROPS Deals!

DROPS SS24

Astoria

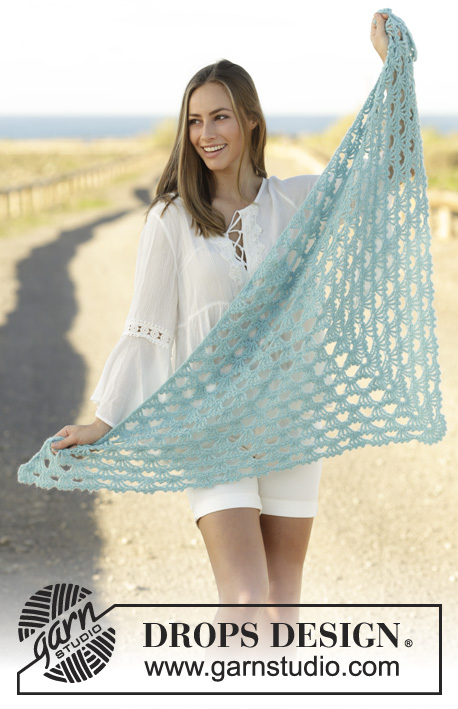
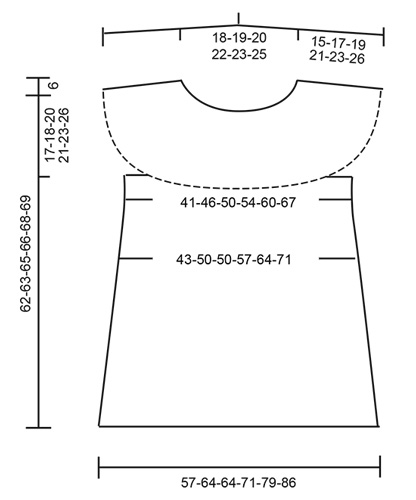
Crochet top with round yoke, lace pattern, worked top down in DROPS Paris. Size: S - XXXL.

DROPS 175-15
DROPS design: Pattern no w-623
Yarn group C or A + A
----------------------------------------------------------
Size: S - M - L - XL - XXL - XXXL
Materials:
DROPS PARIS from Garnstudio
450-500-550-600-650-700 g colour 38, raspberry

DROPS CROCHET HOOK SIZE 5 mm - or size needed to get 14 trebles and 8.5 rows or 14 double trebles and 5.5 rows = 10 cm in width and 10 cm vertically.
----------------------------------------------------------

-------------------------------------------------------

Alternative Yarn – See how to change yarns here
Yarn Groups A to F – Use the same pattern and change the yarn here
Yarn usage using an alternative yarn – Use our yarn converter here

-------------------------------------------------------

DROPS Paris
DROPS Paris
100% Cotton
from 1.10 £ /50g
Get the yarn to make this pattern from 9.90£.

The yarn cost is calculated from the pattern’s smallest size and the yarn’s cheapest product type. Looking for an even better price? You might find it on the DROPS Deals!

Pattern instructions

NOTE: This pattern is written in British English. All measurements in charts are in cm. For conversion from cm to inches - click here. There are different terms for crocheting in British and American English. If this pattern includes crochet, click for "crochet terms" here. For this pattern in American English, please click here.
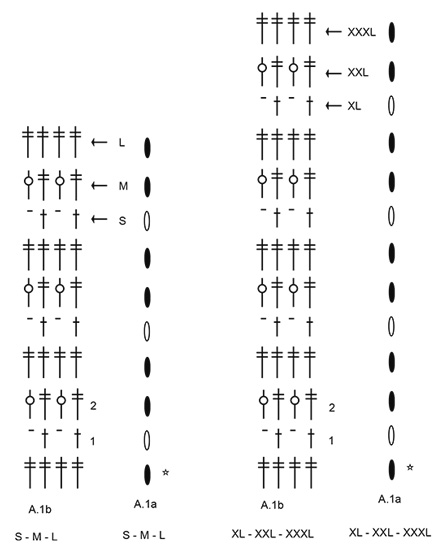
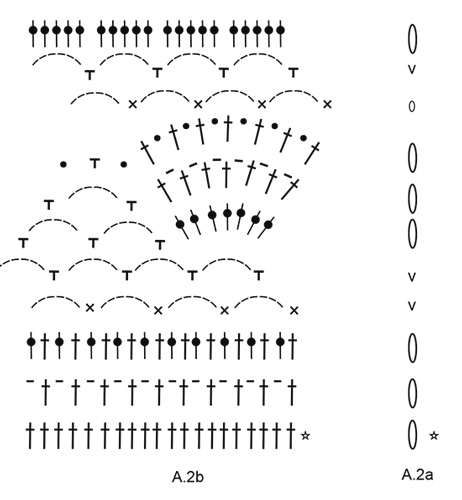
CROCHET INFO:
At beginning of every round with treble crochets replace first treble crochet with 3 chain stitches. Finish round with 1 slip stitch in 3rd chain stitch.
At beginning of every round with double treble crochets replace first double treble crochet with 4 chain stitches. Finish round with 1 slip stitch in 4th chain stitch.
At beginning of every round with triple treble crochets replace first triple treble crochet with 5 chain stitches. Finish round with 1 slip stitch in 5th chain stitch.

INCREASE TIP (evenly spaced):
To calculate how to increase evenly, use the number of stitches increases are done over (e.g. 84 stitches) and divide this number by number of increases to be done (e.g. 24) = 3.5. I.e. in this example increase after alternately approx. every 3rd and 4th stitch.
DECREASE TIP:
Decrease 1 treble crochet by working 2 treble crochets together as follows:
* Make 1 yarn over, insert hook in next treble crochet, get yarn, make 1 yarn over, pull yarn through the 2 first loops on hook *, repeat from *-* one more time, make 1 yarn over and pull yarn through all 3 loops on hook (= 1 treble crochet decreased).

PATTERN:
See diagrams A.1 and A.2 (A.1a and A.2a shows how rounds begin and end). Choose diagram for your size.
----------------------------------------------------------

TOP:
Work in the round top down.

YOKE:
Begin with crochet hook 5 mm and Paris, work 100-103-109-115-121-124 chain stitches and form a ring with 1 slip stitch in first chain stitch. Insert a marker thread on the beginning of the round = mid back. Work 4 chain stitches (= 1 double treble crochet) - READ CROCHET INFO, work 1 double treble crochet in each of the next 3-0-0-0-0-3 chain stitches, * skip 1 chain stitch, work 1 double treble crochet in each of the next 5 chain stitches *, repeat from *-* 15-16-17-18-19-19 more times = 84-86-91-96-101-104 double treble crochets. Work 1 round with double trebles and increase 24-30-29-32-31-40 double trebles evenly - READ INCREASE TIP (evenly spaced) = 108-116-120-128-132-144 double trebles. REMEMBER THE CROCHET TENSION!
Insert 4 marker threads in piece without working as follows: Insert 1st marker thread after 8-9-10-11-11-13 double trebles. Insert 2nd marker thread after another 38-40-40-42- 44-46 double trebles, 3rd marker thread is after another 16-18-20-22-22-26 double trebles and 4th marker thread after another 38-40-40-42-44-46 double treble crochets. There are now 8-9-10-11-11-13 double treble crochets left until mid back.

Work A.1b (choose diagram for your size). A.1a shows how round begins and ends), AT THE SAME TIME increase double treble crochets evenly over the 38-40-40-42-44-46 stitches in each side. Number of stitches between the 2 markers mid front and mid back is constant (= 16-18-20-22-22-26 stitches). Increase in the different sizes as follows:

Size S and M:
Increase 14-17 stitches in each side on 2nd and 5th round in A.1b, then increase 16-18 stitches on 6th-8th round = 196-220 stitches.
NOTE! See round marked with arrow for when yoke is done in the different sizes.

Size L, XL, XXL and XXXL:
Increase 14-16-18-19 stitches in each side on 2nd, 5th and 8th round in A.1b, then increase 16-16-20-21 stitches on 9th-9th-11th-11th round = 236-256-280-300 stitches.
NOTE! See round marked with arrow for when yoke is done in the different sizes.

Work next round in all sizes as follows:
NOTE: in sizes S and XL crochet around the chain stitches instead of in the chain stitches. Work 1 double treble crochet in each of the first 27-30-32-35-39-43 stitches, work 4-4-6-6-6-8 chain stitches under sleeve, skip 44-50-54-58-62-64 stitches for sleeve, work 1 double treble in each of the next 54-60-64-70-78-86 stitches, work 4-4-6-6-6-8 chain stitches under sleeve, skip 44-50-54-58-62-64 stitches for sleeve, work 1 double treble in each of the remaining 27-30-32-35-39-43 stitches on round. Piece measures approx. 17-18-20-21-23-25 cm measures from neck edge and down vertically.

BODY:
= 116-128-140-152-168-188 stitches. NOW MEASURE THE PIECE FROM HERE! Work 1 triple treble crochet in every stitch. When piece measures 5 cm, increase 4-12-0-8-12-12 triple treble crochets evenly = 120-140-140-160-180-200 triple treble crochets. Cut the yarn. To fit the pattern symmetrically mid front and mid back on top displace beginning of round as follows: Skip the first 15-5-5-15-5-15 triple treble crochets on round and fasten strand with 1 double crochet in next triple treble crochet. Begin on 2nd round in diagrams and work A.2a (shows how round begins and ends), work A.2b (= 6-7-7-8-9-10 repetitions).
On last round in diagram increase trebles. To make the pattern symmetrical mid front and mid back increase the same number of trebles in each side. Increase 20 trebles in each side evenly between mid back and fan in pattern mid front on top. Increase 40 trebles in total evenly in all sizes = 160-180-180-200-220-240 trebles. Continue from 2nd round in A.2a and A.2b (= 8-9-9-10-11-12 repetitions on round). When diagrams have been worked vertically, work 2nd and 3rd round 1 more time. Piece measures approx. 62-63-65-66-68-69 cm from neck edge mid back and down. Fasten off.

NECK EDGE:
Begin mid back of neck and fasten strand with 1 double crochet.
Work 1 double crochet in every chain stitch but work only in the chain stitches worked with treble crochets = 84-86-91-96-101-104 double crochets. Fasten off.

SLEEVE EDGE:
Begin mid under sleeve and work 4 chain stitches (= 1 double treble crochet). Work 1 double treble crochet in every stitch and work 3 double treble crochets around the outermost stitch in transition between yoke and body AT THE SAME TIME decrease 13-15-16-14-12-11 double treble crochets evenly on round – READ DECREASE TIP = 41-45-50-56-62-67 double treble crochets. Fasten off.

This pattern has been corrected.

Updated online: 09.04.2018
This pattern has been re-written, new drawing and diagrams as well.
Updated online: 03.04.2019
Correction - YOKE: Size S and M:
Increase 14-17 stitches in each side on 2nd and 5th round in A.1b, then increase 16-18 stitches on 6th-8th round = 196-220 stitches.
Size L, XL, XXL and XXXL:
Increase 14-16-18-19 stitches in each side on 2nd, 5th and 8th round in A.1b, then increase 16-16-20-21 stitches on 9th-9th-11th-11th round = 236-256-280-300 stitches.

Diagram

symbols = = 1 chain stitch
symbols = = 1 double crochet around chain space
symbols = = 1 double treble crochet in stitch
symbols = 1 treble crochet in stitch
symbols = 1 double treble crochet in stitch
symbols = 1 treble crochet around chain stitch
symbols = 1 picot: 3 chain stitches, 1 treble crochet in first chain stitch
symbols = 6 chain stitches
symbols = round begins with 3 chain stitches and finishes with 1 slip stitch in 3rd chain stitch
symbols = round begins with 4 chain stitches and finishes with 1 slip stitch in 4th chain stitch
symbols = round begins with 1 chain stitch and finishes with 1 slip stitch in 1st chain stitch, then work slip stitches until first chain space
symbols = round begins with 1 chain stitch and finishes with 1 slip stitch in 1st chain stitch
symbols = this round has already been worked, begin on next round
symbols = on this round increase evenly - see explanation in pattern
symbols = 1 double treble crochet around chain space
diagram
diagram
diagram
Do you have a question? See a list of frequently asked questions (FAQ)

Knitting tension is what determines the final measurements of your work, and is usually measured per 10 x 10 cm. It is provided like so: number of stitches in width x number of rows in height - eg: 19 stitches x 26 rows = 10 x 10 cm.

The knitting tension is very individual; some people knit/crochet loosely while others work tightly. You adjust the knitting tension with the needle size, which is why the suggested needle size is only meant as a guide! You need to adjust this (up or down) to ensure that YOUR knitting tension matches the knitting tension provided in the pattern. If you work with a different knitting tension than provided you will have a different yarn consumption, and your work will have different measurements than what the pattern suggests.

The knitting tension also determines which yarns can replace each other. As long as you achieve the same knitting tension you can replace one yarn with another.

See DROPS lesson: How to measure your tension/gauge

See DROPS video: How to make a gauge tension swatch

The required amount of yarn is provided in grams, eg: 450 g. To calculate how many balls you’ll need you first need to know how many grams are in 1 ball (25g, 50g or 100g). This information is available if you click on the individual yarn quality on our pages. Divide the amount required with the amount of each ball. For example, if each ball is 50g (the most common amount), the calculation will be as follows: 450 / 50 = 9 balls.

The important thing when changing from one yarn to another is that the knitting/crochet tension remains the same. This is so that the measurements of the finished piece will be the same as on the sketch provided. It is easier to achieve the same knitting tension using yarns from the same yarn group. It is also possible to work with multiple strands of a thinner yarn to achieve the knitting tension of a thicker one. Please try our yarn converter. We recommend you to always work a test swatch.

Please NOTE: when changing yarn the garment might have a different look and feel to the garment in the photo, due to individual properties and qualities of each yarn.

See DROPS lesson: Can I use a different yarn than the one mentioned in the pattern?

All our yarns are categorised into yarn groups (from A to F) according to thickness and knitting tension – group A contains the thinnest yarns and group F the thickest. This makes it easier for you to find alternative yarns to our patterns, should you wish to switch yarn. All yarns within the same group have a similar knitting tension and can easily replace each other. However, different yarn qualities have different structures and properties which will give the finished work a unique look and feel.

Click here for an overview of the yarns in each yarn group

At the top of all our patterns you’ll find a link to our yarn calculator, which is a helpful tool should you wish to use a different yarn than suggested. By filling in the yarn quality you wish to replace, the amount (in your size) and number of strands, the calculator will present good alternative yarns with the same knitting tension. Additionally it will tell you how much you’ll require in the new qualities and whether you’ll need to work with multiple strands. Most skeins are 50g (some are 25g or 100g).

If the pattern is worked with multiple colours, every colour will have to be calculated separately. Similarly, if the pattern is worked with several strands of different yarns (for example 1 strand Alpaca and 1 strand Kid-Silk) you will have to find alternatives for each, individually.

Click here to see our yarn calculator

Since different yarns have different qualities and textures we have chosen to keep the original yarn in our patterns. However, you can easily find options among our available qualities by using our yarn calculator, or simply pick a yarn from the same yarn group.

It is possible that some retailers still have discontinued yarns in stock, or that someone has a few skeins at home that they would like to find patterns for.

The yarn calculator will provide both alternative yarn as well as required amount in the new quality.

If you think it's hard to decide what size to make, it can be a good idea to measure a garment you own already and like the size of. Then you can pick the size by comparing those measures with the ones available in the pattern's size chart.

You'll find the size chart at the bottom of the pattern.

See DROPS lesson: How to read size chart

The needle size provided in the pattern serves only as a guide, the important thing is to follow the knitting tension. And since knitting tension is very individual, you will have to adjust the needle size to ensure that YOUR tension is the same as in the pattern – maybe you’ll have to adjust 1, or even 2 needle sizes, up or down to achieve the correct tension. For this, we recommend that you work test swatches.

Should you work with a different knitting tension than the one provided, the measurements of the finished garment might deviate from the measurement sketch.

See DROPS lesson: How to measure your tension/gauge

See DROPS video: How to make a tension/gauge swatch

Working a garment top-down provides more flexibility and room for personal adjustment. For example it is easier to try the garment on while working, as well as making adjustments to length of yoke and shoulder caps.

The instructions are carefully explaining every step, in the correct order. Diagrams are adjusted to the knitting direction and are worked as usual.

The diagram depicts all rows/rounds, and every stitch seen from the right side. It is read from bottom to top, from right to left. 1 square = 1 stitch.

When working back and forth, every other row is worked from the right side and every other row is worked from the wrong side. When working from the wrong side, the diagram will have to be worked reversed: from left to right, knit stitches are purled, purl stitches are knit etc.

When working in the round every round is worked from the right side and the diagram are worked from right to left on all rounds.

See DROPS lesson: How to read knitting diagrams

The diagram depicts all rows/rounds, and every stitch seen from the right side. It is worked from bottom to top, from right to left.

When working back and forth every other row is worked from the right side: from right to left and every other row is worked from the wrong side: from left to right.

When working in the round, every row in the diagram are worked from the right side, from right to left.

When working a circular diagram you start in the middle and work your way outwards, counter clockwise, row by row.

The rows usually start with a given number of chain stitches (equivalent to the height of the following stitch), this will either be depicted in the diagram or explained in the pattern.

See DROPS lesson: How to read crochet diagrams

Instructions for working several diagrams after each other on the same row/round, will often be written like so: “work A.1, A.2, A.3 a total of 0-0-2-3-4 times". This means you work A.1 once, then A.2 is worked once, and A.3 is repeated (in width) the number of times provided for your size – in this case like so: S = 0 times, M = 0 times, L=2 times, XL= 3 times and XXL = 4 times.

The diagrams are worked as usual: begin with the first row in A.1, then work the first row in A.2 etc.

See DROPS lesson: How to read knitting diagrams

See DROPS lesson: How to read crochet diagrams

The total width of the garment (from wrist-to-wrist) will be larger in the larger sizes, despite the actual sleeves being shorter. The larger sizes have longer sleeve caps and wider shoulders, so there will be a good fit in all sizes.

The measurement sketch/schematic drawing provides information regarding the full length of the garment. If it’s a jumper or a jacket the length is measured from the highest point on the shoulder closest to the neckline, and straight down to the bottom of the garment. It is NOT measured from the tip of shoulder. Similarly, the length of yoke is measured from the highest point on the shoulder and down to where yoke is split into body and sleeves.

On a jacket measures are never taken along bands, unless specifically stated. Always measure inside band stitches when measuring the length.

See DROPS lesson: How to read a schematic drawing

Diagrams are often repeated on the round or in height. 1 repeat is the diagram the way it appears in the pattern. If it says to work 5 repeats of A.1 in the round, then you work A.1 a total of 5 times after/next to each other in the round. If it says to work 2 repeats of A.1 vertically/in height you work the entire diagram once, then begin again at the start and work the entire diagram one more time.

Chain stitches are slightly narrower than other stitches and to avoid working the cast-on edge too tight, we simply chain more stitches to begin with. The stitch count will be adjusted on the following row to fit the pattern and measurement sketch.

The rib edge is more elastic and will contract slightly compared to, for example, stocking stitch. By increasing before the rib edge, you avoid a visible difference in width between the rib edge and the rest of the body.

It’s very easy to cast off too tightly, and by making yarn overs while casting off (and simultaneously casting these off) you avoid a too tight cast off edge.

See DROPS video: How to bind off with yarn overs (yo)

To achieve an even increase (or decrease) you can increase on, for example: every 3rd and 4th row alternately, like so: work 2 rows and increase on the 3rd row, work 3 rows and increase on the 4th. Repeat this until the increase is complete.

See DROPS lesson: Increase or decrease 1 st on every 3rd and 4th row alternately

Should you prefer to work in the round instead of back and forth, you may of course adjust the pattern. You’ll need to add steeks mid-front (usually 5 stitches), and follow the instructions. When you would normally turn and work from the wrong side, simply work across the steek and continue in the round. At the end you’ll cut the piece open, pick up stitches to work bands, and cover the cut edges.

See DROPS video: How to knit steeks and cut open

Should you prefer to work back and forth instead of in the round, you may of course adjust the pattern so you work the pieces separately and then assemble them at the end. Divide the stitches for the body in 2, add 1 edge stitch in each side (for sewing) and work the front and back pieces separately.

See DROPS lesson: Can I adapt a pattern for circular needles into straight needles?

Pattern repeats can vary slightly in the different sizes, in order to get the correct proportions. If you’re not working the exact same size as the garment in the photo, yours might deviate slightly. This has been carefully developed and adjusted so that the complete impression of the garment is the same in all sizes.

Make sure to follow instructions and diagrams for your size!

If you have found a pattern you like which is available in women’s size it’s not very difficult to convert it to men’s size. The biggest difference will be the length of sleeves and body. Start working on the women size that you think would fit across the chest. The additional length will be worked right before you cast off for the armhole/sleeve cap. If the pattern is worked top-down you can add the length right after the armhole or before the first decrease on sleeve.

Regarding additional yarn amount, this will depend on how much length you add, but it is better with a skein too many than too few.

All yarns will have excess fibres (from production) that might come off as lint or shedding. Brushed yarns (ie hairier yarns) have more of these loose, excess fibres, causing more shedding.

Shedding also depends on what is worn under or over the garment, and whether this pulls at the yarn fibres. It’s therefore not possible to guarantee that there will be no shedding

Below are some tips on how to get the best result when working with hairier yarns:

1. When the garment is finished (before you wash it) shake it vigorously so the looser hairs come off. NOTE: do NOT use a lint roller, brush or any method that pulls at the yarn.

2. Place the garment in a plastic bag and put it in your freezer - the temperature will cause the fibres to become less attached to each other, and excess fibres will come off easier.

3. Leave in the freezer for a few hours before taking it out and shaking it again.

4. Wash the garment according to the instructions on the yarn label.

Pilling is a natural process that happens to even the most exclusive of fibers. It's a natural sign of wear and tear that is hard to avoid, and that is most visible in high friction areas of your garment like a sweater's arms and cuffs.

You can make your garment look as new by removing the pilling, using a fabric comb or a pill/lint remover.

Still can't find the answer you need? Then scroll down and leave your question so one of our experts can try to help you. This will be done normally within 5 to 10 working days.
In the meantime, you can read the questions and answers that others have left to this pattern or join the DROPS Workshop on Facebook to get help from fellow knitters/crocheters!

You might also like...

Post a comment to pattern DROPS 175-15

We would love to hear what you have to say about this pattern!

If you want to leave a question, please make sure you select the correct category in the form below, to speed up the answering process. Required fields are marked *.

Comments / Questions (53)

country flag InfiernoC wrote:

Hallo, ich würde die Tunika gerne in Grüße M häkeln jedoch, jedoch versteht ich diesen Part nicht "HÄKELINFO lesen, je 1 Doppelstäbchen in die nächsten 3-0-0-0-0-3 Luftmaschen, * 1 Luftmasche überspringen, je 1 Doppelstäbchen in die nächsten 5 Luftmaschen *, von *-* noch weitere 15-16-17-18-19-19 x wiederholen = 84-86-91-96-101-104 Doppelstäbchen." Ganz besonders mit den 3-0-0-0-3. Ich weiß zwar, dass die Zahlen für die Größen stehen, jedoch nicht, wie ich das häkeln soll.

31.07.2022 - 07:26

DROPS Design answered:

Liebe InfiernoC, Für Größe M arbeitest du: 4 Luftmaschen häkeln (= 1 Doppelstäbchen) – HÄKELINFO lesen, * 1 Luftmasche überspringen, je 1 Doppelstäbchen in die nächsten 5 Luftmaschen *, von *-* noch weitere 16 x wiederholen = 86 Doppelstäbchen.

31.07.2022 - 19:15

country flag Gunilla Leavitt wrote:

I am wondering if the legend isn't incorrect in chart A2b. It says: "x = 1 treble crochet in stitch", and I'm fairly certain that it should be "x = 1 single crochet in stitch". Please fix? Or let me know if I'm mistaken :)

02.07.2022 - 07:45

DROPS Design answered:

Dear Gunilla, yes, it's a typo, it's a single crochet (US) or double crochet (UK) in the stitch. We will correct it as soon as possible. Thank you.

02.07.2022 - 16:15

country flag Saran Wylie wrote:

What do the numbers 1 and 2 mean next to the 2nd and 3rd rows of the pattern A1.b?

23.07.2021 - 18:58

DROPS Design answered:

Dear Mrs Wylie, the numbers refer to the number of row, the first row is not the first row in the diagram but only shows previous row - see explanation to the star in the diagram key. Happy crocheting!

26.07.2021 - 08:11

country flag Christina Ostrom wrote:

Hello! I want to omit the yoke entirely and just start under that making that large band before the open lace work be a tube top with the lace body. How could I accomplish this? Or what row does the yoke stop and that part begins?

30.06.2021 - 02:38

DROPS Design answered:

Dear Mrs Ostrom, the lace pattern under body starts when it says to work A.2 (diagram for the lace pattern) - we are unfortunately not able to adjust each pattern to each individual request. Please contact the store where you bought the yarn for any further individual assistance. Thanks for your comprehension.

30.06.2021 - 07:26

country flag Pat Ferron wrote:

At the end of the yoke instructions, “ Work next round in all sizes as follows: ” (where the chain stitches are added to create the arm opening), it starts with a group of treble crochet stitches, then the chains, then its a group of double treble crochets, followed by the 2nd set of chain stitches, and ending with another group of double crochets. Should that first set of treble crochets actually be double crochets so the height of the row stays consistent?

16.08.2020 - 19:56

DROPS Design answered:

Dear Mrs Ferron, it should be double treble (= UK English) / treble (= US English) all this row, patern will be edited, thanks for letting us know. Happy crocheting!

17.08.2020 - 09:00

country flag Liselott Storäng wrote:

Hej...läser man mönstret "bara" från höger till vänster vid varje varv?...Mvh Liselott

29.07.2020 - 07:04

DROPS Design answered:

Hej Liselott, ja når du virkar runt läser du diagrammet från höger till vänster. Du kan også se hvordan man læser et hæklediagram i lektionen nederst i opskriften. God fornøjelse!

29.07.2020 - 15:33

country flag Pat Ferron wrote:

In the diagram explanation it does not have the line with an open circle shown in the A.1b diagram in rounds 2, 5, 8 & 11. Is it suppose to be a treble crochet around chain stitch? The only one close to it is the line with a black circle thru it listed as a double crochet around chain stitch which only appears in the A.2b diagram.

14.07.2020 - 14:51

DROPS Design answered:

Dear Mrs Ferron, are you talking about the last symbol in diagram key? The symbol with a whilte circle is a treble crochet around chain space. Happy crocheting!

14.07.2020 - 15:38

country flag Jenny wrote:

Just finished it. I stopped after 2nd fan pattern as it was getting too long and that made a nice edge.

06.07.2020 - 20:36

country flag Lily Mason wrote:

When increasing the sides for the sides of the yoke, it says to increase 17 for both sides on rounds 2 and 5, then 18 for 6 and 8. However does this mean that it wants me to increase both sides by 18? or 9 for each side? I end up with 36 extra stitches and I'm very confused by that.

05.01.2020 - 09:23

DROPS Design answered:

Dear Mrs Mason, you increase 17 sts in each side on 2nd and 5th round in A.1b (= 34 sts increased in total on each of these both rounds), there are 116sts + 34 +34 = 184 sts and then increase 18 sts in each side on 8th round = 184 + 18+18= 220 sts. Happy crocheting!

06.01.2020 - 09:09

country flag Ola wrote:

I didn't get the sectioning in the beginning... I am doing the xxxl size and I don't believe the number of stitches is correct

02.11.2019 - 20:10

DROPS Design answered:

Hello! All patterns are translated from Norwegian and you can always check the original pattern for measurements and calculations. Happy crocheting!

02.11.2019 - 21:40