
Popular categories
Looking for a yarn?


Comments / Questions (46)
![]() Rara wrote:
Rara wrote:
Bonjour, je voudrais faire des manches longues sur ce modèle. Je tricote une taille s. A combien de cm du bas de la manche faut il tricoter le tour envers pour avoir des manches longues ? Merci.
10.03.2025 - 20:57DROPS Design answered:
Bonjour Rara, aidez-vous d'un modèle similaire de même tension avec la longueur des manches qui vous convient pour ainsi calculer le début des manches (ce pull se tricote de bas en haut, pas de haut en bas). Bon tricot!
12.03.2025 - 08:13
![]() Lilian Gardien wrote:
Lilian Gardien wrote:
Ik kom er niet uit met het breien van patroon 176-22 , ik heb moeite met patroon A2.Als ik die omslag tussen 2 steken heb gemaakt, wat moet ik dan de naald erna doen met een rechte omslag? Ik krijg die gaatjes niet die ik op de foto zie.
06.08.2021 - 12:58DROPS Design answered:
Dag Lilian,
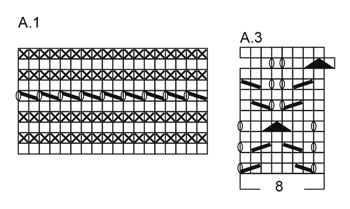
De omslagen brei je op de volgende naald gewoon recht.
07.08.2021 - 10:32
![]() Shelley wrote:
Shelley wrote:
I am in Australia and I bought the yarn online at the Wool Warehouse in the UK. I just want to find out how you got to 224 stitches on the decrease in the yoke for Size L. The average of 2.6 is not working as a decrease is 2 stitches anyway, so are you decreasing in every 2 stitches?
04.07.2021 - 03:55DROPS Design answered:
Dear Shelley, after you have worked A.2, you have 357 sts on needle you will now knit 1 round decreasing evenly 133 stitches = 224 stitches remain - this lesson explains how to decrease evenly and should help you. Happy knitting!
05.07.2021 - 07:58
![]() Shelley wrote:
Shelley wrote:
I think whats throwing me out is that the decrease is after 2 stitches but then a decrease is 2 stitches. I can’t seem to get the right stitches of 224 and I’ve done it about 3 times.
03.07.2021 - 13:51DROPS Design answered:
Dear Shelley, if you are really stuck, you can ask for help eithr over the phone, or in person, in the store where you bought your DROPS yarn from. Happy stitching!
04.07.2021 - 00:38
![]() Shelley wrote:
Shelley wrote:
Am having a problem with the decreasing in the yoke for size L when at the end of A2 I have 357 stitches divided by 133 = 2.6. So decrease after approx every 2 stitches but does that mean K2 and then decrease a stitch in the 3rd? I did that and I ended up with too many 268 stitches at the end instead of 224. Can you please explain the decreases i.e after knitting the 2 stitches is the k2tog decrease counted as the first stitch before the next decrease?
03.07.2021 - 13:31DROPS Design answered:
Dear Shelley, THIS lesson might help you to calculate how to decrease evenly. Happy Knitting!
04.07.2021 - 00:37
![]() Shelley wrote:
Shelley wrote:
On picking up the stitches to start the yoke, where do you begin the first round? Is it in the middle of the 10 stitches that were cast off for the sleeve? Thank you
29.06.2021 - 12:05DROPS Design answered:
Dear Shelley, yoke is worked in the round and can start either from mid back or at the transition of a sleeve and the back piece. Happy knitting!
29.06.2021 - 15:46
![]() Shelley wrote:
Shelley wrote:
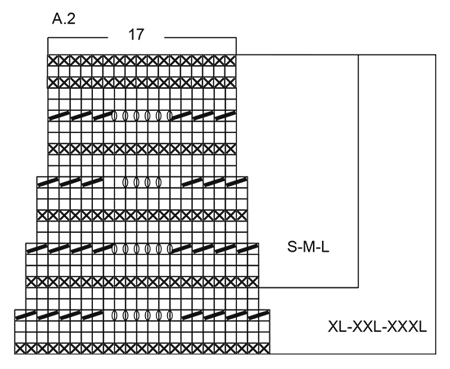
Thank you very much for your response. Does that also explain the graph in A.2? The stepped graph has me confused, does each change in the number of stitches refer to the different sizes?
07.06.2021 - 14:04DROPS Design answered:
Dear Shelley, the number of stitches in A.2 will decrease, fo ex on row 3 you decrease a total of 8 times but work only 6 yarn overs = on row 4 there are 2 sts less in every repeat. You can use markers between each repeat of A.2 in width to check number of stitches and make sure it is right (you should end with 17 sts in A.2). Happy knitting!
07.06.2021 - 15:52
![]() Shelley wrote:
Shelley wrote:
I would love to knit this jumper but I am puzzled by the second to last round in graph 3. I’ve never seen a round like that before. Can you explain the meaning of that please? Thank you
05.06.2021 - 15:26DROPS Design answered:
Dear Shelly, it is just that the pattern is starting one stitch earlier. It also finishes one stitch sooner, so the stitch number will not change, but this is the way the stitches get propwrly on top of each other. Happy Knitting!
07.06.2021 - 03:46
![]() Berbett wrote:
Berbett wrote:
Bonjour, Je souhaite tricoter le modèle sans faire le diagramme A2, tricoter en jersey jusqu'au diagramme A3. Pourriez-vous m'expliquer comment faire étant donné que le diagramme A2 permet de faire 76 diminutions. Comment diminuer sur le jersey ? En vous remerciant cordialement d'avance. Pia.
25.01.2021 - 17:30DROPS Design answered:
Bonjour Mme Berbett, dans la taille M vous devez diminuer 38 mailles a intervalles reguliers a chaque tour ou les mailles sont diminuees au diagramme A.2 (4eme et 10eme tour) tout en travaillant le point jersey au lieu du diagramme A.2. Comment repartir des diminutions à intervalles réguliers vous trouverez ICI. Bon tricot!
25.01.2021 - 17:50
![]() Joy Smith wrote:
Joy Smith wrote:
Do you export yarns to Australia?
05.04.2020 - 06:17DROPS Design answered:
Helo Joy Smith! You can find stores who ship worldwide here: https://www.garnstudio.com/findastore.php?s=w&cid=19
05.04.2020 - 16:58
|
|||||||||||||||||||
Apricot Cream#apricotcreamsweater |
|||||||||||||||||||
 |
 |
||||||||||||||||||
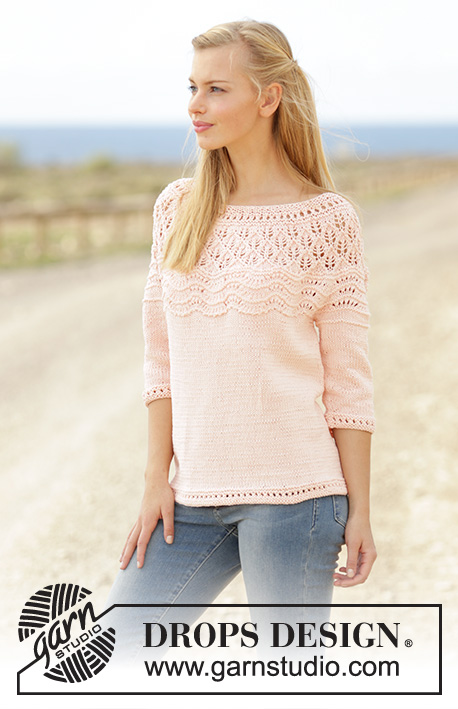
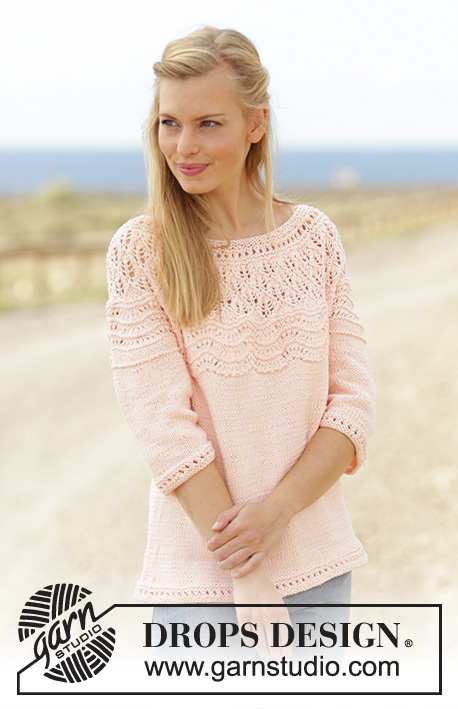
Knitted jumper with lace pattern, wave pattern and round yoke in DROPS Muskat. Size: S - XXXL.
DROPS 176-22 |
|||||||||||||||||||
|
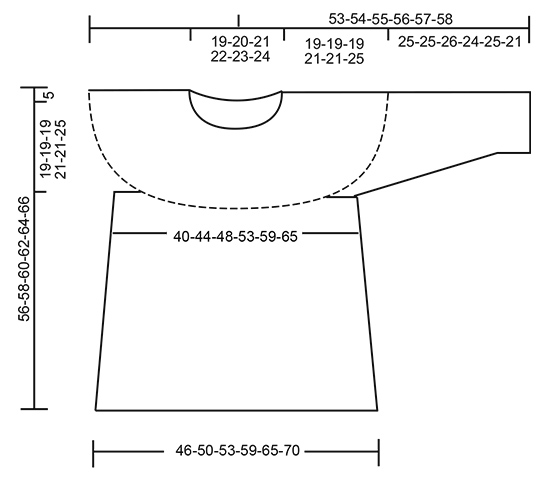
PATTERN: See diagrams A.1, A.2 and A.3. See start for your size in A.2. DECREASE TIP: Decrease as follows before marker thread: Work until 3 stitches remain before marker thread: Knit 2 together, knit 1. Decrease as follows after marker thread: Knit 1, slip 1 stitch knitwise, knit 1, pass slipped stitch over stitch worked. INCREASE TIP: Begin 1 stitch before marker thread, make 1 yarn over, knit 2 (marker thread is in the middle of these stitches), make 1 yarn over. Knit yarn overs twisted on next round. INCREASE/DECREASE EVENLY: To calculate how to increase or decrease evenly on round, use the total number of stitches on needle (e.g. 272 stitches) and divide stitches by number of increases or decreases to be done (e.g. 85) = 3.2. In this example increase after approx. every 3rd stitch. Increase by making 1 yarn over, on next round knit yarn over twisted to avoid holes. If decreasing knit approx. every other and 3rd. stitch together. RIDGES (in the round): 1 RIDGE = 2 rounds. 1 round knit and 1 round purl. ---------------------------------------------------------- JUMPER: Worked in the round on circular needle, bottom up. First work the body, then the sleeves, then slip parts together and work round yoke. BODY: Cast on 192-208-224-248-272-296 stitches on circular needle size 4 mm with Muskat. Work A.1 over all stitches. When A.1 has been worked 1 time vertically, continue in stocking stitch. Insert 2 marker threads in piece; 1 at the beginning of round and 1 after 96-104-112-124-136-148 stitches = in each side. Then continue in stocking stitch. REMEMBER THE KNITTING TENSION When piece measures 8 cm, decrease 1 stitch on each side of each marker thread - READ DECREASE TIP! Decrease every 4-4-5-5-5-5 cm 6 times in total = 168-184-200-224-248-272 stitches. When piece measures 32-34-36-36-37-36 cm, cast off 8-8-10-10-12-14 stitches in each side (= 4-4-5-5-6-7 stitches on each side of each marker thread) = 76-84-90-102-112-122 stitches on front/back piece. Put piece aside and work the sleeves. SLEEVES: Cast on 48-50-52-54-56-58 stitches on double pointed needles size 4 mm with Muskat. Work A.1 over all stitches. When A.1 has been worked one time vertically, continue in stocking stitch. Insert 1 marker thread at beginning of round = mid under sleeve. When piece measures 5 cm, increase 1 stitch on each side of marker thread - READ INCREASE TIP. Increase every 5th-4th-3rd-3rd-3rd-2nd round 10-13-16-17-18-19 times in total = 68-76-84-88-92-96 stitches on round. When piece measures 23-23-24-22-23-19 cm, purl 1 round over all stitches and then continue in stocking stitch. When piece measures 25-25-26-24-25-21 cm, cast off 8-8-10-10-12-14 stitches mid under sleeve (= 4-4-5-5-6-7 stitches on each side of marker thread) = 60-68-74-78-80-82 stitches. Work another sleeve the same way. YOKE: Slip sleeves on to same circular needle as body where armholes were cast off = 272-304-328-360-384-408 stitches. Knit 1 round while increasing 85-95-113-123-122-144 stitches evenly - READ INCREASE/DECREASE EVENLY = 357-399-441-483-506-552 stitches. Then work according to A.2 (= 17-19-21-21-22-24 repetitions in width). When A.2 has been worked 1 time vertically, there are 289-323-357-357-374-408 stitches on round. Knit 1 round while decreasing 97-115-133-133-134-160 stitches evenly = 192-208-224-224-240-248 stitches. Work A.3 over all stitches (= 24-26-28-28-30-31 repetitions in width). Work A.3 2-2-2-2-2-3 times in total vertically. Knit 1 round while decreasing 50-58-66-66-72-74 stitches evenly = 142-150-158-158-168-174 stitches. Work A.1 over all stitches. On next to last round in A.1 decrease 50-56-62-62-70-74 stitches evenly = 92-94-96-96-98-100 stitches. Finish A.1, then work 2 RIDGES - see explanation above, over all stitches. Cast off by knitting. |
|||||||||||||||||||
Diagram explanations |
|||||||||||||||||||
|
|||||||||||||||||||
|
|||||||||||||||||||
|
|||||||||||||||||||
|
|||||||||||||||||||
Have you finished this pattern?Tag your pictures with #dropspattern #apricotcreamsweater or submit them to the #dropsfan gallery. Do you need help with this pattern?You'll find 26 tutorial videos, a Comments/Questions area and more by visiting the pattern on garnstudio.com. © 1982-2025 DROPS Design A/S. We reserve all rights. This document, including all its sub-sections, has copyrights. Read more about what you can do with our patterns at the bottom of each pattern on our site. |
|||||||||||||||||||


With over 40 years in knitting and crochet design, DROPS Design offers one of the most extensive collections of free patterns on the internet - translated to 17 languages. As of today we count 314 catalogues and 11822 patterns translated into English (UK/cm).
We work hard to bring you the best knitting and crochet have to offer, inspiration and advice as well as great quality yarns at incredible prices! Would you like to use our patterns for other than personal use? You can read what you are allowed to do in the Copyright text at the bottom of all our patterns. Happy crafting!
Post a comment to pattern DROPS 176-22
We would love to hear what you have to say about this pattern!
If you want to leave a question, please make sure you select the correct category in the form below, to speed up the answering process. Required fields are marked *.