DROPS Merino Extra Fine
100% Wool
from 3.50 £ /50g
Get the yarn to make this pattern from 28.00£.

The yarn cost is calculated from the pattern’s smallest size and the yarn’s cheapest product type. Looking for an even better price? You might find it on the DROPS Deals!

DROPS SS24

Honey Blossom

Jumper with lace pattern, worked top down with ¾ length sleeves in DROPS Merino Extra Fine. Sizes S - XXXL.

DROPS 176-5
DROPS Design: Pattern no. me-101
Yarn group B

----------------------------------------------------------
Sizes: S - M - L - XL - XXL - XXXL
Materials:
DROPS MERINO EXTRA FINE from Garnstudio (belongs to yarn group B)
400-450-500-550-600-650 g colour 24, light yellow

DROPS DOUBLE POINTED NEEDLES OR CIRCULAR NEEDLE (40 and 80 cm) SIZE 4 MM – or the needles required to get 21 stitches and 28 rows stocking stitch on 10 cm in width and 10 cm in height.

----------------------------------------------------------

-------------------------------------------------------

Alternative Yarn – See how to change yarns here
Yarn Groups A to F – Use the same pattern and change the yarn here
Yarn usage using an alternative yarn – Use our yarn converter here

-------------------------------------------------------

DROPS Merino Extra Fine
100% Wool
from 3.50 £ /50g
Get the yarn to make this pattern from 28.00£.

The yarn cost is calculated from the pattern’s smallest size and the yarn’s cheapest product type. Looking for an even better price? You might find it on the DROPS Deals!

Pattern instructions

NOTE: This pattern is written in British English. All measurements in charts are in cm. For conversion from cm to inches - click here. There are different terms for crocheting in British and American English. If this pattern includes crochet, click for "crochet terms" here. For this pattern in American English, please click here.
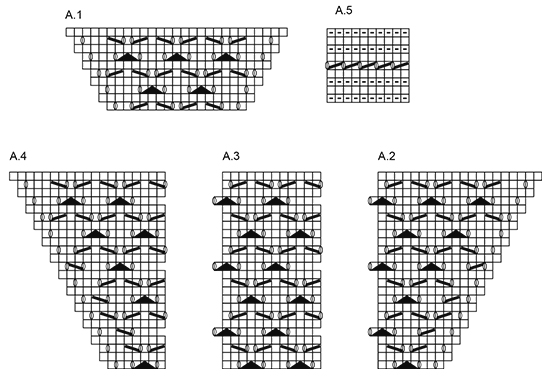
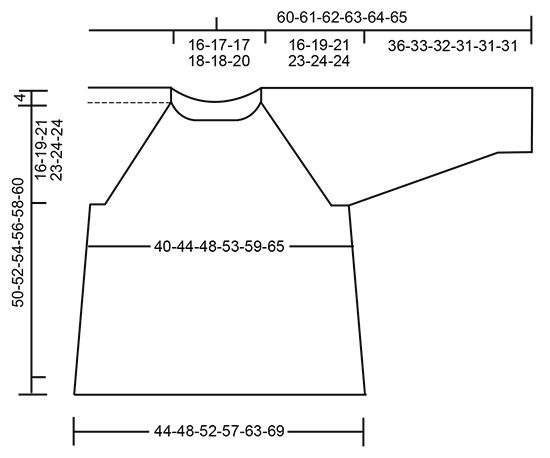
RIDGE/GARTER STITCH(worked in the round):
1 ridge = 2 rounds. Work 1 round knit and 1 round purl.

PATTERN: 
See diagrams A.1 to A.5.

RAGLAN:
SLEEVE:
The increases on the sleeve are a part of diagrams A.1, A.2 and A.4. Increase 1 stitch in each side of each sleeve every 2nd round, knit the yarn overs on next round, there will be holes.

BODY:
Increase 1 stitch in each side of the front piece and 1 stitch in each side of the back piece as follows (= in total 4 stitches increased):
Increase as follows: Start 2 stitches before A.1: Make 1 yarn over, knit 2, work A.1, knit 2, make 1 yarn over. Repeat before and after the next A.1. Knit the yarn overs on next round, there will be holes.

When increasing every 4th round, increase as follows:
ROUND 1: Start 2 stitches before A.1: Make 1 yarn over, knit 2, work A.1, knit 2, make 1 yarn over. Repeat before and after the next A.1.
ROUND 2: Knit the yarn overs, there will be holes.
ROUND 3: Start 4 stitches before A.1: Knit 2 together, make 1 yarn over, knit 2, work A.1, knit 2, make 1 yarn over, slip 1 stitch as if to knit, knit 1, pass the slipped stitch over the stitch that was knitted – there are no increases, but the row of holes continues as before. Repeat before and after the next A.1.
ROUND 4: Knit the yarn overs, there will be holes.

INCREASE TIP:
Start 1 stitch before the marker thread, make 1 yarn over, knit 2 (the marker thread sits between these 2 stitches), make 1 yarn over. Knit the yarn overs twisted on the next round.

DECREASE TIP:
Start 3 stitches before the marker thread, knit 2 together, knit 2 (the marker thread sits between these 2 stitches), slip 1 stitch as if to knit, knit 1, pass the slipped stitch over the knitted stitch. The stitches that do not fit the pattern mid under sleeve are worked in stocking stitch.
----------------------------------------------------------

JUMPER: 
The piece is worked in the round with circular needle from mid back, top down. Cast on 94-98-102-106-110-114 stitches with circular needle size 4 mm and Merino Extra Fine. Work 2 RIDGES – see description above, on the last round of the ridges increase 20 stitches evenly along the round = 114-118-122-126-130-134 stitches. Continue working as follows: Work 19-20-21-22-23-24 stitches stocking stitch (= half the back piece), 1 yarn over, 1 stitch stocking stitch, A.1 (= 17 stitches) (= right sleeve), 1 stitch stocking stitch, 1 yarn over, 38-40-42-44-46-48 stitches stocking stitch (= front piece), 1 yarn over, 1 stitch stocking stitch, A.1 (= left sleeve), 1 stitch stocking stitch, 1 yarn over, 19-20-21-22-23-24 stitches stocking stitch (= half the back piece). The first increase to RAGLAN is now complete. Continue upwards with this division of pattern and stocking stitch. Increase to raglan as described above. On the sleeve increase every 2nd round 22-26-29-31-32-33 times, on the body increase every round 0-0-0-0-0-6 times, then every 2nd round 14-16-17-25-32-30 times and finally every 4th round 4-5-6-3-0-0 times.

NOTE! When A.1 is finished, continue working as follows (across the stitches on the sleeves): A.2 (= 8 stitches), A.3 (= 12 stitches), A.4 (= 7 stitches). When A.2, A.3 and A.4 have been worked 1 time in height work as follows: A.2, A.3 across the next 36 stitches (= 3 repeats), A.4. Every time that A.2 to A.4 are worked one time in height continue with 2 more repeats of A.3 between A.2 and A.4. Finish A.2, A.3 and A.4 when you have increased a total of 22-26-29-31-32-33 times on the sleeves and a total of 18-21-23-28-32-36 times on the front piece and back piece.

After all the increases, there are now 61-69-75-79-81-83 stitches on each sleeve, 76-84-90-102-112-122 stitches on the front piece and back piece = 274-306-330-362-386-410 stitches in total. The next round is worked as follows:

Work 38-42-45-51-56-61 stitches (= half the back piece), place the next 61-69-75-79-81-83 stitches on a thread (= sleeve), cast on 8-8-10-10-12-14 new stitches, work the next 76-84-90-102-112-122 stitches (= front piece), place the next 61-69-75-79-81-83 stitches on a thread (= sleeve), cast on 8-8-10-10-12-14 new stitches, work the last 38-42-45-51-56-61 stitches (= half the back piece).

BODY:
There are now 168-184-200-224-248-272 stitches on the body. Continue with stocking stitch. Insert a marker thread in each side, in the middle of the 8-8-10-10-12-14 new stitches which were cast on. THE PIECE IS NOW MEASURED FROM HERE. When the piece measures 3 cm increase 1 stitch on each side of each marker thread (= 4 stitches increased), increase every 7 cm in total 4 times – READ INCREASE TIP! = 184-200-216-240-264-288 stitches. When the piece measures 27-26-26-26-27-29 cm work A.5 across all the stitches, then cast off. The piece measures approx. 50-52-54-56-58-60 cm from the cast-on edge.

SLEEVE:
Place the stitches from the thread back on double pointed needles size 4 mm and knit up 1 stitch in each of the 8-8-10-10-12-14 stitches that were cast on under the sleeve = 69-77-85-89-93-97 stitches. Insert a marker thread in the middle of the new stitches = mid under sleeve. Continue with A.3, the stitches that do not fit the pattern mid under sleeve are worked in stocking stitch. Continue with this pattern. When the piece measures 3-3-3-5-5-5 cm decrease 1 stitch on each side of the marker thread, decrease every 3-2-1½-1½-1-1 cm in total 9-12-15-16-17-18 times – READ DECREASE TIP = 51-53-55-57-59-61 stitches. When the piece measures 33-30-29-28-28-28 cm work A.5 across all the stitches. Cast off when A.5 has been worked once in height, the sleeve measures approx. 36-33-32-31-31-31 cm. Work the other
sleeve the same way.

This pattern has been corrected.

Updated online: 15.09.2017
JUMPER:...On the sleeve increase every 2nd row 22-26-29-31-32-33 times, on the body increase every row 0-0-0-0-0-6 times, then every 2nd row 14-16-17-25-32-30 times, and finally every 4th row 4-5-6-3-0-0 times.

Diagram

symbols = knit
symbols = purl
symbols = slip 1 stitch as if to knit, knit 1, pass the slipped stitch over the knitted stitch
symbols = knit 2 together
symbols = 1 yarn over between 2 stitches
symbols = slip 1 stitch as if to knit, knit 2 together, pass the slipped stitch over the knitted together stitches
diagram
diagram

Each of our patterns has specific tutorial videos to help you.

Do you have a question? See a list of frequently asked questions (FAQ)

Knitting tension is what determines the final measurements of your work, and is usually measured per 10 x 10 cm. It is provided like so: number of stitches in width x number of rows in height - eg: 19 stitches x 26 rows = 10 x 10 cm.

The knitting tension is very individual; some people knit/crochet loosely while others work tightly. You adjust the knitting tension with the needle size, which is why the suggested needle size is only meant as a guide! You need to adjust this (up or down) to ensure that YOUR knitting tension matches the knitting tension provided in the pattern. If you work with a different knitting tension than provided you will have a different yarn consumption, and your work will have different measurements than what the pattern suggests.

The knitting tension also determines which yarns can replace each other. As long as you achieve the same knitting tension you can replace one yarn with another.

See DROPS lesson: How to measure your tension/gauge

See DROPS video: How to make a gauge tension swatch

The required amount of yarn is provided in grams, eg: 450 g. To calculate how many balls you’ll need you first need to know how many grams are in 1 ball (25g, 50g or 100g). This information is available if you click on the individual yarn quality on our pages. Divide the amount required with the amount of each ball. For example, if each ball is 50g (the most common amount), the calculation will be as follows: 450 / 50 = 9 balls.

The important thing when changing from one yarn to another is that the knitting/crochet tension remains the same. This is so that the measurements of the finished piece will be the same as on the sketch provided. It is easier to achieve the same knitting tension using yarns from the same yarn group. It is also possible to work with multiple strands of a thinner yarn to achieve the knitting tension of a thicker one. Please try our yarn converter. We recommend you to always work a test swatch.

Please NOTE: when changing yarn the garment might have a different look and feel to the garment in the photo, due to individual properties and qualities of each yarn.

See DROPS lesson: Can I use a different yarn than the one mentioned in the pattern?

All our yarns are categorised into yarn groups (from A to F) according to thickness and knitting tension – group A contains the thinnest yarns and group F the thickest. This makes it easier for you to find alternative yarns to our patterns, should you wish to switch yarn. All yarns within the same group have a similar knitting tension and can easily replace each other. However, different yarn qualities have different structures and properties which will give the finished work a unique look and feel.

Click here for an overview of the yarns in each yarn group

At the top of all our patterns you’ll find a link to our yarn calculator, which is a helpful tool should you wish to use a different yarn than suggested. By filling in the yarn quality you wish to replace, the amount (in your size) and number of strands, the calculator will present good alternative yarns with the same knitting tension. Additionally it will tell you how much you’ll require in the new qualities and whether you’ll need to work with multiple strands. Most skeins are 50g (some are 25g or 100g).

If the pattern is worked with multiple colours, every colour will have to be calculated separately. Similarly, if the pattern is worked with several strands of different yarns (for example 1 strand Alpaca and 1 strand Kid-Silk) you will have to find alternatives for each, individually.

Click here to see our yarn calculator

Since different yarns have different qualities and textures we have chosen to keep the original yarn in our patterns. However, you can easily find options among our available qualities by using our yarn calculator, or simply pick a yarn from the same yarn group.

It is possible that some retailers still have discontinued yarns in stock, or that someone has a few skeins at home that they would like to find patterns for.

The yarn calculator will provide both alternative yarn as well as required amount in the new quality.

If you think it's hard to decide what size to make, it can be a good idea to measure a garment you own already and like the size of. Then you can pick the size by comparing those measures with the ones available in the pattern's size chart.

You'll find the size chart at the bottom of the pattern.

See DROPS lesson: How to read size chart

The needle size provided in the pattern serves only as a guide, the important thing is to follow the knitting tension. And since knitting tension is very individual, you will have to adjust the needle size to ensure that YOUR tension is the same as in the pattern – maybe you’ll have to adjust 1, or even 2 needle sizes, up or down to achieve the correct tension. For this, we recommend that you work test swatches.

Should you work with a different knitting tension than the one provided, the measurements of the finished garment might deviate from the measurement sketch.

See DROPS lesson: How to measure your tension/gauge

See DROPS video: How to make a tension/gauge swatch

Working a garment top-down provides more flexibility and room for personal adjustment. For example it is easier to try the garment on while working, as well as making adjustments to length of yoke and shoulder caps.

The instructions are carefully explaining every step, in the correct order. Diagrams are adjusted to the knitting direction and are worked as usual.

The diagram depicts all rows/rounds, and every stitch seen from the right side. It is read from bottom to top, from right to left. 1 square = 1 stitch.

When working back and forth, every other row is worked from the right side and every other row is worked from the wrong side. When working from the wrong side, the diagram will have to be worked reversed: from left to right, knit stitches are purled, purl stitches are knit etc.

When working in the round every round is worked from the right side and the diagram are worked from right to left on all rounds.

See DROPS lesson: How to read knitting diagrams

The diagram depicts all rows/rounds, and every stitch seen from the right side. It is worked from bottom to top, from right to left.

When working back and forth every other row is worked from the right side: from right to left and every other row is worked from the wrong side: from left to right.

When working in the round, every row in the diagram are worked from the right side, from right to left.

When working a circular diagram you start in the middle and work your way outwards, counter clockwise, row by row.

The rows usually start with a given number of chain stitches (equivalent to the height of the following stitch), this will either be depicted in the diagram or explained in the pattern.

See DROPS lesson: How to read crochet diagrams

Instructions for working several diagrams after each other on the same row/round, will often be written like so: “work A.1, A.2, A.3 a total of 0-0-2-3-4 times". This means you work A.1 once, then A.2 is worked once, and A.3 is repeated (in width) the number of times provided for your size – in this case like so: S = 0 times, M = 0 times, L=2 times, XL= 3 times and XXL = 4 times.

The diagrams are worked as usual: begin with the first row in A.1, then work the first row in A.2 etc.

See DROPS lesson: How to read knitting diagrams

See DROPS lesson: How to read crochet diagrams

The total width of the garment (from wrist-to-wrist) will be larger in the larger sizes, despite the actual sleeves being shorter. The larger sizes have longer sleeve caps and wider shoulders, so there will be a good fit in all sizes.

The measurement sketch/schematic drawing provides information regarding the full length of the garment. If it’s a jumper or a jacket the length is measured from the highest point on the shoulder closest to the neckline, and straight down to the bottom of the garment. It is NOT measured from the tip of shoulder. Similarly, the length of yoke is measured from the highest point on the shoulder and down to where yoke is split into body and sleeves.

On a jacket measures are never taken along bands, unless specifically stated. Always measure inside band stitches when measuring the length.

See DROPS lesson: How to read a schematic drawing

Diagrams are often repeated on the round or in height. 1 repeat is the diagram the way it appears in the pattern. If it says to work 5 repeats of A.1 in the round, then you work A.1 a total of 5 times after/next to each other in the round. If it says to work 2 repeats of A.1 vertically/in height you work the entire diagram once, then begin again at the start and work the entire diagram one more time.

Chain stitches are slightly narrower than other stitches and to avoid working the cast-on edge too tight, we simply chain more stitches to begin with. The stitch count will be adjusted on the following row to fit the pattern and measurement sketch.

The rib edge is more elastic and will contract slightly compared to, for example, stocking stitch. By increasing before the rib edge, you avoid a visible difference in width between the rib edge and the rest of the body.

It’s very easy to cast off too tightly, and by making yarn overs while casting off (and simultaneously casting these off) you avoid a too tight cast off edge.

See DROPS video: How to bind off with yarn overs (yo)

To achieve an even increase (or decrease) you can increase on, for example: every 3rd and 4th row alternately, like so: work 2 rows and increase on the 3rd row, work 3 rows and increase on the 4th. Repeat this until the increase is complete.

See DROPS lesson: Increase or decrease 1 st on every 3rd and 4th row alternately

Should you prefer to work in the round instead of back and forth, you may of course adjust the pattern. You’ll need to add steeks mid-front (usually 5 stitches), and follow the instructions. When you would normally turn and work from the wrong side, simply work across the steek and continue in the round. At the end you’ll cut the piece open, pick up stitches to work bands, and cover the cut edges.

See DROPS video: How to knit steeks and cut open

Should you prefer to work back and forth instead of in the round, you may of course adjust the pattern so you work the pieces separately and then assemble them at the end. Divide the stitches for the body in 2, add 1 edge stitch in each side (for sewing) and work the front and back pieces separately.

See DROPS lesson: Can I adapt a pattern for circular needles into straight needles?

Pattern repeats can vary slightly in the different sizes, in order to get the correct proportions. If you’re not working the exact same size as the garment in the photo, yours might deviate slightly. This has been carefully developed and adjusted so that the complete impression of the garment is the same in all sizes.

Make sure to follow instructions and diagrams for your size!

If you have found a pattern you like which is available in women’s size it’s not very difficult to convert it to men’s size. The biggest difference will be the length of sleeves and body. Start working on the women size that you think would fit across the chest. The additional length will be worked right before you cast off for the armhole/sleeve cap. If the pattern is worked top-down you can add the length right after the armhole or before the first decrease on sleeve.

Regarding additional yarn amount, this will depend on how much length you add, but it is better with a skein too many than too few.

All yarns will have excess fibres (from production) that might come off as lint or shedding. Brushed yarns (ie hairier yarns) have more of these loose, excess fibres, causing more shedding.

Shedding also depends on what is worn under or over the garment, and whether this pulls at the yarn fibres. It’s therefore not possible to guarantee that there will be no shedding

Below are some tips on how to get the best result when working with hairier yarns:

1. When the garment is finished (before you wash it) shake it vigorously so the looser hairs come off. NOTE: do NOT use a lint roller, brush or any method that pulls at the yarn.

2. Place the garment in a plastic bag and put it in your freezer - the temperature will cause the fibres to become less attached to each other, and excess fibres will come off easier.

3. Leave in the freezer for a few hours before taking it out and shaking it again.

4. Wash the garment according to the instructions on the yarn label.

Pilling is a natural process that happens to even the most exclusive of fibers. It's a natural sign of wear and tear that is hard to avoid, and that is most visible in high friction areas of your garment like a sweater's arms and cuffs.

You can make your garment look as new by removing the pilling, using a fabric comb or a pill/lint remover.

Still can't find the answer you need? Then scroll down and leave your question so one of our experts can try to help you. This will be done normally within 5 to 10 working days.
In the meantime, you can read the questions and answers that others have left to this pattern or join the DROPS Workshop on Facebook to get help from fellow knitters/crocheters!

You might also like...

Post a comment to pattern DROPS 176-5

We would love to hear what you have to say about this pattern!

If you want to leave a question, please make sure you select the correct category in the form below, to speed up the answering process. Required fields are marked *.

Comments / Questions (39)

country flag Hilde wrote:

Hei Honey Blossom. Under GENSER står det: 1 maske glattstrikk, 1 kast på bolen under første økning til raglan. Fortsett med denne inndelingen og øk til ragland som forklart. Under RAGLAN står det: 2 masker glattstrikk, 1 kast. Mitt spørsmål er om det skal være 2 eller 3 masker totalt mellom kastene/hullene? Forstår at det skal være 1 m på ermet i følge mønsteret, men usikker på om det skal være 1 eller 2 masker før kastet på bolen?

17.09.2019 - 14:44

country flag Claudine wrote:

Hi. I'm making the XL size and I'm on the first lot of increasing and on the sleeve 17sts and 31 increases gives the total of 79sts at the end but on the body 22/44sts and 28 increases only gives 50/100sts when finished and not 51/102 as stated? I can't see where I'm going wrong? Many thanks.

07.06.2019 - 09:30

DROPS Design answered:

Dear Claudine, you increase on body a total of 29 times (1st inc is explained + on every other round 25 times + on every 4th round 3 times) (= 44 + 29 x 2 sts inc = 102 sts (51 sts on each half back piece) and increase on sleeve a total of 31 times (= 17 + 30x2 = 77 sts), so that you have: 51 sts (back piece), 1 st, 77 sts sts (sleeve), 1 st, 102 sts (front piece), 1 st, 77 sts (sleeve), 1 st, 51 sts (back piece) = 362 sts. Happy knitting!

07.06.2019 - 10:37

country flag Laetitia wrote:

Bonjour, Concernant les augmentations des devant et dos, je suis décalée. Faut-il conserver les 2mailles endroit avant et après A1 ou le nombre de ces mailles évoluent avec les augmentations ?

30.05.2019 - 01:46

DROPS Design answered:

Bonjour Laetitia! Les augmentations du raglan pour les manches sont indiquées dans les diagrammes (d'abord A.1 puis A.2/A.4 = début/fin de la manche). Pour le dos et le devant, augmentez comme indiqué sous RAGLAN DOS & DEVANT avant/après A.1: en commençant 2 mailles avant A.1 (quant on augmente tous les 2 tours), et alternativement - soit 2 mailles avant A.1, soit 4 mailles avant A.1 (quant on augmente tous les 4 tours). Bon tricot!

30.05.2019 - 17:56

country flag Galadrielle L wrote:

Bonjour, j'aime beaucoup ce modèle. Mais j'en suis aux manches et je ne comprend pas comment reprendre le diagramme A3. Les mailles à tricoter en jersey sous la manche sont seulement les mailles relevées ? et comment reprendre le motif du diagramme en se basant seulement sur le A3 ? car le début du rang ne correspond par avec le début de A3. Merci beaucoup pour votre réponse.

02.03.2019 - 15:40

DROPS Design answered:

Bonjour Galadrielle, vous continuez A.3 sur les mailles de la manche en continuant le motif comme avant - vous pouvez tricoter certaines nouvelles mailles relevées en A.3 si besoin. Les autres mailles relevées seront à tricoter en jersey. Bon tricot!

04.03.2019 - 08:18

Aniko wrote:

(2/2) Sorry, comment was too long. Then the description suggests to continue with the same division of pattern and stocking stitches. To me this means that I do again 19 st, 1 yo, 1 st, A.1, etc. But this way there are only 118 stitches that I can knit over, so I have +4 at the end of the 2nd round. Can you please tell me what am I doing wrong here?

07.06.2018 - 00:33

DROPS Design answered:

When continuing the pattern, you will now work until 1 st remain before A.1 (= K20 on next round), then K1, work 2nd row in A.1, K all sts until next A.1, work 2nd row in A.1 and finish with 21 sts (= K1 after A.1, Yo from previous row + K19 from previous row). Continue increasing as explained under RAGLAN/ BODY as explained at the beginning of the pattern: K until 2 sts remain before A.1, YO on back piece, K2, A.1, K2, YO, K front piece until 2 sts remain before A.1, YO, K2, A.1, K2, YO and work remaining sts on back piece. Happy knitting!

07.06.2018 - 09:20

Aniko wrote:

(1/2) Hi GarnStudio, I am quite new to knitting and I am already stuck at the beginning. I started with the first 2 ridges and increased 20 stitches. I am making a small jumper so I have a total of 114 stitches. I followed the instruction on continuing: I worked 19 st, 1 yo, 1 st, A.1, etc. This results in a total of 122 stitches after the 1st round, because there are 2*2 increases in the pattern and we do 4 yarn overs.

07.06.2018 - 00:32

DROPS Design answered:

Dear Aniko, that's right after this first round you have increased a total of 8 sts (= 2 sts in each A.1 + 2 sts on front piece and 2 sts on back piece). You have worked the first increase for raglan: the increase for raglan on sleeves are included in diagram and on front and back piece you increase 1 st before/after A.1.

07.06.2018 - 09:16

country flag Heloise M wrote:

Merci pour votre réponse ! J’ai juste besoin d’une petite précision : (toujours pour les augmentations du dos/corps) les jetés suffisent-t-ils pour faire les augmentations (donc 4 mailles en plus tout les 2 tours) ou faut-il en plus faire 4 augmentations dans le jersey en plus (donc 8 mailles en plus tout les 2 tours? Merci beaucoup en tout cas de repondre aussi vite!

18.05.2018 - 09:51

DROPS Design answered:

Bonjour Heloise, les jetés sont les augmentations du raglan, pour le devant et le dos, augmentez: 0-0-0-0-0-6 fois tous les tours, 14-16-17-25-32-30 fois tous les 2 tours et enfin 4-5-6-3-0-0 fois tous les 4 tours (et en même temps 22-26-29-31-32-33 fois tous les 2 tours pour les manches en suivant les diagrammes). Bon tricot!

18.05.2018 - 10:36

country flag Heloise M wrote:

Bonjour, Je ne comprends pas les explications sur les augmentations au niveau du corps du pull... mon raglan est dans le mauvais sens. Pourriez vous mieux expliquer quand les augmentations sont tout les 2 rangs? Merci

17.05.2018 - 21:05

DROPS Design answered:

Bonjour Heloise, les augmentations du raglan pour les manches sont indiquées dans les diagrammes (d'abord A.1 puis A.2/A.4 = début/fin de la manche). Pour le dos et le devant, augmentez comme indiqué sous RAGLAN DOS & DEVANT avant/après A.1, quand vous augmentez tous les 2 tours: tricotez le rang après l'augmentation en jersey (et les jetés à l'endroit pour qu'ils forment des trous). Quand vous augmenterez tous les 4 tours: répétez les 4 tours indiqués pour que les jours des augmentations du raglan continuent même quand on n'augmente pas (= tour 3). Bon tricot!

18.05.2018 - 08:56

country flag Rikke Mikkelsen wrote:

Jeg sidder og sammenligner Wind Down og denne bluse. Jeg kan egentlig bedst lide udskæring og facon på wind down men ærmerne på denne model er meget kønnere. Kan man kombinere de to opskrifter på en god måde?

02.05.2018 - 09:10

DROPS Design answered:

Hej Rikke, der er ikke stor forskel på selve udskæringen, den er bare lidt mindre i Wind Down. Vælg Honey Blossom, og strik bredde og længde efter Wind Down. Eller så vælger du Wind Down og følger ærmerne i Honey Blossom. Vi kan desværre ikke hjælpe dig med at sætte de to opskrifter sammen. God fornøjelse!

04.05.2018 - 12:03

country flag Neupauer wrote:

In dem Diagramm sind beim Muster leere Kästchen eingezeichnet, wahrscheinlich ist ein Umschlag gemeint, aber bei „zwei Maschen wie zum Rechtsstricken abheben usw, wird man aus dem leeren Kästchen nicht schlau. Gibt es diesen schönen Pulli in einem Anleitungsheft zum Bestellen?

03.03.2018 - 18:08

DROPS Design answered:

Liebe Frau Neupauer, in der 5., 13. und 21. Reihe A.2-A.4 wird die erste Maschen A.3 zusammen mit der letzten Maschen A.2 gestrickt, und die erste Masche der nächste A.3/A.4 zusammen mit den letzten Maschen in A.3 gestrickt, beachten Sie nur, daß die Maschenanzahl in jedem Diagram stimmt. Viel Spaß beim stricken!

05.03.2018 - 08:39