
Popular categories
Looking for a yarn?


Comments / Questions (39)
![]() Chris wrote:
Chris wrote:
Bonjour, Comment convertir un TOP DOWN en un BAS en HAUT comme pour ce modèle que je convoite ? Merci d'avance Chris
22.08.2022 - 16:12DROPS Design answered:
Bonjour Chris, vous pouvez le lire à l'envers, autrement dit: montez le nombre de mailles rabattues en bas, et augmenter au lieu de diminuer + diminuer au lieu d'augmenter - il sera toutefois peut-être plus simple de suivre les explications telles quelles, une leçon et une vidéo sont là pour vous guider dans la technique si besoin. Bon tricot!
22.08.2022 - 16:29
![]() Alberte Olivia Bank wrote:
Alberte Olivia Bank wrote:
Hej. Jeg tænkte på om man kunne lave en lille højhals på istedet for den runde åbne hals - i en 2 r, 2 v rib så den matcher ærmerne - i givet fald, hvad vil så være det anbefalede antal masker - det samme (ribben trækker jo arbejdet lidt sammen)?
28.02.2022 - 12:22DROPS Design answered:
Hej Alberte, du kan evt bruge samme hals som DROPS 217-22 eller 228-6 eller 227-35 og justere maskeantallet efter halsen og fortsætte med denne model :)
02.03.2022 - 12:08
![]() Ida Eikaas wrote:
Ida Eikaas wrote:
Hei, Går det an å strikke denne oppskriften nedenfra og opp i stedet for omvendt? Og hva skulle jeg i så fall være særlig obs på? På forhånd tusen takk!
19.10.2021 - 13:06DROPS Design answered:
Hej Ida, tror det vil være for kompliceret at vende diagrammerne... Men se vores video hvor let det er at strikke ovenfra og ned :)
21.10.2021 - 09:21
![]() Helene wrote:
Helene wrote:
Merci pour votre explication. Comme je ne trouve d’aiguilles circulaires de 40 cm dans ma ville. Je vais appliquer le magic loop que je ne connaissais pas. Super site!
17.08.2020 - 11:55
![]() Helene wrote:
Helene wrote:
Je ne comprends pas comment tricoter en rond 100 mailles avec l’aiguille circulaire. Le fil est trop long pour faire un tour Merci pour votre éclairage
15.08.2020 - 21:43DROPS Design answered:
Bonjour Hélène, utilisez une petite aiguille circulaire de 40 cm ou bien utilisez la longue aiguille de 80 cm et la technique dite du magic loop. Bon tricot!
17.08.2020 - 08:31
![]() Lisa wrote:
Lisa wrote:
Hej, jag blev lite förbryllad av hur många varv som stickas totalt innan man ska sätta av maskor för ärmhålen. Tänker jag rätt att det är 25 varv för storlek S?
07.01.2020 - 21:08DROPS Design answered:
Hej Lisa, följ även måttet som står i beskrivningen (och måttskissen) så du får rätt mått i din storlek :)
15.01.2020 - 16:03
![]() Lisa wrote:
Lisa wrote:
Hej, jag ställde en fråga angående ökningen på F&B respektive ärmar men förstod tyvärr inte svaret. Ställer därför frågan igen och hoppas på ett förtydligande: FRAM- OCH BAKST: Öka på varje v totalt 0-6-5-12-10-16 ggr, sedan på vartannat v totalt 18 ggr i alla stl och till slut på vart 4:e v totalt 6-6-7-6-8-8 ggr. ÄRMARNA: Öka på vartannat v totalt 14-19-27-30-33-32 ggr och sedan på vart 4:e v totalt 8-7-4-3-3-5 ggr.
10.04.2019 - 10:44DROPS Design answered:
Hei Lisa. Det økes på begge sider av de 4 merkene, men ikke alltid på de samme omgangene. Hver gang du øker på for/bakdel økes 2 masker på fordel og 2 masker på bakdel. Hver gang du øker på ermene økes 2 masker på hvert erme. På for/ bakdel øker du hver 2. omg totalt 18 ganger. Samtidig øker du hver 2. omg på ermene totalt 14 ganger. Dvs: de første 14 gangene du øker, økes det på både ermene og for/ bakdel. Videre økes det hver 4. omg på ermene (dette skal gjøres 8 ganger), mens du fortsetter å øke hver 2. omg på for/bakdel. Når du har økt 18 ganger på for/bakdel går du over til å også øke hver 4. omg her (dette skal gjøres 6 ganger). God fornøyelse
10.04.2019 - 14:43
![]() Lisa wrote:
Lisa wrote:
Hej, jag undrar över beskrivningen: FRAM- OCH BAKST: Öka på varje v totalt 0-6-5-12-10-16 ggr, sedan på vartannat v totalt 18 ggr i alla stl och till slut på vart 4:e v totalt 6-6-7-6-8-8 ggr. ÄRMARNA: Öka på vartannat v totalt 14-19-27-30-33-32 ggr och sedan på vart 4:e v totalt 8-7-4-3-3-5 ggr. Första ökningen på F&B i S ökas noll och sedan 18 maskor fördelat på fram- och bakdel? Alltså tex 9 maskor för framdel och 9 maskor för bakdel?
09.04.2019 - 23:06DROPS Design answered:
Hei Lisa. Du øker ved hver raglan på for- og bakstykket hver 2. omgang totalt 18 ganger. Dvs, 18 omganger der du øker 2 masker på forstykket og 2 masker på bakstykket (1 maske i hver side). Etter de 18 økingene er det altså 36 masker økt på forstykket og 36 masker økt på bakstykket. Videre øker du hver 4. omgang 6 ganger (12 masker økt på forstykket og 12 masker økt på bakstykket). Det samme gjelder på ermet: du øker ved hvert merke (i hver side av ermet) på hver 2. omgang 14 ganger. Altså 2 masker økt på hvert erme hver økning. God fornøyelse
10.04.2019 - 07:37
![]() Amelia wrote:
Amelia wrote:
When it says divide the piece in the middle and finish back and front separately, does it mean that from that point it is knitted back and forth and then front and back are joined together in the round for the rib? I am confused because I don’t see front and back assembly instructions. Thank you!
14.07.2018 - 01:09DROPS Design answered:
Hi Amelia, The piece is divided into front and back pieces so that you end up with a split in both sides. If you do not wish to have this split, you can continue in the round. Happy knitting!
14.07.2018 - 11:28
![]() Scoobie wrote:
Scoobie wrote:
Ich kenne die Methode des Abkettens mit zwei Fäden nicht und bin leider weder bei Ihren Anleitungen noch bei der Internetsuche fündig geworden. Gibt es ein Synonym dazu, oder könnten Sie es noch einmal erklären? Liebe Grüße aus Norddeutschland
16.03.2018 - 12:08DROPS Design answered:
Liebe Scoobie, einfach der Faden von innen der Knäuel und der Faden von aussen der Knäuel zusammen nehmen und die Maschen wie normaleweise aber mit diesen beiden Fäden abketten. Viel Spaß beim stricken!
16.03.2018 - 14:15
|
||||||||||||||||||||||
Misty Harbor#mistyharborsweater |
||||||||||||||||||||||
 |
 |
|||||||||||||||||||||
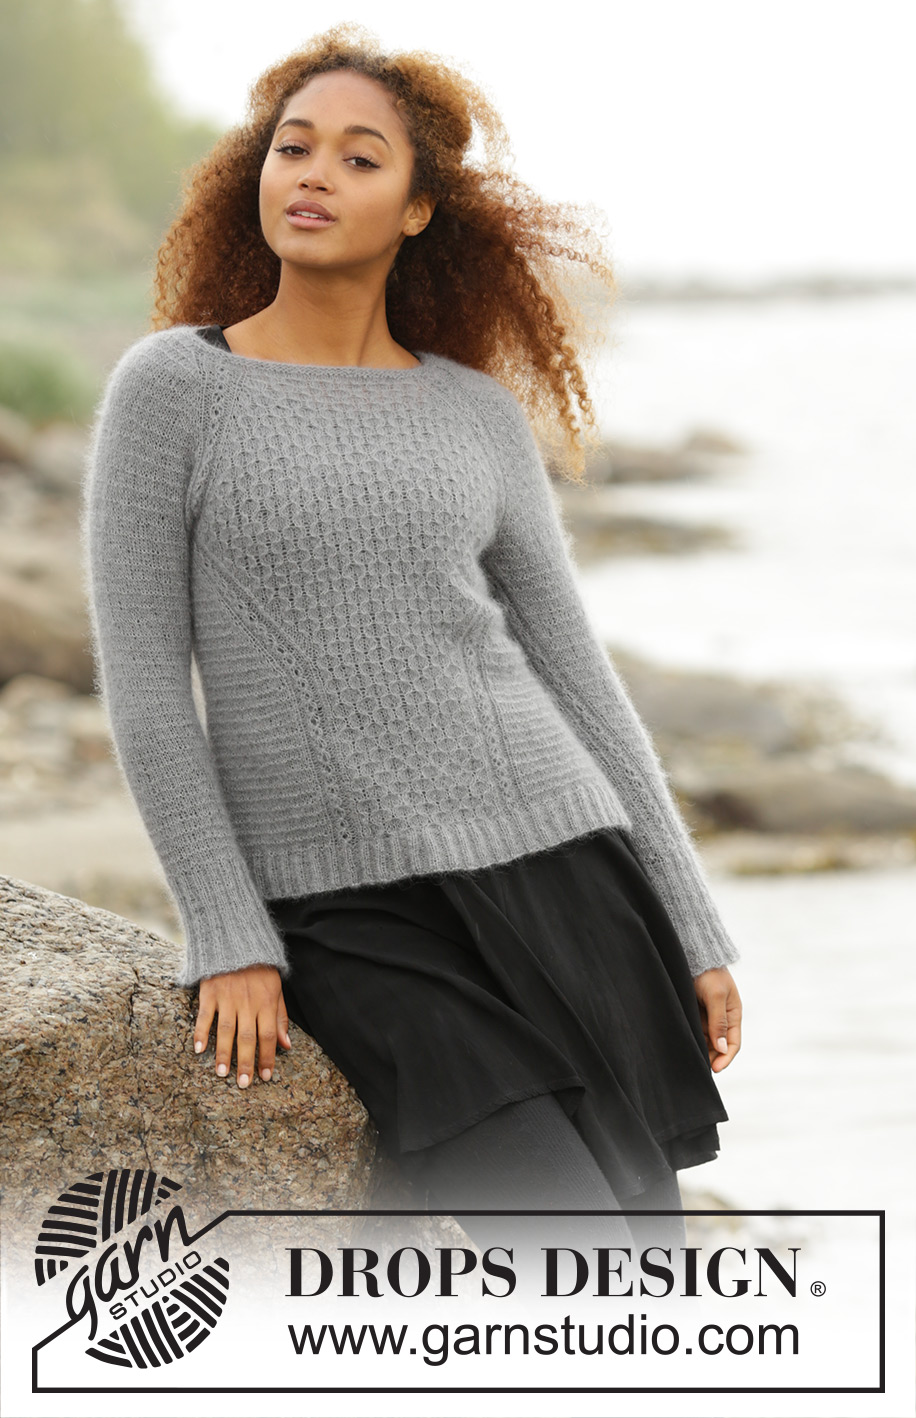
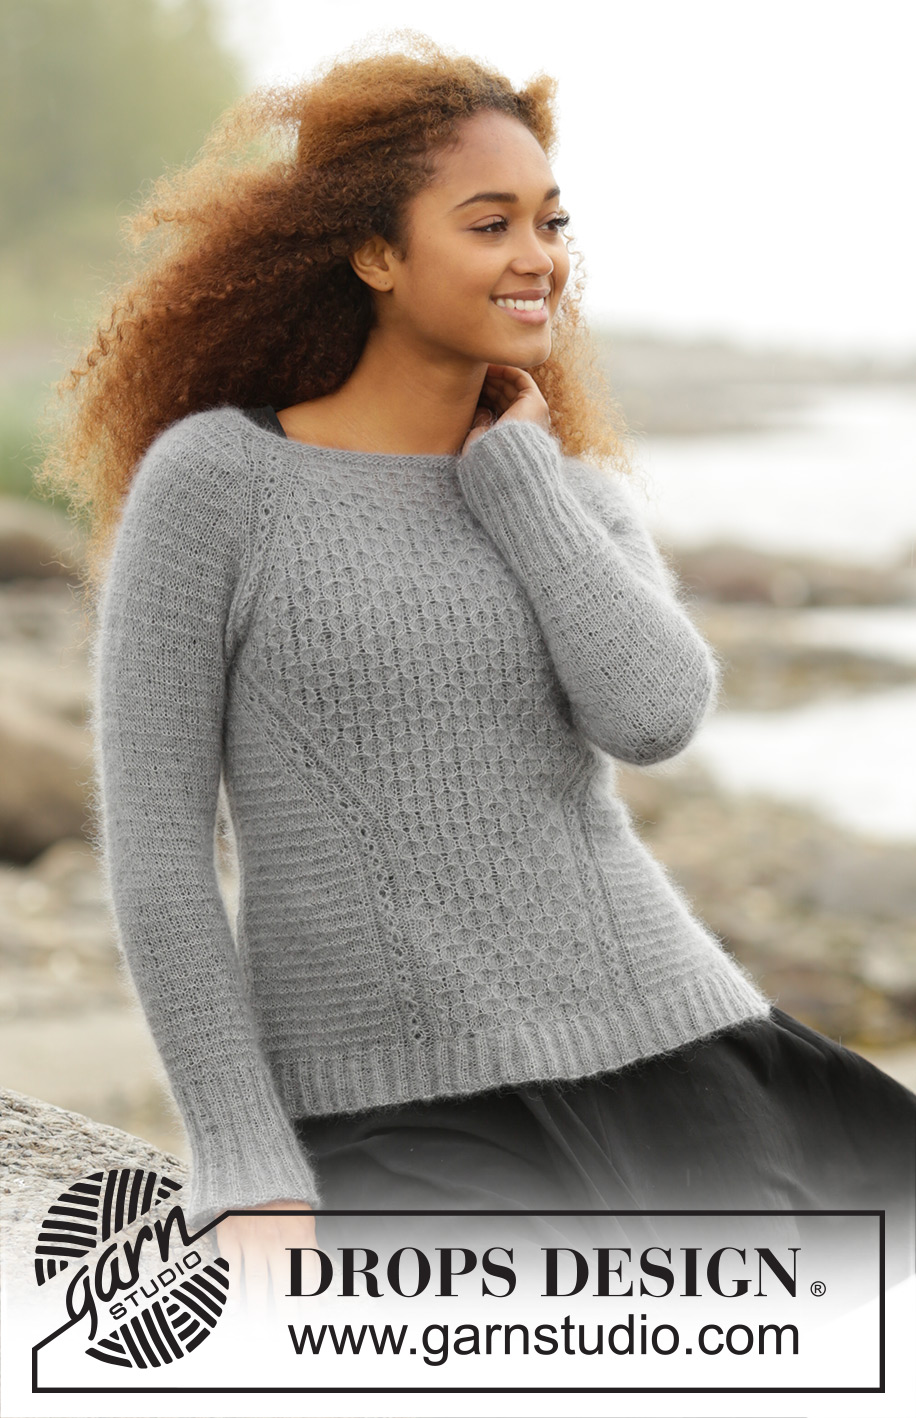
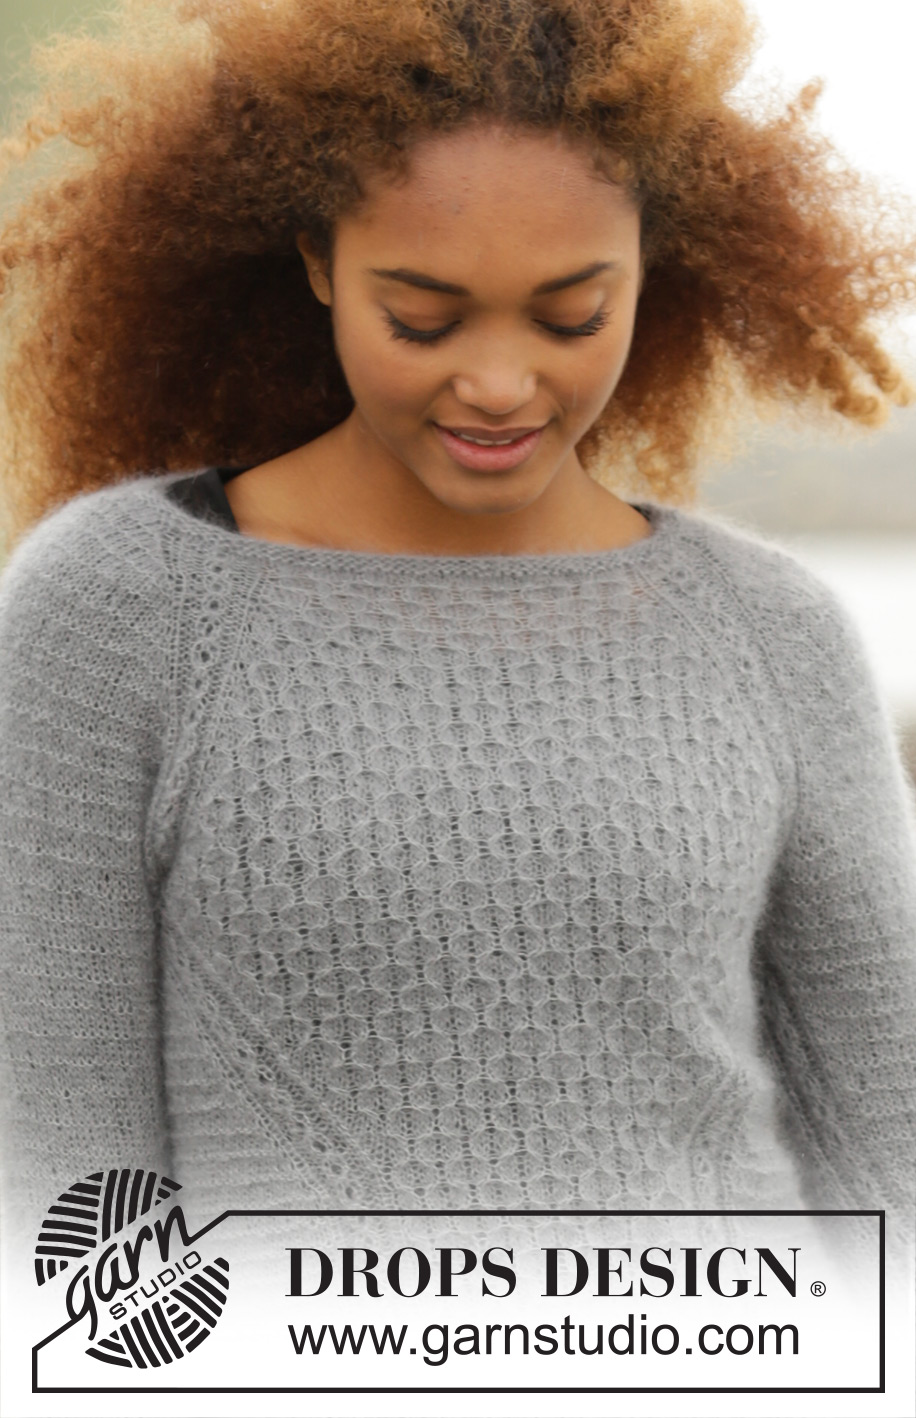
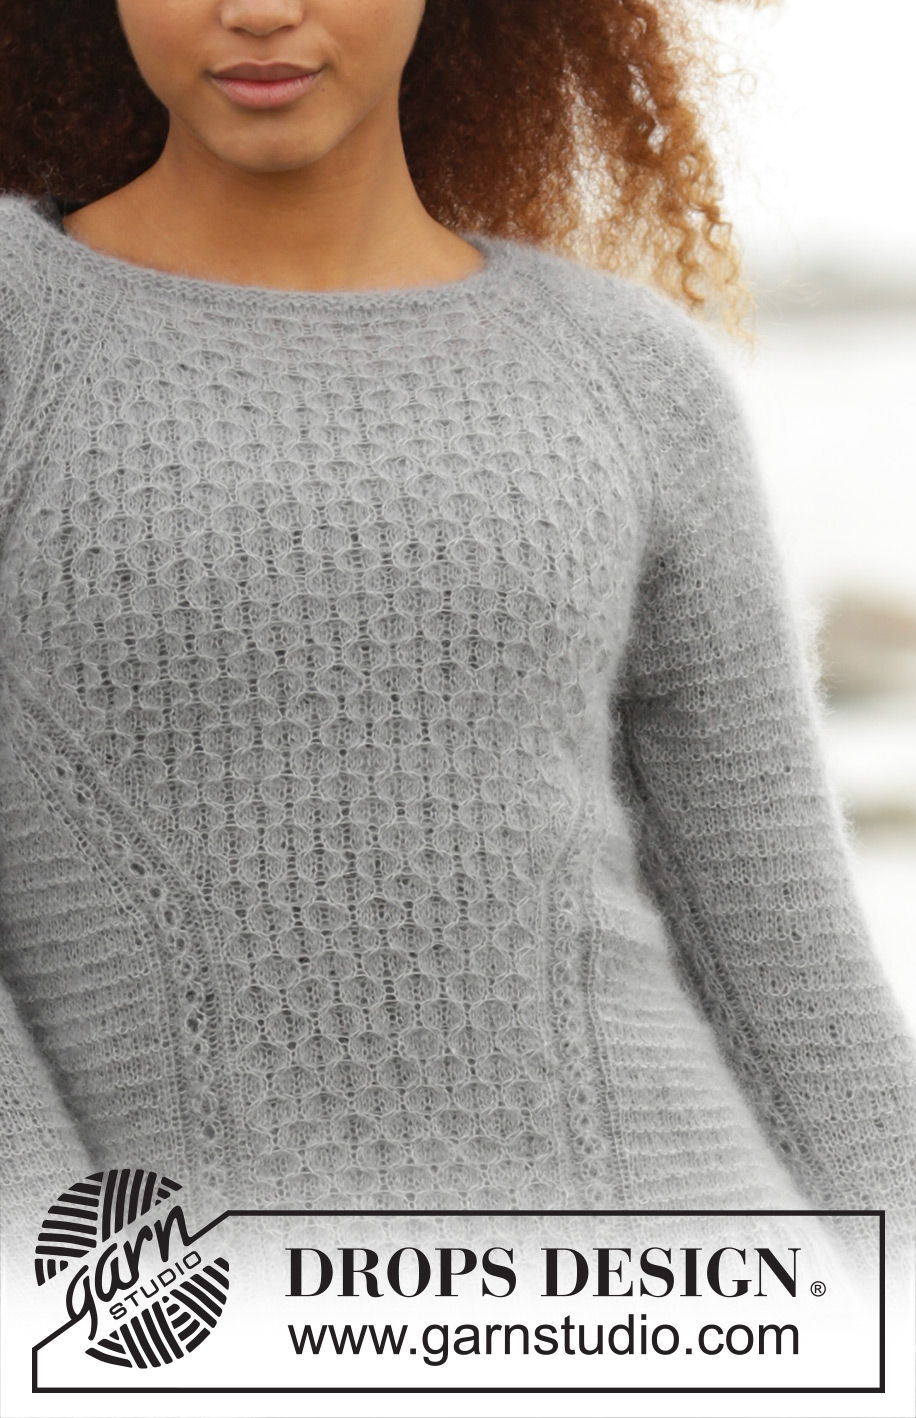
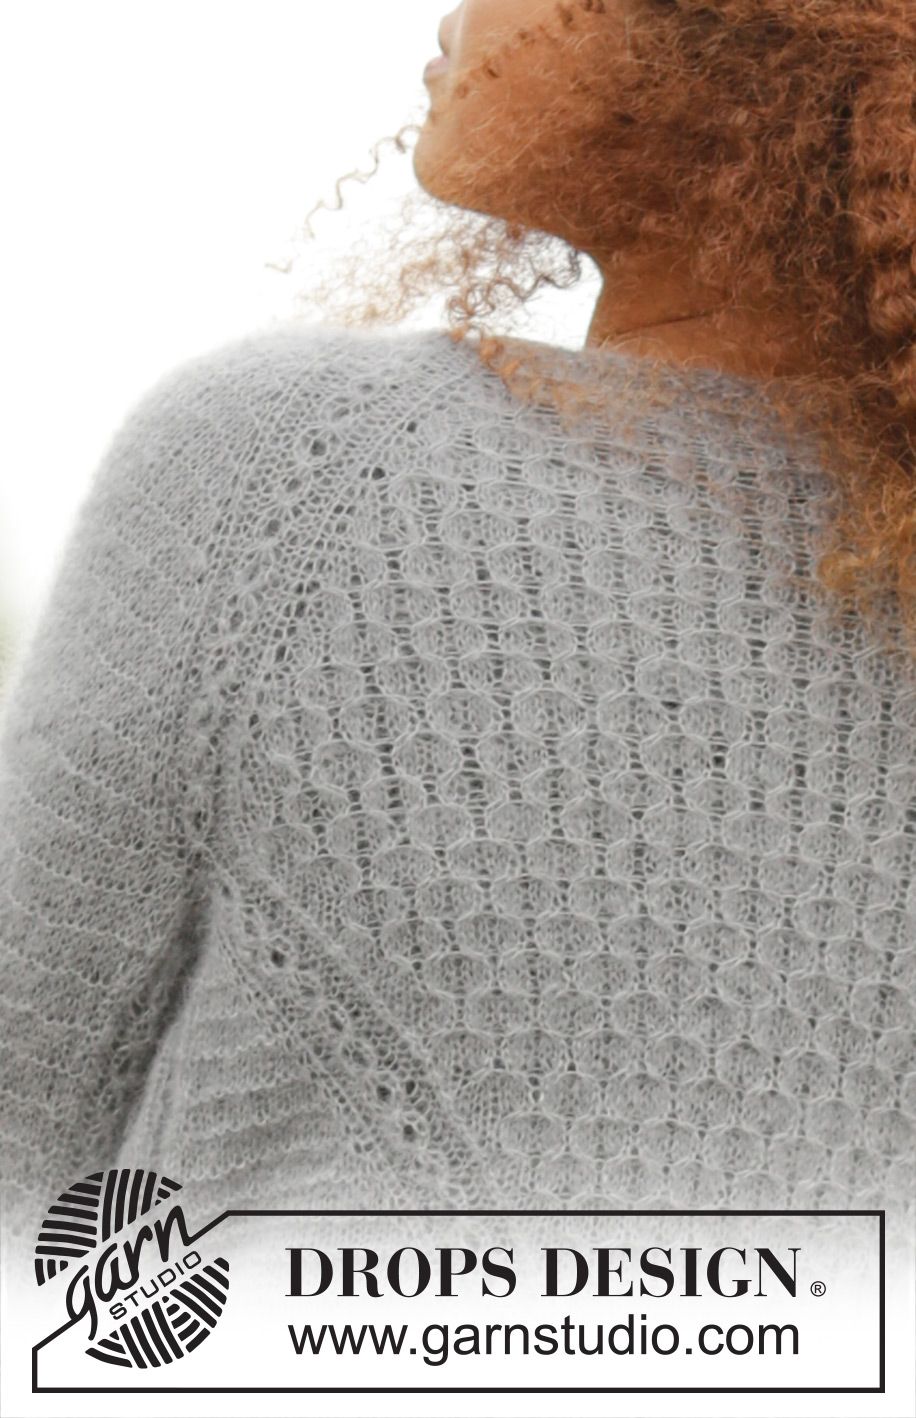
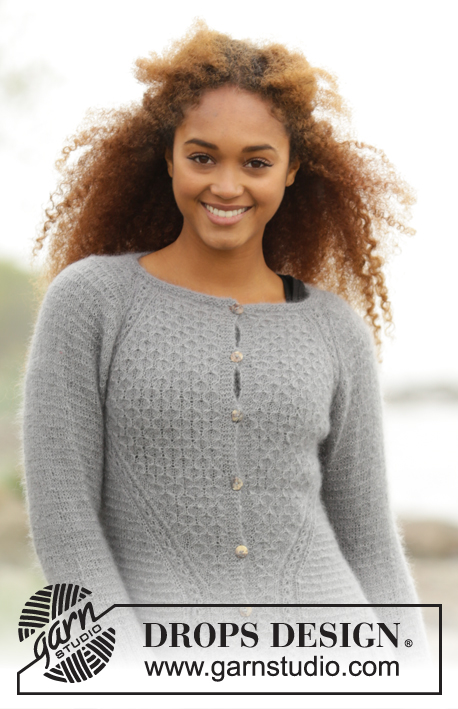
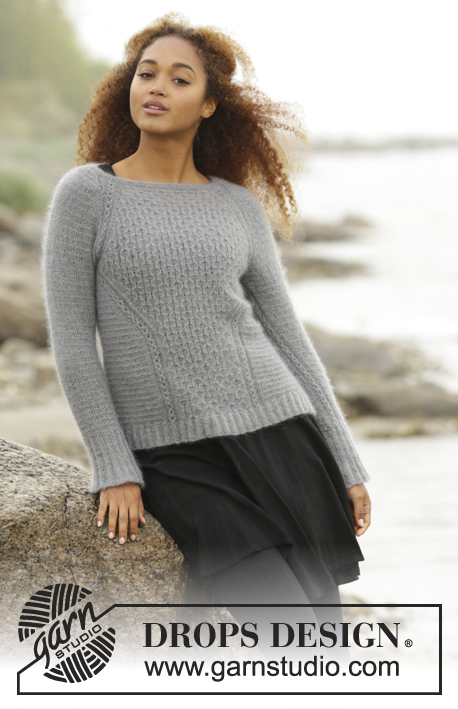
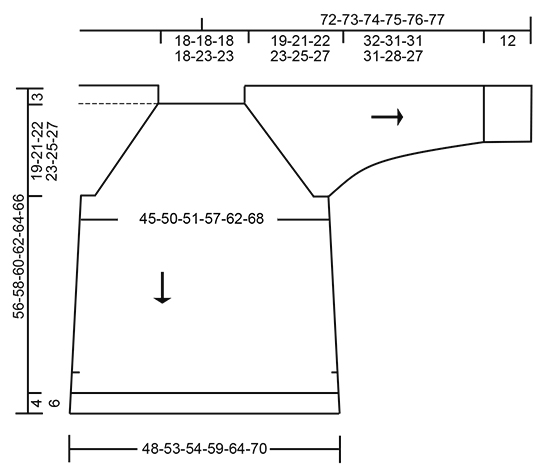
Knitted DROPS jumper, worked top down with raglan and textured pattern in “Kid-Silk”. Size: S - XXXL.
DROPS 171-24 |
||||||||||||||||||||||
|
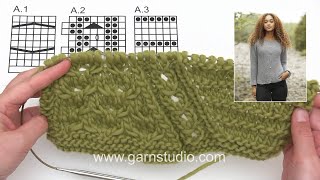
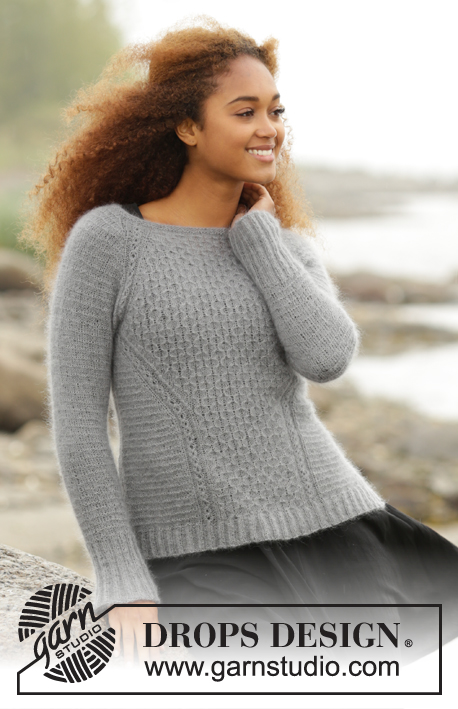
GARTER ST (worked in the round): 1 ridge = 2 rounds. * K 1 round and P 1 round *, repeat from *-*. GARTER ST (back and forth): K all rows. 1 ridge = 2 rows K. PATTERN: See diagrams A.1 to A.3. The diagrams show all rows in pattern seen from RS. RAGLAN: Inc for raglan on each side of A.2 in every transition between sleeve and body. Inc 1 st by making 1 YO, on next row work YO twisted to avoid holes. Work the inc sts in stocking st until the fit A.1 on body and work them in A.3 on sleeves NOTE: Inc differently on body and sleeves as explained in pattern and on some rounds there will only be inc on front and back piece and not on sleeves. DISPLACEMENT IN A.2 (applies to front and back piece after armhole): A.2 should be displaced from the side under sleeve to mid front/mid back. On right front/back piece this is done as follows: Work as before until A.2, make 1 YO, work A.2 as before but when last st in A.2 remains slip this st as if to K, K 1 and psso. Continue pattern as before. On next round work YO twisted to avoid holes - work new sts in A.3. On left front/back piece this is done as follows: Work as before until 1 st remains before A.2, K next st tog with first st in A.2, work A.2 as before, make 1 YO and work the remaining sts as before. On next round work YO twisted to avoid holes - work new sts in A.3. INCREASE TIP (applies to sides of body): Inc 1 st by making 1 YO, on next round work YO twisted to avoid holes. Work the inc sts in A.3. DECREASE TIP (applies to sleeves): Dec 2 sts mid under sleeve as follows: Beg 2 sts before A.2, K 2 tog, work A.2 (= 8 sts), slip next st as if to K, K 1, psso (= 2 sts dec). ---------------------------------------------------------- JUMPER: Worked in the round on circular needle from top down. YOKE: Cast on 100-100-100-100-124-124 sts on circular needle size 3 mm with Kid-Silk. Work 2 ridges in GARTER ST - see explanation above. K 1 round while inc 20 sts evenly in all sizes = 120-120-120 -120-144-144 sts. Switch to circular needle size 3,5 mm. Work next round as follows: A.2 (= 8 sts in raglan line), A.3 over the next 8 sts (= right sleeve), A.2 (= 8 sts in raglan line), A.1 over the next 36-36-36-36-48-48 sts (= 6-6-6-6-8-8 repetitions of 6 sts on front piece), A.2 (= 8 sts in raglan line), A.3 over the next 8 sts (= left sleeve), A.2 (= 8 sts in raglan line), A.1 over the last 36-36-36-36-48-48 sts (= 6-6-6-6-8-8 repetitions of 6 sts on back piece). Continue pattern like this. REMEMBER THE KNITTING TENSION AT THE SAME TIME on next round beg inc for RAGLAN – see explanation above! NOTE: Inc differently on body and sleeves: BODY: Inc on every round 0-6-5-12-10-16 times in total, then on every other round 18 times in total in all sizes and finally every 4th round 6-6-7-6-8-8 times in total. SLEEVES: Inc every other round a total of 14-19-27-30-33-32 times, and on every 4th round a total of 8-7-4-3-3-5 time. After all inc are done there are 304-344-364-396-432-460 sts on needle. Work next round as follows: Work 4 sts (= ½ repetition of A.2), slip the next 60-68-78-82-88-90 sts on 1 stitch holder (= right sleeve), cast on 12-12-14-14-14-16 sts under sleeve, work the next 92-104-104-116-128-140 sts (= front piece), slip the next 60-68-78-82-88-90 sts on 1 stitch holder (= left sleeve), cast on 12-12-14-14-14-16 sts under sleeve, work the remaining 88-100-100-112-124-136 sts (= back piece). Cut the yarn. BODY: = 208-232-236-260-284-312 sts on needle (beg of round = in the middle of the 12-12-14-14-16 new sts under sleeve in the right side of piece). Insert 1 marker, NOW MEASURE PIECE FROM HERE! Work next round as follows: 2 sts in garter st, 0-0-1-1-1-2 sts pattern according to diagram A.3, continue A.2 over the next 8 sts, continue A.1 over the next 84-96-96-108-120-132 sts at the front of jumper, continue A.2 over the next 8 sts, work 0-0-1-1-1-2 sts pattern according to diagram A.3, 4 sts in garter st (insert 1 marker in the middle of these 4 sts = in the middle of left side), 0-0-1-1-1-2 sts pattern according to diagram A.3, continue A.2 over the next 8 sts, continue A.1 over the next 84-96-96-108-120-132 sts at the back of jumper, continue A.2 over the next 8 sts, work 0-0-1-1-1-2 sts pattern according to diagram A.3 and finish with 2 sts in garter st. Continue pattern like this. AT THE SAME TIME on next round beg DISPLACEMENT IN A.2 – see explanation above. Repeat displacement every other round 24-24-24-24-30-30 times in total - NOTE: When displacing A.2, the total no of sts will be the same but there will be fewer sts in A.1 towards mid front and mid back and more sts in A.3 towards the sides. Sts in A.1 that do not fit in pattern when displacing, is worked in stocking st until they fit pattern again. AT THE SAME TIME when piece measures 6 cm from marker, inc 1 st on each side of the 4 sts in garter st in each side - READ INCREASE TIP. Inc like this every 6 cm a total of 3 times = 220-244-248-272-296-324 sts. After last displacement there will be 6-8-8-10-10-12 repetitions of A.1 mid front/mid back (i.e. 36-48-48-60-60-72 sts with A.1). Now continue pattern without displacements. When piece measures 22-22-23-24-24-24 cm from marker (jumper measures approx. 44-46-48-50-52-54 cm from shoulder) divide the piece in the middle of the 4 sts in garter st in each side and finish front and back piece separately. BACK PIECE: = 110-122-124-136-148-162 sts. Continue pattern as before with 2 edge sts in garter st in each side until piece measures 30-30-31-30-30-30 cm from marker (jumper measures approx. 52-54-56-56-58-60 cm from shoulder). P 1 row from WS while inc 8-8-6-6-6-8 sts evenly = 118-130-130-142-154-170 sts - NOTE: Continue the 2 edge sts in each side in garter st and continue A.2 with K over K and P over P (i.e. do not inc over A.2 or sts in garter st). Switch to circular needle size 3 mm and work next row from RS as follows: 2 edge sts in garter st, * K 2, P 2 *, repeat from *-* until 4 sts remain on needle, finish with K 2 and 2 edge sts in garter st (adjust so that rib fits rib in A.2). Continue rib like this but on next row from RS inc all 2 P sts to 3 P sts (inc 1 st by making 1 YO in transition between K and P, on next row K YO twisted to avoid holes) = 146-161-161-176-191-211 sts. When rib measures 4-4-4-6-6-6 cm, loosely cast of with garter st over garter st, K over K and P over P (to avoid a tight cast-off edge cast off with 2 strands Kid-Silk). Jumper measures approx. 56-58-60-62-64-66 cm from shoulder and down. FRONT PIECE: = 110-122-124-136-148-162 sts. Work as on back piece. SLEEVE: Worked in the round on a short circular needle, switch to double pointed needles when needed. Slip the 60-68-78-82-88-90 sts from stitch holder in one side of piece back on a short circular needle size 3.5 mm and cast in addition on 12-12-14-14-14-16 new sts mid under sleeve = 72-80-92-96-102-106 sts. NOW MEASURE PIECE FROM HERE! Continue A.3 in the round but now work A.2 only over the middle 8 sts under sleeve. When sleeve measures 1½ cm, dec 1 st on each side of A.2 - READ DECREASE TIP (= 2 sts dec). Dec a total of 13-16-21-22-23-24 times in Size S: On every 7th round, in size M: Alternately on every 5th and 6th round, in size L + XL: On every 4th round, in size XXL: Alternately on every 3rd and 4th round and in size XXXL. On every 3rd round = 46-48-50-52-56-58 sts. When sleeve measures 32-31-31-31-28-27 cm, K 1 round while inc 14-16-18-16-16-14 sts evenly = 60-64-68-68-72-72 sts. Switch to double pointed needles size 3 mm and work rib in the round over all sts (= K 2/P 2 but adjust to continue rib over A.2 mid under sleeve). When rib measures 8 cm, inc all P 2 to P 3 = 75-80-85-85-90-90 sts. When rib measures 12 cm (or desired length, sleeve measures now approx. 44-43-43-43-40-39 cm), cast off with K over K and P over P - NOTE: To avoid a tight cast-off edge cast off with 2 strands Kid-Silk. ASSEMBLY: Sew the opening under the sleeves. |
||||||||||||||||||||||
Diagram explanations |
||||||||||||||||||||||
|
||||||||||||||||||||||
|
||||||||||||||||||||||
|
||||||||||||||||||||||
Have you finished this pattern?Tag your pictures with #dropspattern #mistyharborsweater or submit them to the #dropsfan gallery. Do you need help with this pattern?You'll find 25 tutorial videos, a Comments/Questions area and more by visiting the pattern on garnstudio.com. © 1982-2025 DROPS Design A/S. We reserve all rights. This document, including all its sub-sections, has copyrights. Read more about what you can do with our patterns at the bottom of each pattern on our site. |
||||||||||||||||||||||


With over 40 years in knitting and crochet design, DROPS Design offers one of the most extensive collections of free patterns on the internet - translated to 17 languages. As of today we count 314 catalogues and 11822 patterns translated into English (UK/cm).
We work hard to bring you the best knitting and crochet have to offer, inspiration and advice as well as great quality yarns at incredible prices! Would you like to use our patterns for other than personal use? You can read what you are allowed to do in the Copyright text at the bottom of all our patterns. Happy crafting!
Post a comment to pattern DROPS 171-24
We would love to hear what you have to say about this pattern!
If you want to leave a question, please make sure you select the correct category in the form below, to speed up the answering process. Required fields are marked *.