DROPS Alaska
DROPS Alaska
100% Wool
from 1.90 £ /50g
Get the yarn to make this pattern from 9.50£.

The yarn cost is calculated from the pattern’s smallest size and the yarn’s cheapest product type. Looking for an even better price? You might find it on the DROPS Deals!

DROPS Super Sale

Touch of Gold

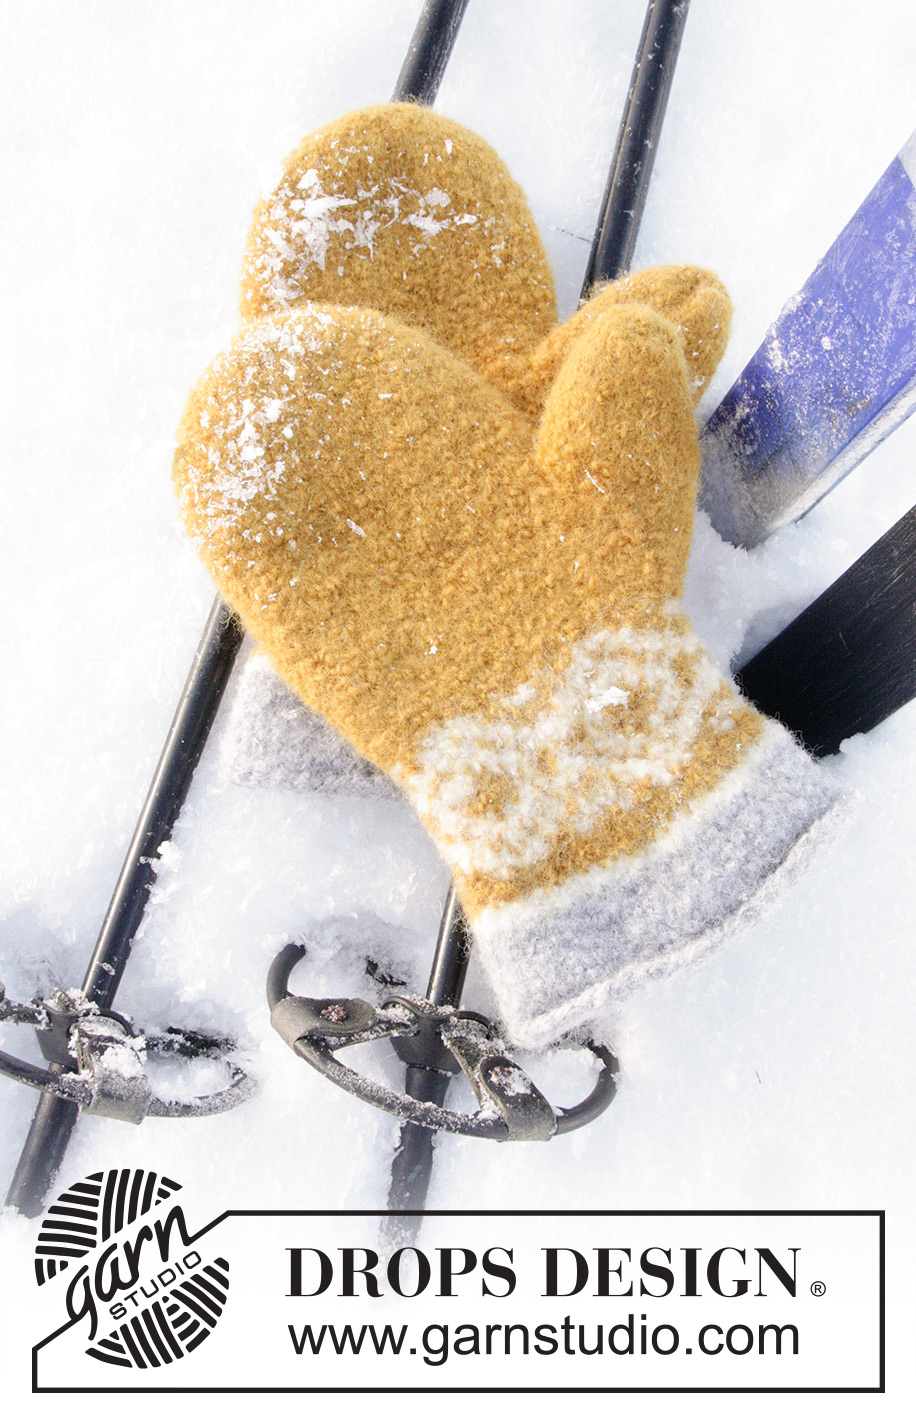
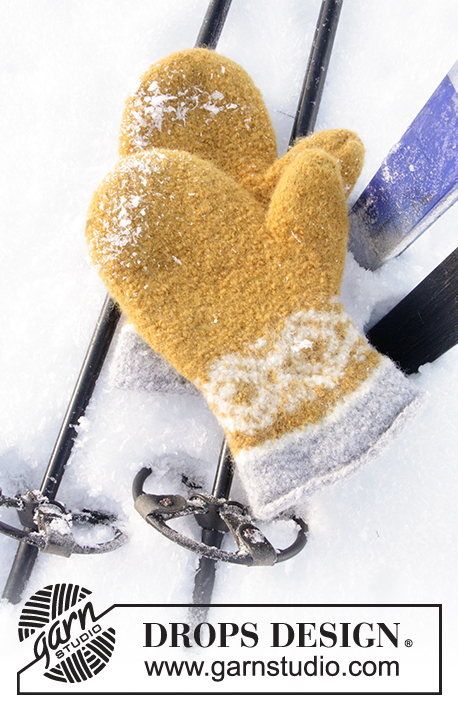
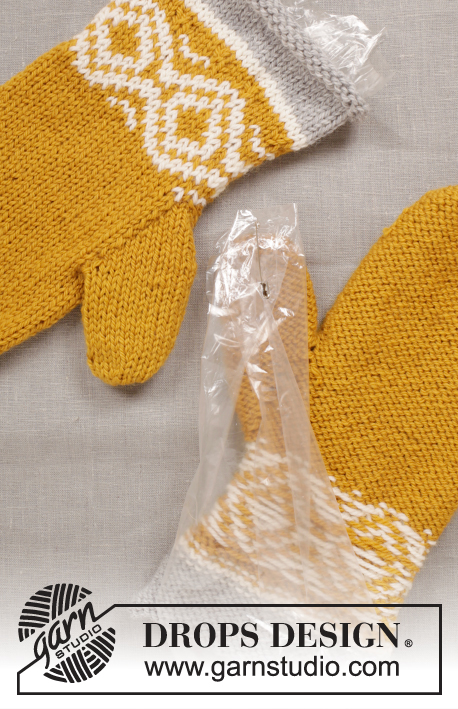
DROPS Easter: Knitted and felted DROPS mittens for men and women with Nordic pattern in ”Alaska”.

DROPS Extra 0-1245
DROPS design: Pattern no x-413
Yarn group C or A + A
----------------------------------------------------------
Size: Women (Men): S/M - M/L - L/XL (S/M - L/XL)
Length before felting: 38-40-44 (44-46) cm.
Length after felting: 28-30-33 (33-35) cm.
Length from thumb gusset before felting: 17-17-19 (19-20) cm.
Length from thumb gusset after felting: 11-11-12 (12-13) cm.
Materials:
DROPS ALASKA from Garnstudio
150 g for all sizes in colour no 58, mustard
50 g for all sizes in colour no 02, off white
50 g for all sizes in colour no 03, light grey.

NOTE: Mittens worked with one colour = 200 g Alaska for all sizes.

DROPS DOUBLE POINTED NEEDLES SIZE 5.5 mm - or size needed to get 16 sts x 20 rows in stocking st = 10 x 10 cm before felting.
ACCESSORIES: 2 safety pins for felting

-------------------------------------------------------

Alternative Yarn – See how to change yarns here
Yarn Groups A to F – Use the same pattern and change the yarn here
Yarn usage using an alternative yarn – Use our yarn converter here

-------------------------------------------------------

DROPS Alaska
DROPS Alaska
100% Wool
from 1.90 £ /50g
Get the yarn to make this pattern from 9.50£.

The yarn cost is calculated from the pattern’s smallest size and the yarn’s cheapest product type. Looking for an even better price? You might find it on the DROPS Deals!

DROPS Super Sale

SAVE 30% on 6 cotton favourites!
Valid until 12.04.2024

Pattern instructions

NOTE: This pattern is written in British English. All measurements in charts are in cm. For conversion from cm to inches - click here. There are different terms for crocheting in British and American English. If this pattern includes crochet, click for "crochet terms" here. For this pattern in American English, please click here.
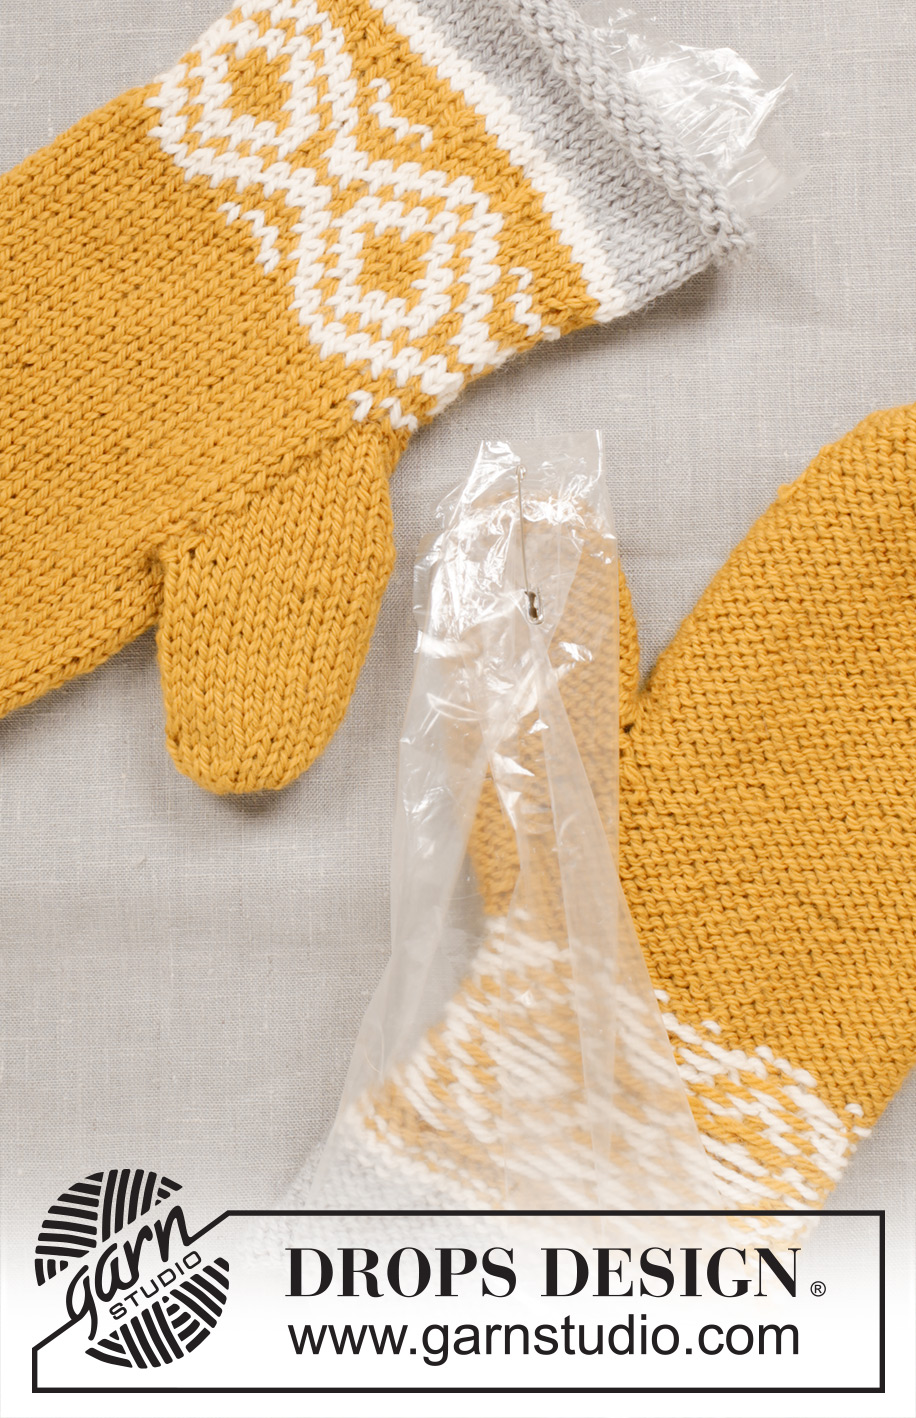
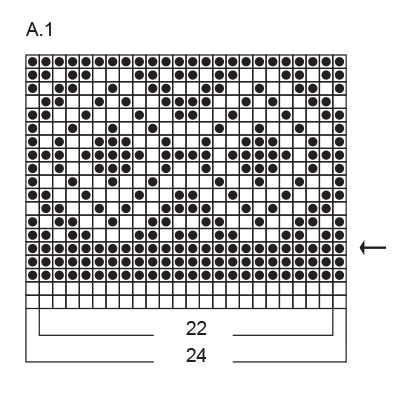
PATTERN:
See diagram A.1 (choose diagram for correct size: 22-22-24 (24-24 sts)). Pattern is worked in stocking st.

INCREASE TIP:
Inc 1 st by working 2 sts in the same st.
----------------------------------------------------------

MITTEN:
Work piece in the round on double pointed needles with Alaska. Cast on 52-52-56 (56-56) sts on double pointed needles size 5.5 mm with light grey. Work entire mitten in stocking st - REMEMBER KNITTING TENSION. When piece measures 5-6-7 (7-8) cm, work PATTERN - see explanation above, in the round according to A.1 - AT THE SAME TIME dec 8 sts evenly on 5th row in diagram (dec by K 2 tog) = 44-44-48 (48-48) sts. When diagram has been worked vertically, continue with mustard until finished measurements - AT THE SAME TIME on first round dec 6-6-8 (8-6) sts evenly = 38-38-40 (40-42) sts. When piece measures 15-16-17 (17-18) cm, insert 1 marker in the 19th-19th-20th (20th-21st) st on round (= marking for thumb). Then inc 1 st on each side of st with marker, repeat in on outside of the inc sts every other round 3-3-4 (4-4) more times - READ INCREASE TIP = 46-46-50 (50-52) sts. After last inc, slip the inc sts + st with marker + 1 st in each side of these sts on a stitch holder for thumb = 11-11-13 (13-13) thumb sts. Cast on 3 new sts behind the thumb sts = 38-38-40 (40-42) sts. Piece measures approx. 21-23-25 (25-26) cm. Continue in stocking st in the round over these sts. When piece measures 36-38-42 (42-44) cm, work all sts tog 2 by 2 = 19-19-20 (20-21) sts. When piece measures 38-40-44 (44-46) cm, work all sts tog 2 by 2 one more time (when no of sts do not fit work last st K) = 10-10-10 (10-11) sts remain on needle. Cut the yarn and pull it through the remaining sts, tighten tog and fasten.

THUMB:
Slip the 11-11-13 (13-13) thumb sts on to double pointed needles size 5.5 mm and pick up 5 sts in the 3 inc sts from hand = 16-16-18 (18-18) sts. Work in the round on double pointed needles in stocking st. When thumb measures approx. 6-6-6½ (6½-7) cm from sts picked up, dec 4-4-6 (6-6) sts evenly (dec by K 2 tog) = 12 sts. Work 2 rounds. On next round, dec 4 sts evenly = 8 sts. When piece measures 8½-8½-9 (9-9½) cm, work all sts tog 2 by 2 = 4 sts. Cut the yarn and pull it through the remaining sts, tighten tog and fasten.

Knit another mitten the same way.

FELTING:
Turn the mitten inside-out and place a plastic bag inside the thumb to avoid it felting together. Fasten it with a safety pin - NOTE: Fasten the pin vertically down towards tip of thumb to make it easy to remove after felting. Turn the mitten out again so that it is felted with RS outwards.
Then place the mittens in the washing machine with a detergent without enzymes and optical bleach. Wash at 40 degrees with normal spin but no pre-wash. After wash shape the mittens to the right measurements while still wet and leave to dry flat. At subsequent wash, wash the mittens at regular wool programme.

AFTER FELTING:
If the piece is not felted enough and is too big: Wash the piece one more time in the washing machine while it is still wet add a terry towel that measures approx. 50 x 70 cm - NOTE: Do not use a short program.
If the piece has been felted too much and is too small: While the piece is still wet stretch it to the correct measurements, if the piece is dry, make sure to soak it first.
Remember: All subsequent washes are as a normal wool garment.

Diagram

symbols = off white


symbols = mustard
symbols = dec row
diagram

Each of our patterns has specific tutorial videos to help you.

Do you have a question? See a list of frequently asked questions (FAQ)

Knitting tension is what determines the final measurements of your work, and is usually measured per 10 x 10 cm. It is provided like so: number of stitches in width x number of rows in height - eg: 19 stitches x 26 rows = 10 x 10 cm.

The knitting tension is very individual; some people knit/crochet loosely while others work tightly. You adjust the knitting tension with the needle size, which is why the suggested needle size is only meant as a guide! You need to adjust this (up or down) to ensure that YOUR knitting tension matches the knitting tension provided in the pattern. If you work with a different knitting tension than provided you will have a different yarn consumption, and your work will have different measurements than what the pattern suggests.

The knitting tension also determines which yarns can replace each other. As long as you achieve the same knitting tension you can replace one yarn with another.

See DROPS lesson: How to measure your tension/gauge

See DROPS video: How to make a gauge tension swatch

The required amount of yarn is provided in grams, eg: 450 g. To calculate how many balls you’ll need you first need to know how many grams are in 1 ball (25g, 50g or 100g). This information is available if you click on the individual yarn quality on our pages. Divide the amount required with the amount of each ball. For example, if each ball is 50g (the most common amount), the calculation will be as follows: 450 / 50 = 9 balls.

The important thing when changing from one yarn to another is that the knitting/crochet tension remains the same. This is so that the measurements of the finished piece will be the same as on the sketch provided. It is easier to achieve the same knitting tension using yarns from the same yarn group. It is also possible to work with multiple strands of a thinner yarn to achieve the knitting tension of a thicker one. Please try our yarn converter. We recommend you to always work a test swatch.

Please NOTE: when changing yarn the garment might have a different look and feel to the garment in the photo, due to individual properties and qualities of each yarn.

See DROPS lesson: Can I use a different yarn than the one mentioned in the pattern?

All our yarns are categorised into yarn groups (from A to F) according to thickness and knitting tension – group A contains the thinnest yarns and group F the thickest. This makes it easier for you to find alternative yarns to our patterns, should you wish to switch yarn. All yarns within the same group have a similar knitting tension and can easily replace each other. However, different yarn qualities have different structures and properties which will give the finished work a unique look and feel.

Click here for an overview of the yarns in each yarn group

At the top of all our patterns you’ll find a link to our yarn calculator, which is a helpful tool should you wish to use a different yarn than suggested. By filling in the yarn quality you wish to replace, the amount (in your size) and number of strands, the calculator will present good alternative yarns with the same knitting tension. Additionally it will tell you how much you’ll require in the new qualities and whether you’ll need to work with multiple strands. Most skeins are 50g (some are 25g or 100g).

If the pattern is worked with multiple colours, every colour will have to be calculated separately. Similarly, if the pattern is worked with several strands of different yarns (for example 1 strand Alpaca and 1 strand Kid-Silk) you will have to find alternatives for each, individually.

Click here to see our yarn calculator

Since different yarns have different qualities and textures we have chosen to keep the original yarn in our patterns. However, you can easily find options among our available qualities by using our yarn calculator, or simply pick a yarn from the same yarn group.

It is possible that some retailers still have discontinued yarns in stock, or that someone has a few skeins at home that they would like to find patterns for.

The yarn calculator will provide both alternative yarn as well as required amount in the new quality.

If you think it's hard to decide what size to make, it can be a good idea to measure a garment you own already and like the size of. Then you can pick the size by comparing those measures with the ones available in the pattern's size chart.

You'll find the size chart at the bottom of the pattern.

See DROPS lesson: How to read size chart

The needle size provided in the pattern serves only as a guide, the important thing is to follow the knitting tension. And since knitting tension is very individual, you will have to adjust the needle size to ensure that YOUR tension is the same as in the pattern – maybe you’ll have to adjust 1, or even 2 needle sizes, up or down to achieve the correct tension. For this, we recommend that you work test swatches.

Should you work with a different knitting tension than the one provided, the measurements of the finished garment might deviate from the measurement sketch.

See DROPS lesson: How to measure your tension/gauge

See DROPS video: How to make a tension/gauge swatch

Working a garment top-down provides more flexibility and room for personal adjustment. For example it is easier to try the garment on while working, as well as making adjustments to length of yoke and shoulder caps.

The instructions are carefully explaining every step, in the correct order. Diagrams are adjusted to the knitting direction and are worked as usual.

The diagram depicts all rows/rounds, and every stitch seen from the right side. It is read from bottom to top, from right to left. 1 square = 1 stitch.

When working back and forth, every other row is worked from the right side and every other row is worked from the wrong side. When working from the wrong side, the diagram will have to be worked reversed: from left to right, knit stitches are purled, purl stitches are knit etc.

When working in the round every round is worked from the right side and the diagram are worked from right to left on all rounds.

See DROPS lesson: How to read knitting diagrams

The diagram depicts all rows/rounds, and every stitch seen from the right side. It is worked from bottom to top, from right to left.

When working back and forth every other row is worked from the right side: from right to left and every other row is worked from the wrong side: from left to right.

When working in the round, every row in the diagram are worked from the right side, from right to left.

When working a circular diagram you start in the middle and work your way outwards, counter clockwise, row by row.

The rows usually start with a given number of chain stitches (equivalent to the height of the following stitch), this will either be depicted in the diagram or explained in the pattern.

See DROPS lesson: How to read crochet diagrams

Instructions for working several diagrams after each other on the same row/round, will often be written like so: “work A.1, A.2, A.3 a total of 0-0-2-3-4 times". This means you work A.1 once, then A.2 is worked once, and A.3 is repeated (in width) the number of times provided for your size – in this case like so: S = 0 times, M = 0 times, L=2 times, XL= 3 times and XXL = 4 times.

The diagrams are worked as usual: begin with the first row in A.1, then work the first row in A.2 etc.

See DROPS lesson: How to read knitting diagrams

See DROPS lesson: How to read crochet diagrams

The total width of the garment (from wrist-to-wrist) will be larger in the larger sizes, despite the actual sleeves being shorter. The larger sizes have longer sleeve caps and wider shoulders, so there will be a good fit in all sizes.

The measurement sketch/schematic drawing provides information regarding the full length of the garment. If it’s a jumper or a jacket the length is measured from the highest point on the shoulder closest to the neckline, and straight down to the bottom of the garment. It is NOT measured from the tip of shoulder. Similarly, the length of yoke is measured from the highest point on the shoulder and down to where yoke is split into body and sleeves.

On a jacket measures are never taken along bands, unless specifically stated. Always measure inside band stitches when measuring the length.

See DROPS lesson: How to read a schematic drawing

Diagrams are often repeated on the round or in height. 1 repeat is the diagram the way it appears in the pattern. If it says to work 5 repeats of A.1 in the round, then you work A.1 a total of 5 times after/next to each other in the round. If it says to work 2 repeats of A.1 vertically/in height you work the entire diagram once, then begin again at the start and work the entire diagram one more time.

Chain stitches are slightly narrower than other stitches and to avoid working the cast-on edge too tight, we simply chain more stitches to begin with. The stitch count will be adjusted on the following row to fit the pattern and measurement sketch.

The rib edge is more elastic and will contract slightly compared to, for example, stocking stitch. By increasing before the rib edge, you avoid a visible difference in width between the rib edge and the rest of the body.

It’s very easy to cast off too tightly, and by making yarn overs while casting off (and simultaneously casting these off) you avoid a too tight cast off edge.

See DROPS video: How to bind off with yarn overs (yo)

To achieve an even increase (or decrease) you can increase on, for example: every 3rd and 4th row alternately, like so: work 2 rows and increase on the 3rd row, work 3 rows and increase on the 4th. Repeat this until the increase is complete.

See DROPS lesson: Increase or decrease 1 st on every 3rd and 4th row alternately

Should you prefer to work in the round instead of back and forth, you may of course adjust the pattern. You’ll need to add steeks mid-front (usually 5 stitches), and follow the instructions. When you would normally turn and work from the wrong side, simply work across the steek and continue in the round. At the end you’ll cut the piece open, pick up stitches to work bands, and cover the cut edges.

See DROPS video: How to knit steeks and cut open

Should you prefer to work back and forth instead of in the round, you may of course adjust the pattern so you work the pieces separately and then assemble them at the end. Divide the stitches for the body in 2, add 1 edge stitch in each side (for sewing) and work the front and back pieces separately.

See DROPS lesson: Can I adapt a pattern for circular needles into straight needles?

Pattern repeats can vary slightly in the different sizes, in order to get the correct proportions. If you’re not working the exact same size as the garment in the photo, yours might deviate slightly. This has been carefully developed and adjusted so that the complete impression of the garment is the same in all sizes.

Make sure to follow instructions and diagrams for your size!

If you have found a pattern you like which is available in women’s size it’s not very difficult to convert it to men’s size. The biggest difference will be the length of sleeves and body. Start working on the women size that you think would fit across the chest. The additional length will be worked right before you cast off for the armhole/sleeve cap. If the pattern is worked top-down you can add the length right after the armhole or before the first decrease on sleeve.

Regarding additional yarn amount, this will depend on how much length you add, but it is better with a skein too many than too few.

All yarns will have excess fibres (from production) that might come off as lint or shedding. Brushed yarns (ie hairier yarns) have more of these loose, excess fibres, causing more shedding.

Shedding also depends on what is worn under or over the garment, and whether this pulls at the yarn fibres. It’s therefore not possible to guarantee that there will be no shedding

Below are some tips on how to get the best result when working with hairier yarns:

1. When the garment is finished (before you wash it) shake it vigorously so the looser hairs come off. NOTE: do NOT use a lint roller, brush or any method that pulls at the yarn.

2. Place the garment in a plastic bag and put it in your freezer - the temperature will cause the fibres to become less attached to each other, and excess fibres will come off easier.

3. Leave in the freezer for a few hours before taking it out and shaking it again.

4. Wash the garment according to the instructions on the yarn label.

Pilling is a natural process that happens to even the most exclusive of fibers. It's a natural sign of wear and tear that is hard to avoid, and that is most visible in high friction areas of your garment like a sweater's arms and cuffs.

You can make your garment look as new by removing the pilling, using a fabric comb or a pill/lint remover.

Still can't find the answer you need? Then scroll down and leave your question so one of our experts can try to help you. This will be done normally within 5 to 10 working days.
In the meantime, you can read the questions and answers that others have left to this pattern or join the DROPS Workshop on Facebook to get help from fellow knitters/crocheters!

You might also like...

Post a comment to pattern DROPS Extra 0-1245

We would love to hear what you have to say about this pattern!

If you want to leave a question, please make sure you select the correct category in the form below, to speed up the answering process. Required fields are marked *.

Comments / Questions (12)

country flag Marianne wrote:

Skal man benytte plastikpose og nål til tommeltot hver gang en filtet luffe baskes?

31.03.2023 - 21:49

DROPS Design answered:

Hej Marianne, hvis du vil vaske den igen, så skal den vaskes i hånden, så den ikke fileter mere og da behøver du ikke bruge en plasticpose :)

13.04.2023 - 10:22

country flag Andrea wrote:

I just finished these -the pattern is so easy to follow! Although if you knit the smallest size in in one colour, like I did, 150 grams of Alaska are enough!

08.01.2023 - 16:00

country flag Gunilla wrote:

Vid 16 cm påbörjas ökning för tumme. När ökningen är gjord ska arbetet mäta 23 cm. Jag kommer upp i 19 cm! Vad har jag missat?

28.08.2022 - 21:43

DROPS Design answered:

Hei Gunilla. Stemmer strikkefastheten din i høyden? Om du har riktig antall masker, kan du fortsette til ca 23 cm. mvh DROPS Design

29.08.2022 - 13:21

country flag Alice Skjønberg wrote:

Strikker største størrelsen, og stusser på lengde på tommel. På oppgitte mål står det at tommel før toving skal måle 20 cm fra tommelgropen. Men i mønsteret står det at det skal felles når tommel måler 9,5 cm. Hva er riktig? PS synes 9-10 cm før toving virker lite…

20.02.2022 - 10:53

DROPS Design answered:

Hei Alice. Det er ikke mål fra tommelgrop og opp tommelen (altså lengden på tommelen), men fra tommelgrop og lengden på selve votten/opp fingrene, den skal være 20 cm før toving. Om du er usikker på om 9-10 cm på tommelen blir lite, kan du evnt tove tovene i tørketrommel (om du har). Da kan du sjekke underveis i "toveprossessen" om de vil passe eller ikke. Evnt strikke en prøvelapp og sjekke hvor mye din vaskemaskin vil tove. mvh DROPS Design

21.02.2022 - 13:34

country flag Sabine wrote:

Diese Fäustlinge habe ich in Größe S mit Drops Air gestrickt. Als sie aus der Waschmaschine kamen, sahen sie aus, als wären sie für ein Kleinkind. Aber sie ließen sich gut auf die meine Größe und in die richtige Passform dehnen. Vielen, lieben Dank, für die leicht verständliche Anleitung.

08.02.2022 - 16:29

country flag Kari wrote:

Mitt første vottepar! Problemer med matte'n her: Strikker damestr m/l og har felt 6 m etter ferdig mønster = 38 m. Men så starter økningen ifb med tommel - øk 1 m på hver side av merketråden 3 ganger... I mitt hode skal det da bli økt 6 m tilsammen som da bli totalt 44 - mens mønsteret sier at det da skal bli 46 m etter øking! Hva er det jeg ikke forstår? Takk

14.09.2020 - 10:40

DROPS Design answered:

Hei Kari. Du har kanskje glemt å telle med den første økningen. Det skal økes med 1 maske på hver side av masken med merketråd = 40 masker etter 1.økningen. Så skal økningen gjentas på utsiden av de økte maskene på hver 2.omgang 3 ganger til = 46 masker. God Fornøyelse!

14.09.2020 - 14:15

country flag Marie Nilsson wrote:

X-413 modell vantar i Alaska garn Det står i mönstret att man skall avmaska vid 36cm på stolek S/M stämmer det?

29.11.2018 - 19:58

DROPS Design answered:

Hei Marie. Når arbeidet måler 36 cm skal du strikke 2 og 2 masker sammen, når arbeidet måler 38 cm feller du av. God fornøyelse.

30.11.2018 - 14:27

country flag Marie-Andrée Benoit wrote:

Bonjour,\r\nC\'est pour les moufles Touch of Gold. Pour faire le pouce, c\'est écrit \"Augmenter ensuite une maille de chaque coté de la maille avec le marqueur, répéter ces augmentations de part et d\'autres des augmentations encore 4fois tous les 2 tours.

26.09.2018 - 21:45

DROPS Design answered:

Bonjour Mme Benoît, cette vidéo montre comment tricoter le pouce d'une moufle - suivez bien les indications du modèle avec le nombre d'augmentations etc. à faire, la vidéo montre juste la technique. Bon tricot!

27.09.2018 - 08:25

country flag Debbie wrote:

I cannot figure out how to do the thumb gusset even with the help of the two videos that are available. Can you help me with this. I just need clearer instructions on where to increase in each row.

06.12.2017 - 04:05

DROPS Design answered:

Dear Debbie, you increase first on each side of st with marker: inc, st with marker, inc. On next inc row, increase on either side of these 3 sts: inc, K1, st with marker, K1, inc, then on next increase row work: inc, K2, st with marker, K2, inc, repeat these inc until there will be 11-13 sts (see size) for thumb, ie last increase will be: inc, K4-5, st with marker, K4-5, inc = 11-13 sts for thumb. Happy knitting!

06.12.2017 - 09:41

country flag Maria Moreira wrote:

Boa tarde Venho pedir ajuda do seguinte; há possibilidade de obter um vídeo de como apanhar malhas caídas no ponto inglês. Obrigada Maria

10.12.2016 - 19:50

DROPS Design answered:

Bom dia, Esteja atenta aos próximos vídeos. Pode ser que haja algum que ensine a apanhar malhas caídas no ponto inglês. Bom tricô!

12.12.2016 - 12:05